Sunstech CDP10 Bruksanvisning
Sunstech CD-spelare/brännare CDP10
Läs gratis den bruksanvisning för Sunstech CDP10 (4 sidor) i kategorin CD-spelare/brännare. Guiden har ansetts hjälpsam av 37 personer och har ett genomsnittsbetyg på 4.2 stjärnor baserat på 4 recensioner. Har du en fråga om Sunstech CDP10 eller vill du ställa frågor till andra användare av produkten? Ställ en fråga
Sida 1/4
CDP10
User Guide
Please read these instructions completely before operating this product.
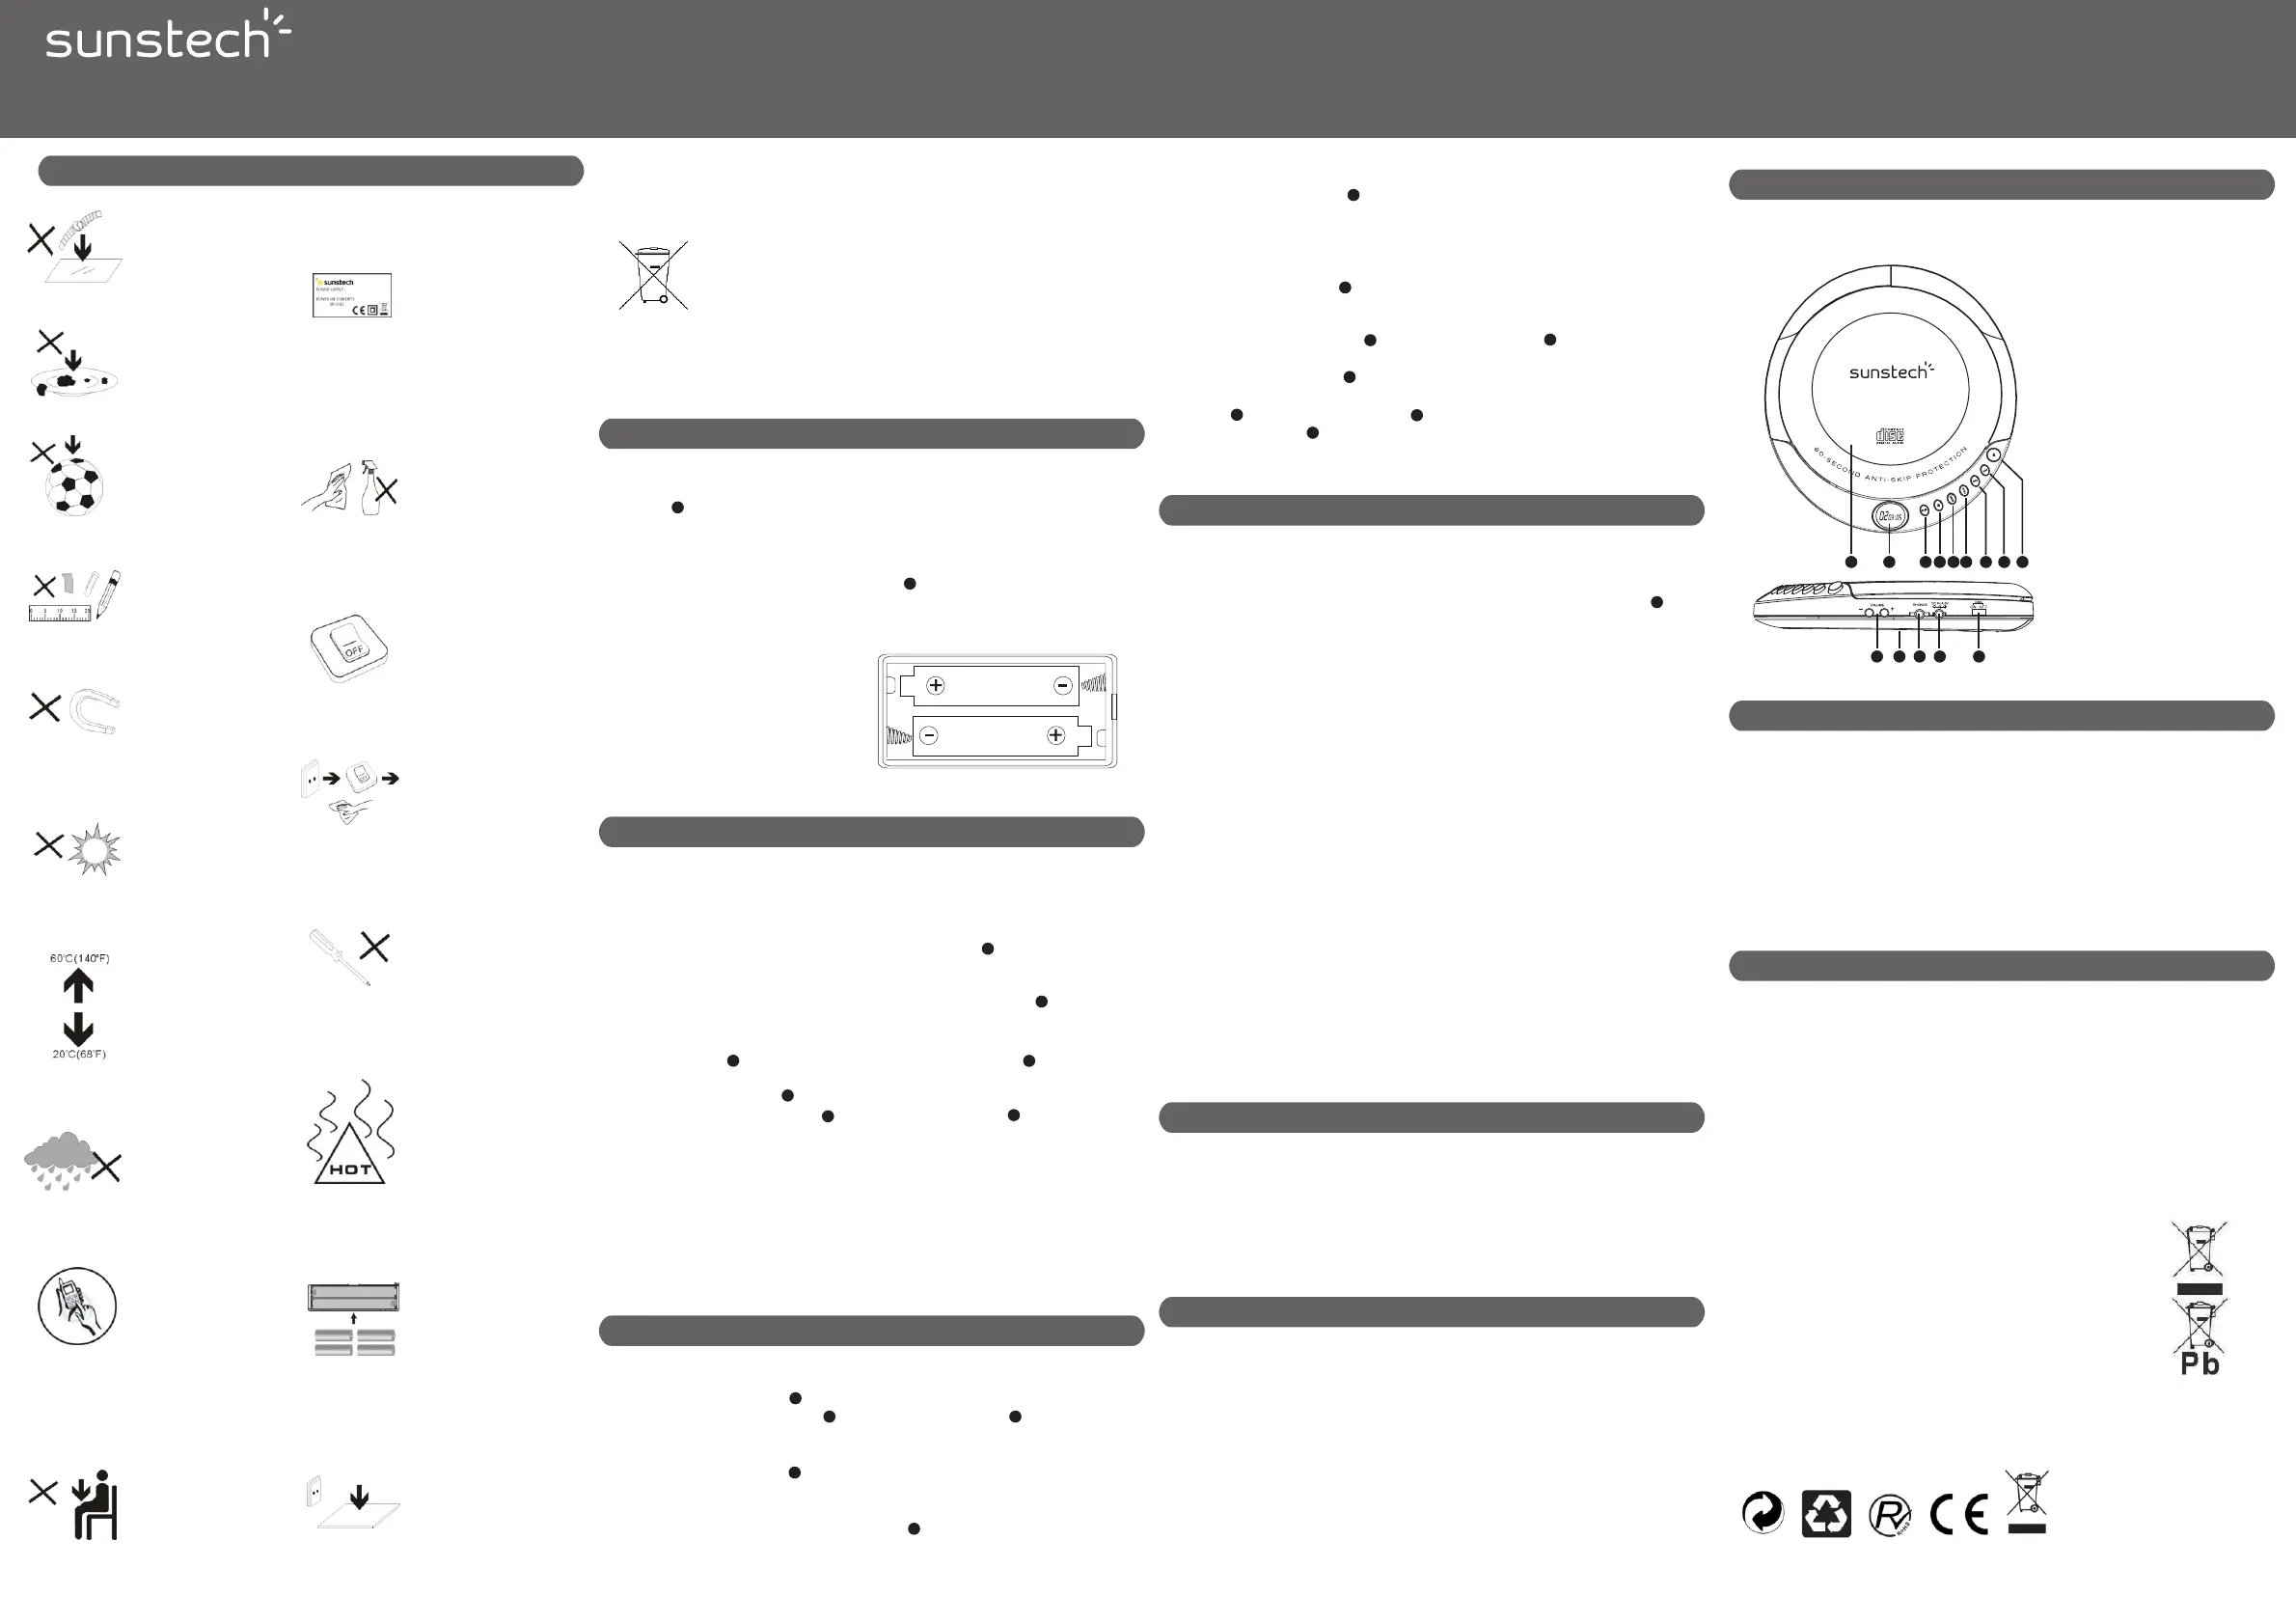
1.
CD DOOR
2.DISPLAY
3.PLAY/PAUSE button
4.STOP button
5.MODE button
6.PROGRAM button
7.SKIP/SEARCH – button
8. SKIP/SEARCH + button
9.OPEN DOOR button
10.VOLUME + / –
11.Battery Compartment
12. HEADPHONE jack
13. DC Power Input
14.Bass Boost System (BBS)
1. DO NOT place
objects on top of the
device, as objects may
scratch the device.
SAFETY PRECAUTION
2. DO NOT expose the
device to dirty or dusty
environments.
3. DO NOT place the
device on an uneven
or unstable surface.
4. DO NOT insert any
foreign objects into
the device.
5. DO NOT expose
the device to strong
magnetic or electrical
eld.
6. DO NOT expose
the device to direct
sunlight as it can
damage the device.
Keep it away from
heat sources.
7. DO NOT store your
device in temperatures
higher than 40°C
(104°F). The internal
operating temperature
for this device is from
20°C(68°F) to 60°C
(140°F).
8. DO NOT use the
device in the rain.
9. Please check with
your Local Authority
or retailer for proper
disposal of electronic
products.
10. The device and
adaptor may product
some heat during
normal operation of
charging. To prevent
discomfort or injury
from heat exposure,
DO NOT leave the
device on your lap.
11. Power input
rating: Refer to the
rating label on the
device and be sure
that the power adaptor
complies with the
rating. Only use
accessories specied
by the manufacturer.
12. Clean the device
with a soft cloth. If
needed, dampen the
cloth slightly before
cleaning. Never use
abrasives or cleaning
solutions.
13. Always power off
the device to install or
remove external devices
that do not support
hot-plug.
14. Disconnect the
device from an electrical
outlet and power off
before cleaning the
device.
15. DO NOT
disassemble the device.
Only a certied service
technician should
perform repair.
16. The device has
apertures to disperse
heat. DO NOT block
the device ventilation,
the device may become
hot and malfunction as
a result.
17. Risk of explosion
if battery replaced by
an incorrect type.
Dispose of used
batteries according
to the instruction.
18. Pluggable
equipment: the
socket-outlet shall
be installed near the
equipment and shall
be easily accessible.
The symbol above means that according to local laws and
regulations your product and/or its battery shall be disposed
of separately from household waste. When this product
reaches its end of life, take it to a collection point
designated by local authorities. The separate collection
and recycling of your product and/or its battery at the time
of disposal will help conserve natural resources and ensure
that it is recycled in a manner that protects human health
and the environment.
European Union: Disposal Information
BATTERY INSTALLATION
1. Open the Battery Compartment by sliding the Battery Compartment
Cover in the direction of the arrow and lifting it up.
2. Place two new “AA” size batteries (not included) into the Battery
Compartment, observing the polarity ( + / – ) as indicated inside the
Compartment.
3. Replace the Battery Compartment Cover .
Replace batteries whenNOTE:
the Low Battery is indicated on
digital display.
CAUTION: Failure to properly
align the battery polarity can
cause personal injury and/or
property damage
CD OPERATION
Basic CD Operation (Note: This unit is compatible with MP3)
1. Open the Unit Door by pushing the Open Door Button .
2. Place the CD Disc label side up, onto the spindle until it snaps into place,
and then close the Unit Door.
3. Connect your earbuds or headphones to the Headphones Jack located
on side of the unit.
4. To turn the unit on and begin playback from the rst track, press the PLAY/
PAUSE button . To Stop or Turn off unit, press STOP button .
5. Once the CD Disc is playing, adjust the volume by pressing the (–) and (+)
buttons on side of unit .
6. Press SKIP/SEARCH – button or SKIP/SEARCH + button to restart a
current track or skip forward to another track. Press and hold to scan for an
individual track on the CD.
CAUTION: Avoid prolonged exposure to high sound levels, as this may cause
permanent hearing damage.
Do not use discs that have been scratched or damaged in this product, as they
may cause the product to skip or stop.
PLAYBACK MODES
ADDITIONAL FEATURES
Bass Boost (BBS) Function
The bass boost function enhances the low frequency Bass response to output
of the audio. To enable or disable this feature, slide the BBS function switch
located on side of the unit to the desired position.
Caution
Do not play high volume with BBS function ON as it can damage our hearing
or equipment (Ear buds)
60-Second Anti-Shock System
This CD player has a built-in Anti-shock system that cuts down on the CD
skipping, which is useful when using the CD player in a car or while jogging/
walking. Anti-shock is automatically activated when the unit is turned on and
playback begins.
The Anti-shock System will start automatically, the sound will mute for a
moment and the display with blink” ESP”.
If the CD player is subjected to vibration during playback, “ ESP” will blink
again. During the vibration, the music should continue to play the signals
stored in the memory until the CD player can read the music data properly
from the disc.
Headphone Jack
Plug headphones or ear buds into the PHONES jack to private listening.
CLEANING & MAINTENANCE
1. CLEANING THE CD LENS: if the CD lens is dusty, clean it with a brush blower.
Blow several times on the lens and remove the dust with the brush.
Finger prints may be removed with a cotton swab moistened with alcohol.
2. CLEANING THE UNIT: do not use volatile chemicals on this unit.
Clean by lightly wiping with a soft cloth.
TROUBLESHOOTING
PLAYER NOT WORKING:
1. Check the batteries and installed properly
2. Make sure power is on
SOUND NOT CLEAR OR NO SOUND
1. Check volume level
2. Check to make sure ear buds/headphones are plugged in all the way.
3. Clean CD lens
NO CD PLAYBACK:
1. Disc is not inserted correctly
2. Disc is not compatible.
LOCATION OF CONTROLS
1
2
34
56
7
8
9
1011121314
SPECIFICATIONS
Power source............................................................................................ X2 “AA” SIZE BATTERY
Compact Disc format......................................................................................CD/CD-R/CD-RW
Earphone Jack..............................................................................1/8” (3.5mm) diameter plug
Pickup..............................................................................optical 1-beam semiconductor laser
Error Correction Method....................................................Cross-interleave Reed-Solomon
D/A Converter.................................................................................................................16-bit DAC
Sampling Frequency.........................................................................................................44.1 KHz
CD Frequency Response........................................................................................20Hz-20KHze
Made in China
WARRANTY CONDITIONS
(Waste Electrical & Electronic Equipment(WEEE)
Your product is designed and manufactured with high quality
materials and components which can be recycled and reused.
This symbol means that electrical and electronic equipment,
at their end of-life should be disposed of separately from your
household waste. Please dispose of this equipment at your local
community waste collection/recycling centre. In the European
Union there are separate collection systems for used electrical
and electronic products. Please help us to conserve the
environment we live in!
Random
Pressing the MODE button a fourth time while in Stop mode will switch to
random setting. Press play to begin playback of the tracks on CD in a random
order.
Programmed Playback
1. Press PROGRAM button to create a custom playback order for up to 20
tracks on CD.
4
11
11
9
12
3
10
7
8
Repeat/Repeat All
1. Press the MODE button once to REPEAT a single track.
2. Press SKIP/SEARCH – button or SKIP/SEARCH + button to select the
desired track. The unit will play the same track over and over until the STOP
button is pressed.
3. Press the MODE button a second time to repeat the entire CD.
Intro
While in Stop mode, press the MODE button a third time to play the rst
10 seconds of each track.
5
7
8
5
5
5
6
2. “01” will begin to blink on the display.
3. Press SKIP/SEARCH-button or SKIP/SEARCH+button to select
the rst track.
4. Press PROGRAM button again to save the selected track.
5. Repeat steps 3 and 4 to program up to 20 tracks using SKIP/SEARCH-
button or SKIP/SEARCH+ button to assign each track number.
6. Press PLAY/PAUSE to begin playing programmed tracks.
7
8
6
7
8
3
14
CD MP3 Player
Portable
The warranty of this product is for 2 years since the purchase date.
The warranty will exclude breakdowns caused by bad use of the product, wrong
Installation or installation in not desirable places for a proper maintenance of the
product, rips, updates of the products that are not the supplied by the brand,
pieces wore away for its use or for not domestic or inappropriate use. Also are
excluded breakdowns caused for manipulations of the products by people or
companies alien to our company.
For any request regarding the warranty terms, the purchase receipt must be
attached.
Correct disposal of this Product
Produktspecifikationer
| Varumärke: | Sunstech |
| Kategori: | CD-spelare/brännare |
| Modell: | CDP10 |
Behöver du hjälp?
Om du behöver hjälp med Sunstech CDP10 ställ en fråga nedan och andra användare kommer att svara dig
CD-spelare/brännare Sunstech Manualer

18 September 2024
18 September 2024
18 September 2024
18 September 2024
18 September 2024
CD-spelare/brännare Manualer
Nyaste CD-spelare/brännare Manualer
5 April 2025
10 Mars 2025
5 Mars 2025
20 Februari 2025
20 Februari 2025
20 Februari 2025
20 Februari 2025
20 Februari 2025
20 Februari 2025
20 Februari 2025