Tempo DFE100 Bruksanvisning
Läs gratis den bruksanvisning för Tempo DFE100 (2 sidor) i kategorin Processor. Guiden har ansetts hjälpsam av 19 personer och har ett genomsnittsbetyg på 4.3 stjärnor baserat på 5 recensioner. Har du en fråga om Tempo DFE100 eller vill du ställa frågor till andra användare av produkten? Ställ en fråga
Sida 1/2
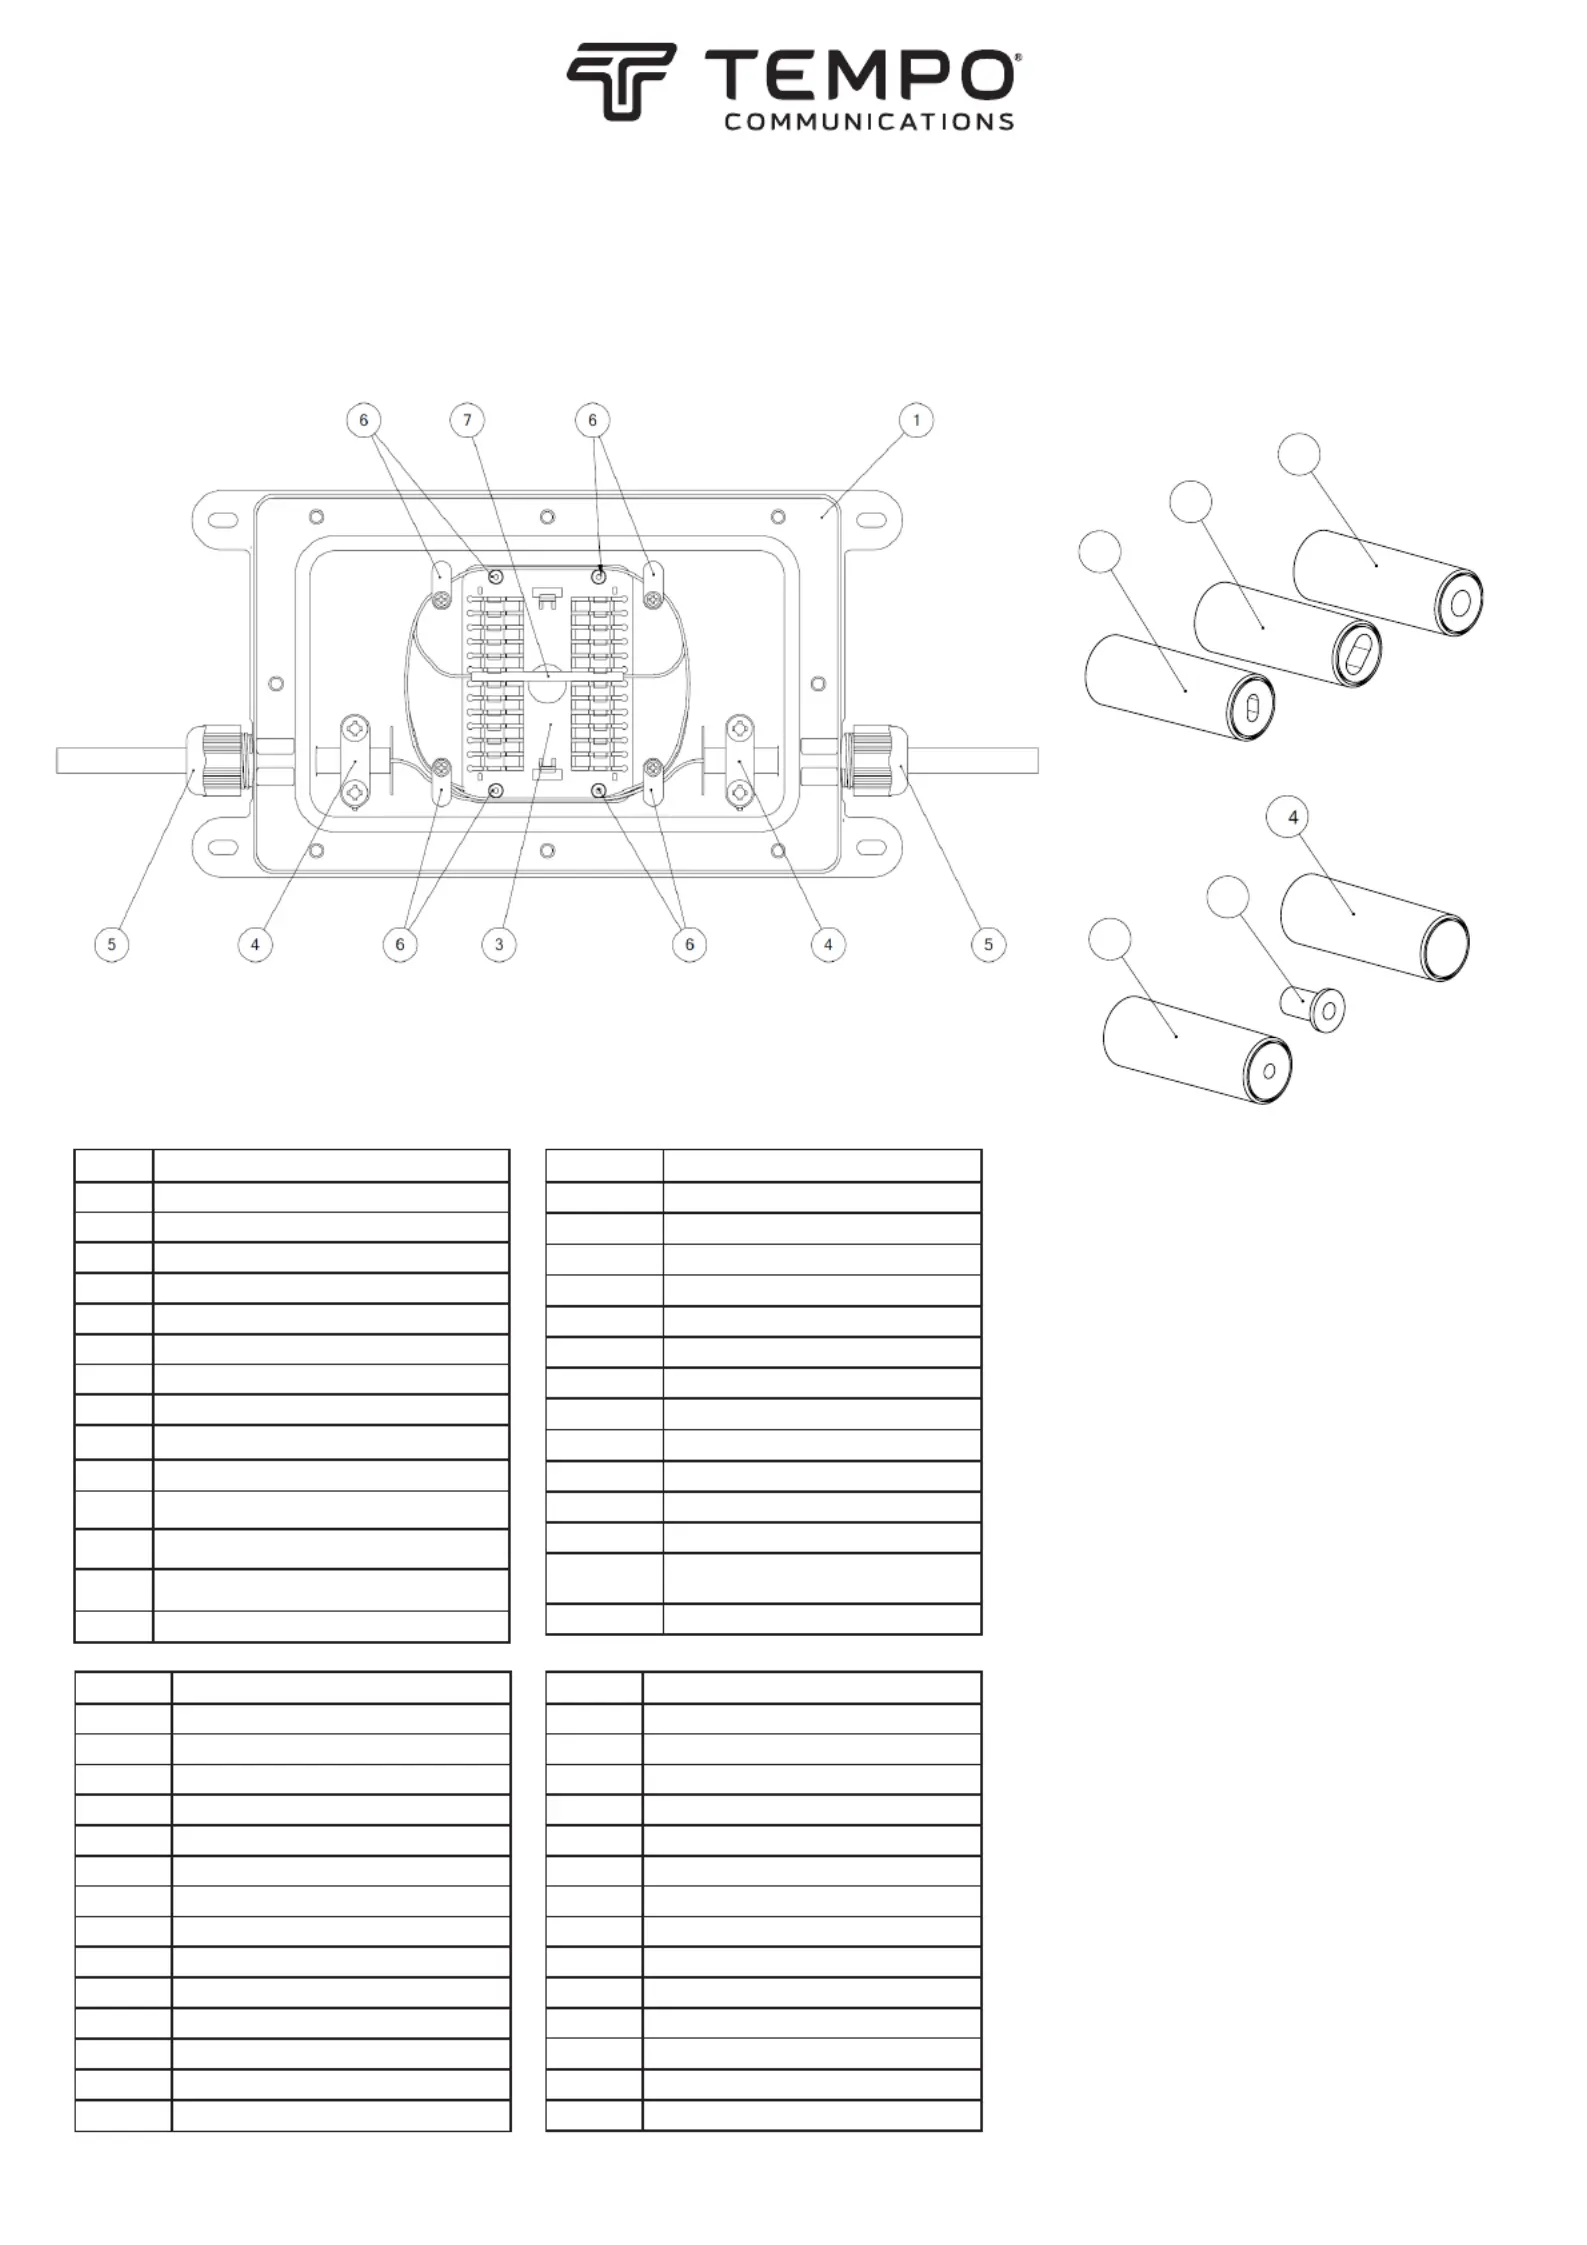
DFEASSEMBLY INSTRUCTIONS
ITEMDESCRIPTION
1BASE
2LID
3SPLICE TRAY
4CABLE CLAMP
5CABLE PORT NUT
6FIBER GUIDE
7SPLICE PROTECTOR
8MECHANICAL SPLICE CONNECTOR
98.1mm OVAL CABLE GASKET
105.4mm OVAL CABLE GASKET
11Ø 5.1mm CABLE GASKET
12Ø3.0mm CABLE GASKET
133mm CABLE CLAMP INSERT
14SOLID GASKET
ARTICLEDESCRIPTION
1BASE
2COUVERCLE
3CASSETTE D’ÉPISSURE
4SERRE-CÂBLE
5ÉCROU DU PORT DE CÂBLE
6GUIDE À FIBRE
7PROTECTEUR D’ÉPISSURE
8CONNECTEUR D’ÉPISSURE MÉCANIQUE
9JOINT DE CÂBLE OVAL DE 8,1 mm
10JOINT DE CÂBLE OVAL DE 5,4 mm
11
JOINT DE CÂBLE DE 5,1 mm
12
JOINT DE CÂBLE DE 3 mm
13
INSERT DE PINCE DE CABLE 3mm
14JOINT SOLIDE
ARTIKELBESCHREIBUNG
1BASIS
2VERSCHLUSS
3VERSCHWEISSHASPEL
4KABELKLEMME
5KABELANSCHLUSSMUTTER
6FASERFÜHRUNG
7SPLEISSSCHUTZ
8MECHANISCHER SPLEISSANSCHLUSS
98,1 mm OVALE KABELDURCHFÜHRUNG
105,4 mm OVALE KABELDURCHFÜHRUNG
11Ø 5,1 mm KABELDURCHFÜHRUNG
12
Ø3.0mmKABELDURCHFÜHRUNG
13
Ø3.0mm KABELKLEMME EINSATZ
14Feste Dichtung
INSTRUCCIONES DE MONTAJE DEL DFE
DFE INSTRUCTIONS DE MONTAGE
DFE MONTAGEANLEITUNG
||
1. Strip 8.1mm cable as shown below.
Peel toner wire back as necessary.
Pele el cable de 8.1 mm como se muestra
arriba. Pele el cable de tóner según sea necesario.
RING INDICATES SMALL END TO BE INSERTED FIRST INTO CABLE PORT ON BASE
EL ANILLO INDICA QUE EL EXTREMO PEQUEÑO SE INSERTARÁ PRIMERO EN EL PUERTO DEL CABLE EN
LA BASE
L’ANNEAU INDIQUE LE PETIT EMBOUT À INSÉRER D’ABORD DANS LE PORT DE CÂBLE SUR LA BASE
DER RING ZEIGT AN, DASS DAS KLEINE ENDE ZUERST IN DEN
11
9
10
12
13
8,1 mm Kabel wie oben gezeigt abisolieren.
Ziehen Sie den Tonerdraht nach Bedarf zurück.
Inserte la junta de 8.1 mm en el cable insertan-
do primero el extremo pequeño.
Insérez le joint de 8,1 mm sur le câble pour le
petit embout à insérer en premier.
Setzen Sie die 8,1 mm Durchführung auf
das Kabel, indem Sie das kleine Ende zuerst
einfügen.
2. Place nut (5) on cable.
Coloque la tuerca (5) en el cable.
Placez l’écrou (5) sur le câble.
Setzen Sie die Mutter (5) auf das Kabel.
3. Insert 8.1mm gasket on cable for small
end inserting rst.
Dénudez le câble de 8,1 mm tel qu’indiqué
ci-dessus. Retirez le l du toner si nécessaire.
Used to ll unused
ports in the four
port DFE.
*DFE100 shown for reference
12
ARTICULODESCRIPCIÓN
1BASE
2TAPA
3BANDEJA DE EMPALME
4SUJETACABLES
5TUERCA DE PUERTO DE CABLE
6GUÍA DE FIBRA
7PROTECTOR DE EMPALME
8CONECTOR DE EMPALME MECÁNICO
9JUNTA DE CABLE OVALADA DE 8.1 mm
10JUNTA DE CABLE OVALADA DE 5.4 mm
11JUNTA DE CABLE DE 5.1 mm
12JUNTA DE CABLE 3mm
13INSERCIÓN DE ABRAZADERA
DE CABLE 3mm
14JUNTA SÓLIDA
Produktspecifikationer
| Varumärke: | Tempo |
| Kategori: | Processor |
| Modell: | DFE100 |
| Bredd: | 225 mm |
| Djup: | 120 mm |
| Höjd: | 34 mm |
| Produktens färg: | Svart |
| Material, hölje: | Acrylonitrile butadiene styrene (ABS), Polycarbonate (PC) |
| Antal skarvbrickor som stöds (max): | 2 |
| Antal fibrer som stöds (max): | 12 |
| Kabeldiameter som stöds (min): | 5.1 mm |
| Kabeldiameter som stöds (max): | 8.1 mm |
Behöver du hjälp?
Om du behöver hjälp med Tempo DFE100 ställ en fråga nedan och andra användare kommer att svara dig
Processor Tempo Manualer

24 Juli 2025
Processor Manualer
Nyaste Processor Manualer
27 Mars 2026
28 Januari 2026
10 Oktober 2025
5 Oktober 2025
5 Oktober 2025
5 Oktober 2025
5 Oktober 2025
5 Oktober 2025
5 Oktober 2025
5 Oktober 2025