Toa SR-FS4 Bruksanvisning
Toa Inte kategoriserad SR-FS4
Läs gratis den bruksanvisning för Toa SR-FS4 (2 sidor) i kategorin Inte kategoriserad. Guiden har ansetts hjälpsam av 25 personer och har ett genomsnittsbetyg på 4.4 stjärnor baserat på 4 recensioner. Har du en fråga om Toa SR-FS4 eller vill du ställa frågor till andra användare av produkten? Ställ en fråga
Sida 1/2
Printed in Japan
133-05-386-50
INSTALLATION MANUAL
FLOOR STAND
SR-FS4
The SR-FS4 Floor Stand is designed exclusively for use with a
stack of 2 SR-S4L Line Array Speakers.
Mounted on casters with lock, it can be easily moved.
Note
To link 2 SR-S4L speakers, an optional SR-EP4 Extension Plate is
needed.
1. SAFETYPRECAUTIONS
•Before installation or use, be sure to carefully read all the
instructions in this section for correct and safe operation.
•Be sure to follow all the precautionary instructions in this section,
which contain important warnings and/or cautions regarding
safety.
•After reading, keep this manual handy for future reference.
4. SPECIFICATIONS
• Accessories
Caster ................................................................4
Plane washer for M10 ........................................4
Spring washer for M10 .......................................4
Hexagon head bolt M5 x 20
(with washer)
.........12
Hexagon head bolt M6 x 16
(with washer)
.........12
• Option
Extension plate: SR-EP4
Note:The design and specifications are subject to change without notice for improvement.
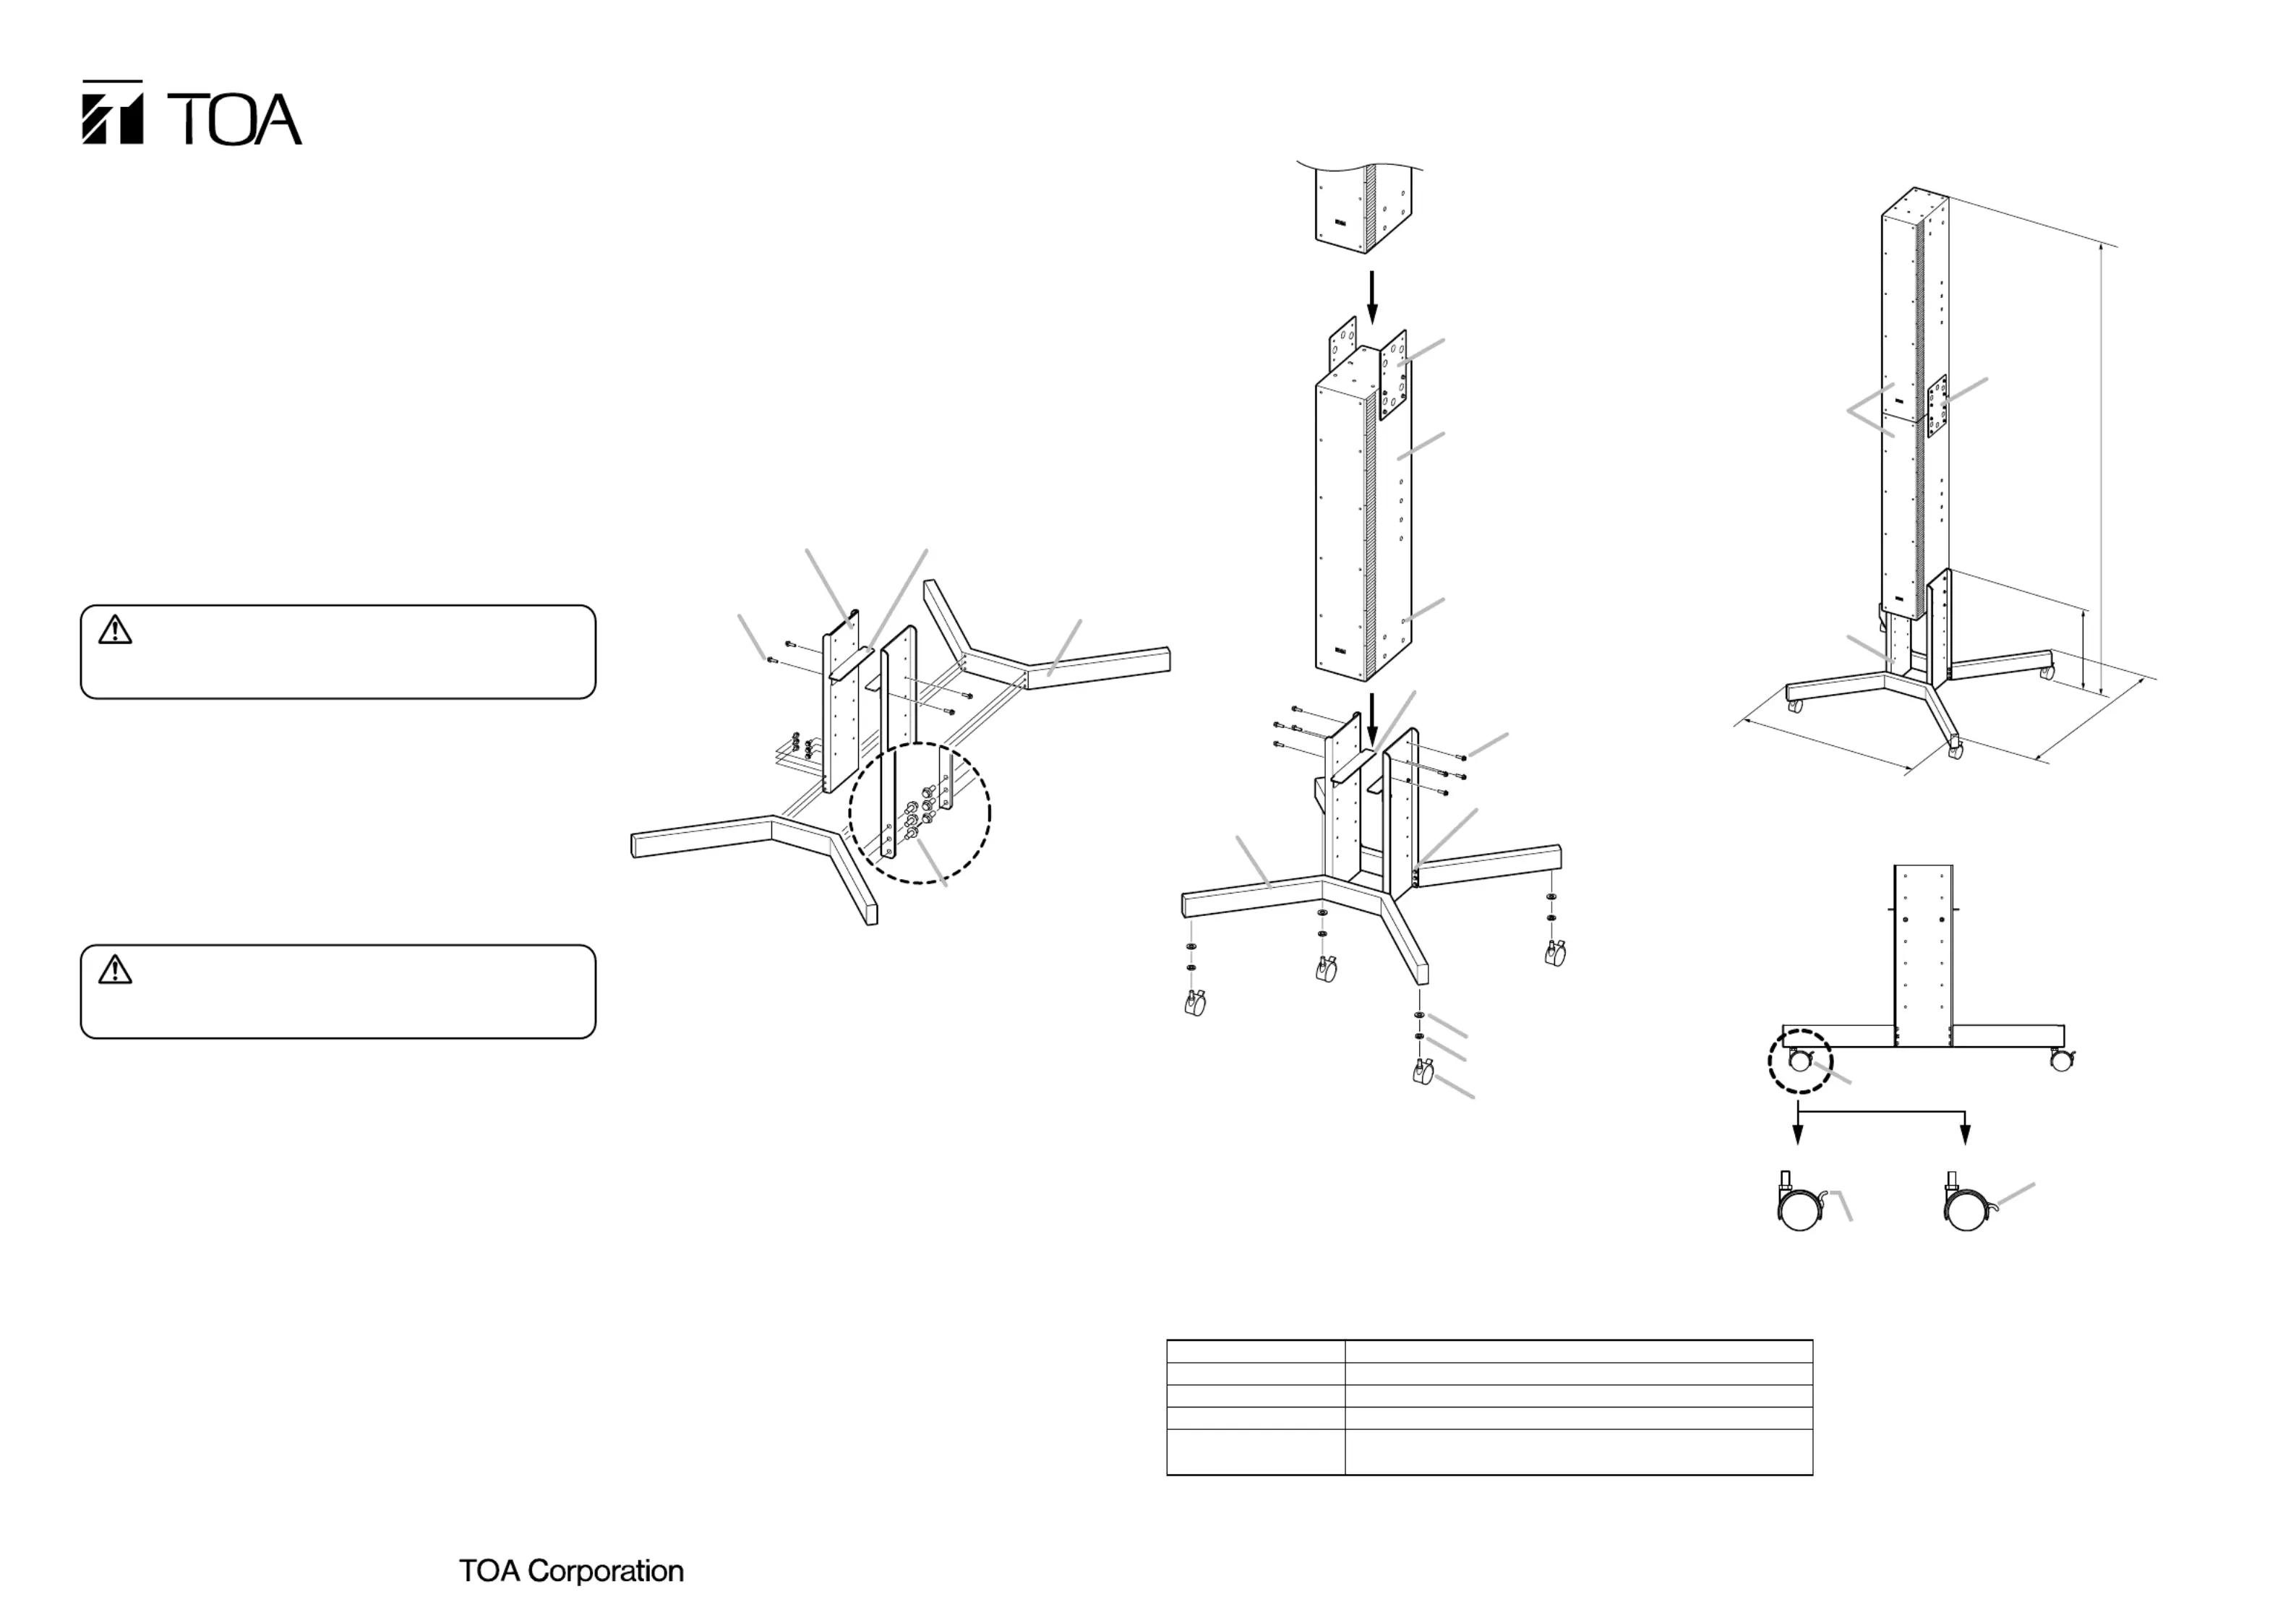
Step 1.Attach the side panels to the stand bases.
Tighten the fixing bolts loosely, not firmly.
Step 2.Mount the speaker support brackets to the side
panels.
Note
The stand height or speaker elevated height can be
adjusted in 5 steps (6 cm per step) by changing the
bracket mounting position. Change the bracket
position as required.
The bracket position in the assembly diagram below
allows the speakers to be elevated highest above the
floor. Normally, mount the brackets at this position.
2. ASSEMBLING THE STAND
•Avoid installing or mounting the unit in unstable locations, such
as on a rickety table or a slanted surface. Doing so may result in
the unit falling down and causing personal injury and/or property
damage.
•Tighten each bolt securely. Ensure that the unit has no loose
joints after installation to prevent accidents that could result in
personal injury.
•Move the unit slowly on a flat floor. Moving it on a slanted or
uneven floor may cause the unit falling down, resulting in
personal injury.
Indicates a potentially hazardous situation which, if mishandled,
could result in death or serious personal injury.
WARNING
Indicates a potentially hazardous situation which, if mishandled, could
result in moderate or minor personal injury, and/or property damage.
CAUTION
•Install the unit only in stable locations, and lock the casters. If it
falls down or moves, this may cause personal injury and/or
property damage.
•Avoid placing the unit and speaker cables in a doorway or other
high traffic area as people may trip on the unit or cables. Doing
otherwise may cause the unit falling down, resulting in personal
injury.
•Do not stand or sit on, nor hang down from the unit as this may
cause it to fall down or drop, resulting in personal injury and/or
property damage.
•Avoid touching the unit's sharp metal edge to prevent injury.
Step 3.Attach the casters to the stand bases.
Step 4.Remove the 8 screws on both sides of the lower
speaker.
Note
The removed screws are not used.
Step 5.Install the lower speaker first.
Put the speaker on the speaker support brackets, then
fix it with the supplied 8 hexagon head bolts.
Step 6.Tighten the bolts loosely screwed in Step 1.
Confirm in advance that the 4 casters do not rattle on
the flat floor.
Step 7.Install the upper speaker.
Join upper and lower speakers together using the
optional SR-EP4 Extension Plate.
Note
For the joint method, refer to the instruction manual
included with the SR-S4L speaker.
Applicable Speaker SR-S4L (to be mounted with 2 speakers linked together)
Finish Steel plate, white, paint
Dimensions 780 (w) x 567 (h) x 772 (d) mm (completely assembled)
Weight 1 kg (including accessories)2
Product CompositionStand base ...... 2, Side panel ...... 2,
Speaker support bracket ...... 2
780
772
1998 2238–
567
Unit: mm
SR-S4L
(optional)
SR-FS4
SR-EP4
(optional)
Side panel
(component of SR-FS4)
Hexagon head
bolt with washer
M5 x 20 (accessory)
Speaker support bracket
(component of SR-FS4)
Stand base
(component of SR-FS4)
2
Hexagon head bolt with washer
M6 x 16 (accessory)
1
Caster (accessory)
Plane washer for M10 (accessory)
Spring washer for M10 (accessory)
Hexagon head bolt with
washer M5 x 20 (accessory)
Remove the attached 8 screws.
Tighten all the loose bolts.
3
4
5
7
6
Stand base
(component of SR-FS4)
Speaker support bracket
(component of SR-FS4)
SR-S4L (optional)
SR-EP4 (optional)
[Finished assembly diagram]
3. HOW TO LOCK CASTERS
[Caster locked][Caster unlocked]
Lock the caster by
pressing down the
stopper.
Caster
Stopper
Produktspecifikationer
| Varumärke: | Toa |
| Kategori: | Inte kategoriserad |
| Modell: | SR-FS4 |
Behöver du hjälp?
Om du behöver hjälp med Toa SR-FS4 ställ en fråga nedan och andra användare kommer att svara dig
Inte kategoriserad Toa Manualer

11 December 2024
21 Oktober 2024
11 Oktober 2024
26 September 2024
26 September 2024
26 September 2024
26 September 2024
24 September 2024
24 September 2024
24 September 2024
Inte kategoriserad Manualer
Nyaste Inte kategoriserad Manualer
9 April 2025
9 April 2025
9 April 2025
9 April 2025
9 April 2025
9 April 2025
9 April 2025
9 April 2025
9 April 2025
9 April 2025