Tunturi Cross Fit Trainer Bruksanvisning
Tunturi träningsutrustning Cross Fit Trainer
Läs gratis den bruksanvisning för Tunturi Cross Fit Trainer (4 sidor) i kategorin träningsutrustning. Guiden har ansetts hjälpsam av 34 personer och har ett genomsnittsbetyg på 4.1 stjärnor baserat på 2 recensioner. Har du en fråga om Tunturi Cross Fit Trainer eller vill du ställa frågor till andra användare av produkten? Ställ en fråga
Sida 1/4
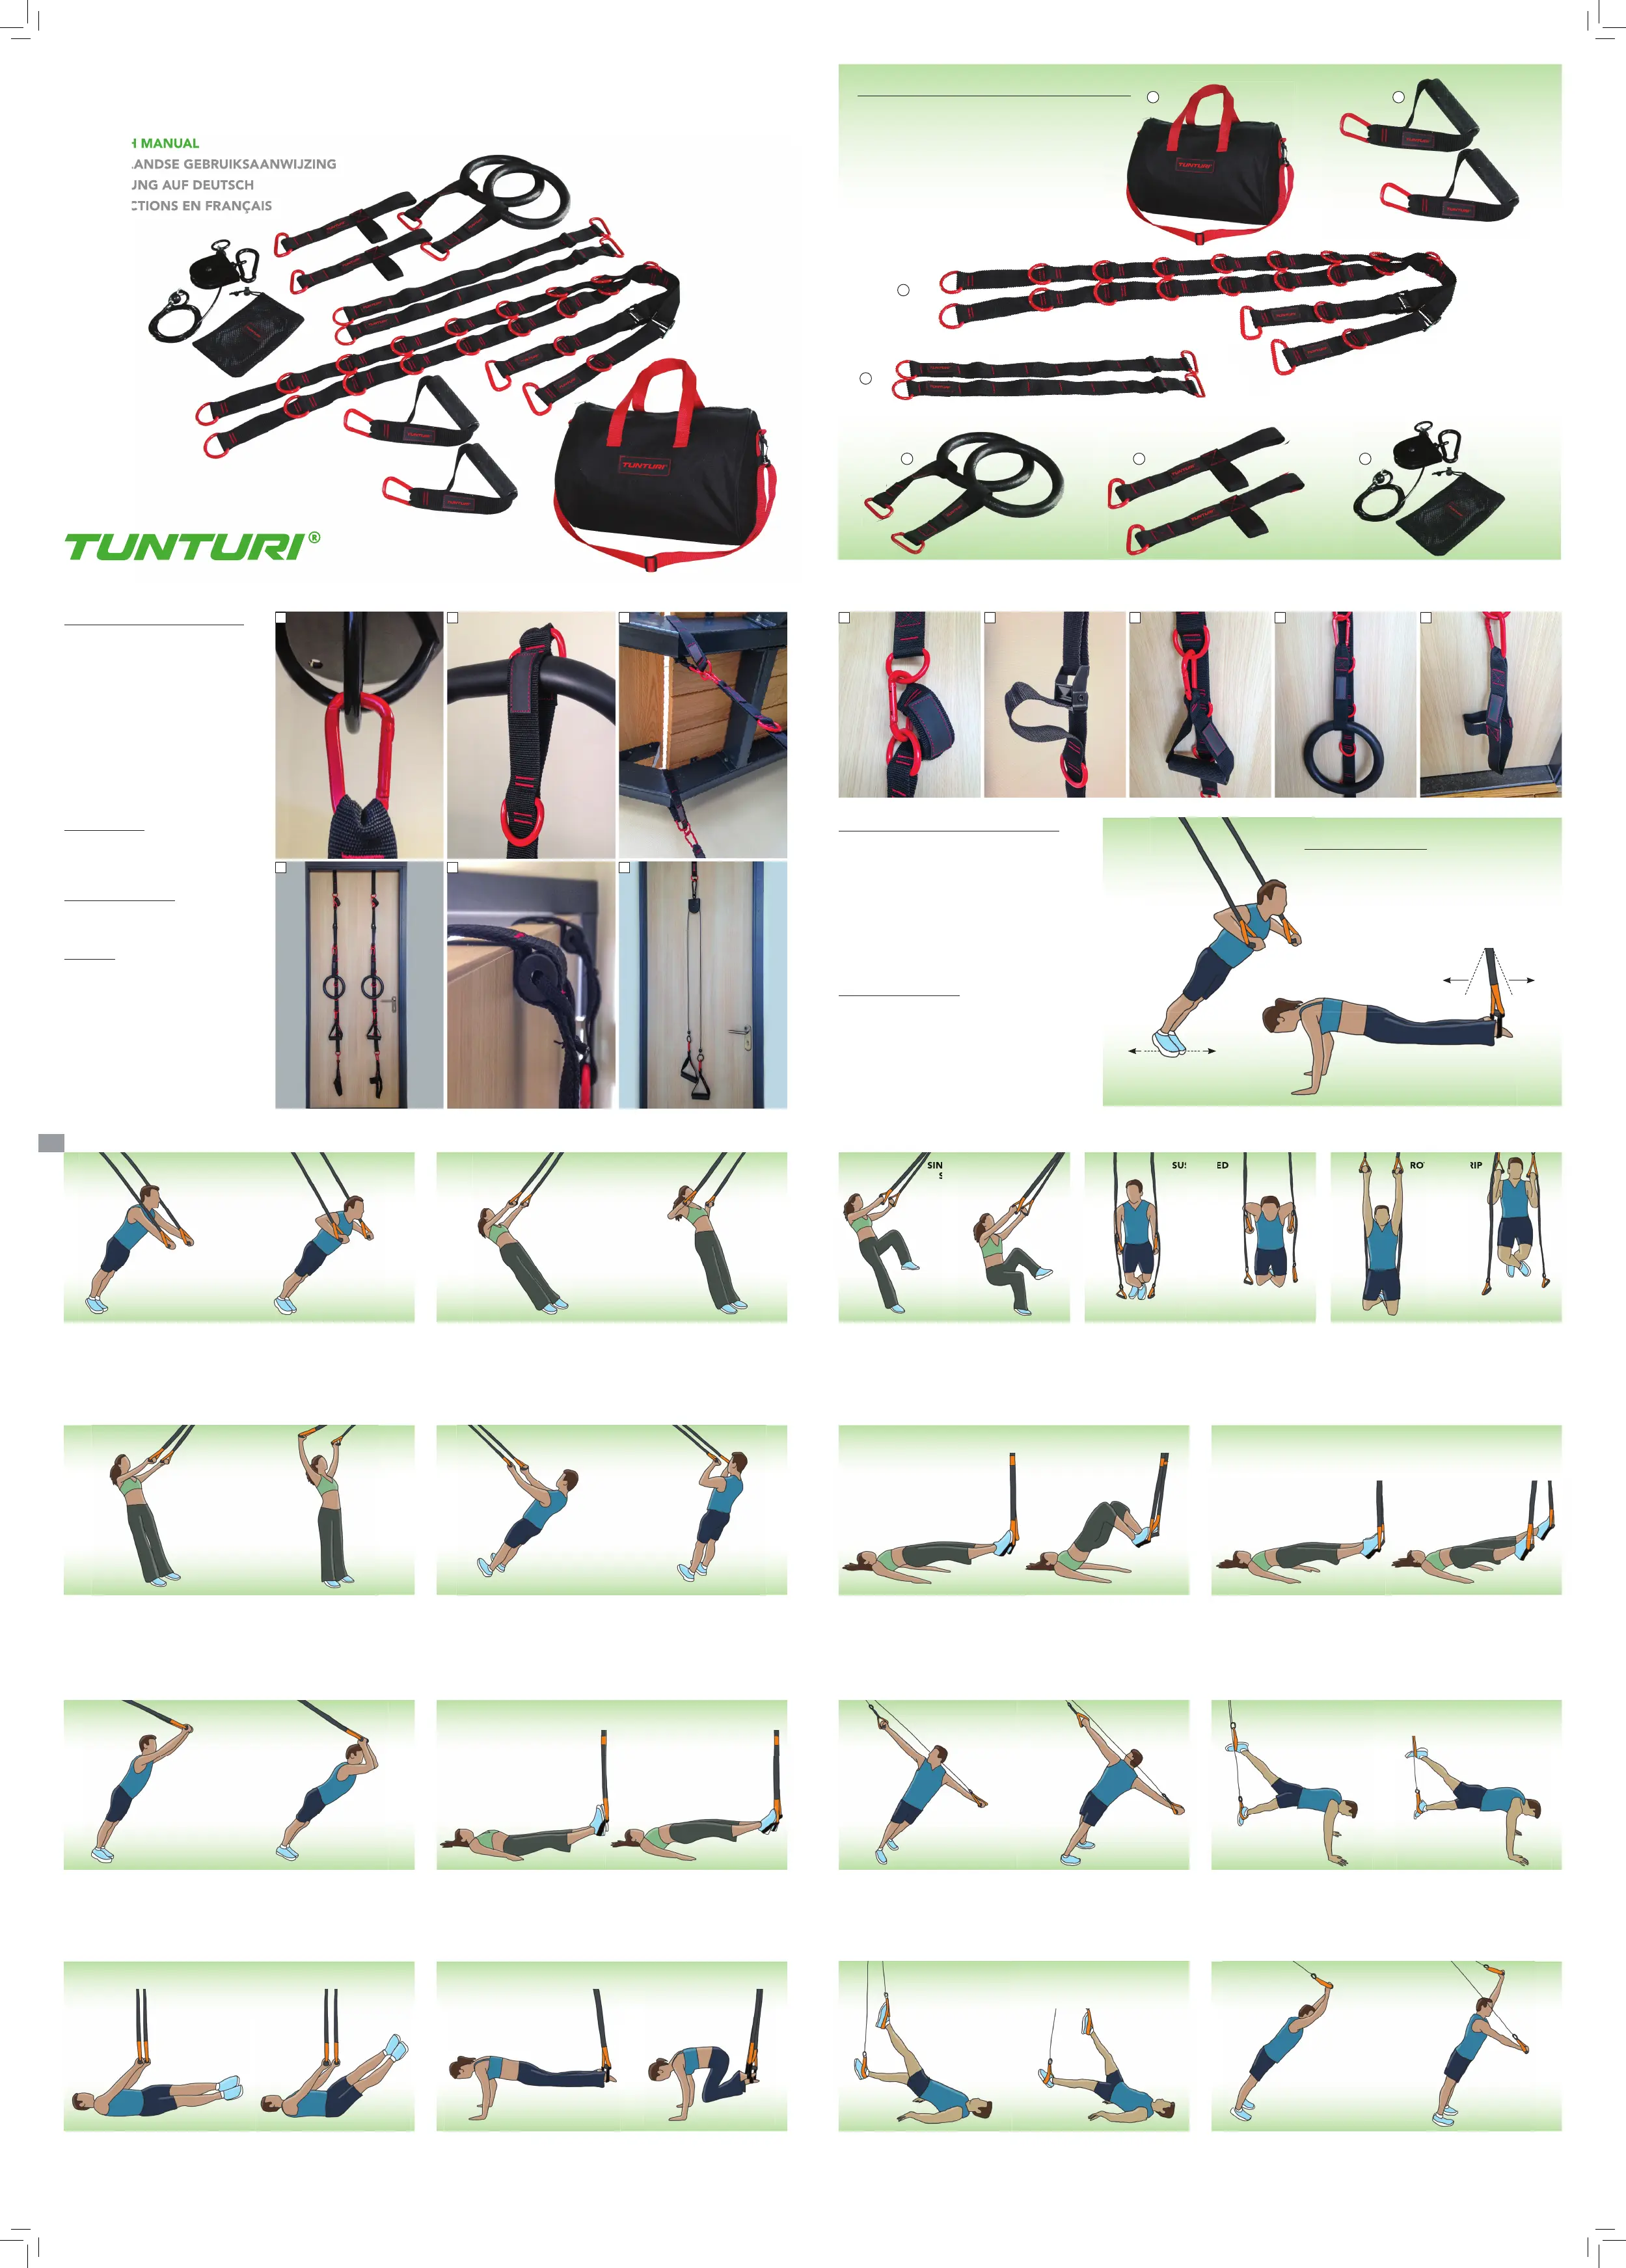
THE COMPONENTS OF THE TUNTURI CROSS FIT TRAINER
A.
Carry bag
B.
Handles
C.
Suspension cord with D-rings
D.
Multifunctional fi xing cords
E.
Olympic rings
F.
Foot straps
G.
Isometric Pulley set
› ENGLISH MANUAL
• NEDERLANDSE GEBRUIKSAANWIJZING
• ANLEITUNG AUF DEUTSCH
• INSTRUCTIONS EN FRANÇAIS
Stand facing away from the Trainer
with your arms extended in front at
shoulder height. Keep your entire
body aligned – legs, hips, shoulder
and head. Keep your back strong.
Lower your chest towards your hands
like a push-up, keeping elbows at
shoulder height. Extend your arms to
return to the starting position.
Stand facing the Trainer with
your arms extended towards it at
shoulder height. Keep your entire
body aligned.
Keep your arms extended and lift
them slowly until they are in a ‘Y’
position: wide and overhead. Slowly
return to the starting position.
Stand facing the Trainer with your
arms extended toward it at shoulder
height and your hands angled to
45 degrees. Keep your entire body
aligned.
Pull your body towards the handles
until your hands are in the mid torso
area, keeping your upper arm at a
45 degree angle to the torso. Slowly
return to the starting position.
Stand facing the Trainer with
your arms extended towards it at
shoulder height. Keep your entire
body aligned and strong.
Stabilze your upper arm and curl
your hands back towards your
temples. Your hips should be stable
throughout the excercise. Slowly
return to the starting position.
CHEST PRESS
HIGH Y
SHOULDER RAISE
BACK ROW
HIGH BICEP CURL
Stand facing the Trainer
with your arms extended,
only slightly bent, at
shoulder height. The
Trainer is used to self-
spot and provide dynamic
balance support.
Extend your free leg to
the front and perform a
single leg squat. Hold
a good posture and
alignment thoughout
the excercise.
Stand directly in the
middle of both straps
and grasp handles at
waist level, palms facing
in. Firmly grasp one
handle with each hand.
Press upward on the
handles until both feet
are off the ground and
arms are straight. Keep
elbows tight to body,
lower your upper body
until hands reach chest
level. Slowly return to
starting position.
Stand directly in the
middle of both straps
and grasp handles with
palms facing forward.
Pull elbows down
towards the chest as your
head lifts above handle
level. Rotate hands 180
degrees during the
movement. Slowly return
to starting position.
Lie on your back with both heels in
the foot cradles. Push your hips off
the fl oor so your body is completely
aligned.
Keep your feet dorsifl exed. Pull your
heels under your body towards the
glutes in a leg curl motion. Slowly
return to the starting position.
Lie on your back with both heels in
the foot cradles. Pish your hips off
the fl oor so your body is aligned with
your feet.
Press with your toes and use the
glutes to abduct the legs apart as
wide as fl exibility will allow. Slowly
return to the starting position.
SINGLE LEG
SQUAT
HAMSTRING CURLHIP ABDUCTION
ROTATING GRIP
PULL-UPS
SUSPENDED
DIPS
SINGLE LEG
SQUAT
SUSPENDED
ROTATING GRIP
SUSPENDED
ROTATING GRIP
Stand facing away from the Trainer
with your arms extended in front.
Keep your entire body aligned.
Avoid bending at the waist or
arching your back.
Stabilize your upper arms and lower
your forehead towards your hands
by bending your elbows. Drive with
your triceps to push your body back
to the starting position.
Lie on your back holding the handles
with your arms positioned at 45
degrees. Push down on the handles
fi rmly to intensify the challenge.
Keep your lower back on the fl oor
throughout the excercise.
Raise your legs to 90 degrees and then
turn them to one side, rotating from the
core. Lower as far as possible, keeping
your lower back on the fl oor. Raise your
legs back to 90 degrees and repeat on
the opposite side.
In a seated position place your heels
in the foot cradles. Lie back with your
arms beside your body. Keep your
abdomen and and your lower back
strong.
Push your hips up into a bridge
position so that your entire body
is aligned from shoulders to heels.
Slowly lower your hips and return to
the starting position.
Kneel with your back to the Trainer and
put your toes through the foot cradles.
Assume a push-up position, keeping
your entire body aligned. (Too hard?
Try resting on your forearms.)
Lift your hips and pull both knees
towards your chest in a reverse
crunch movement. Slowly return to
the starting position.
TRICEP PRESSSUSPENDED SUPINE BRIDGE
SUSPENDED CRUNCHOBLIQUE LEG RAISE
Begin facing away from the main
straps and lean forward slightly with
the arms extended straight at chest
height.
Then pull your left arm forward and
down and your right arm rotates
upward. Pull your right arm down
and forward as your left arm rotates
upward to the left.
Begin sitting on the ground facing
the straps Place both heels in foot
cradles and lie down on your back
with both legs straight and feet
directly under the anchor points Press
the heels down into the foot cradles
and lift your hips upwards.
Press the right leg down as your left
leg lifts upward Keeping the hips lifted,
press your left leg down as your right
leg lifts upward.
Place both feet (toes down) in foot
cradles, directly under the anchor
point. Begin in High Plank with both
hands directly under shoulders.
Press the right leg down as your left
leg lifts upward keeping the hips
lifted. Press your left leg down as
your right leg lifts upward.
Stand facing away from the main straps.
Begin leaning forward slightly with the
arms straight, palms facing down.
Lift your right arm upward as your
left arm presses down. Press your
right arm down while your left arm
moves upward above the head.
A
B
C
D
EG
FASTENING THE CROSS FIT TRAINER
The Cross fi t Trainer should always be
fastened to a safe point that is sturdy
enough to carry your body weight. There are
several ways to fasten the Cross Fit Trainer
cords or the Pulley.
1. To an existing eye/ring.
Fasten the suspension
cords using the locking ring to an existing
fi xture. (See image 1)
2. Around an existing bar.
To slide the upper
portion of the basic cord over a bar (See
image 2)
3. With the Multifunctional fi xing cords, use it:
A. On a bar or tree. (See image 3) With the
snap ring you can attach the D-ring. Then
the suspension cord to the D ring of the
fi xing cord. Use only a point that is solid
enough to carry your body weight.
B. Clamping above a door. (See image 4)
Put the fi xing cord (with the anchor on the
outside) on a door, close the door and gently
pull, and test whether it is tight.
Please note: (See image 5) Only use it on
doors strong enough with no open space
between the door jam and the door. Always
train on the inside of the door (so the side
where it does not open). Then while training,
you pull the door fi rmer into the jam, and so
the anchor cannot come off. If there is any
doubt, do not use the door attachment!
The pulley
can be mounted in the same
manner with one fi xing cord or directly with
the large locking ring to an existing ring.
(See image 6)
ADJUSTING THE TUNTURI CROSS FIT TRAINER
The length of the trainer is easy to adjust by attaching
one of the lower D-rings to the snap ring. (See image A)
Small extra length adjustments can be done with the
black steel clasp on the top of the main cord. (See
image B)
All the different parts can be attached on any height to
the D-rings of the main suspension cords. (See image
C, D & E)
TRAINING POSSIBILITIES
With the cross fi t trainer you can perform a great
range of training exercises (see all images later in
this manual). The level of diffi culty is adjustable by
standing closer or further from the attachment point.
(See image to the right)
All depicted exercises can also be performed with the
pulley. In general, the exercises with the pulley are
more diffi cult and heavier than with the cords.
harder
hardereasier
ABCDE
ADJUSTING RESISTANCE
To increase resistance and diffi culty, simply modify your
starting position. For standing excercises, steepen the
angle of your starting position. For fl oor excercises, move
your starting position away from the anchor. To decrease
resistance and diffi culty, move in the opposite direction.
F
123
645
PULLEY EXERCISE 1
STRAIGHT ARM
CHEST TWIST
PULLEY EXERCISE 3
TWO LEG SCISSORS
MOVEMENT (FACE UP)
PULLEY EXERCISE 4
FORWARD
ARM SWING
PULLEY EXERCISE 2
TWO LEG SCISSORS MOVEMENT (FACE DOWN)
easier
Cross Fit Trainer
› ENGLISH MANUAL
•NEDERLANDSE GEBRUIKSAANWIJZING
•ANLEITUNG AUF DEUTSCH
•INSTRUCTIONS EN FRANÇAIS
Produktspecifikationer
| Varumärke: | Tunturi |
| Kategori: | träningsutrustning |
| Modell: | Cross Fit Trainer |
Behöver du hjälp?
Om du behöver hjälp med Tunturi Cross Fit Trainer ställ en fråga nedan och andra användare kommer att svara dig
träningsutrustning Tunturi Manualer

9 September 2025
9 September 2025
9 September 2025
9 September 2025
9 September 2025
9 September 2025
8 September 2025
8 September 2025
8 September 2025
8 September 2025
träningsutrustning Manualer
Nyaste träningsutrustning Manualer
2 April 2026
29 Mars 2026
23 Mars 2026
22 Mars 2026
20 Mars 2026
16 Mars 2026
4 Mars 2026
24 Februari 2026
24 Februari 2026
16 Februari 2026