Vivanco UR 850 LCD Bruksanvisning
Vivanco Fjärrkontroller UR 850 LCD
Läs gratis den bruksanvisning för Vivanco UR 850 LCD (8 sidor) i kategorin Fjärrkontroller. Guiden har ansetts hjälpsam av 20 personer och har ett genomsnittsbetyg på 4.7 stjärnor baserat på 3 recensioner. Har du en fråga om Vivanco UR 850 LCD eller vill du ställa frågor till andra användare av produkten? Ställ en fråga
Sida 1/8
UR 850 LCD Universal Controller
Vivanco GmbH, Ewige Weide 15, D-22926 Ahrensburg, e-Mail: 1[email protected]
(GB) Operating Instructions
Vivanco UR 850 LCD remote control for
practically all TV, audio, video and other
infrared-controllable devices
Inserting the batteries
Open the battery compartment on the back of the
device, push the flap down lightly and insert 2 AA
alkaline batteries. Make sure that the polarity on the
batteries and in the battery compartment correspond
(thick spring = cell at bottom = -) and then close the
lid carefully. – Use undamaged batteries only.
Adapting to devices
In order to control your devices you must adapt or
set the remote control to them. There are two ways
of doing so: direct control code entry or code
search.
If the UR 850 LCD does not understand you it
displays and you can then repeat the entry. ERROR
Direct control code entry
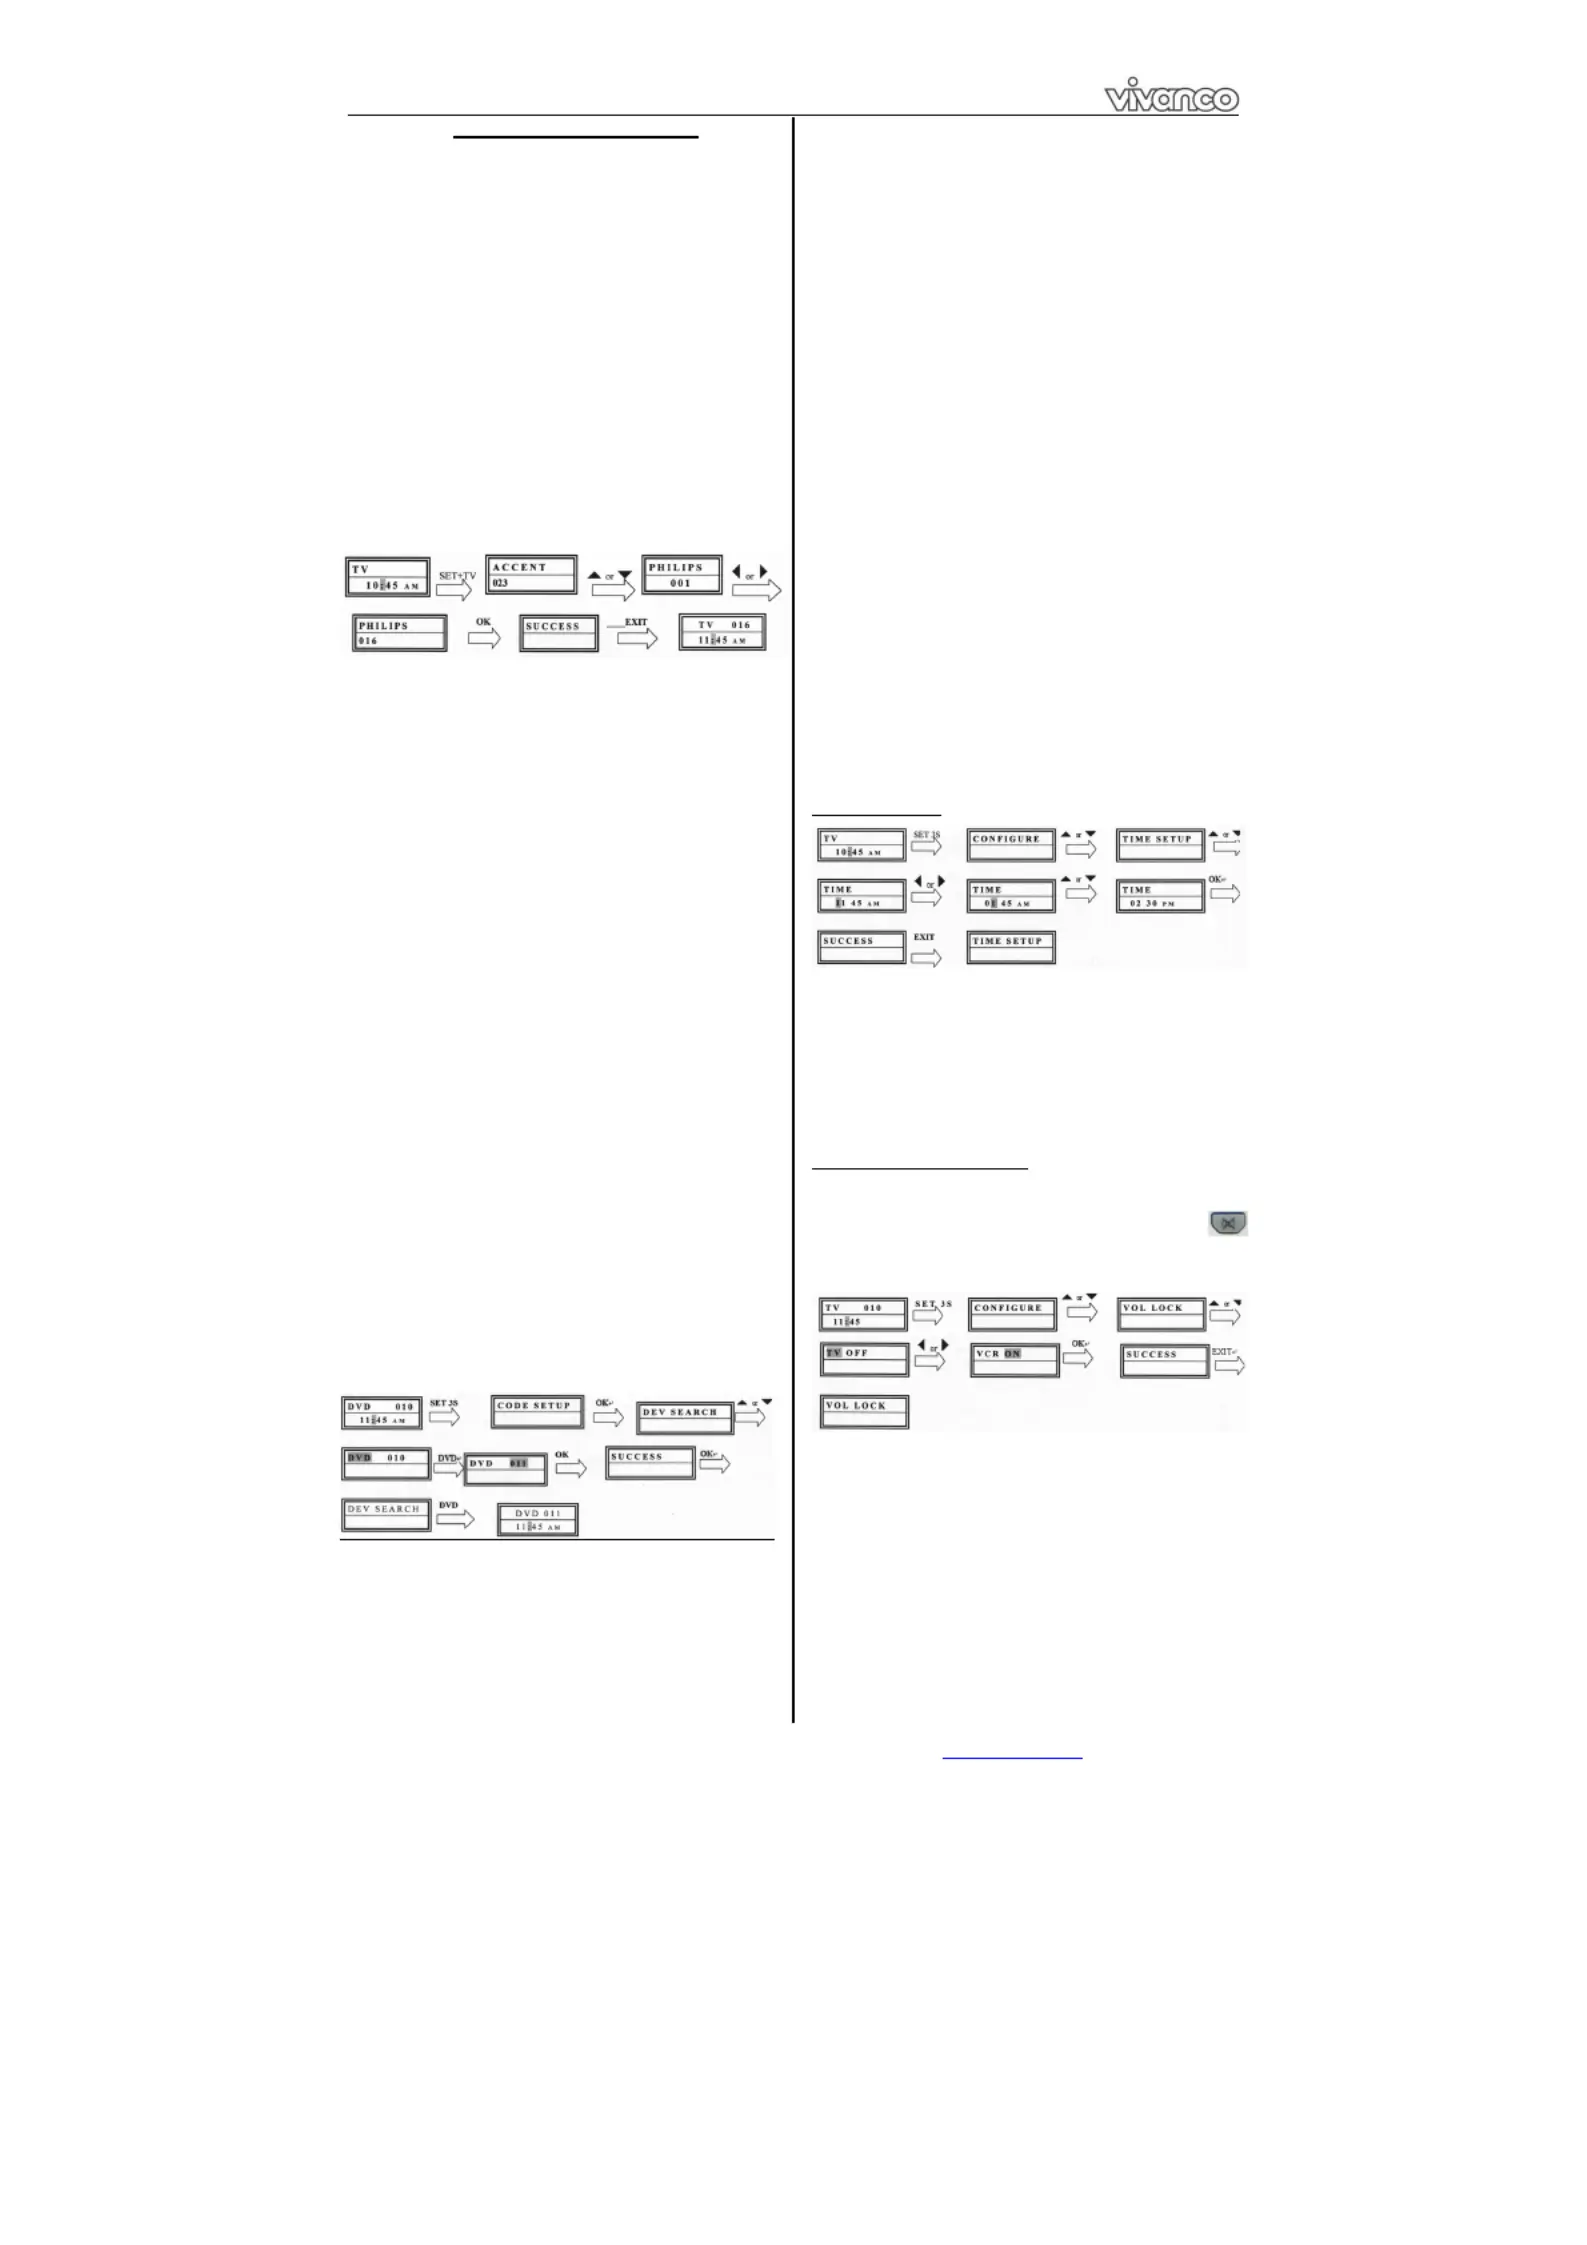
Example: setting the remote control for a Philips TV
set:
1. Switch on your device, e.g. the TV, set to any
station.
2. To prepare code entry, briefly press the SET
button in the bottom right corner of the keypad, then
the required device button, e.g. . A brand and a TV
code number appear, see diagram.
– You cannot enter
a new code if you have activated the code entry lock.
3. Select the brand of your device, in this
example Philips, with or . The first available
code in the device list is displayed.
4. Press a few buttons to determine whether you
have found a suitable code. When the code
corresponds to your device, press and the OK
setting for this device is completed.
5. If the code you have found does work at all or
not properly, try another code by selecting the next
code for the brand using the or button, then
test the code as described above under 4. and, if
successful, confirm with . OK
6. To set the remote control for other devices,
proceed in the same way. Instead of the device TV
button, press another button, e.g. , CBL/VCRSAT
(DVB-T, DECODER), , , , , DVDTUNERTAPECD
AUX).
-Before setting a code and performing the subsequent test
for recording or playback devices, please insert a medium
(tape, CD, cassette, DVD, etc.).- You can interrupt code
entry at any time by pressing . EXIT
Code search
If the brand of your appliance is not in the list or
none of the codes given fits, we recommend the
automatic code search.
Your remote control finds the correct control settings
almost automatically in a few seconds:
1. Switch on the device to be controlled. For
example, a program number appears in the display
of your satellite receiver.
2. To start the code search, press and hold the
SETCODE SETUP button for approx. 3 seconds.
appears in the display. Confirm this function by
pressing . OK
3. then appears in the display. DEV SEARCH
Confirm this function by pressing .OK
– If DEV
SEARCHdoes not appear you can set the function with the
or button.
4. Press the device button of the device to be
controlled, e.g. and confirm the function by DVD
pressing . OK
5. Then point the remote control at the device to
be controlled while the remote control emits a
different signal every 2 seconds. The ON/OFF
respective code number is shown in the display.
6. When your device reacts, press a few buttons
to determine whether you have found a suitable
code. If the code corresponds to your device, press
OK SUCCESS twice.appears in the display, then
you press the device button, e.g. , to confirm DVD
the entry. The setting for this device is now
completed.
7. If the code you have found does work at all or
not properly, press and EXIT DEV SEARCH
appears again. Then proceed again as described
under 3.
Please note: - You can reverse the search direction with the
or button if you have reacted too slowly to a response
from the device. – The Menu buttons cannot by used for
testing. -Before setting a code and performing the
subsequent test for recording or playback devices, please
insert a medium (tape, CD, cassette, DVD, etc.).- You can
interrupt code entry at any time by pressing . EXIT
Other settings
Setting the time
1 Press and hold for 3 seconds, then set SET
CONFIGUREwith the or button. Confirm this
function by pressing . OK
2 appears in the display. Confirm TIME SETUP
this function by pressing . OK
3 Enter the time using the number buttons and
confirm with the button. Then press OKEXIT
several times to quit the setting mode.
Set priority volume control
With this function you can determine a device
exclusively for volume control, e.g. your audio
amplifier. Then the buttons , nd VOL +VOL – a
always control the amplifier, regardless of which
device you are controlling.
1 Press and hold for 3 seconds, then set SET
CONFIGUREwith the or button. Confirm this
function by pressing OK
2 appears in the display. Set TIME SETUP VOL
LOCKwith the or button. Confirm this function
by pressing . OK
3 Select the device button, e.g. for the AUX
amplifier and set priority= using the or ON
button. Confirm this function by pressing . OK
4 Then press several times to quit the EXIT
setting mode.
- You can cancel the priority setting using the same
procedure. Instead of , set for all devices. ONOFF
Produktspecifikationer
| Varumärke: | Vivanco |
| Kategori: | Fjärrkontroller |
| Modell: | UR 850 LCD |
| Batterityp: | AAA |
| Antal batterier: | 2 |
| Batterier medföljer: | Nej |
| Displaytyp: | LCD |
Behöver du hjälp?
Om du behöver hjälp med Vivanco UR 850 LCD ställ en fråga nedan och andra användare kommer att svara dig
Fjärrkontroller Vivanco Manualer

31 Juli 2024
27 Juli 2024
24 Juli 2024
22 Juli 2024
Fjärrkontroller Manualer
Nyaste Fjärrkontroller Manualer
16 Oktober 2024
15 Oktober 2024
13 Oktober 2024
13 Oktober 2024
13 Oktober 2024
12 Oktober 2024
12 Oktober 2024
11 Oktober 2024
11 Oktober 2024
10 Oktober 2024