Wet Sounds PORTED 12 ENC Bruksanvisning
Wet Sounds ej kategoriserat PORTED 12 ENC
Läs gratis den bruksanvisning för Wet Sounds PORTED 12 ENC (2 sidor) i kategorin ej kategoriserat. Guiden har ansetts hjälpsam av 21 personer och har ett genomsnittsbetyg på 4.7 stjärnor baserat på 6 recensioner. Har du en fråga om Wet Sounds PORTED 12 ENC eller vill du ställa frågor till andra användare av produkten? Ställ en fråga
Sida 1/2
PORTED 12 ENC
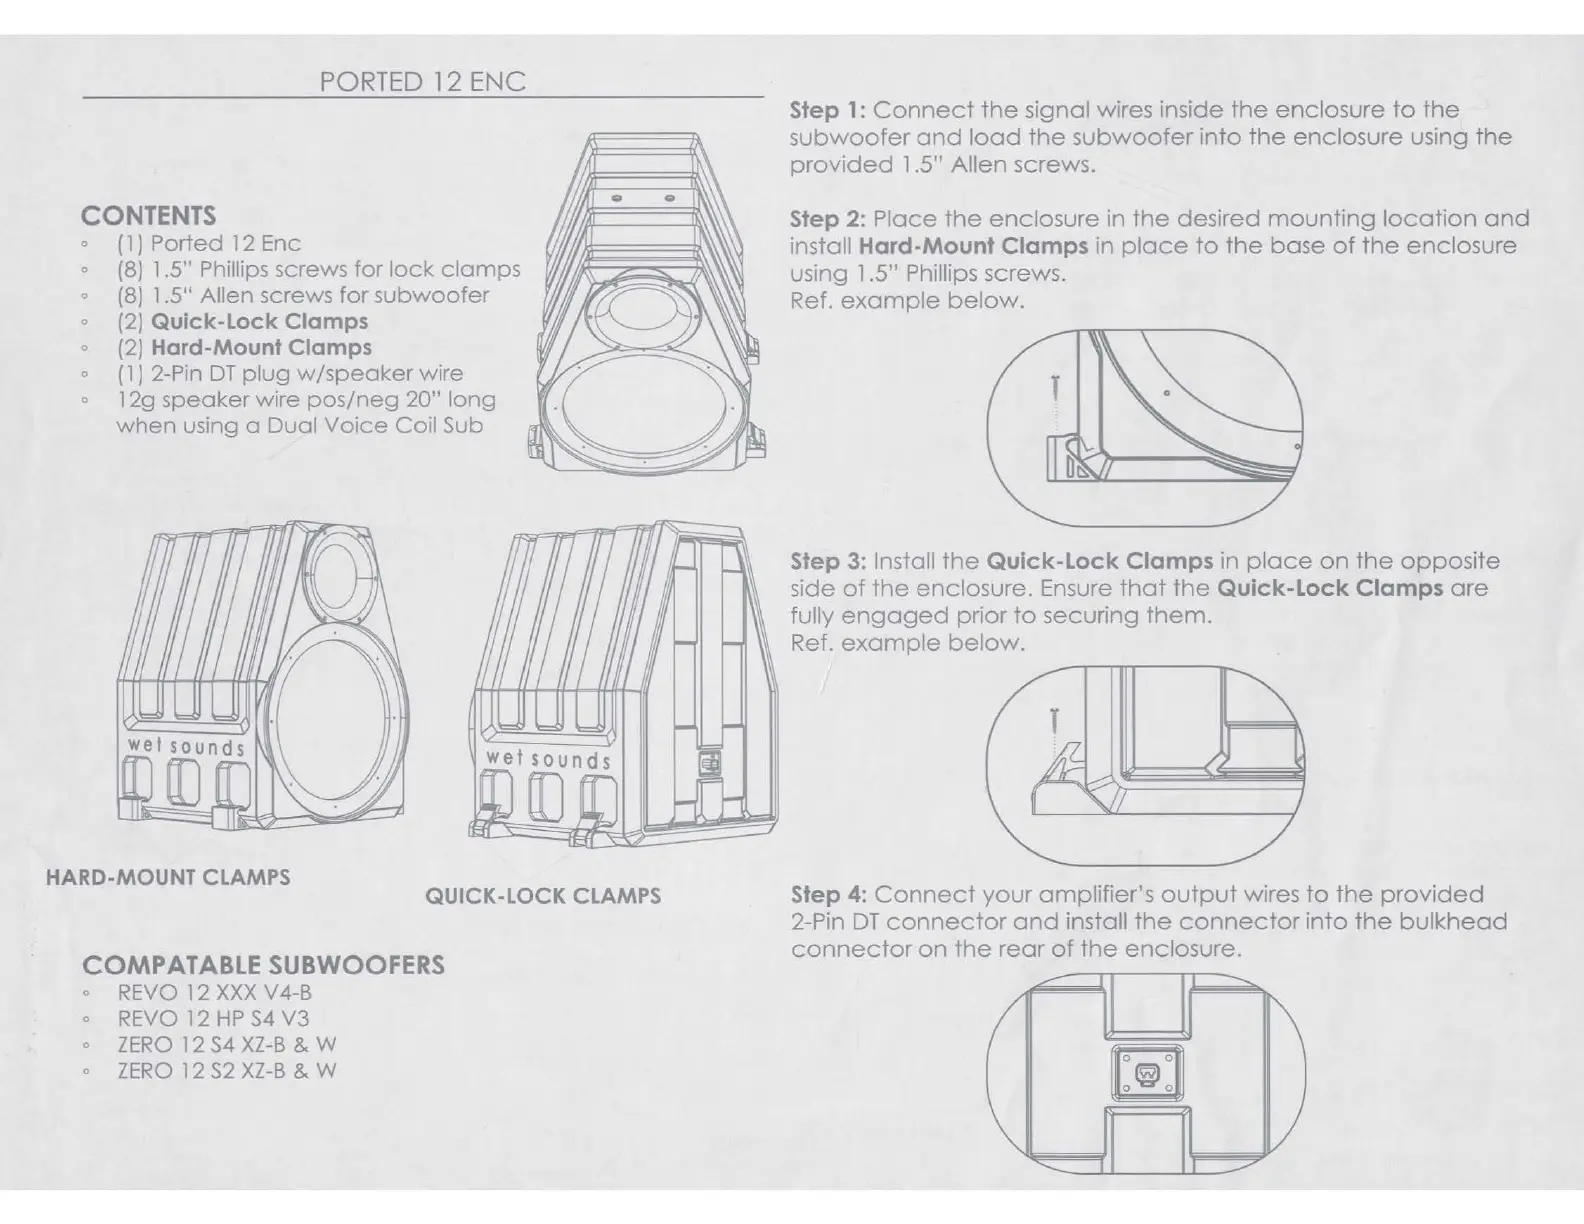
CONTENTS
0
( 1 J Ported
12
Enc
0
(8)
1.5" Phillips screws for
lock
clamps
0
(8)
1.5" Allen screws for subwoofer
o
(2)
Quick-Lock Clamps
0
(2) Hard-Mount Clamps
0
(
1 J
2-Pin
OT
plug
w/speaker
wire
0
12g speaker wire
pos/neg
20" long
when
using a Dual
Voice
Coil Sub
HARD-MOUNT
CLAMPS
QUICK-LOCK
CLAMPS
COMPATABLE SUBWOOFERS
0
REVO
12
XXX
V4-B
0
REVO
12
HP
S4
V3
0
ZERO
12
S4
XZ-B
& W
0
ZERO
l 2
S2
XZ-B
& W
Step
1:
Connect
the
signal wires inside
the
enclosure
to
the
subwoofer
and
load
the
subwoofer
into
the
enclosure using
the
provided
1 .5" Allen screws.
Step
2:
Place
the
enclosure
in
the
desired
mounting
location
and
install
Hard-Mount
Clamps
in
place
to
the
base
of
the
enclosure
using 1 .5" Phillips screws.
Ref.
example
below.
Step
3:
Install
the
Quick-Lock
Clamps
in
place
on
the
opposite
side
of
the
enclosure. Ensure
that
the
Quick-Lock
Clamps
are
fully
engaged
prior
to
securing
them.
Ref.
example
below.
T
Step 4:
Connect
your
amplifier's
output
wires
to
the
provided
2-Pin
OT
connector
and
install
the
connector
into
the
bulkhead
connector
on
the
rear
of
the
enclosure.
~
~
PORTED 12 ENC
CONTENTS
0
( 1 J Ported
12
Enc
0
(8)
1.5" Phillips screws for
lock
clamps
0
(8)
1.5" Allen screws for subwoofer
o
(2)
Quick-Lock Clamps
0
(2) Hard-Mount Clamps
0
(
1 J
2-Pin
OT
plug
w/speaker
wire
0
12g speaker wire
pos/neg
20" long
when
using a Dual
Voice
Coil Sub
HARD-MOUNT
CLAMPS
QUICK-LOCK
CLAMPS
COMPATABLE SUBWOOFERS
0
REVO
12
XXX
V4-B
0
REVO
12
HP
S4
V3
0
ZERO
12
S4
XZ-B
& W
0
ZERO
l 2
S2
XZ-B
& W
Step
1:
Connect
the
signal wires inside
the
enclosure
to
the
subwoofer
and
load
the
subwoofer
into
the
enclosure using
the
provided
1 .5" Allen screws.
Step
2:
Place
the
enclosure
in
the
desired
mounting
location
and
install
Hard-Mount
Clamps
in
place
to
the
base
of
the
enclosure
using 1 .5" Phillips screws.
Ref.
example
below.
Step
3:
Install
the
Quick-Lock
Clamps
in
place
on
the
opposite
side
of
the
enclosure. Ensure
that
the
Quick-Lock
Clamps
are
fully
engaged
prior
to
securing
them.
Ref.
example
below.
T
Step 4:
Connect
your
amplifier's
output
wires
to
the
provided
2-Pin
OT
connector
and
install
the
connector
into
the
bulkhead
connector
on
the
rear
of
the
enclosure.
~
~
PORTED
12 ENC
I
Produktspecifikationer
| Varumärke: | Wet Sounds |
| Kategori: | ej kategoriserat |
| Modell: | PORTED 12 ENC |
Behöver du hjälp?
Om du behöver hjälp med Wet Sounds PORTED 12 ENC ställ en fråga nedan och andra användare kommer att svara dig
ej kategoriserat Wet Sounds Manualer

12 Oktober 2025
30 Augusti 2025
30 Augusti 2025
28 Augusti 2025
ej kategoriserat Manualer
Nyaste ej kategoriserat Manualer
3 April 2026
3 April 2026
3 April 2026
3 April 2026
3 April 2026
3 April 2026
3 April 2026
3 April 2026
3 April 2026