Alcatel Versatis F200 Duo Bruksanvisning
Läs gratis den bruksanvisning för Alcatel Versatis F200 Duo (4 sidor) i kategorin Telefon. Guiden har ansetts hjälpsam av 10 personer och har ett genomsnittsbetyg på 4.1 stjärnor baserat på 9 recensioner. Har du en fråga om Alcatel Versatis F200 Duo eller vill du ställa frågor till andra användare av produkten? Ställ en fråga
Sida 1/4
BEFORE TO USE YOUR PHONE, PLEASE READ ALL
THIS USER'S GUIDE
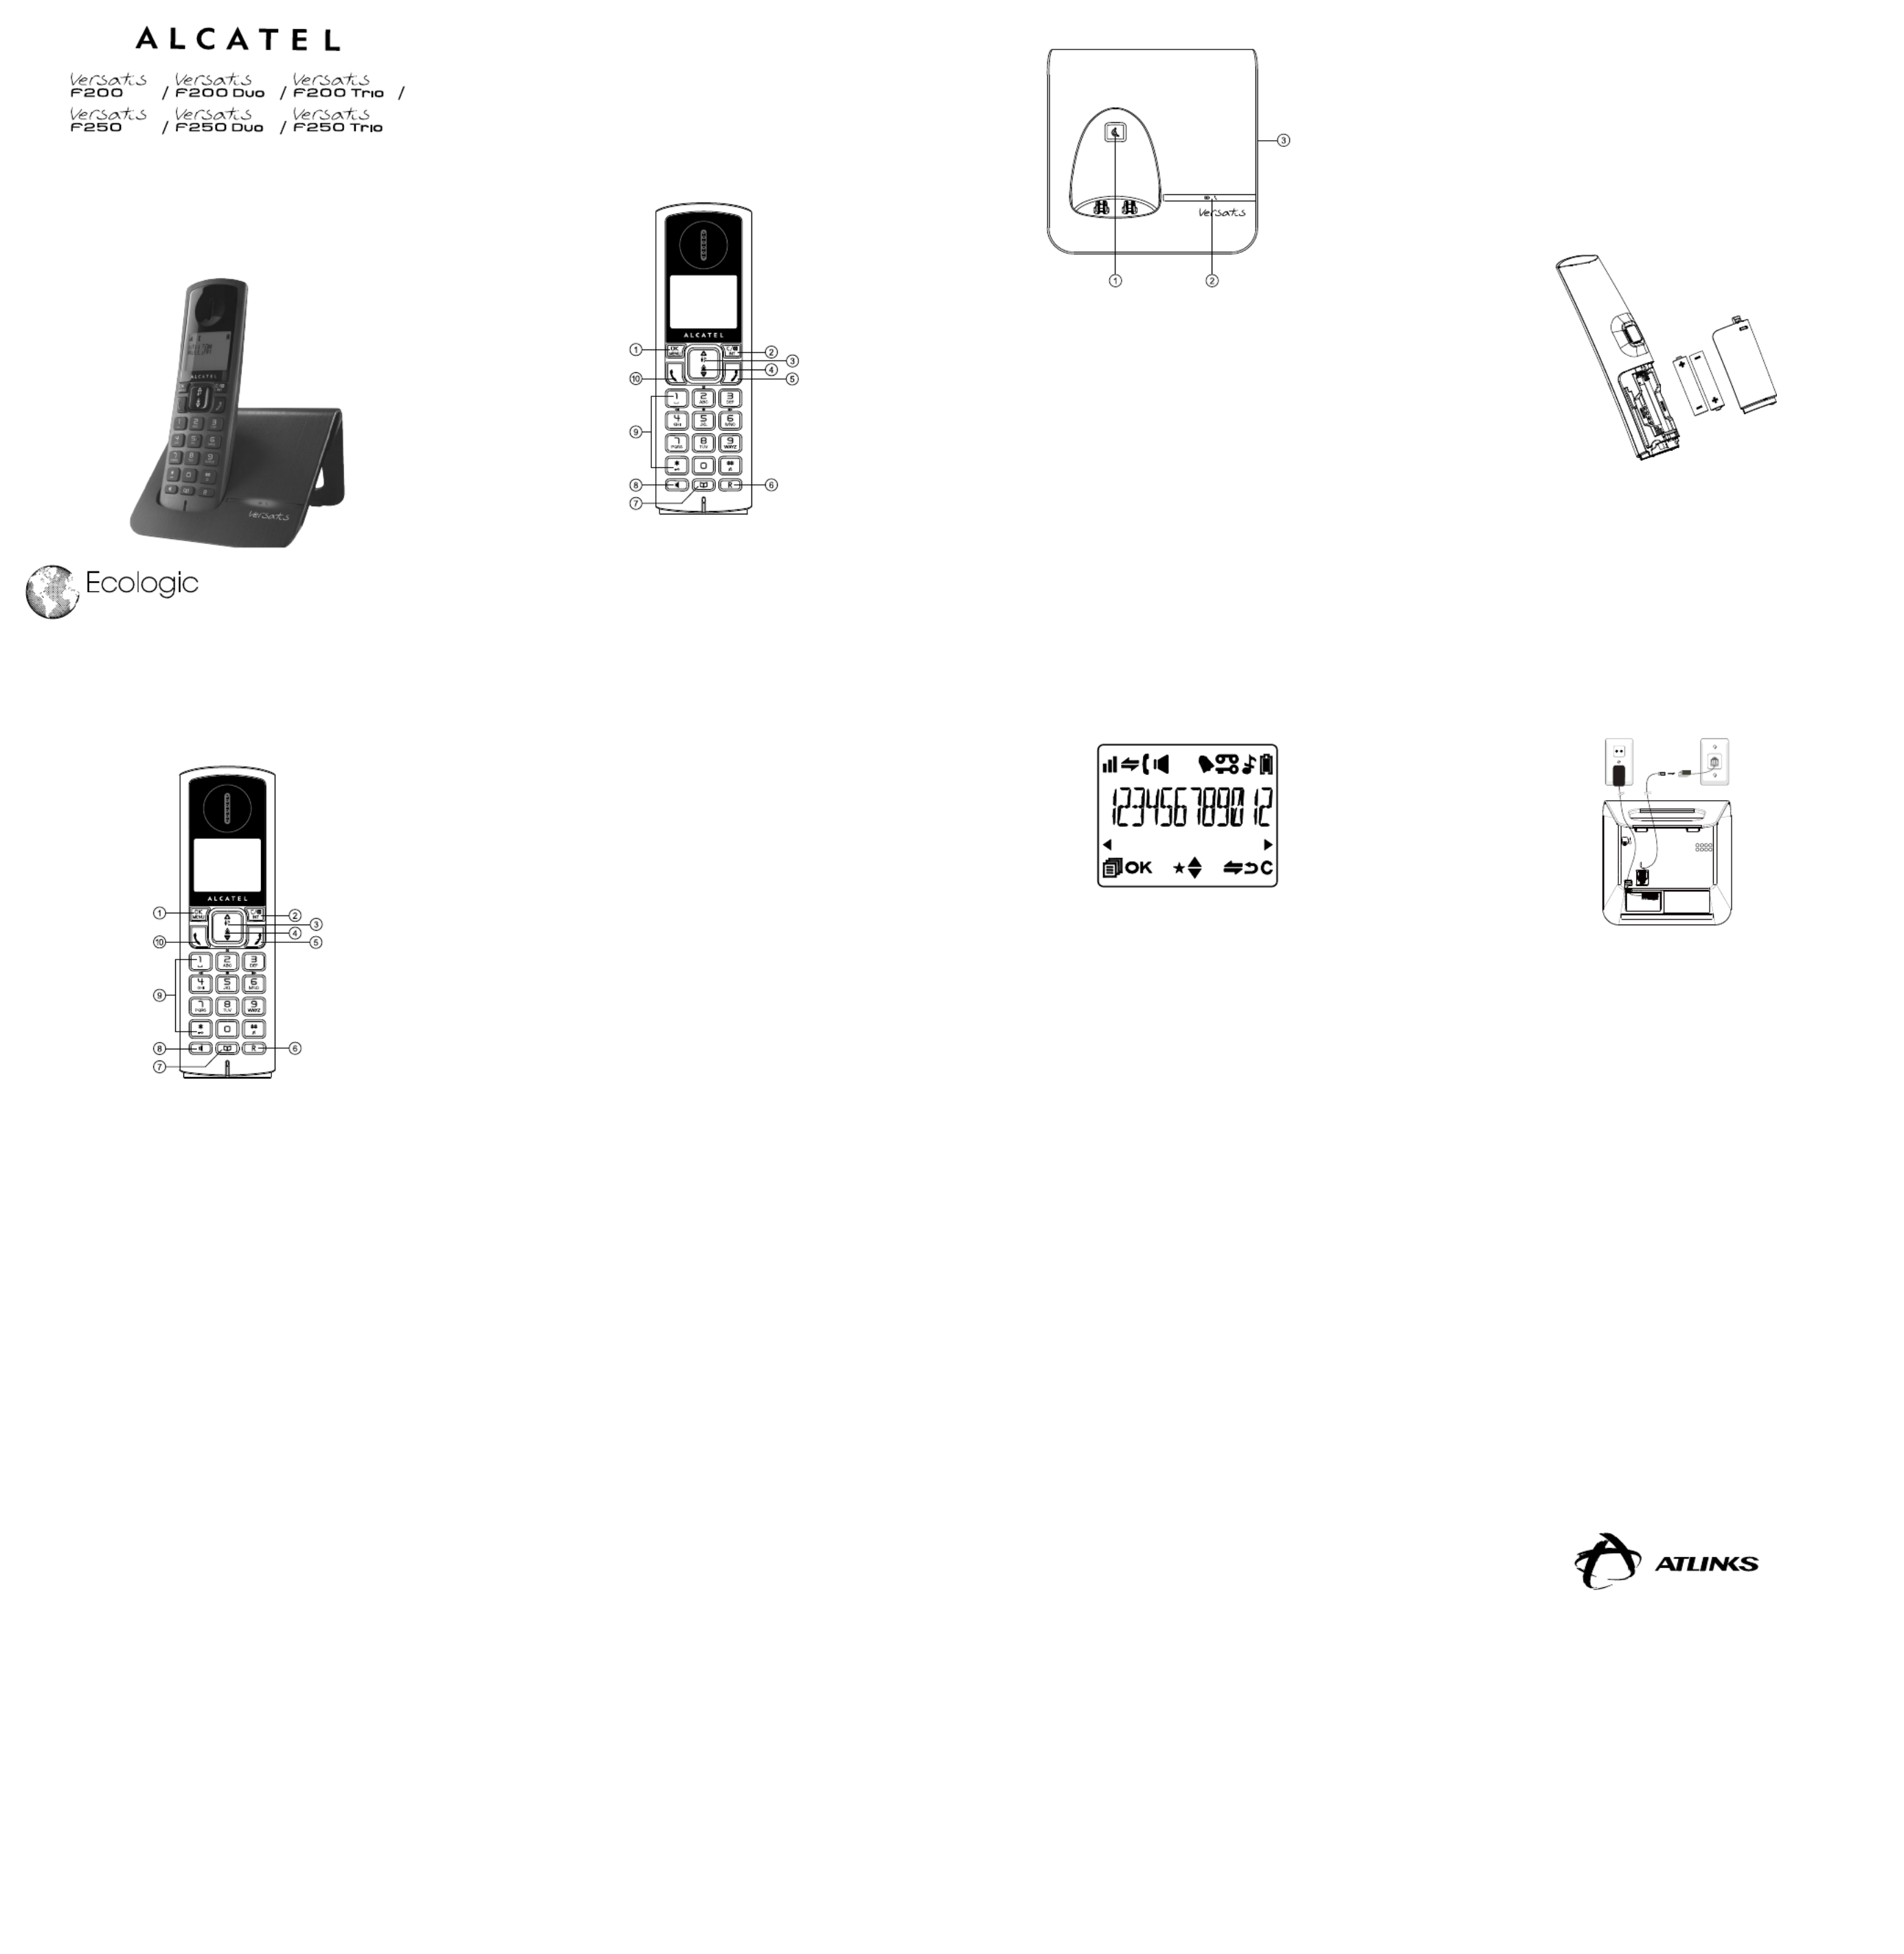
1. KNOWING YOUR PHONE
1.1. Handset Overview (Versatis F200 Only)
1. M
In idle mode: Press to access the main menu
In sub-menu mode: Press to confirm the selection
During a call: Press to access Intercom/Phonebook/Redial
List/Call List
2. C
In main menu mode: Press to go back to idle screen
In sub-menu mode: Press to go back to previous level
In sub-menu mode: Press and hold to go back to idle screen
In editing/predialing mode: Press to clear a character/digit
In editing/predialing mode: Press and hold to delete all the
characters/digits
In keeping with our environmental preservation and
compliance commitment, we include mini-guides in our
packaging. More complete instructions and online assistance
are available on our website:
www.atlinks.com
Ecologic
att tudei
During a call: Press to mute/unmute the microphone
In idle mode: Press to intercom another handset
In ringing: Press to suppress handset ringer
3. +
In idle mode: Press to access the call list
In menu mode: Press to scroll up the menu items
In Phonebook list/Redial list/Call List: Press to scroll up the
list
During a call: Press to increase the volume
In ringing: Press to increase the ringer volume
4. -
In idle mode: Press to access the redial list
In menu mode: Press to scroll down the menu items
In Phonebook list/Redial list/Call list: Press to scroll down the
list
During a call: Press to decrease the volume
In ringing: Press to decrease the ringer volume
5. O
During a call: Press to end a call and go back to idle screen
In menu/editing mode: Press to go back to previous menu
In menu/editing mode: Press and hold to go back to idle
screen
In idle mode: Press and hold to power off the handset
In idle mode: Press and hold to power on/off the handset
6. R
In idle/predialing mode: Press to insert a flash
During a call: Press to dial a flash
7. P
In idle mode: Press to access the phonebook list
8. E
In idle mode: Press to access the redial list
9. ALPHANUMERIC KEYPAD,*, #
* key in idle mode: Press and hold to enable or disable the
keypad lock
# key in idle mode: Press and hold to turn on/off the ringer
# key in call list mode: Press to review caller’s number if
applicable
0 key in predialing/number editing mode: Press and hold to
insert a pause
1, 2, 3 key in idle/off hook mode, press and hold to dial the
stored direct memory number
10.
T
In idle/predialing mode: Press to make a call
In Redial list/Call List/Phonebook entry: Press to make a call
to the selected entry in the list
During ringing: Press to answer a call
1.2. Handset Overview (Versatis F250 only)
1. M
In idle mode: Press to access the main menu
In sub-menu mode: Press to confirm the selection
During a call: Press to access Intercom/Phonebook/Redial
List/Call List
2. C
In main menu mode: Press to go back to idle screen
In sub-menu mode: Press to go back to previous level
In sub-menu mode: Press and hold to go back to idle screen
In editing/predialing mode: Press to clear a character/digit
In editing/predialing mode: Press and hold to delete all the
characters/digits
During a call: Press to mute/unmute the microphone
In idle mode: Press to intercom another handset
In ringing: Press to suppress handset ringer
3. +
In idle mode: Press to access the call list
In menu mode: Press to scroll up the menu items
In Phonebook list/Redial list/Call List: Press to scroll up the
list
During a call: Press to increase the volume
In ringing: Press to increase the ringer volume
4. -
In idle mode: Press to access the redial list
In menu mode: Press to scroll down the menu items
In Phonebook list/Redial list/Call List: Press to scroll down the
list
During a call: Press to decrease the volume
In ringing: Press to decrease the ringer volume
5. O
During a call: Press to end a call and go back to idle screen
In menu/editing mode: Press to go back to previous menu
In menu/editing mode: Press and hold to go back to idle
screen
In idle mode: Press and hold to power off the handset
In idle mode: Press and hold to power on/off the handset
6. R
In idle/predialing mode: Press to insert a flash
During a call: Press to dial a flash
7. P
In idle mode: Press to access the phonebook list
8. S
During a call: Press to turn on/off the speakerphone
In Idle mode/Predialing mode/Redial list/Call List/Phonebook
entry: Press to make a call with speakerphone
During ringing: Press to answer a call with speakerphone
9. ALPHANUMERIC KEYPAD,
*, #
* key in idle mode: Press and hold to enable or disable the
keypad lock
# key in idle mode: Press and hold to turn on/off the ringer
# key in call list mode: Press to review caller’s number if
applicable
0 key in predialing/number editing mode: Press and hold to
insert a pause
1, 2, 3 key in idle/off hook mode, press and hold to dial the
stored direct memory number
10.
T
In idle/predialing mode: Press to make a call
In Redial list/Call List/Phonebook entry: Press to make a call
to the selected entry in the list
During ringing: Press to answer a call
1.3. Base Station Overview
1. A
Press on the base station to page your handset. It will A
ring for approximately 60 seconds.
Press and hold A on the base station for about five seconds,
the base station is entered into registration mode and allows
handset registration.
2. ,@
Steadily on while the handset is charging or in use. (Applicable
only when the LED I/O switch is slid to “I”)
Flash when receiving an incoming call. (Applicable only when
the LED I/O switch is slid to “I”)
3. LED I/O SWITCH (Bottom of the Base)
Slide the switch to "O" position to turn off the base LED
Slide the switch to "I" position to turn on the base LED when
the handset is charging on the base or in use
1.4. Display Icons and Symbols
The LCD display gives you information on the current status of
the telephone.
hSteadily on when the handset is in range of the base.
Flash when out of range of the base or not registered to
the base.
jSteadily on when an intercom is in progress.
Flash when there is an incoming internal call.
kIndicate a call is in progress.
l(Versatis F250 only)
Indicate that handsfree is being used.
xSteadily on when an alarm is set.
Flash when the alarm time set before reaches.
aIndicate that the keypad is locked.
gIndicate when there are received new Voice Message
Waiting (VMWI) not yet read.
Disappear when all the voice messages have been read.
(Network service dependent)
nIndicate that the ringer is switched off.
bIndicate when the battery is fully charged.
Whole icon flashes when the battery performs initial
charging.
Internal block icon flashes when the battery is in final
charging stage.
vIndicate when the battery needs charging.
Flash when low battery power level is detected.
[Indicate when more characters are existed before the text
currently displayed.
]Indicate when more characters are existed after the text
currently displayed.
sIndicate when new call is received.
Turn off when new call has been read.
fScroll up/down the menu items/Phonebook list/Redial list/
Call List.
2. PRECAUTIONS
The signal quality will depend on the location and environment of
the base and handset.
Position your away from sources Versatis F200/Versatis F250
of excessive heat (radiators, direct sunlight, etc.) and protect it
from vibrations and dust. Never allow your telephone to come
into contact with water or other liquids, or with aerosols. To
reduce the risk of interference and optimize reception, take
particular care not to install the base in the immediate vicinity of
windows, large metal objects, reinforced concrete, televisions,
music centres, VCR or DVD players, halogen lamps or heating
devices, fluorescent lighting, burglar alarms, microwave ovens,
computers, etc.
This telephone requires an electrical power supply in order to
function.
To clean your , use an antistatic Versatis F200/Versatis F250
cloth lightly moistened with water.
NB: Your Versatis F200/Versatis F250 is a DECT™* standard
appliance designed to receive and transmit telephone calls. It
is designed for connection to the public telecommunications
network.
3. INSTALLING YOUR PHONE
3.1. Installing and Charging the Batteries
1. Slide down to open the battery compartment cover.
2. Place the 2 supplied AAA rechargeable batteries as indicated.
Pay extra attention to direction of polarity.
3. Slide the battery compartment cover back.
4. Put the handset on the base and charge for 15 hours before
using the handset for the rst time. The handset will give a
beep when it is properly placed on the base or charger.
Notes:
1. Use only the supplied NiMH rechargeable batteries.
2. If the handset will not be used for a long time, disconnect and
remove the batteries to prevent possible leakage.
3.2. Connecting the Base Station
1. Plug one end of the telephone line cord into the telephone
jack on base bottom.
2. Plug the small end of power adapter into a power jack on
base bottom.
3. Connect the power supply plug to the base jack
horizontally, and route the power supply cord through
the slot.
4. Plug the large end of power adapter into a wall power outlet.
5. Plug the other end of the telephone line cord in to the
telephone jack or micro-lter.
6. Always use the cables provided in the box.
If you have broadband service,
a micro-filter (not included) is required.
3.3. Connecting the Charger(s) (for Duo/Trio models)
Plug the power adapter into mains socket.
If you have a Broadband line
If you connect your telephone to a line with a broadband
connection, you will need to insert a micro-filter between the
telephone and the telephone line, otherwise you may get
interference between the telephone and the broadband, which
could cause problems.
In a home with broadband, every telephone must have a micro-
filter connected, not just the one at the telephone point that your
modem is connected to. If you need more broadband micro-
filters, contact your broadband supplier.
www.atlinks.com
ATLINKS Europe
22 quai Gallieni
92150 Suresnes- France
© ATLINKS 2012 - Reproduction prohibited.
The Manufacturer reserves the right to modify the specifications
of its products in order to make technical improvements or
comply with new regulations.
ALCATEL and ATLINKS are registered trademarks.
The Alcatel logo and Alcatel name are trademarks of Alcatel and
used under licence by ATLINKS.
F200/F200 Duo/Trio LA
F250/F250 Duo/Trio LA
A/W No.: 10000441 Rev.0 (EN)
Printed in China
Produktspecifikationer
| Varumärke: | Alcatel |
| Kategori: | Telefon |
| Modell: | Versatis F200 Duo |
Behöver du hjälp?
Om du behöver hjälp med Alcatel Versatis F200 Duo ställ en fråga nedan och andra användare kommer att svara dig
Telefon Alcatel Manualer

16 Mars 2026
4 Mars 2026
6 Juni 2025
6 Juni 2025
20 Februari 2025
8 Januari 2025
30 December 2025
18 Oktober 2024
29 September 2024
29 September 2024
Telefon Manualer
Nyaste Telefon Manualer
2 April 2026
2 April 2026
27 Mars 2026
26 Mars 2026
14 Mars 2026
13 Mars 2026
30 Januari 2026
25 Januari 2026
25 Januari 2026
25 Januari 2026