Bauhn AWCRMC-0925 Bruksanvisning
Bauhn ej kategoriserat AWCRMC-0925
Läs gratis den bruksanvisning för Bauhn AWCRMC-0925 (3 sidor) i kategorin ej kategoriserat. Guiden har ansetts hjälpsam av 35 personer och har ett genomsnittsbetyg på 4.4 stjärnor baserat på 3 recensioner. Har du en fråga om Bauhn AWCRMC-0925 eller vill du ställa frågor till andra användare av produkten? Ställ en fråga
Sida 1/3
Press PREV/NEXT button to select sound type.
Press MODE button for 2 seconds to switch to night sound mode.
Relaxing Background Sound Mode (Night Sound)
USB Mode
FM Mode
Press MODE button for 2 seconds to switch to USB mode.
Press MODE button for 2 seconds to switch to FM mode.
Press ALARM button for 2 seconds to start auto searching FM stations.
Press PREV/NEXT button to select FM station.
Note: On FM mode, the LED light may generate interference when the FM signal is weak, please
switch off the LED light if interference occurs.
AUX Input Mode
Micro SD (TF Card) Mode
Press MODE button for 2 seconds to switch to AUX input mode.
Press MODE button for 2 seconds to switch to Micro SD (TF Card) mode.
Bluetooth Mode
Use the 3.5mm audio cable (not included) to connect your external device to the port.
Press MODE button for 2 seconds to switch to Bluetooth mode.
The Bluetooth paring name is AWCRMC-0925-H. After connected your smart phone, you can play
music through the clock radio.
The clock radio supports TWS and can pair with another clock radio (same model). Press ALARM
button twice to switch on/off TWS mode. Once TWS successfully paired with each other, music will now
be played on both clock radio simultaneously.
Press MODE button to play/pause music.
Press PREV/NEXT button to select the previous or next track.
Press and hold PREV/NEXT button to adjust volume.
Wireless Charging Pad
Connect the supplied USB-C power cable to the DC input and the other end to a USB charging
adaptor (not included).
Place your smart phone facing up on the wireless charging pad. Once the phone is correctly aligned,
the charging process will auto start. The wireless charging LED indicator solid blue light indicates the
charging is in progress. If the LED is off, your mobile phone may not support wireless charging, or it is
not aligned to wireless charging pad or it is fully charged.
Note: Please always connect DC input. Otherwise, the wireless charging pad will not work.
Charging the Clock Radio
When battery is too low, the clock radio will turn off automatically. Connect the supplied USB-C power
cable to the DC input. The charging indicator will light up red during charging. Once fully charged,
the indicator light will turn off. Charging time is approximately 4-5 hours.
Note: When using wireless charging pad simultaneously, the clock radio may not be charged before your
smart phone fully charged.
Press POWER button for 2 seconds to turn the clock radio on/off.
Time Synchronization
The product will request access message of the Bluetooth paired Android smart phone. After granted
access, the product will auto synchronize clock when reconnect smart phone. This synchronization
function is also working with iPhone.
Setting the Clock
Press CLOCK button for 2 seconds to enter clock settings.
You can adjust the clock hour and minute by pressing CLOCK button and PREV/NEXT button.
Press CLOCK button twice to switch between 12 & 24 hour mode.
When the alarm bell starts to ring and the ALARM button is not pressed to stop the alarm. The alarm
will enter snooze mode and the alarm bell will ring again after 5 minutes.
Press ALARM button for 2 seconds to enter alarm settings. You can adjust the alarm hour, minute
and alarm sound by pressing PREV/NEXT button.
Press ALARM button to switch alarm on/off.
Setting the Alarm
•
•
•
•
•
•
•
•
•
•
•
•
•
•
Connect the antenna before switch to FM mode and search.
•
•
•
•
•
•
•
•
•
•
•
•
Connect a USB-C cable into the clock radio for the antenna. The other end does not need to be plugged in.
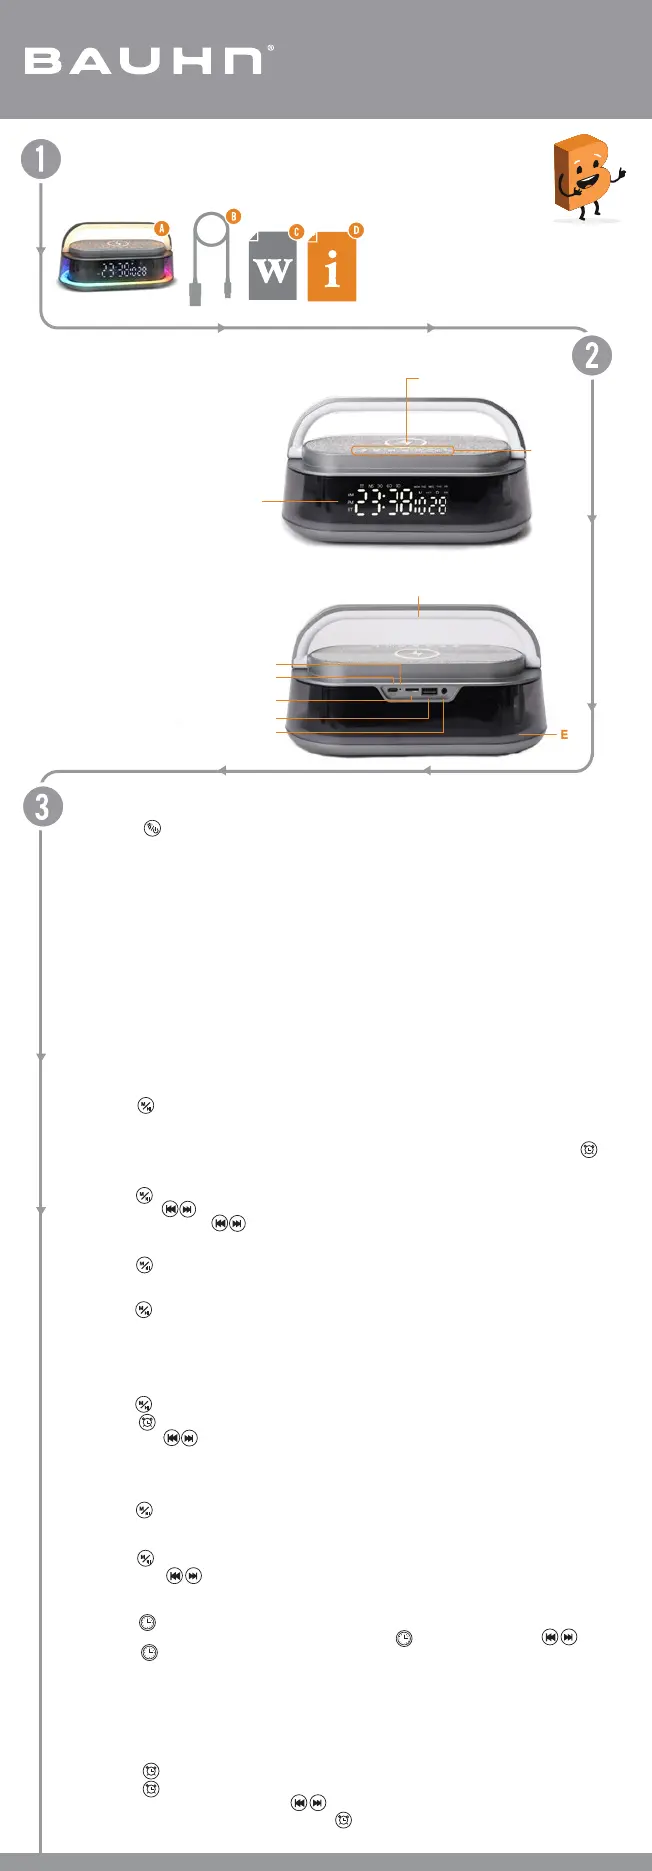
E
Product Overview
Operation
Have you got everything?
A. Clock Radio with
Wireless Charging
B. USB-A to USB-C Cable
C. Warranty Certificate
D. User Guide
A
Wireless Charging Pad
B
LED Display
C
Control Buttons
E
Ambient Light
D
F
Handle Light
Charging Indicator
DC Input (USB-C)
User Guide
Model: AWCRMC-0925-H
Clock Radio with Wireless Charging
B
A
3
G
Micro SD (TF Card) Input
H
USB Flash Drive Input
I
AUX Input
J
H
G
F
C
J
I
D
.
Produktspecifikationer
| Varumärke: | Bauhn |
| Kategori: | ej kategoriserat |
| Modell: | AWCRMC-0925 |
Behöver du hjälp?
Om du behöver hjälp med Bauhn AWCRMC-0925 ställ en fråga nedan och andra användare kommer att svara dig
ej kategoriserat Bauhn Manualer

9 Oktober 2025
8 Oktober 2025
8 Oktober 2025
8 Oktober 2025
9 September 2025
9 Augusti 2025
4 Augusti 2025
ej kategoriserat Manualer
Nyaste ej kategoriserat Manualer
3 April 2026
3 April 2026
3 April 2026
3 April 2026
3 April 2026
3 April 2026
3 April 2026
3 April 2026
3 April 2026