Berker 85741188 Bruksanvisning
Berker Inte kategoriserad 85741188
Läs gratis den bruksanvisning för Berker 85741188 (11 sidor) i kategorin Inte kategoriserad. Guiden har ansetts hjälpsam av 36 personer och har ett genomsnittsbetyg på 4.1 stjärnor baserat på 3 recensioner. Har du en fråga om Berker 85741188 eller vill du ställa frågor till andra användare av produkten? Ställ en fråga
Sida 1/11
Shutter timer
Safety instructions
Electrical equipment must only be installed
and assembled by a qualied electrician in ac-
cordance with the relevant installation stan-
dards, regulations, directives and safety and
accident prevention directives of the country.
Failure to comply with these installation inst-
ructions may result in damage to the device, -
re or other hazards.
These instructions are an integral component
of the product, and must be retained by the
end user.
Design of the device
(3)
(5)
(6)
(7)
(4)
(2)
(1)
Figure 1: Design of the device
(1)Insert (see Accessories, not in scope of
delivery)
(2)Frame (not in scope of delivery)
(3)Application module
(4)Display
(5)Design cover
(6)Screw for dismantling protection (not for
design lines R.1/R.3)
(7)Operation buttons
Function
Correct use
-Application module for shutter inserts
-Manual, time-controlled and automatic operati-
on of blind/shutter motors connected to insert
-Unsuitable for lighting control
-Only suitable for use in indoor areas, no drip or
spray water
Product characteristics
-Two preset standard time programmes
-Individual adjustment of the time programmes
possible
-Astro programme for automatic operation at
dawn/dusk
-Astro time shift to adjust the operation times
-Holiday programme for random operation times
in automatic mode
-Keylock
-Automatic switching to standard/daylight sa-
ving time
Performance after mains breakdown/return of
mains supply
-Mains breakdown:
Saving of the current conguration and pro-
gramming in the non-volatile memory. The de-
vice then switches to economy mode. Only the
internal clock continues to run to keep the time
up-to-date. The use of a buer memory ensu-
res that the time stays up-to-date for up to 24
hours.
-Return of mains supply:
The application module executes an initialisati-
on operation
1)
, the basic display is restored.
The saved programming is loaded from the
memory. Any operations pending during the
power outage will not be executed after return
of mains supply.
1)
If the buer memory is full, date and time must be
entered sagain.
Operation
Operating concept and display elements
When controlling the shutter, the buttons (Fig.2)
distinguish between a short press and a long
press of > 0.5 seconds on the button.
Pressing the button for >2seconds can trigger
various functions within the menu operation.
The current clock status is displayed. Active func-
tions are displayed by using symbols (Table1).
Display illumination is activated for as soon as a
button is pressed.
OK
07:03
Wednesday
12:14
21:02
(8)(9)(11)(10)
(12)
(13)
(14)
Figure 2: Display and operating elements
(8)UP button
(9)Back button
(10)OK button
(11)DOWN button
(12)Display area for weekday and time
(13)Display area for active functions/programming
(14)Display area for the next operation times
SymbolFunktion
Shutter timer disabled,
button operation is not possible
Manual operation,
no automatic operation times
Preset programme P1 (week program-
me) or P2 (week/weekend program-
me) is active
Astro programme is active,
UP and DOWN operation times are
controlled depending on dawn/dusk
times
Party programme is active
Only manual mode - programs, exten-
sion units and radio commands are not
executed
Holiday programme
Random variation of operation times,
only possible in combination with
, ,
Table 1: Displays in the function/programme line of
the screen
Operate shutter - operation from the basic
display
Manual shutter operation is possible at any time
from the basic display, even if automatic program-
mes are active.
Press the or button.
Short press on button: Adjustment of the slat
position.
Long press on button (> 0.5 s): Lock, shutter
moves to nal position.
The max. operation time upon a long press on
the button is 2 minutes.
Short press on or button during the shut-
ter movement.
The shutter stops at the position reached.
If a protection signal (wind, rain) is present, no
move commands are executed (see Setting
Operating Mode).
Locking/unlocking operation
The operation buttons of the shutter timer can be
locked, in order to prevent unintentional operation,
e.g. by children.
The shutter timer shows the basic display.
Press the button for more than 5 seconds.
is displayed. The operation buttons are
locked.
Press the button again for more than 5
seconds.
disappears in the display. The operation
buttons are enabled.
Opening the menu and navigating
The shutter timer is set and programmed via the
menu.
operating
mode
holiday
mode
(15)
(16)
(17)
Fig. 3: Main menu
(15)Selected menu item
(16)Position display of the selected menu item in
the list of options
(17)Next option in the list
Short press on any button.
Operation is activated. The display is illumina-
ted.
Long press on OK button.
The main menu is displayed. The rst menu
item operating mode (Fig. 3, 15) is highlighted
dark.
Press the or button to navigate through
the menu.
The selected menu item is highlighted dark.
Conrm the selected option by pressing OK.
The submenu opens.
Navigation through the menus can continue as
described above.
Press the button.
The display switches to the previous contents.
To return to the basic display, press the á but-
ton multiple times as necessary.
If no button is pressed for a period of two minu-
tes, the display returns to the basic display.
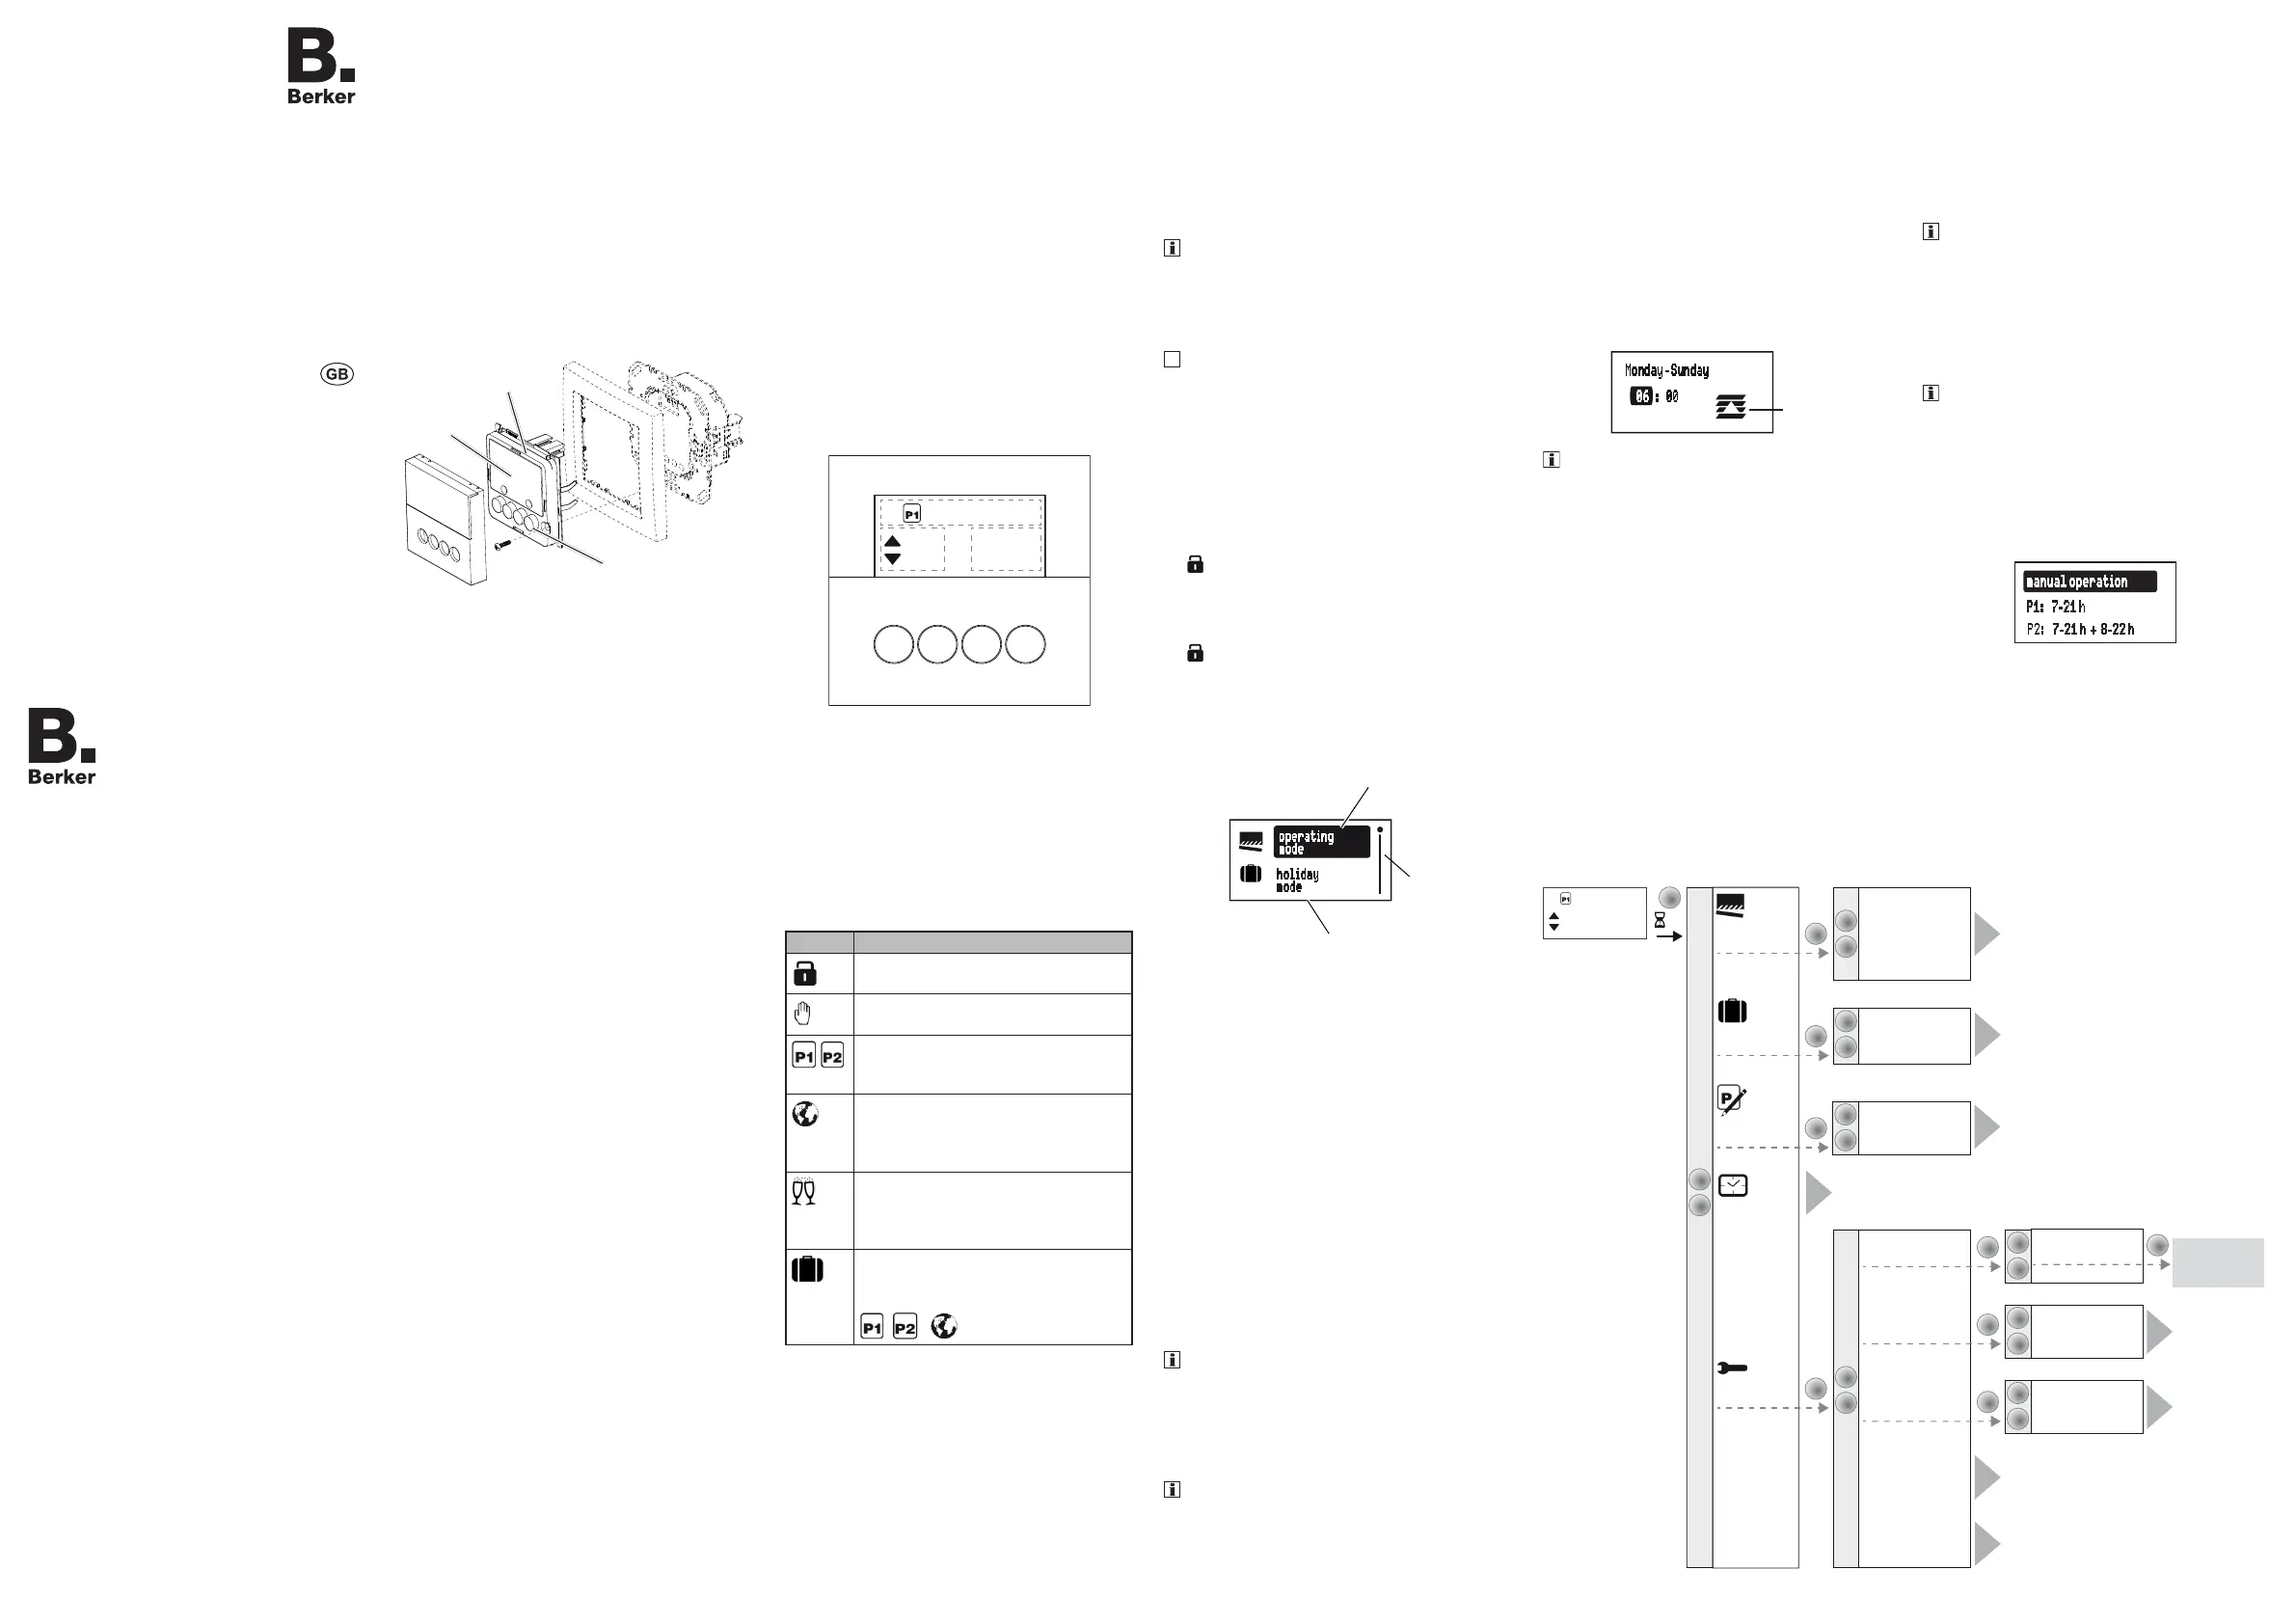
The following diagram (Figure 4) shows an
overview of the functions of the menus/submenus:
A.. refers to sections with additional information.
Values in brackets are visible depending on the
timer programming status.
Setting the values
Values, such as time or date, have to be set rst
for the programming of some functions.
The value to be set is selected and is highlighted
dark.
Press the or button.
Short press on button: Change the value by
one step.
Keep button pressed: Scroll through values.
Scrolling stops when the button is released.
Monday - Sunday
06 : 00
(25)
If operation times are set, then a symbol (25)
shows whether it is an UP or DOWN operation
time.
Press the OK button.
The set value is applied.
Press the button.
The display switches to the previous value. The
setting is not applied.
Submenu A1 - Select programme
One can choose between the following program-
mes:
-Manual operation:
Operation takes place solely using the buttons
(see Operate shutter - operation from the basic
display).
-Time programmes P1: 7 - 21 h and P2: 7 - 21
h + 8 - 22 h :
These programmes are factory preset but can
be changed individually.
P1 is a week programme with identical operati-
on times for each day, P2 is a week/weekend
programme with dierent operation times for
Mon. - Fri. and Sat. - Sun.
-Astro mode:
Programme for dawn/dusk-dependent control
of the shutters (see submenu A7 - Setup Astro
programme).
The astro mode is only displayed if it has been
set up.
-Party mode:
The party mode prevents unintentional operati-
on of the controlled blinds/shutters by program-
med operation time or extension unit operation,
e.g. to prevent people from being shut out by
the shutter going down.
When the party mode is active, a blind/shutter
can only be operated manually using the but-
tons on the time switch. Control of the shutter
by higher-level control-sections and sensors as
well as by extension units, radio and forced
control commands is deactivated.
The shutter timer shows the Programme selection
submenu (Fig. 4, 19). The most recently selected
programme is highlighted dark.
manual operation
P1: 7-21h
P2: 7-21h+ 8-22h
Press the or button to select the desired
programme.
Press the OK button.
The screen switches to the basic display. The
selected programme is run, the corresponding
symbol (Table 1) is shown in the display (Fig.
2, 13).
07:03
Wednesday
12:14
21:02
manual operation
P1: 7 - 21h
P2: 7 - 21h + 8 - 22h
(astro mode)
party mode
(activation)
(deactivation)
Deutsch
English
Francais
country-city selection
coordinates
OK
2 s
OK
OK
language
time settings
astro settings
factory settings
summer/winter time
operating
mode
holiday
mode
program
settings
time / date
advanced
settings
Displayed in
selected language
(e.g.: English)
modify
(restore defaults)
OK
OK
OK
OK
OK
OK
display settings
A1
A2
A3
A4
A5
A6
A7
(18)
(19)
(20)
(21)
(22)
(23)
(24)
A8
Figure 4: Menu overview
Operation and
installation instructions
Berker GmbH & Co. KG
Zum Gunterstal
66440 Blieskastel/Germany
Tel.: +49 6842 945 0
Fax: +49 6842 945 4625
E-Mail: info@berker.de
www.berker.com
05/2022
6LE008037A
Shutter timer
Nr.ord.: 8574 11 ..
Produktspecifikationer
| Varumärke: | Berker |
| Kategori: | Inte kategoriserad |
| Modell: | 85741188 |
Behöver du hjälp?
Om du behöver hjälp med Berker 85741188 ställ en fråga nedan och andra användare kommer att svara dig
Inte kategoriserad Berker Manualer

30 December 2025
30 December 2025
30 December 2025
17 December 2024
17 December 2024
17 December 2024
17 December 2024
17 September 2024
17 September 2024
8 September 2024
Inte kategoriserad Manualer
Nyaste Inte kategoriserad Manualer
9 April 2025
9 April 2025
9 April 2025
9 April 2025
9 April 2025
9 April 2025
9 April 2025
9 April 2025
9 April 2025
9 April 2025