Big Ben QuickFire Destruction Pad Bruksanvisning
Big Ben
Kontroller
QuickFire Destruction Pad
Läs nedan 📖 manual på svenska för Big Ben QuickFire Destruction Pad (5 sidor) i kategorin Kontroller. Denna guide var användbar för 2 personer och betygsatt med 4.5 stjärnor i genomsnitt av 2 användare
Sida 1/5

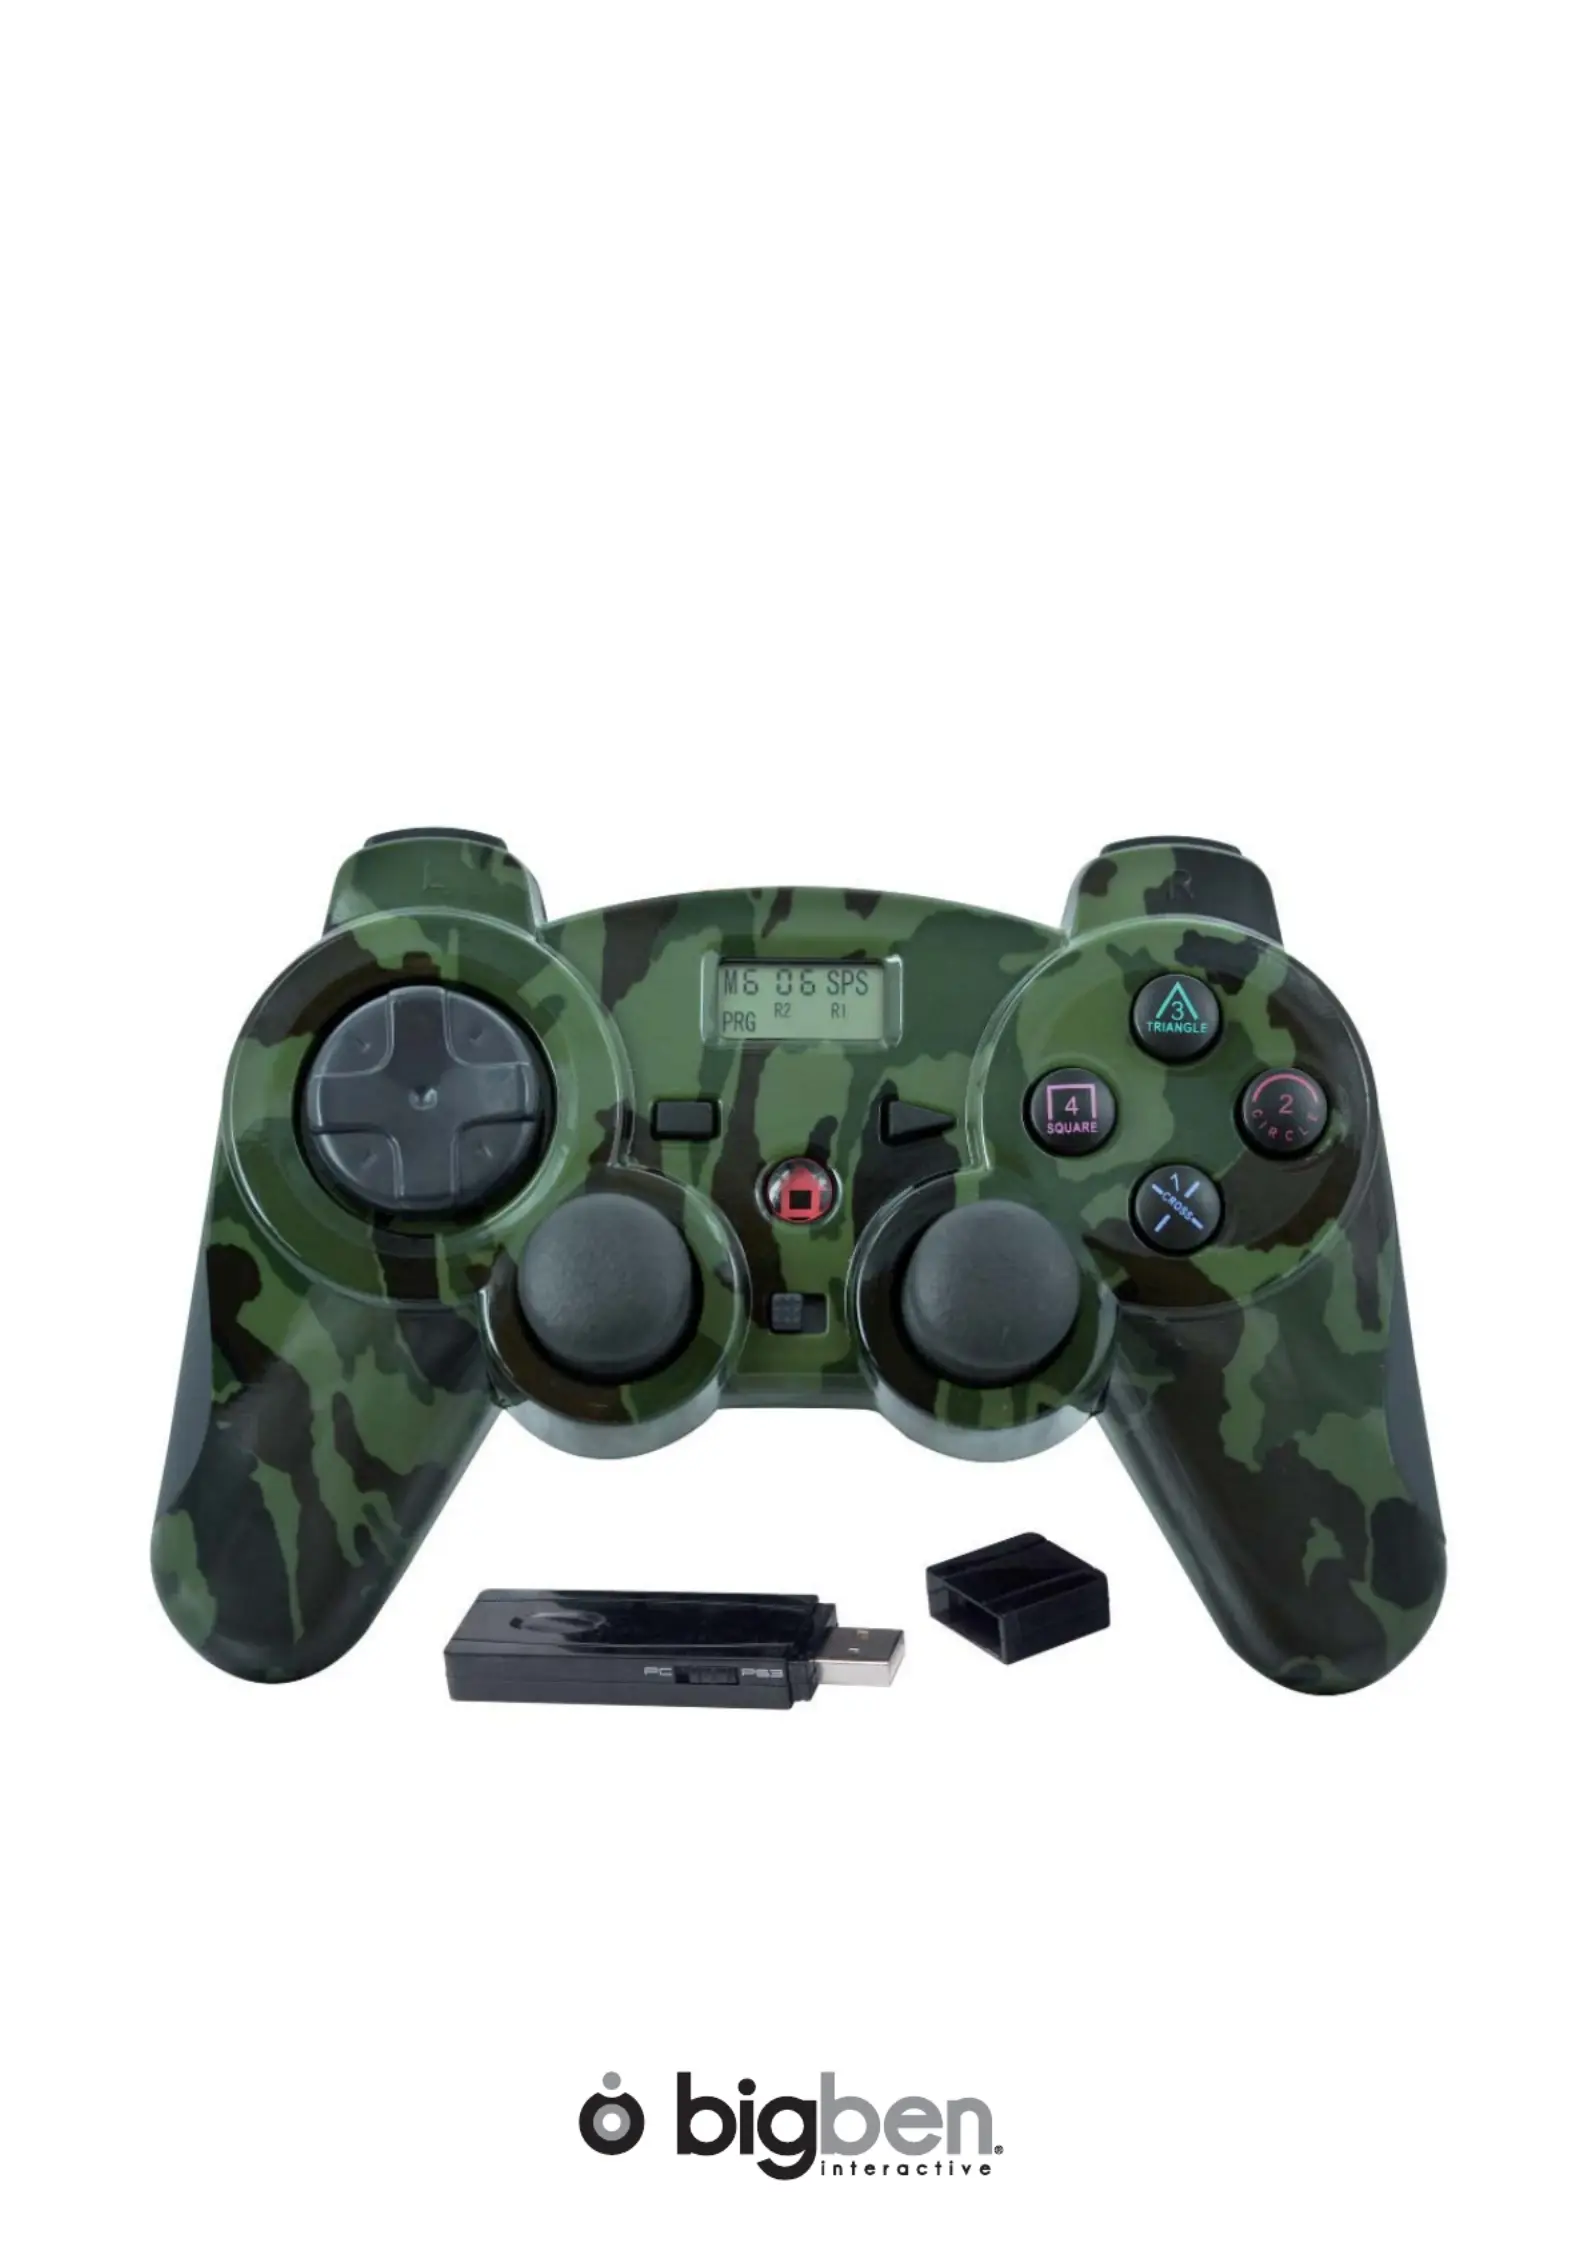
PS3™ QUICKFIRE CONTROLLER
User’s Manual

Thank you for purchasing the Quickfi re controller for PS3™ from Bigben Interactive.
This product includes:
• 5 Preset quick fi re modes for all your favourite games.
• Clear LCD screen.
• 8 shots per second up to 48 shots per second.
• Custom fi ring mode – set your own quick fi re rate from 6 shots per second up to a blistering 60 shots per second.
• Program any action buttons for rapid fi re.
• Tilt sensors and vibration.
• Ergonomic, non slip triggers.
• Supplied with 2 AA Alkaline batteries.
Controller Set-Up and Use
Battery Installation
1. Remove the battery compartment cover from underneath the controller
2. Insert 2 x 1.5 volt AA size batteries, observing the correct polarity
3. Refi t the battery compartment cover
Using the Controller with a PS3™.
Slide the switch on the Receiver Unit to PS3™ mode.
Receiver Connection
Plug the Receiver Unit into one of the USB ports on your PS3™ console. The Red LED on the Receiver Unit will fl ash constantly.
Using your Controller
1. Switch on the controller by sliding the power On/Off switch, on the Controller, to on. When the controller has successfully connected with
the Receiver Unit the Red LED, on the receiver, will stop fl ashing and be lit continuously.
2. Press the `PS Home’ button on the centre of the controller. This is the button with the house symbol.
3. The controller will connect to your PlayStation
®3 console and the numbered Red LED’s will light up showing your controller number.
4. Ensure that your contoller is assigned as controller 1.
If it is not recognised as controller 1, press and hold the home button to bring up the option menu, while you have a game loaded.
Select the controller settings and then select the ‘Reassign the Controller’ option.
Scroll down with the d-pad on the rifl e until it says 1 on the TV screen.
Press X to select it and then press O twice to go back to your game.
For further information on assigning controller ports please refer to your console instruction manual.
Quick fi re modes
The Quickfi re controller has 6 different quick fi re modes to suit all of your favourite shooting games. The controller is set to mode 1, 8 shots
per second by default.
The mode is displayed on the LCD screen as M1 08SPS. Quick fi re is set to the R1 button of your controller as this is the most common
fi ring button for shooting games.
L
SEL ECT
ON OFF
ST A RT
PS
R
M5 48 SP S
PRG
L
SEL ECT
ON OFF
ST A RT
PS
R
M1 08 SPS
PRG
L
SEL ECT
ON OFF
ST A RT
PS
R
M1 10 SPS
PRG
R1
M2
M1
M3
M4
M5
Changing the quick fi re modes
The quick fi re modes have been designed to work on all of your shooting games. To ensure full compatibility please select the correct mode
for your game.
The modes are as follow:
M1 8SPS – Call of Duty 4 Modern Warfare
M2 10SPS – Call of Duty World at War and Call of Duty: Black Ops
M3 20SPS – Call of Duty Modern Warfare 2
M4 32SPS – Call of Duty Modern Warfare 2
M5 48SPS - Call of Duty Modern Warfare 2
Please note that modes M4 and M5 may have varied results depending on which guns you are using in the game. If you experience
any problems, stick with the M3 mode. These modes will also work with other popular shooting games, like Battlefi eld™, Killzone™,
Resistance™ etc. Try the different modes to select which works best.
To change between modes follow these steps.
1. Press start and select simultaneously to enter the programming mode.
2. Press up or down on the D-pad to cycle through the different modes.
3. When you have found your correct mode press start and select again to confi rm your selection.
4. The controller will now fi re at your chosen speed when you press R1.
L
SEL ECT
ON OFF
ST A RT
PS
R
M1 08 SPS
PRG
L
SEL ECT
ON OFF
ST A RT
PS
R
M1 06 SPS
PRG
M6
M5
M1
M2
M3

Custom quick fi re mode
The quick fi re controller also includes a custom mode to ensure future compatibility with new games and so you can experiment with
different fi ring rates. The rates can range for 6 shots to 60 shots per second.
To set the custom fi ring rates follow these steps:
1. Press start and select simultaneously to enter the programming mode.
2. Press up or down on the D-pad to cycle through the different modes and choose M6.
3. Then press the select button to enter the shots mode.
4. Press up or down on the D-pad to choose the shots per second you want.
5. Press start and select again to confi rm your selection.
6. The controller will now fi re at your chosen rate when you are in M6 mode.
L
SEL ECT
ON OFF
ST A RT
PS
R
M1 08 SPS
P RG
L
SEL ECT
ON OFF
ST A RT
PS
R
M6 06 SP S
PRG
L
SEL ECT
ON OFF
ST A RT
PS
R
M1 06 SPS
PRG
M6
M5
M1
M2
M3
L
SEL ECT
ON OFF
ST A RT
PS
R
M6 14 SP S
PRG
L
SEL ECT
ON OFF
ST A RT
PS
R
M6 10 SPS
PRG
R1
14
12
16
--
60
Programming other buttons for rapid fi re
By default, only the R1 button is used for quick fi re, but if you are playing games that use another button for fi ring, you can also program
them.
To set other buttons for quick fi re, follow these steps:
1. Press the select and PS Home button on the controller simultaneously to enter the button programming mode. The LCD screen will
then display PRG.
2. Press the button you wish to program as quick fi re (i.e. the triangle button) A triangle symbol will then appear on the LCD screen to
indicate it has been pressed.
3. Press select and PS Home again to confi rm your selection. The triangle button will now act in quick fi re mode. The button will remain
as a quick fi re button even when you switch off your controller
L
SEL ECT
ON OFF
ST A RT
PS
R
PRG
L
SEL ECT
ON OFF
ST A RT
PS
R
PRG
L
SEL ECT
ON OFF
ST A RT
PS
R
PRG
To set the button back to normal, follow these steps.
1. Press the select and PS Home button on the controller simultaneously to enter the button programming mode. The LCD screen will
then display PRG.
2. Press the button you wish to clear as quick fi re (i.e. the triangle button) The triangle symbol will then disappear from the LCD screen
to indicate it has been pressed.
3. Press select and PS Home again to confi rm your selection. The triangle button will set back to normal.
L
SEL ECT
ON OFF
ST A RT
PS
R
PRG
L
SEL ECT
ON OFF
ST A RT
PS
R
PRG
L
SEL ECT
ON OFF
ST A RT
PS
R
PRG
Disable Quick fi re on R1 button
If you do not want rapid fi re on the R1 button you can disable it in the same way as mentioned above
1. Press the select and PS Home button on the controller simultaneously to enter the button programming mode. The LCD screen will
then display PRG.
2. Press the R1 The R1 symbol will then disappear from the LCD screen to indicate it has been pressed.
3. Press select and PS Home again to confi rm your selection. The R1 button will set back to normal and will no longer have quick fi re.
L
SEL ECT
ON OFF
ST A RT
PS
R
P RG
R1
L
SEL ECT
ON OFF
ST A RT
PS
R
M1 08 SP S
L
SEL ECT S T ART
PS
R
PRG
Clearing all programming
If you wish to set your controller back to default, simply switch it off and switch it back on again, whilst holding the start and select buttons
simultaneously. All controls will then be set to standard factory settings.
L
SEL ECT
ON OFF
ST A RT
PS
R
L
SEL ECT
ON OFF
ST A RT
PS
R
M1 08 SP S
PRG
R1
Produktspecifikationer
Varumärke: | Big Ben |
Kategori: | Kontroller |
Modell: | QuickFire Destruction Pad |
Behöver du hjälp?
Om du behöver hjälp med Big Ben QuickFire Destruction Pad ställ en fråga nedan och andra användare kommer att svara dig
Kontroller Big Ben Manualer

7 Augusti 2024
Kontroller Manualer
- Kontroller Sony
- Kontroller Samsung
- Kontroller Bosch
- Kontroller Huawei
- Kontroller HP
- Kontroller Philips
- Kontroller Panasonic
- Kontroller Garmin
- Kontroller Honeywell
- Kontroller JBL
- Kontroller Kenwood
- Kontroller Pioneer
- Kontroller Canon
- Kontroller Akai
- Kontroller Amazon
- Kontroller American Audio
- Kontroller Hikvision
- Kontroller Draper
- Kontroller Spektrum
- Kontroller Nedis
- Kontroller Thomson
- Kontroller Gembird
- Kontroller Pyle
- Kontroller Manta
- Kontroller Asus
- Kontroller Thermador
- Kontroller SilverStone
- Kontroller RCA
- Kontroller Targus
- Kontroller Vivanco
- Kontroller Niceboy
- Kontroller Logitech
- Kontroller Manhattan
- Kontroller BeamZ
- Kontroller Thermaltake
- Kontroller Trust
- Kontroller Tripp Lite
- Kontroller Toa
- Kontroller DataVideo
- Kontroller Schneider
- Kontroller Axis
- Kontroller ART
- Kontroller Hama
- Kontroller Parrot
- Kontroller Denon
- Kontroller Mitsubishi
- Kontroller Velleman
- Kontroller Microsoft
- Kontroller Sonance
- Kontroller Korg
- Kontroller Bogen
- Kontroller Da-Lite
- Kontroller Ednet
- Kontroller Cisco
- Kontroller American DJ
- Kontroller Perel
- Kontroller Nintendo
- Kontroller Plantronics
- Kontroller Bose
- Kontroller Lumens
- Kontroller IFM
- Kontroller Steelseries
- Kontroller Somfy
- Kontroller SBS
- Kontroller Mackie
- Kontroller Bigben Interactive
- Kontroller Genius
- Kontroller Adj
- Kontroller Belkin
- Kontroller Razer
- Kontroller Zephyr
- Kontroller DJI
- Kontroller Ion
- Kontroller Nacon
- Kontroller Supermicro
- Kontroller GeoVision
- Kontroller Genesis
- Kontroller Boss
- Kontroller Behringer
- Kontroller Deltaco
- Kontroller PreSonus
- Kontroller Danfoss
- Kontroller Marshall
- Kontroller Valcom
- Kontroller Magnus
- Kontroller Tascam
- Kontroller Astro
- Kontroller Bigben
- Kontroller IK Multimedia
- Kontroller Carel
- Kontroller Hunter
- Kontroller Speed-Link
- Kontroller Naxa
- Kontroller Sven
- Kontroller Intel
- Kontroller Sherwood
- Kontroller Konig
- Kontroller Numark
- Kontroller Sweex
- Kontroller Vizio
- Kontroller Vakoss
- Kontroller Zebra
- Kontroller Metronic
- Kontroller Aruba
- Kontroller Natec
- Kontroller Ikan
- Kontroller Chauvet
- Kontroller One For All
- Kontroller T'nB
- Kontroller Tracer
- Kontroller Audac
- Kontroller ESI
- Kontroller Schaudt
- Kontroller GVM
- Kontroller Rain Bird
- Kontroller Irritrol
- Kontroller Zoom
- Kontroller Marshall Electronics
- Kontroller Vaddio
- Kontroller Thrustmaster
- Kontroller Jung
- Kontroller Harvia
- Kontroller Apart
- Kontroller Datalogic
- Kontroller Saramonic
- Kontroller Synology
- Kontroller Saitek
- Kontroller Turtle Beach
- Kontroller Radial Engineering
- Kontroller ATen
- Kontroller Showtec
- Kontroller Russound
- Kontroller Fusion
- Kontroller Eurolite
- Kontroller RGBlink
- Kontroller Gefen
- Kontroller Scosche
- Kontroller Xtreme
- Kontroller IHome
- Kontroller Infinity
- Kontroller DBX
- Kontroller Senal
- Kontroller Homematic IP
- Kontroller Krom
- Kontroller Monoprice
- Kontroller Fostex
- Kontroller ASTRO Gaming
- Kontroller Areca
- Kontroller HQ Power
- Kontroller HyperX
- Kontroller Tangent
- Kontroller Broan
- Kontroller OSD Audio
- Kontroller Crestron
- Kontroller Hori
- Kontroller Monster
- Kontroller Music Hall
- Kontroller Manfrotto
- Kontroller Dreamgear
- Kontroller SPL
- Kontroller Monacor
- Kontroller AirTurn
- Kontroller Adaptec
- Kontroller Smart-AVI
- Kontroller StarTech.com
- Kontroller SIIG
- Kontroller Contour Design
- Kontroller Sonifex
- Kontroller Xantech
- Kontroller Kohler
- Kontroller Ganz
- Kontroller Movistar
- Kontroller KanexPro
- Kontroller Konix
- Kontroller Dangerous Music
- Kontroller Reely
- Kontroller Clarity
- Kontroller Auray
- Kontroller Logic3
- Kontroller GOgroove
- Kontroller Morningstar
- Kontroller Cameo
- Kontroller Esperanza
- Kontroller Kanlux
- Kontroller HID Identity
- Kontroller LYYT
- Kontroller Venom
- Kontroller Novation
- Kontroller PDP
- Kontroller Savio
- Kontroller Inovonics
- Kontroller Gioteck
- Kontroller 8BitDo
- Kontroller MOZA
- Kontroller Robitronic
- Kontroller Steca
- Kontroller Icon
- Kontroller Premier Mounts
- Kontroller Aquatic AV
- Kontroller Tru Components
- Kontroller Elite Screens
- Kontroller AViPAS
- Kontroller KONFTEL
- Kontroller Kramer
- Kontroller Apricorn
- Kontroller PowerA
- Kontroller LSI
- Kontroller Phoenix Contact
- Kontroller Media-tech
- Kontroller Softube
- Kontroller SmartAVI
- Kontroller RiotPWR
- Kontroller Highpoint
- Kontroller Leviton
- Kontroller Atlas Sound
- Kontroller EtiamPro
- Kontroller Gossen Metrawatt
- Kontroller IVT
- Kontroller PCE Instruments
- Kontroller SecurityMan
- Kontroller Ltech
- Kontroller Lindy
- Kontroller Canyon
- Kontroller Atlona
- Kontroller Hotone
- Kontroller IPEGA
- Kontroller Dadson
- Kontroller Niles
- Kontroller Rachio
- Kontroller Ledxon
- Kontroller Blizzard Lighting
- Kontroller Trenton Systems
- Kontroller Steelplay
- Kontroller Heath Zenith
- Kontroller Gamesir
- Kontroller Alfatron
- Kontroller Key Digital
- Kontroller COLBOR
- Kontroller Polsen
- Kontroller Lab Gruppen
- Kontroller AMX
- Kontroller BZBGear
- Kontroller Rolls
- Kontroller Heritage Audio
- Kontroller CTA Digital
- Kontroller Re.corder
- Kontroller MuxLab
- Kontroller Snakebyte
- Kontroller Nyko
- Kontroller EXSYS
- Kontroller Amer
- Kontroller Juniper
- Kontroller ALC
- Kontroller Kanex
- Kontroller Audibax
- Kontroller Mitzu
- Kontroller CoolerMaster
- Kontroller Dragonshock
- Kontroller Atlantis Land
- Kontroller Universal Remote Control
- Kontroller LumenRadio
- Kontroller Datapath
- Kontroller Circle
- Kontroller Victrix
- Kontroller Axor
- Kontroller MOGA
- Kontroller HuddleCamHD
- Kontroller Indiana Line
- Kontroller PTZ Optics
- Kontroller Rosco
- Kontroller Balam Rush
- Kontroller JLCooper
- Kontroller Visual Productions
Nyaste Kontroller Manualer

2 April 2025

30 Mars 2025

30 Mars 2025

30 Mars 2025

30 Mars 2025

30 Mars 2025

28 Mars 2025

27 Mars 2025

26 Mars 2025

2 Mars 2025