Bixolon SPP-R200III Bruksanvisning
Bixolon Mobiltelefon SPP-R200III
Läs gratis den bruksanvisning för Bixolon SPP-R200III (53 sidor) i kategorin Mobiltelefon. Guiden har ansetts hjälpsam av 16 personer och har ett genomsnittsbetyg på 5.0 stjärnor baserat på 4 recensioner. Har du en fråga om Bixolon SPP-R200III eller vill du ställa frågor till andra användare av produkten? Ställ en fråga
Sida 1/53
Information
This installation guide contains quick information required for the product installation.
Refer to the User’s Manual in the CD that comes with the product for detailed
installation instructions. The CD contains the following information.
1. Manual: User’s, Windows CE Module Program, Code pages, Commands,
Bluetooth & Wireless
2. Driver: Windows driver
3. Utility: VMSM (Virtual Memory Switch Manager),
NV Image Download Manager, Firmware Download Manager
We at BIXOLON maintain ongoing efforts to enhance and upgrade the functions and
quality of all our products. In following, product specifications and/or user manual
content may be changed without prior notice.
Please refer to the BIXOLON website for the addresses and phone numbers of the
company's headquarters and branch offices. (www.bixolon.com)
Battery Safety Precautions
1. If you observe any abnormal symptom, such as strange smell and overheating, on
first use after purchasing the product, contact your local dealer immediately.
2. Charge the battery only with the exclusive charger specified (optionally provided)
by BIXOLON. The use of an incorrect charger may result in overheating,
combustion and/or explosion of the battery.
3. Do not use or leave the battery in a location exposed to high temperatures or
intense direct sunlight, such as within an automobile. Doing so can cause battery
overheating and/or combustion. In addition, battery performance and product life
may be reduced.
4. Do not allow water, seawater or moisture to enter or leak into the battery. If the
safety mechanism within the battery becomes oxidized, the battery may
overcharge with abnormal electrical current and/or voltage so that it may overheat,
ignite and/or explode.
5. Do not throw the battery or subject it to strong shock. If the safety mechanism in
the battery is damaged, the battery may be overcharged and, consequently, an
adverse chemical reaction may be generated in the battery.
There is a potential risk of battery overheating, combustion, and/or explosion.
6. Do not use the battery if it is damaged or the exterior is deformed due to external
shock or if it is swollen.
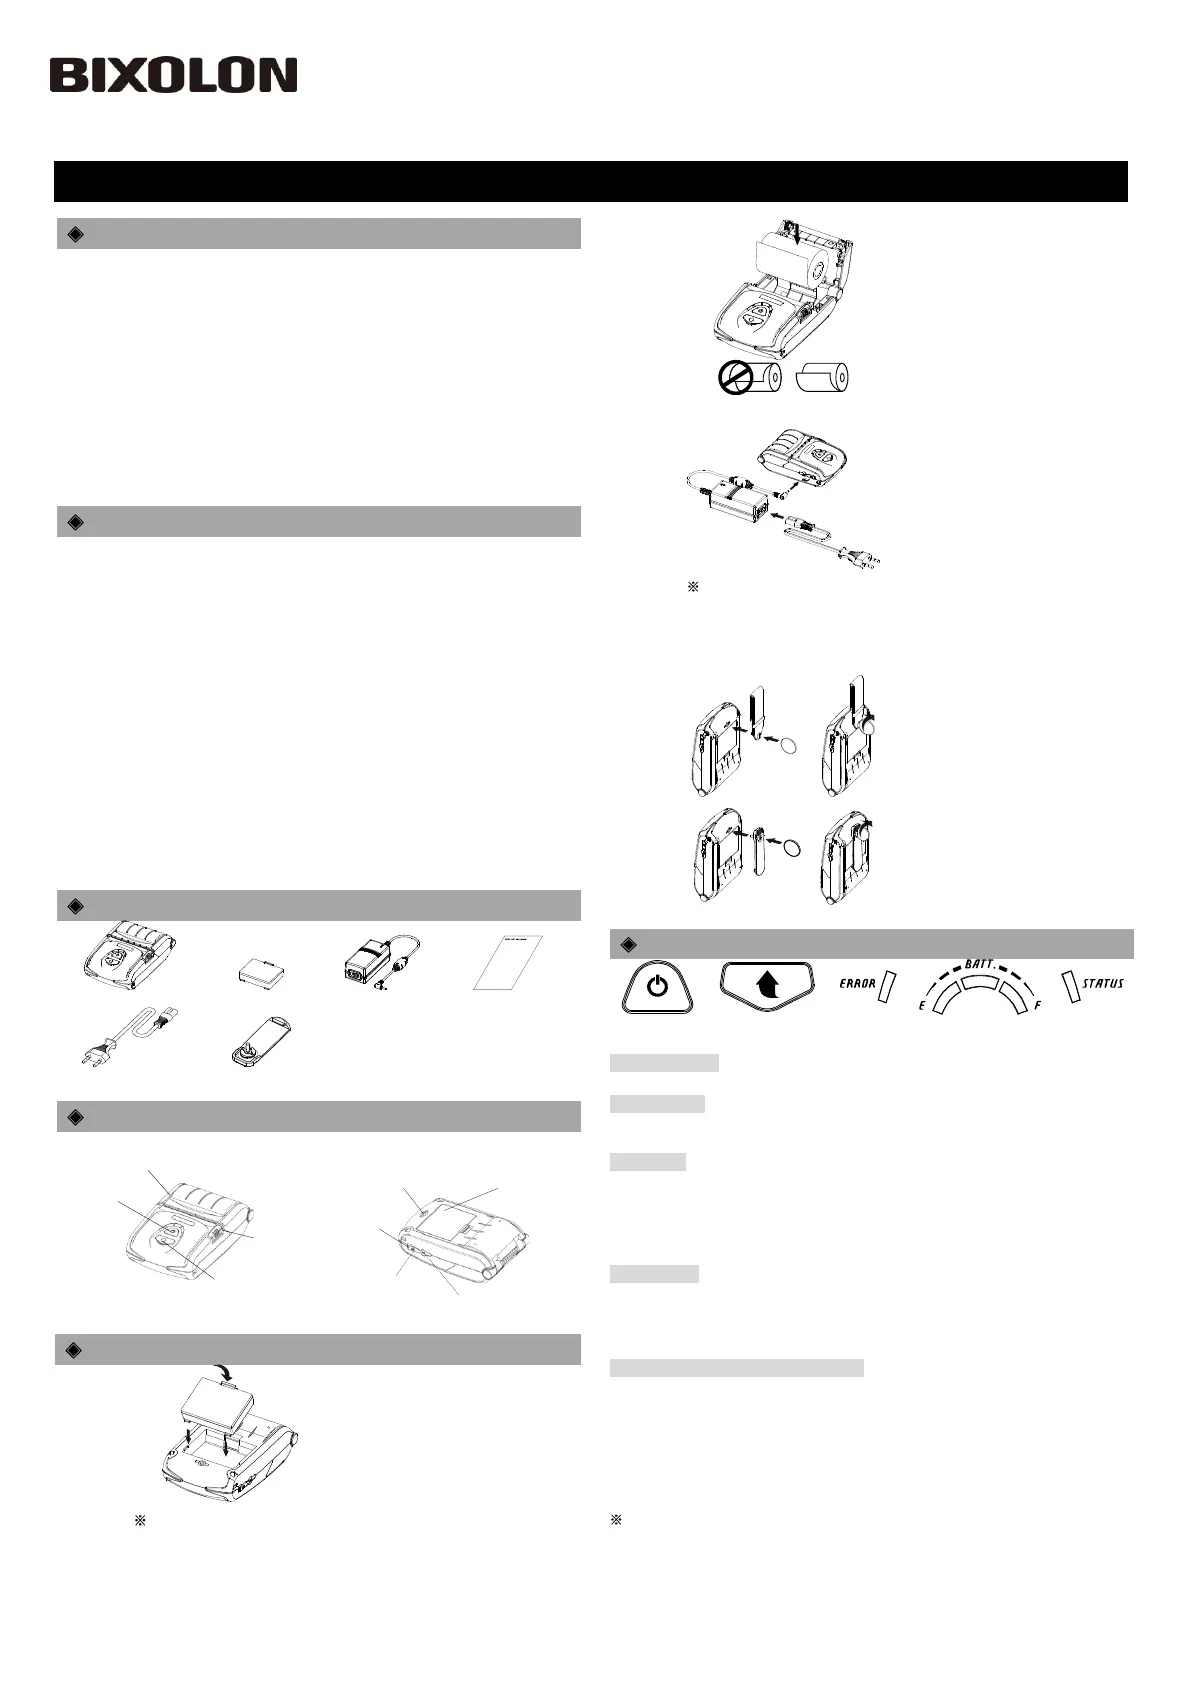
Content Confirmation
SPP-R200III
Battery
Battery Charger
Installation Guide
Power Cord
Belt Clip
Product Part Names
Paper Cover
Power Button
Open button
Paper Feed Button
Cable Connection
Power Connection
Battery
Hole for mounting
belt strap / belt clip
Interface Cap
Installation and Charging
Battery
Installation
1. Insert the battery on the rear side
of the printer, aligning the battery
hook properly.
2. Push the battery into the slot until a
snapping sound is heard.
Note
As the battery is not charged at the time of purchase, charge the
battery prior to product use. (Use the battery charger)
Paper
Installation
1. Press the open button to open the
paper cover.
2. Insert the paper as shown in the
image. (Remove any remaining core
of a fully used paper roll.)
3. Take care to align the paper
correctly.
4. Pull the paper out and close the
paper cover.
5. Tear off any excess paper in the
direction of the side of the printer.
Battery
Charging
1. Turn off the printer power.
2. Connect the power cord to the
battery charger, and the connect AC
power.
3. Open the external interface cap in
the direction of arrow.
4. Connect the battery charger to the
power connector.
Note
The printer may incur serious damage If the battery charger provided
by BIXOLON is not used. BIXOLON is not legally liable for any such
damage. (The voltage and electrical current specifications of the
printer and battery charger must match.)
Belt Strap
Installation
1. Insert the belt strap screw into the
belt strap hole.
2. Use a coin to tighten the belt strap
screw as shown in the image.
Belt Clip
Installation
1. Insert the screw of the belt clip to
the belt clip mounting hole.
2. Fasten the screw of the belt clip
with an object like a coin as shown
in the picture. (be careful to fasten
in the correct direction.)
Control Panel Usage
POWER BUTTON
FEED BUTTON
ERROR LED
BATTERY LED
STATUS LED
• POWER BUTTON
This button is used to turn the printer on and off.
• FEED BUTTON
This button is used to feed paper manually, take the self-test and dump
hexadecimals.
• ERROR LED
If the red led is lit, the paper cover is open.
If the red led is blinking, either the paper has been fully used or the print head is
overheated.
If the red led continues to blink, it may indicate a more serious problem with the
product, and thus an authorized service dealer should be consulted.
• BATTERY LED
If three blue led are lit, the battery is fully charged.
If two blue led are lit, the battery is half charged.
If one blue led is lit, the battery is at the lowest charge level.
If the red led is lit, the battery must be charged or replaced.
• STATUS LED (Bluetooth or Wireless LAN)
1) When using Bluetooth
If the printer is ready for wireless communication with any Bluetooth, the green
led as well as the battery status led is turned on.
2) When using wireless LAN
The right indicator shows the signal strength from wireless LAN.
The green led is solid for acceptable signal strength while the green led blinks for
weak signal strength.
Note
In power save mode, only the Status led is lit.
Printer Installation
KN09-00041A(Ver.1.04)
Mobile Receipt Printer SPP-R200III
Produktspecifikationer
| Varumärke: | Bixolon |
| Kategori: | Mobiltelefon |
| Modell: | SPP-R200III |
| Vikt: | 228 g |
| Bredd: | 79.5 mm |
| Djup: | 43.6 mm |
| Höjd: | 126.7 mm |
| Mobila operativsystem som stöds: | Android, iOS |
| Laddningstid: | 2.5 h |
| RAM-kapacitet: | 0.064 GB |
| Wi-Fi: | Nej |
| Bluetooth-version: | 3.0+HS |
| Maximal upplösning: | 203 x 203 DPI |
| Modell: | Bärbar skrivare |
| Flashminne: | 32 MB |
| Maximal rulldiameter: | 40 mm |
| Skrivhastighet: | 100 mm/sek |
| Inbyggda streckkoder: | 1D, 2D, AZTECCODE, CODABAR (NW-7), Code 39, Code 93, Code-128 Codabar Library, Data Matrix, EAN13, EAN8, GS1 DataBar, ITF, MaxiCode, Micro QR Code, PDF417, QR Code, UPC-A, UPC-E |
| Batteriteknik: | Litium-Ion (Li-Ion) |
| Produktens färg: | Svart |
| Windows-operativsystem som stöds: | Ja |
| Mac-operativsystem som stöds: | Ja |
| Temperatur vid drift: | -15 - 50 ° C |
| Temperaturintervall (förvaring): | 30 - 70 ° C |
| Intervall för relativ operativ luftfuktighet: | 10 - 80 % |
| Seriella portar: | 1 |
| Internationellt skydd (IP) kod: | IP43 |
| Anslutningsteknologi: | Kabel |
| Nätverksansluten (Ethernet): | Nej |
| Batterispänning: | 7.4 V |
| Antal USB 2.0 anslutningar: | 1 |
| USB-port: | Ja |
| Bluetooth: | Ja |
| Linux operativsystem som stöds: | Ja |
| Mac-kompatibel: | Ja |
| Uppladdningsbara: | Ja |
| Utskriftsteknologi: | direkt termal |
| Media-tjocklek: | 0.07 ± 0.005 mm |
| Max utskriftsupplösning, bredd: | 48 mm |
Behöver du hjälp?
Om du behöver hjälp med Bixolon SPP-R200III ställ en fråga nedan och andra användare kommer att svara dig
Mobiltelefon Bixolon Manualer

10 September 2025
15 Juni 2025
8 September 2024
18 Augusti 2024
15 Augusti 2024
10 Augusti 2024
3 Augusti 2024
3 Augusti 2024
1 Augusti 2024
1 Augusti 2024
Mobiltelefon Manualer
Nyaste Mobiltelefon Manualer
14 Mars 2026
15 Februari 2026
10 Februari 2026
9 Februari 2026
6 Februari 2026
6 Februari 2026
5 Februari 2026
27 Januari 2026
6 Oktober 2025
1 Oktober 2025