British Telecom Studio 3500 Bruksanvisning
British Telecom Telefon Studio 3500
Läs gratis den bruksanvisning för British Telecom Studio 3500 (2 sidor) i kategorin Telefon. Guiden har ansetts hjälpsam av 30 personer och har ett genomsnittsbetyg på 4.2 stjärnor baserat på 2 recensioner. Har du en fråga om British Telecom Studio 3500 eller vill du ställa frågor till andra användare av produkten? Ställ en fråga
Sida 1/2
2 Navigating the menus
Your BT Studio 3500 has an easy menu system through which you can access many of
your phone’s features and settings.
1. Press
to open the main menu.
2. Use the and buttons to scroll to the menu or option you want and press
to confirm, or press
to go back to the previous menu.
Exit a menu
To exit a menu or cancel an operation at any time you can press
and hold to return to
the standby screen.
Menu map
Press
to open the phonebook.
Press
to open the redial list.
Press to open the calls list.
3 Making and receiving calls
Make/end a call
1. Press , listen for the dialling tone, then dial the number. To end the call, press
again, or replace the handset on the base or charger.
Preparatory dialling
1. Enter the number first. If you make a mistake, press
to delete the last digit.
2. Press to dial.
Earpiece volume
During a call, you can use the and buttons to adjust the volume of the caller’s voice
in the earpiece.
Secrecy
You can mute the handset microphone and talk without your caller hearing you.
1. During a call, press
.
MUTE
is displayed and you can talk without your caller hearing you.
Press
again to switch secrecy off and resume your call.
Receiving calls
1. When the phone rings, press to answer the call. Or if the handset is on the base or
charger, simply lift the handset to answer the call.
Redial
Your BT Studio 3500 stores the last 10 numbers you have dialled. You can then select any of
the numbers to redial, delete or copy to the phonebook.
1. Press
, the most recently dialled number is displayed. Press and to scroll
through the list and press
to redial the number displayed.
4 Special features
Your BT Studio 3500 has some special features including a 50 number phonebook,
an answering machine and a calls list.
Phonebook
You can store up to 50 names and numbers in the phonebook to make dialling quick and easy.
You can also assign different ringtones to particular numbers, eg. family or work numbers.
Add a new phonebook entry
1. Press
, scroll to
PHONE BOOK
and press .
2. The display shows
ADD ENTRY
. Press .
3. The display shows
NAME ?
. Using the letters on the keypad, enter the name then press .
You may need to press the same button a few times until the letter you want is displayed.
For example, press
2 once for
A
,or twice for
B
. If you make a mistake, press .
4. The display shows
NUMBER ?
. Use the keypad to enter the full phone number and press .
5. The display shows
MELODY 1
, press or to select the ringtone you want and press
to confirm.
ADD ENTRY
is displayed. Continue adding entries or press twice to
return to standby.
Dial a phonebook entry
1. Press
. Entries are displayed alphabetically.
2. Press or to scroll through the phonebook, or search alphabetically by entering
the first letter of the name using the keypad. Press
to dial the selected number.
1Getting started
Place your BT Studio 3500 close enough to a mains power and telephone socket so that the
cables will reach (within 2 metres).
The handset range is up to 300 metres outdoors and 50 metres indoors (in ideal conditions).
The
icon in the handset display indicates when you are in range, it flashes when you go out
of range and you will hear a beep. You will need to move closer to the base. Try to position the
phone at least 1 metre away from other electrical appliances to avoid interference and help
maximise the handset range.
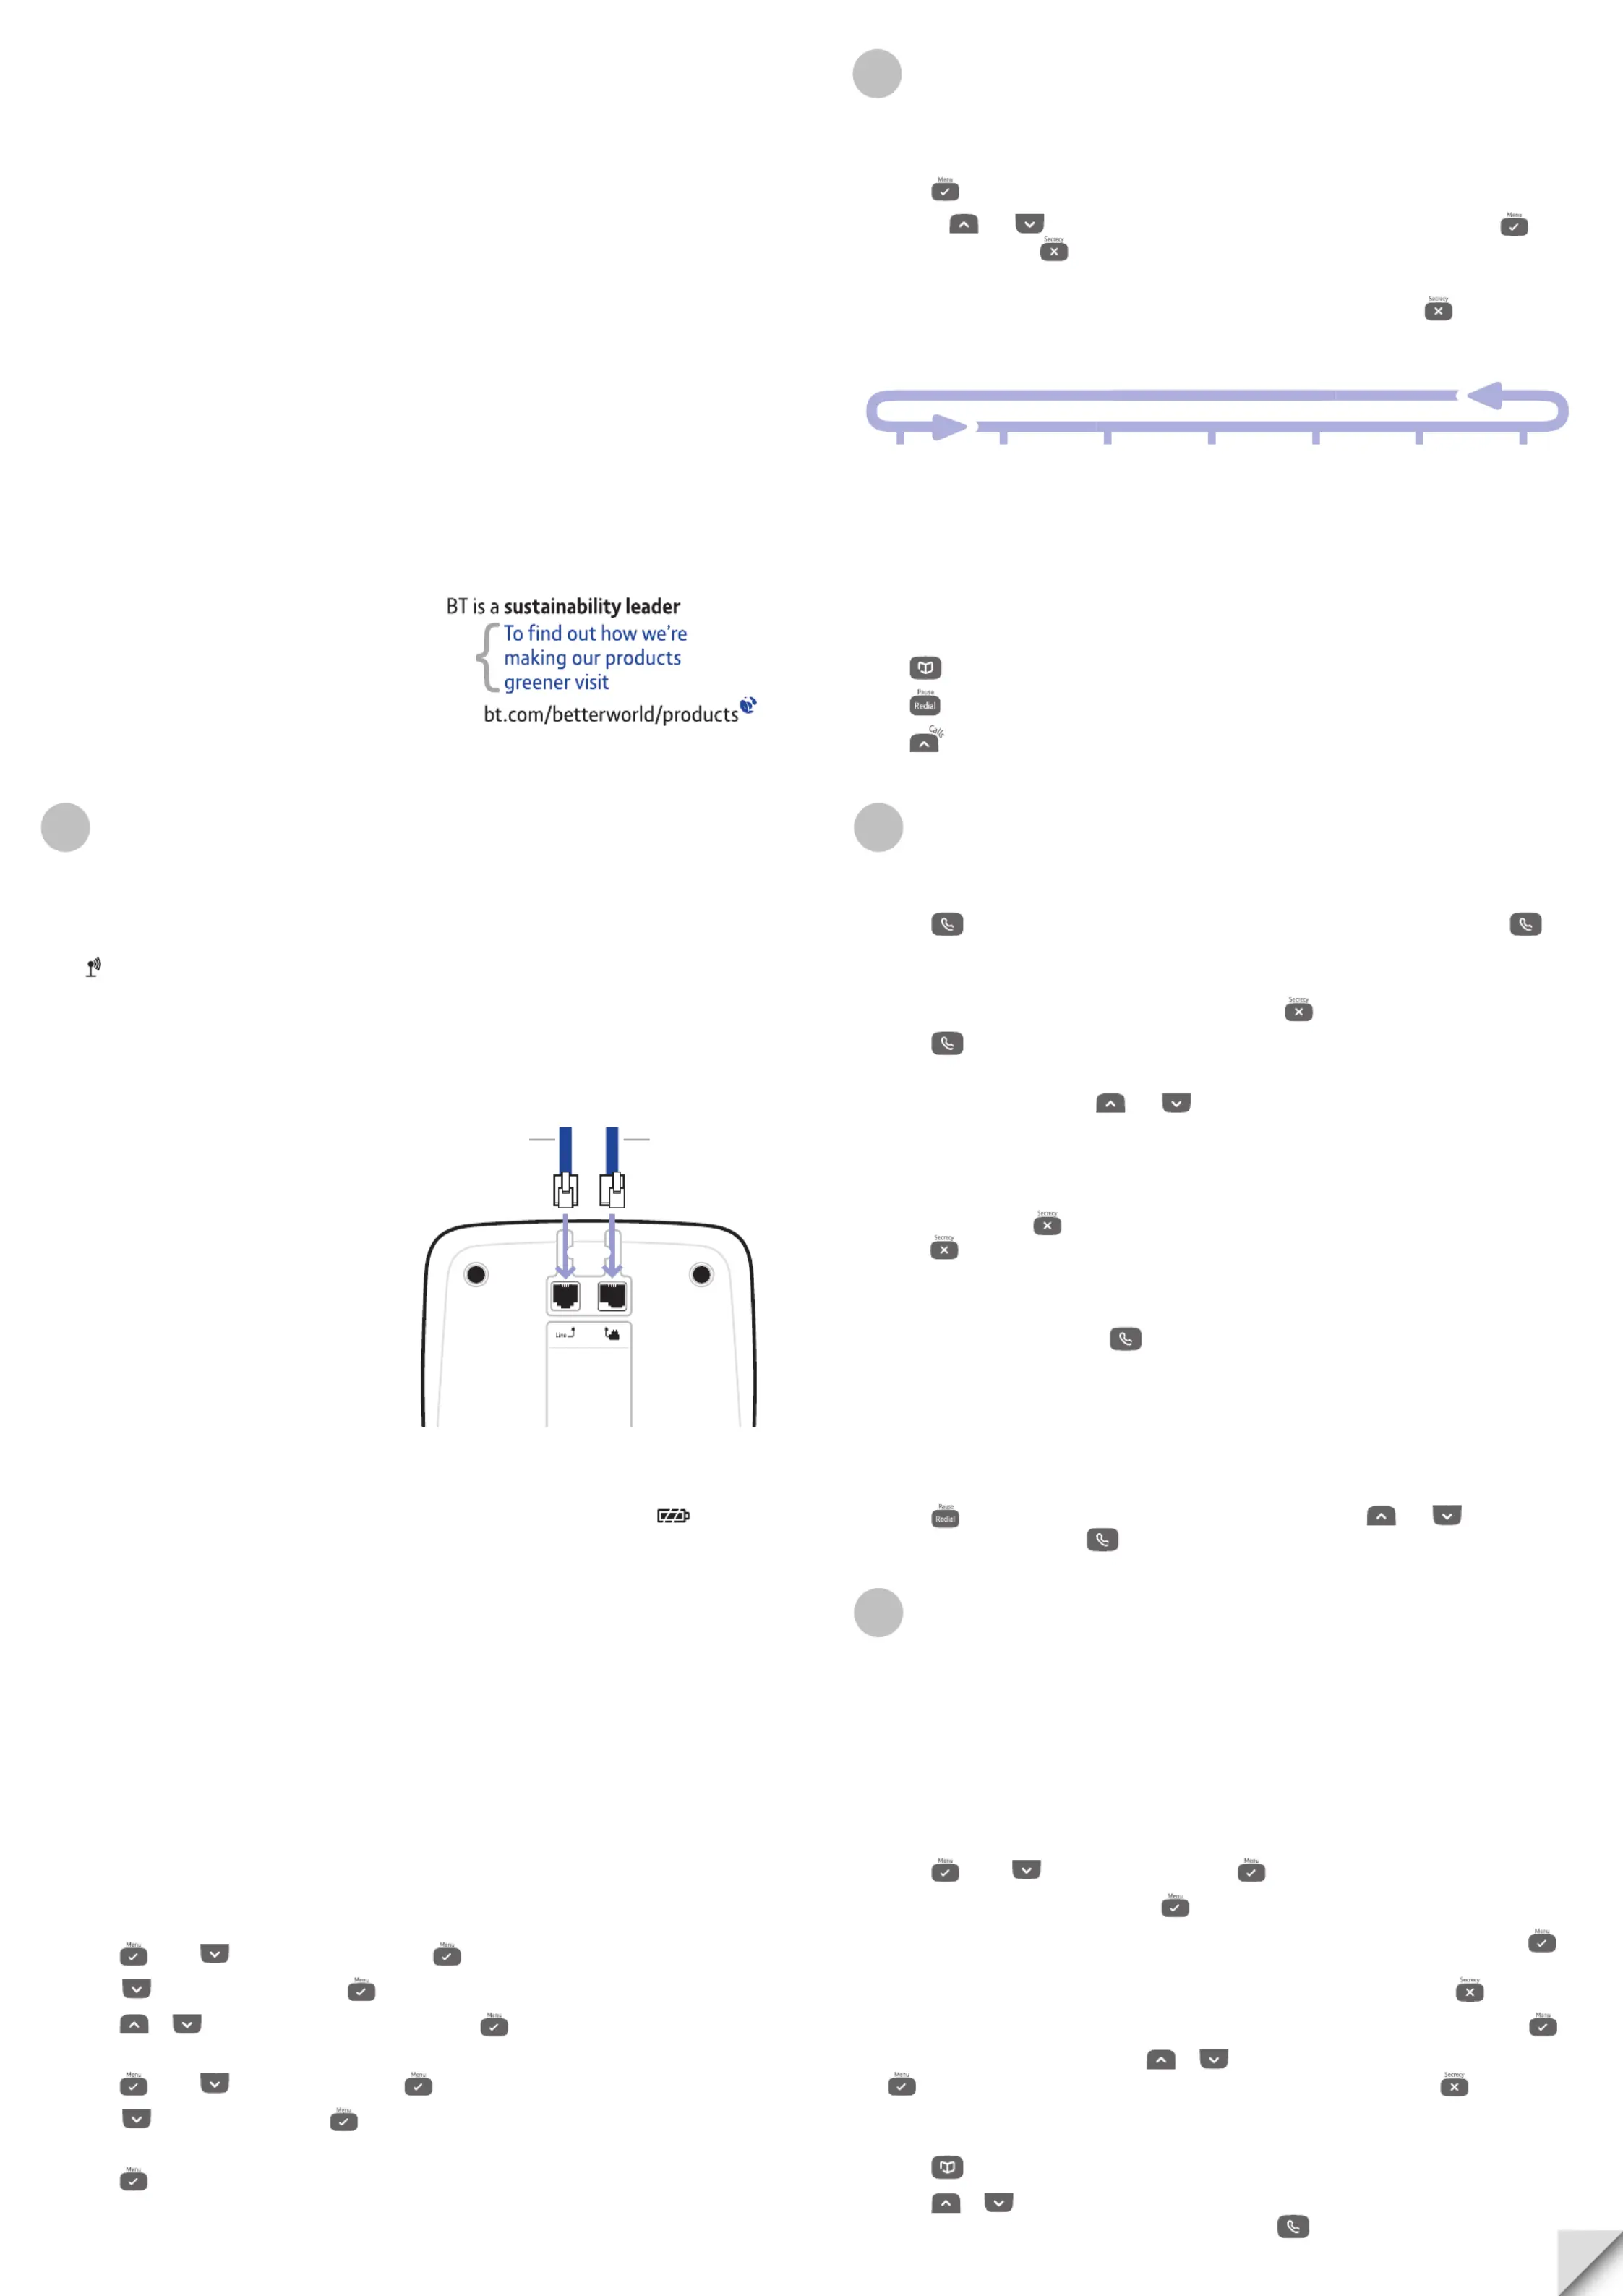
Setting up
1. Plug the power adaptor and telephone cable
into the underside of the base.
Only use the
cables provided with the product.
2. Plug the the other end of the power
adaptor into the wall socket and switch
the power on. The green Power indicator
on the base will light up.
3. Insert the 2 x AAA rechargeable batteries
supplied into the handset, taking note of
the
+
and
-
markings inside the battery
compartment, then slide the battery
compartment shut.
4. Place the handset on the base to charge. Charge the handset for at least 24 hours
before first use
.
5. Once the handset is fully charged, the display will show the full battery icon .
You can now plug the telephone line cord into the telephone wall socket.
Set up your additional handsets (2, 3 and 4-Pack owners only)
1. For each additional handset, plug the power adaptor into the back of the charger and
plug the other end into the mains wall socket and switch the power on.
2. Insert the batteries into the handset, as detailed in point 3 above, and place the handset
on the charger. Charge the handset for at least 24 hours before first use
.
Additional handsets supplied as part of a multipack are pre-registered to the base so, once
charged, are ready for use. Each handset will display its handset number: 1, 2, 3 etc.
Set the day and time using the handset
The date and time is recorded with each answering machine message you receive, so before
you receive your first message you need to set the correct date and time.
Set the day
1. Press
, scroll to
TAM SETTINGS
and press .
2. Scroll to
DAY SETTING
and press . The current day is displayed.
3. Press or to select the required day and press to confirm.
Set the time
1. Press
, scroll to
DATE-TIME
and press .
2. Scroll
to
CLOCK SET
and press . The current time is displayed.
3. Use the keypad to enter the correct time in 24 hour format, eg. for 6.30pm.1830
Press
to confirm.
Your BT Studio 3500 is now ready for use.
Welcome
This Quick Start Guide provides all the information
you need to get your product up and running.
Please fully unfold this guide and follow the numbered
steps below. If you need more detailed instructions,
a full user guide is available to download in PDF format
from www.bt.com/help/userguides
We haven’t printed a full user guide as we’re working to make our
products greener, so please consider the environment before printing.
If you cannot find the answer to your problem in the full online
user guide, then please call the on Helpline0870 605 8047
*
or
email [email protected]
* Calls provided by BT will be charged at up to 8 pence per minute. A Call
Set-Up Fee of up to 6 pence per call applies to calls from Residential
lines. Prices correct at time of going to press. See www.bt.com/pricing
for details. Mobile and other providers’ costs may vary.
Telephone
line cord
Mains power
adaptor
PLAY MESSAGE
NEW MSG
ALL MSG
PHONEBOOK
ADD ENTRY
MODIFY ENTRY
DELETE ENTRY
TAM SETTINGS
ANS ON/OFF
ANS MODE
MEMO REC
OGM SETTING
DAY SETTING
ANS DELAY
REMOTE CODE
SETUP
BASE VOLUME
BASE MELODY
DEL HANDSET
PIN CODE
DIAL MODE
DEFAULT
HANDSET
BEEP
INT RING VOL
EXT RING VOL
INT MELODY
EXT MELODY
AUTO ANSWER
NAME
LANGUAGE
KEY LOCK?
DATE – TIME
DATE SET
CLOCK SET
ALARM SET
REGISTER
SELECT BASE
REG BASE
Produktspecifikationer
| Varumärke: | British Telecom |
| Kategori: | Telefon |
| Modell: | Studio 3500 |
Behöver du hjälp?
Om du behöver hjälp med British Telecom Studio 3500 ställ en fråga nedan och andra användare kommer att svara dig
Telefon British Telecom Manualer

19 Februari 2025
19 Februari 2025
19 Februari 2025
19 Februari 2025
19 Februari 2025
19 Februari 2025
19 Februari 2025
19 Februari 2025
19 Februari 2025
19 Februari 2025
Telefon Manualer
Nyaste Telefon Manualer
2 April 2026
2 April 2026
27 Mars 2026
26 Mars 2026
16 Mars 2026
14 Mars 2026
13 Mars 2026
4 Mars 2026
30 Januari 2026
25 Januari 2026