Canary Secure Mount Bruksanvisning
Canary
ej kategoriserat
Secure Mount
Läs gratis den bruksanvisning för Canary Secure Mount (2 sidor) i kategorin ej kategoriserat. Guiden har ansetts hjälpsam av 15 personer och har ett genomsnittsbetyg på 4.7 stjärnor baserat på 8 recensioner. Har du en fråga om Canary Secure Mount eller vill du ställa frågor till andra användare av produkten? Ställ en fråga
Sida 1/2

Installation instructions
IMPORTANT: Before installing your Secure
Mount, complete setup of your Canary Flex™
device with the Canary® app, available from
canary.is/app on your iOS or Android device.
Step 1: Pick a place with a strong Wi-Fi
signal.
If you can stream live video from your
Canary Flex device from here without
interruption , you’re ready to install your
Secure Mount.
Step 2: Find the best view.
Temporarily hold your device in the desired
position and use the Watch Live feature in
the Canary app to confirm you have the
best view.
Position your device to eliminate as much
background activity as possible, such as
passing cars.
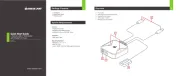
Step 3: Unscrew the baseplate from the
Secure Mount.
Using the provided hex tool, unscrew the
hex screw on the bottom of the base and
remove the baseplate.
Step 4: Install the baseplate.
Hold the baseplate against the installation
surface and use a pencil to make two marks
through the two holes in the back of the
baseplate.
On the pencil marks, drill two pilot holes into
the installation surface.
Note: If wall anchors are required for your
installation (drywall, brick, concrete), use
a 13/64” drill bit to drill pilot holes in the
installation surface.
If wall anchors are not required for your
installation (wood), use a 1/8” drill bit to drill
pilot holes in the installation surface.
Align the baseplate holes with the pilot
holes in the installation surface and install
the provided wall anchors (optional) and
Phillips screws.
Secure Mount
For Canary Flex™
Installation Guide
In the box
1 Secure Mount
1 baseplate
2 Phillips screws
2 wall anchors
1 hex screw
1 hex tool
What you’ll need
Drill
Phillips screwdriver
Produktspecifikationer
| Varumärke: | Canary |
| Kategori: | ej kategoriserat |
| Modell: | Secure Mount |
Behöver du hjälp?
Om du behöver hjälp med Canary Secure Mount ställ en fråga nedan och andra användare kommer att svara dig
ej kategoriserat Canary Manualer

4 Augusti 2025
ej kategoriserat Manualer
- TV One
- Soundstream
- Ergotron
- LERAN
- Oricom
- Jahnke
- Envertec
- Thor
- Maytronics
- Furman
- TSL
- Xtorm
- Hurtle
- Steelseries
- Arozzi
Nyaste ej kategoriserat Manualer
23 Oktober 2025
23 Oktober 2025
23 Oktober 2025
23 Oktober 2025
23 Oktober 2025

23 Oktober 2025

23 Oktober 2025
23 Oktober 2025

23 Oktober 2025
23 Oktober 2025