Canon Pixma MX922 Bruksanvisning
Läs gratis den bruksanvisning för Canon Pixma MX922 (4 sidor) i kategorin Skrivare. Guiden har ansetts hjälpsam av 26 personer och har ett genomsnittsbetyg på 4.7 stjärnor baserat på 4 recensioner. Har du en fråga om Canon Pixma MX922 eller vill du ställa frågor till andra användare av produkten? Ställ en fråga
Sida 1/4
1
XXXXXXXX© CANON INC. 2013
5
1
3
4
2
6
1
2
3
1
2
series
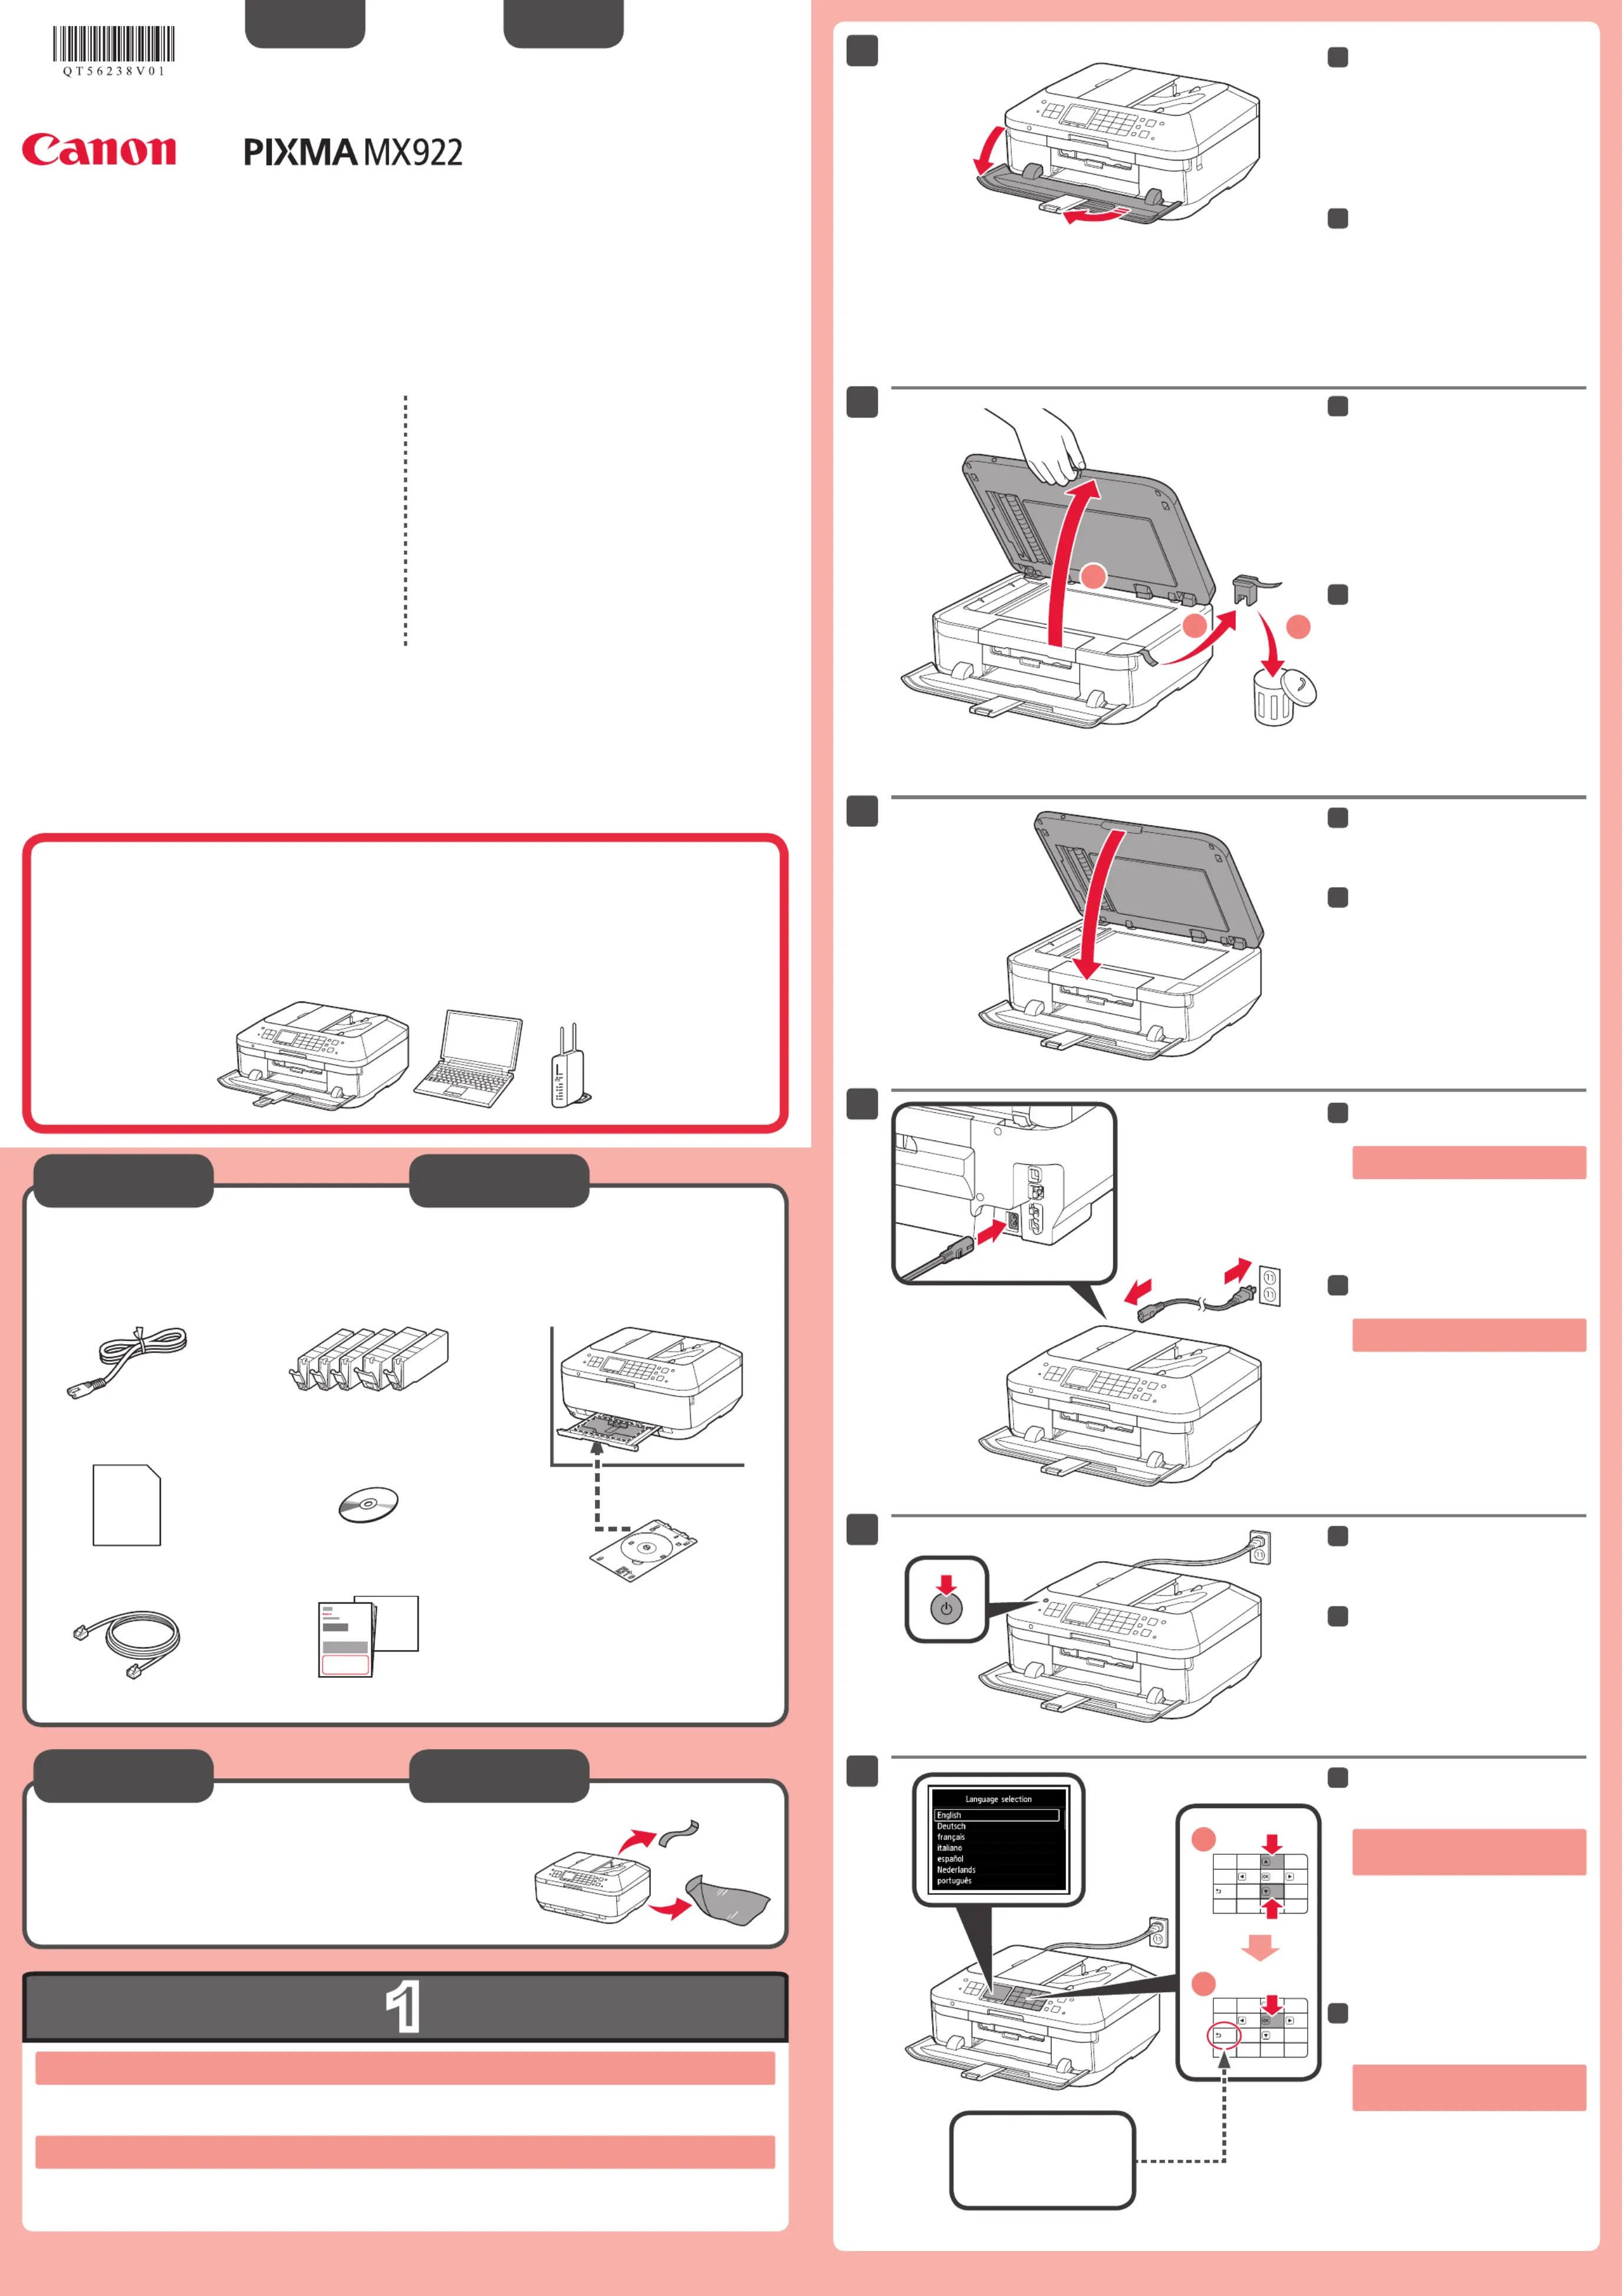
Retire las hojas protectoras y la cinta.
Compruebe que se le han suministrado los siguientes elementos.
La bandeja de salida del papel se abre automáticamente al comenzar la impresión. Mantenga la parte frontal del equipo libre de
obstáculos.
No conecte aún el cable USB o
Ethernet.
Conecte el cable de alimentación.
4
Pulse el botón ACTIVADO (ON).
5
Seleccione su idioma y, a
continuación, pulse el botón .OK
6
Para cambiar el ajuste de idioma, pulse
el botón .Atrás (Back)
Abra la bandeja de salida del
papel.
La extensión de la bandeja de salida se
abre automáticamente.
1
Cierre la cubierta de documentos.
3
Preparativos
Elementos
suministrados
Abra la cubierta de documentos.
Retire la cinta naranja y el material
de protección.
2
Botón Atrás (Back)
ESPAÑOL
¡Léame en primer lugar!
Consérvelo a mano para utilizarlo
como referencia en el futuro.
Para llevar a cabo la instalación, coloque el equipo cerca del punto de acceso* y del
ordenador.
(* necesario para LAN inalámbrica)
Guía de inicio
Canon Inkjet Equipo multifunción para ocina
Ayuda de Canon
Asistencia técnica por correo electrónico:
www.usa.canon.com/support
Asistencia técnica gratuita: 1-800-OK-CANON
Esta opción proporciona asistencia telefónica técnica personal, sin
cargo por servicio, de lunes a viernes (excepto festivos), durante
el periodo de garantía.
Se dispone de un dispositivo telefónico auxiliar para sordos (TDD)
en 1-866-251-3752.
Remove the protective sheets and tape.
Check the included items.
The Paper Output Tray opens automatically as printing starts. Keep the front of the machine clear of any obstacles.
Do not connect the USB or Ethernet
cable yet.
Connect the power cord.
4
Press the button.ON
5
Select your language, then press
the button.OK
6
To change the language setting, press
the button.Back
Open the Paper Output Tray.
The Output Tray Extension opens
automatically.
1
Close the Document Cover.
3
Preparation
Included Items
Open the Document Cover.
Remove the orange tape and
protective material.
2
Back button
ENGLISH
Getting Started
Read me rst!
Keep me handy for future reference.
To perform setup, place the machine near the access point* and computer.
(* Required for wireless LAN)
Canon Inkjet Ofce All-In-One
Getting Help from Canon
Email Tech Support — www.usa.canon.com/support
Toll-Free Tech Support— 1-800-OK-CANON
This option provides live telephone technical support, free of
service charges, Monday-Friday (excluding holidays), during the
warranty period.
Telephone Device for the Deaf (TDD) support is available at
1-866-251-3752.
QT5-6238-V01
PRINTED IN XXXXXXXX
Produktspecifikationer
| Varumärke: | Canon |
| Kategori: | Skrivare |
| Modell: | Pixma MX922 |
| Inbyggd display: | Ja |
| Vikt: | 11657 g |
| Bredd: | 493 mm |
| Djup: | 396 mm |
| Höjd: | 231 mm |
| Skärm diagonal: | 3 " |
| Wi-Fi: | Ja |
| Wi-Fi-standarder: | 802.11b, 802.11g, Wi-Fi 4 (802.11n) |
| Maximal upplösning: | 9600 x 2400 DPI |
| Internminne: | - MB |
| Standardgränssnitt: | Ethernet, USB 2.0, Wireless LAN |
| Maximal kopieringsupplösning: | - DPI |
| Modemhastighet: | 33.6 Kbit/s |
| Faxminne: | 250 sidor |
| Fax: | Färgfaxning |
| Mobil utskriftsteknik: | Apple AirPrint, Google Cloud Print |
| Valfri anslutning: | Bluetooth |
| PictBridge: | Ja |
| Maximalt antal kopior: | 99 kopior |
| Dubbelsidig kopiering: | Ja |
| Automatisk dokumentmatare (ADF): | Ja |
| Produktens färg: | Svart |
| Mac-operativsystem som stöds: | Mac OS X 10.5 Leopard, Mac OS X 10.6 Snow Leopard, Mac OS X 10.7 Lion, Mac OS X 10.8 Mountain Lion |
| Utskrift: | Färgutskrift |
| Dubbelsidig utskrift: | Ja |
| Kopiering: | Färgkopiering |
| Hållbarhetscertifiering: | ENERGY STAR |
| Nätverksansluten (Ethernet): | Ja |
| Skanningstyp: | Flatbädds- och ADF-scanner |
| Displaytyp: | LCD |
| Antal USB 2.0 anslutningar: | 1 |
| USB-port: | Ja |
| Positionering på marknaden: | Hem och kontor |
| Direktutskrift: | Ja |
| Utskriftsteknologi: | Bläckstråleskrivare |
| Utskriftshastighet (Svart, normalkvalitet, A4/US Brev): | - ppm |
| Driftcykel per månad: | - sidor per månad |
| Total inmatningskapacitet: | - ark |
| Pappersinmatningstyp: | Kassett |
| Total utmatningskapacitet: | - ark |
| Pappersfackets typ av media: | Glossy paper, High resolution paper, Matte paper, Photo paper, Plain paper, Semi-glossy paper |
| Icke-ISO utskriftsmaterial av olika storlek: | Legal |
| Maximal skannerupplösning: | 19200 x 19200 DPI |
| Ingång, färgdjup: | 48 bit |
| Optisk skanningsupplösning: | 2400 x 4800 DPI |
| Skanning: | Färgscanning |
| Kopieringshastighet (färg, normalkvalitet, A4): | 8.4 kopior per minut |
| Storleksändring kopieringsmaskin: | 25 - 400 % |
| Storlek på kantfri utskriftsmedia: | 4x6 |
| Kuvertstorlek: | 10 |
| Strömförbrukning (genomsnittligt operativt): | - W |
| DVD/CD utskrift: | Ja |
| Utgång, färgdjup: | 24 bit |
| Skanningsteknik: | CIS |
| Maximalt skanningsområde: | A4 (210 x 297) mm |
| Skanning till: | USB |
| Dubbelsidig skanning: | Ja |
| Kapacitet för automatisk dokumentmatare: | 35 ark |
| Färg på utskriftsupplösning: | 9600 x 2400 DPI |
| Utskriftshastighet (ISO / IEC 24734), mono: | 15 IPM |
| Utskriftshastighet (ISO / IEC 24734), färg: | 10 IPM |
| Fax sändningshastighet: | 3 sek/sida |
| Foto-pappersstorlekar (imperial): | 4x6, 5x7, 8x10 " |
| Automatisk dokumentmatare (ADF), utmatningskapacitet: | 35 ark |
| Fax sändning: | 100 platser |
| Utskriftsupplösning, svart: | 600 x 600 DPI |
Behöver du hjälp?
Om du behöver hjälp med Canon Pixma MX922 ställ en fråga nedan och andra användare kommer att svara dig
Skrivare Canon Manualer

3 Februari 2026
3 Februari 2026
2 Februari 2026
29 Januari 2026
9 Oktober 2025
8 Oktober 2025
8 Oktober 2025
6 Oktober 2025
20 September 2025
10 September 2025
Skrivare Manualer
Nyaste Skrivare Manualer
2 April 2026
22 Mars 2026
17 Mars 2026
17 Mars 2026
17 Mars 2026
17 Mars 2026
15 Mars 2026
14 Mars 2026
14 Mars 2026
14 Mars 2026