Compustar KP2 Bruksanvisning
Läs gratis den bruksanvisning för Compustar KP2 (2 sidor) i kategorin Fjärrkontroll. Guiden har ansetts hjälpsam av 28 personer och har ett genomsnittsbetyg på 4.5 stjärnor baserat på 14.5 recensioner. Har du en fråga om Compustar KP2 eller vill du ställa frågor till andra användare av produkten? Ställ en fråga
Sida 1/2
engine back OFF, close the driver’s side door, and re-attempt steps
#1 through #5.
Via DroneMobile App
If your KP-2 touchpad module is installed with a Drone KL1 KeyLocker
system, you can now manage your passcode(s) from the DroneMobile
App. Please visit https://help.dronemobile.com and search “KP2”.
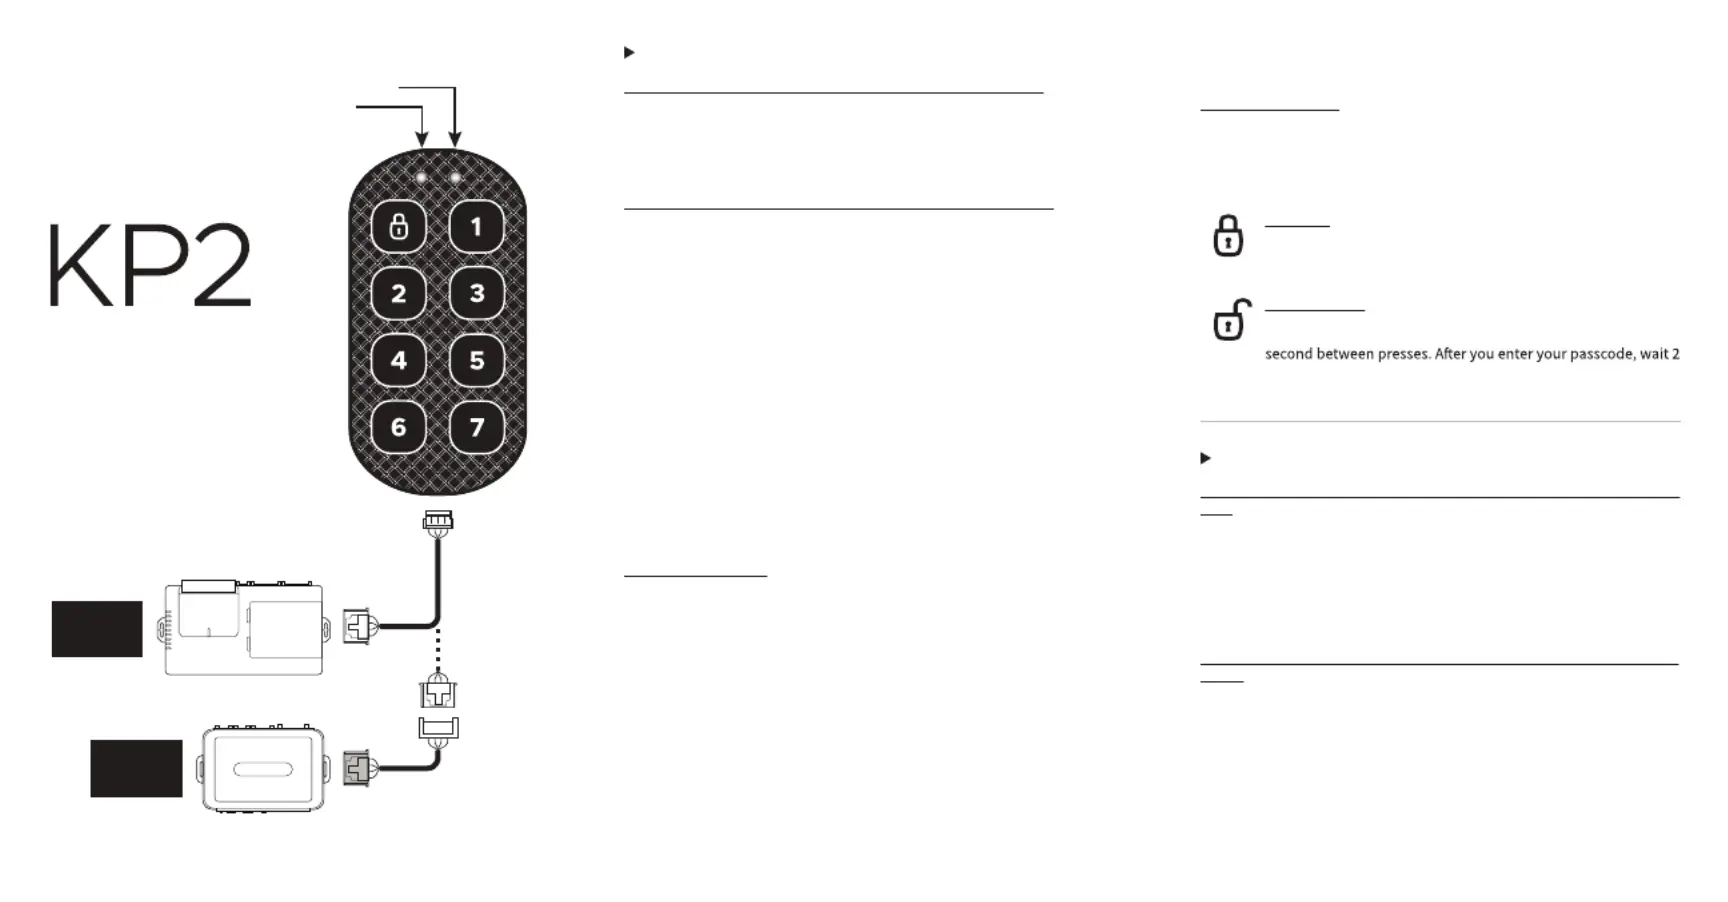
KP-2 User Guide (Arming + Disarming)
Arm/Lock - To arm and lock your vehicle’s doors, hold down
the LOCK button for 2.5 seconds - do not press any number.
One chirp/honk and One parking light flash will confirming
lock/arm.
Disarm/Unlock - To disarm and unlock your vehicle’s doors,
hold down the LOCK button for 2.5 seconds, then enter your
passcode. NOTE: please press each digit firmly and pause for 1
seconds for two chirps/honks and two parking light flashes,
confirming unlock.
Compatibility (ENGLISH)
CM-X, CM7 Series, and CM-DC3 (Make sure firmware is updated)
Connect to the controller RPS port (white 4-pin).
ȗ-X: ature Option 3-16 to Setting 2 (KP2), 4-15 for sensitivity. Fe
ȗǚǽFeature Option 3-16 to Setting 2 (KP2), 4-15 for sensitivity.
ȗǚǖǓǓǽFeature Option 3-16 to Setting 2 (KP2).
ȗȐǖǽ$($ted Operation
ȐǜǓǓǼȐǜǓǓǼ)ǕǗǓǓșke sure firmware is updated)
Connect to the controller UART port (gray 4-pin), using ‘ANT-Adapt-
er-KP2’ (included in kit).
ȗǜǓǓ/AS: ature Option 4-11 to Setting 3 (KP2), 4-15 for Fe
sensitivity.
ȗǕǗǓǓǽ +/$*)ǖȐǓǔ //$)"ǕșǕȚǼǖȐǓǖFeatur to Se for
sensitivity.
Mounting & Installation
1) The KP2 touchpad module should be mounted on the front
windshield on the interior, driver’s side. Thoroughly clean and dry the
intended surface.
2) Connect the 4-pin harness prior to mounting.
3) Remove the protective film on the KP2 touchpad module, exposing
the adhesive.
4) Firmly adhere the KP2 touchpad module to the interior of the
windshield at your desired placement. Hold the module in place for
ǖǓ. conds.
KP2 Programming and Passcode Reset
Via Touchpad Module
1) Using your vehicle’s key, turn the ignition to the ON position. You do
not need to start the engine. Then, open the driver’s side door and
leave it open.
2) Press and hold the LOCK button the KP2 touchpad module for 2.5
seconds.
3) If your system has a siren, it will lightly chirp and the red LED will
blink, indicating programming mode.
4) Firmly tap in the first digit of your new passcode. The LED will blink
green when input is received, and then red (with siren chirp) when it
is safe to enter the next digit. Repeat this process until you have
entered all 4/6 digits.
5) Once you have entered all of the digits, please wait until you hear
another siren chirp and see a single parking light flash. This indicates
that programming was complete and successful.
a) If programming is incomplete and/or fails, you will receive three
siren chirps and three parking light flashes. If this occurs, turn your
Compatibilité (FRANÇAIS)
CM-X, CM7 Series, et CM-DC3 (assurez ous que le micrologiciel est mis à -v
jour)
Connecter au port RPS du contrôleur (blanc à quatre broches).
ȗ-X : Option de fonction 3-16 au glage 2 (KP2), 4-15 pour la ré
sensibilité.
ȗǚǽ+/$*) fonction 3-16 au glage 2 (KP2), 4-15 pour la ré
sensibilité.
ȗǚǖǓǓǽ+/$*) fonction 3-16 au glage 2 (KP2).ré
ȗȐǖǽFonctionnement limité
ȐǜǓǓǼȐǜǓǓǼ /ǕǗǓǓș..0e rez-vous que le micrologiciel est mis
à jour)
Connectez ous au port UART du contrôleur (gris à quatre broches), en -v
utilisant 'ANT-Adapter-KP2' (inclus dans le trousse).
ȗǜǓǓ/AS : Option de fonction 4-11 au glage 3 (KP2), 4-15 ré
pour la sensibilité.
ȗǕǗǓǓǽ+/$*) *)/$*)ǖȐǓǔ0 ǕșǕȚǼǖȐǓǖ+*0-'f réglag
sensibilité.
Montage et installation
1) Le module du pavé tactile KP-2 doit être monté sur le pare-brise
Programming &
Operation Manual
CM-900
CM-900AS
CM2400
CM-X
CM7 Series
CM-DC3
White
Gray
(ANT-Adapter-KP2)
Red LED
Green LED
Produktspecifikationer
| Varumärke: | Compustar |
| Kategori: | Fjärrkontroll |
| Modell: | KP2 |
Behöver du hjälp?
Om du behöver hjälp med Compustar KP2 ställ en fråga nedan och andra användare kommer att svara dig
Fjärrkontroll Compustar Manualer

24 September 2024
Fjärrkontroll Manualer
- TCM
- JVC
- Elite Screens
- Logilink
- Ranex
- Gefen
- NAD
- Edision
- Vizio
- Universal Electronics
- Kenwood
- Technisat
- Entone
- Conceptronic
- Metronic
Nyaste Fjärrkontroll Manualer

9 April 2025

4 April 2025

3 April 2025

3 April 2025

2 April 2025

2 April 2025

1 April 2025

31 Mars 2025

31 Mars 2025

30 Mars 2025