Crestron HR-310-I Bruksanvisning
Crestron Fjärrkontroll HR-310-I
Läs gratis den bruksanvisning för Crestron HR-310-I (2 sidor) i kategorin Fjärrkontroll. Guiden har ansetts hjälpsam av 37 personer och har ett genomsnittsbetyg på 5.0 stjärnor baserat på 6 recensioner. Har du en fråga om Crestron HR-310-I eller vill du ställa frågor till andra användare av produkten? Ställ en fråga
Sida 1/2
DOGUIDE
HR-310/HR-310-I
Handheld Remote
DO Acquire the Remote
The remote must be acquired by an inNET EX
®
wireless gateway or by a control system with a
built-in inNET EX gateway before it may be used with a Crestron control system. Supported devices
with inNET EX gateways include the CEN-GWEXER, CEN-RFGW-EX, DIN-AP3MEX, and MC3.
Use the procedures below to join or leave an inNET EX network and to verify communications
between the device and the control system.
NOTE: If the remote is acquired to an MC3, RF operation on channels 25 and 26 is not supported.
Join the inNET EX Network
1. Press the ACQUIRE button on the inNET EX gateway to enter Acquire mode, or enter
Acquire mode from Crestron Toolbox™ software. For more information, refer to the
CEN-GWEXER Installation Guide (Doc. 7723), the CEN-RFGW-EX DO Guide (Doc. 7745),
the DIN-AP3MEX Installation Guide (Doc. 7492), or the MC3 DO Guide (Doc. 7774) at
www.crestron.com/manuals.
NOTE: In an environment where there are multiple gateways installed, place only one
gateway in Acquire mode at a time.
2. Press the (Home) button on the remote three times, and then press and hold
the button (press, press, press, press + hold) until the green LED on the navigation pad
of the remote ashes once. This process may take up to ten seconds to complete.
3. Release the button to start the acquire process. The green LED ashes slowly to show
that the remote is actively scanning the inNET EX network.
4. Conrm the status of the acquire process:
•If the remote is acquired by the inNET EX network, the green LED stops ashing and
turns on for several seconds.
•If the remote is not acquired by the inNET EX network, the red LED on the navigation
pad ashes rapidly for several seconds. Press the button to cancel the acquire
process. Ensure the gateway is in Acquire mode and that the remote is in range before
attempting the acquire process again.
5. After the acquire process is complete, remove the gateway from Acquire mode as
described by its documentation.
Leave the inNET EX Network
To leave the inNET EX network, perform the acquire process as described in “DO Acquire the
Remote” while the remote is not within range of a gateway in acquire mode. Once the remote is
removed from the network, the red LED on the navigation pad ashes rapidly for several seconds.
Verify the Communication Status
To check the communication status of the remote, press the button three times, and then press
and hold the button (press, press, press, press + hold) for up to two seconds. The navigation pad
LEDs ash to indicate the communication status as described in the table on the following page.
DO Customize the Hard Buttons
The Crestron
®
HR-310 and HR-310-I ship with a default set of nine congurable hard buttons
installed. Custom-engraved buttons may be created and ordered using Crestron Engraver software
to replace the default button set. A custom-engraved frame that secures the custom button set to the
remote is also included with each engraving order. For more information, refer to the HR-310-BTN
Installation Guide (Doc. 8224) at www.crestron.com/manuals.
NOTE: The HR-310 and HR-310-I are functionally similar. For simplicity within this guide, the term
“remote” is used except where noted.
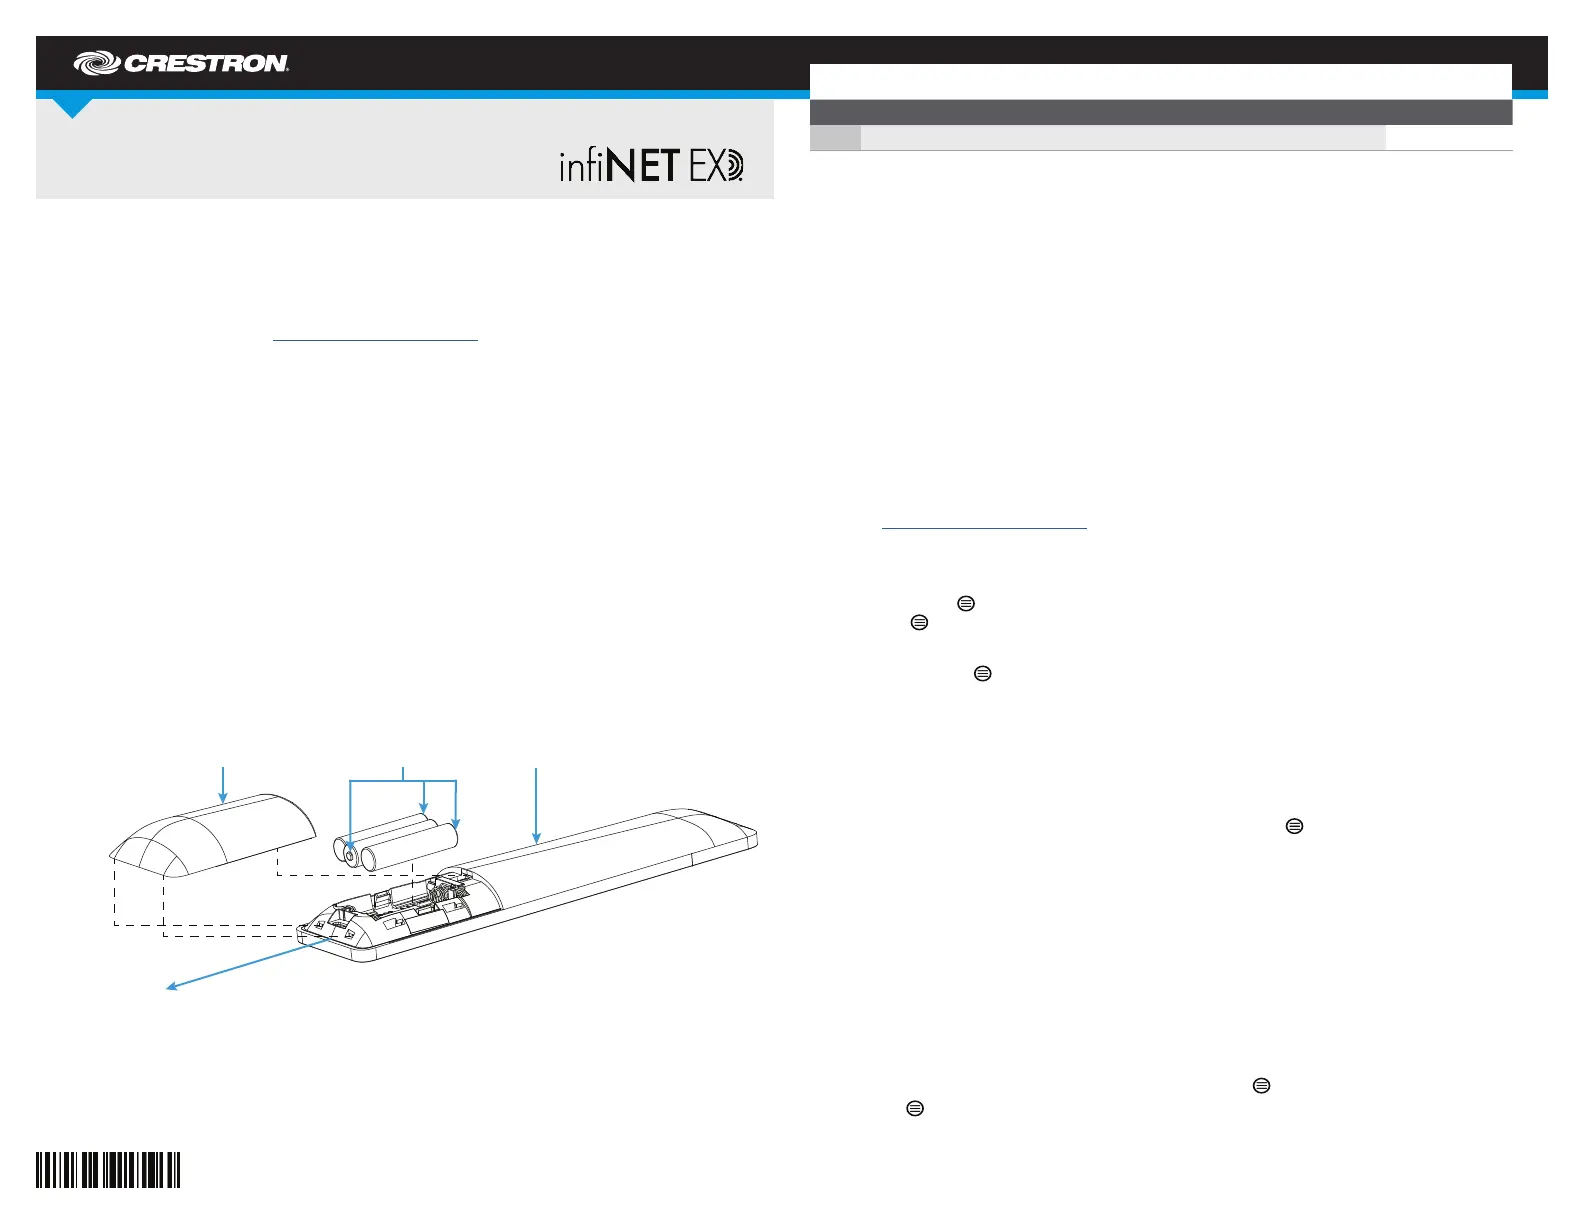
DO Install the Batteries
The remote ships with three AAA alkaline batteries that must be installed prior to operation. To install
the batteries:
1. Locate the battery cover on the rear of the remote.
2. Push gently on the battery cover while sliding it down and away from the remote until the
tabs connecting the cover to the remote disengage.
3. Install the three included AAA batteries as shown in the illustration following step 5.
Observe the correct polarity when inserting the batteries into the compartment.
4. Reattach the battery cover by aligning the tabs on the top and bottom of the cover with
their respective slots on the bottom of the remote.
5. Slide the cover gently upward until the tabs snap into place.
The remote features intelligent keypad backlighting, which illuminates button text only when the
remote detects that the room is dark. In a brightly lit room where the remote is sufciently illuminated,
the keypad backlight (aside from the color indicators) remains off to conserve the batteries.
DO Check the Box
QTYPRODUCTPART NUM.
1Batteries, AAA Alkaline, x32022558
Battery cover
AAA batteries (3):
positive (+) terminals
HR-310/HR-310-I
(rear view)
Slide battery cover down
and away from remote
Produktspecifikationer
| Varumärke: | Crestron |
| Kategori: | Fjärrkontroll |
| Modell: | HR-310-I |
Behöver du hjälp?
Om du behöver hjälp med Crestron HR-310-I ställ en fråga nedan och andra användare kommer att svara dig
Fjärrkontroll Crestron Manualer

10 September 2024
10 September 2024
9 September 2024
8 September 2024
8 September 2024
8 September 2024
8 September 2024
8 September 2024
Fjärrkontroll Manualer
Nyaste Fjärrkontroll Manualer
9 April 2025
4 April 2025
3 April 2025
3 April 2025
2 April 2025
2 April 2025
1 April 2025
31 Mars 2025
31 Mars 2025
30 Mars 2025