Crestron IDOC-PAD-LCA-DSWC-B-S Bruksanvisning
Crestron Vagga/dockningsstation IDOC-PAD-LCA-DSWC-B-S
Läs gratis den bruksanvisning för Crestron IDOC-PAD-LCA-DSWC-B-S (2 sidor) i kategorin Vagga/dockningsstation. Guiden har ansetts hjälpsam av 44 personer och har ett genomsnittsbetyg på 4.0 stjärnor baserat på 2 recensioner. Har du en fråga om Crestron IDOC-PAD-LCA-DSWC-B-S eller vill du ställa frågor till andra användare av produkten? Ställ en fråga
Sida 1/2
DOGUIDE
DO Check the Box
QUANTITYPRODUCTCOLORPART NUMBER
1Bit, Torx, T82025915
4Screw, 6-32 x 3/4", Undercut Head, Phillips2033247
4Screw, M3 x 16 mm, Flat Head, Phillips2013788
4Screw, 4-40 x 3/4", Pan Head, Phillips2007184
2Screw, M3.5 x 25 mm, Flat Head, Phillips2023756
Items for IDOC-PAD-LCA-DSWC-B-S and IDOC-PAD-LCA2-DSWC-B-S
1Cover, FrontBlack4519812
1Plate, MountingBlack2040499
2Screw, 2-56 x 5/16", Pan Head, TorxBlack2040263
4Screw, 6-32 x 1/4", Pan Head, PhillipsBlack2007215
Items for IDOC-PAD-LCA-DSWC-W-S and IDOC-PAD-LCA2-DSWC-W-S
1Cover, FrontWhite4519811
1Plate, MountingWhite2039781
2Screw, 2-56 x 5/16", Pan Head, Torx2040264
4Screw, 6-32 x 1/4", Pan Head, Phillips2007213
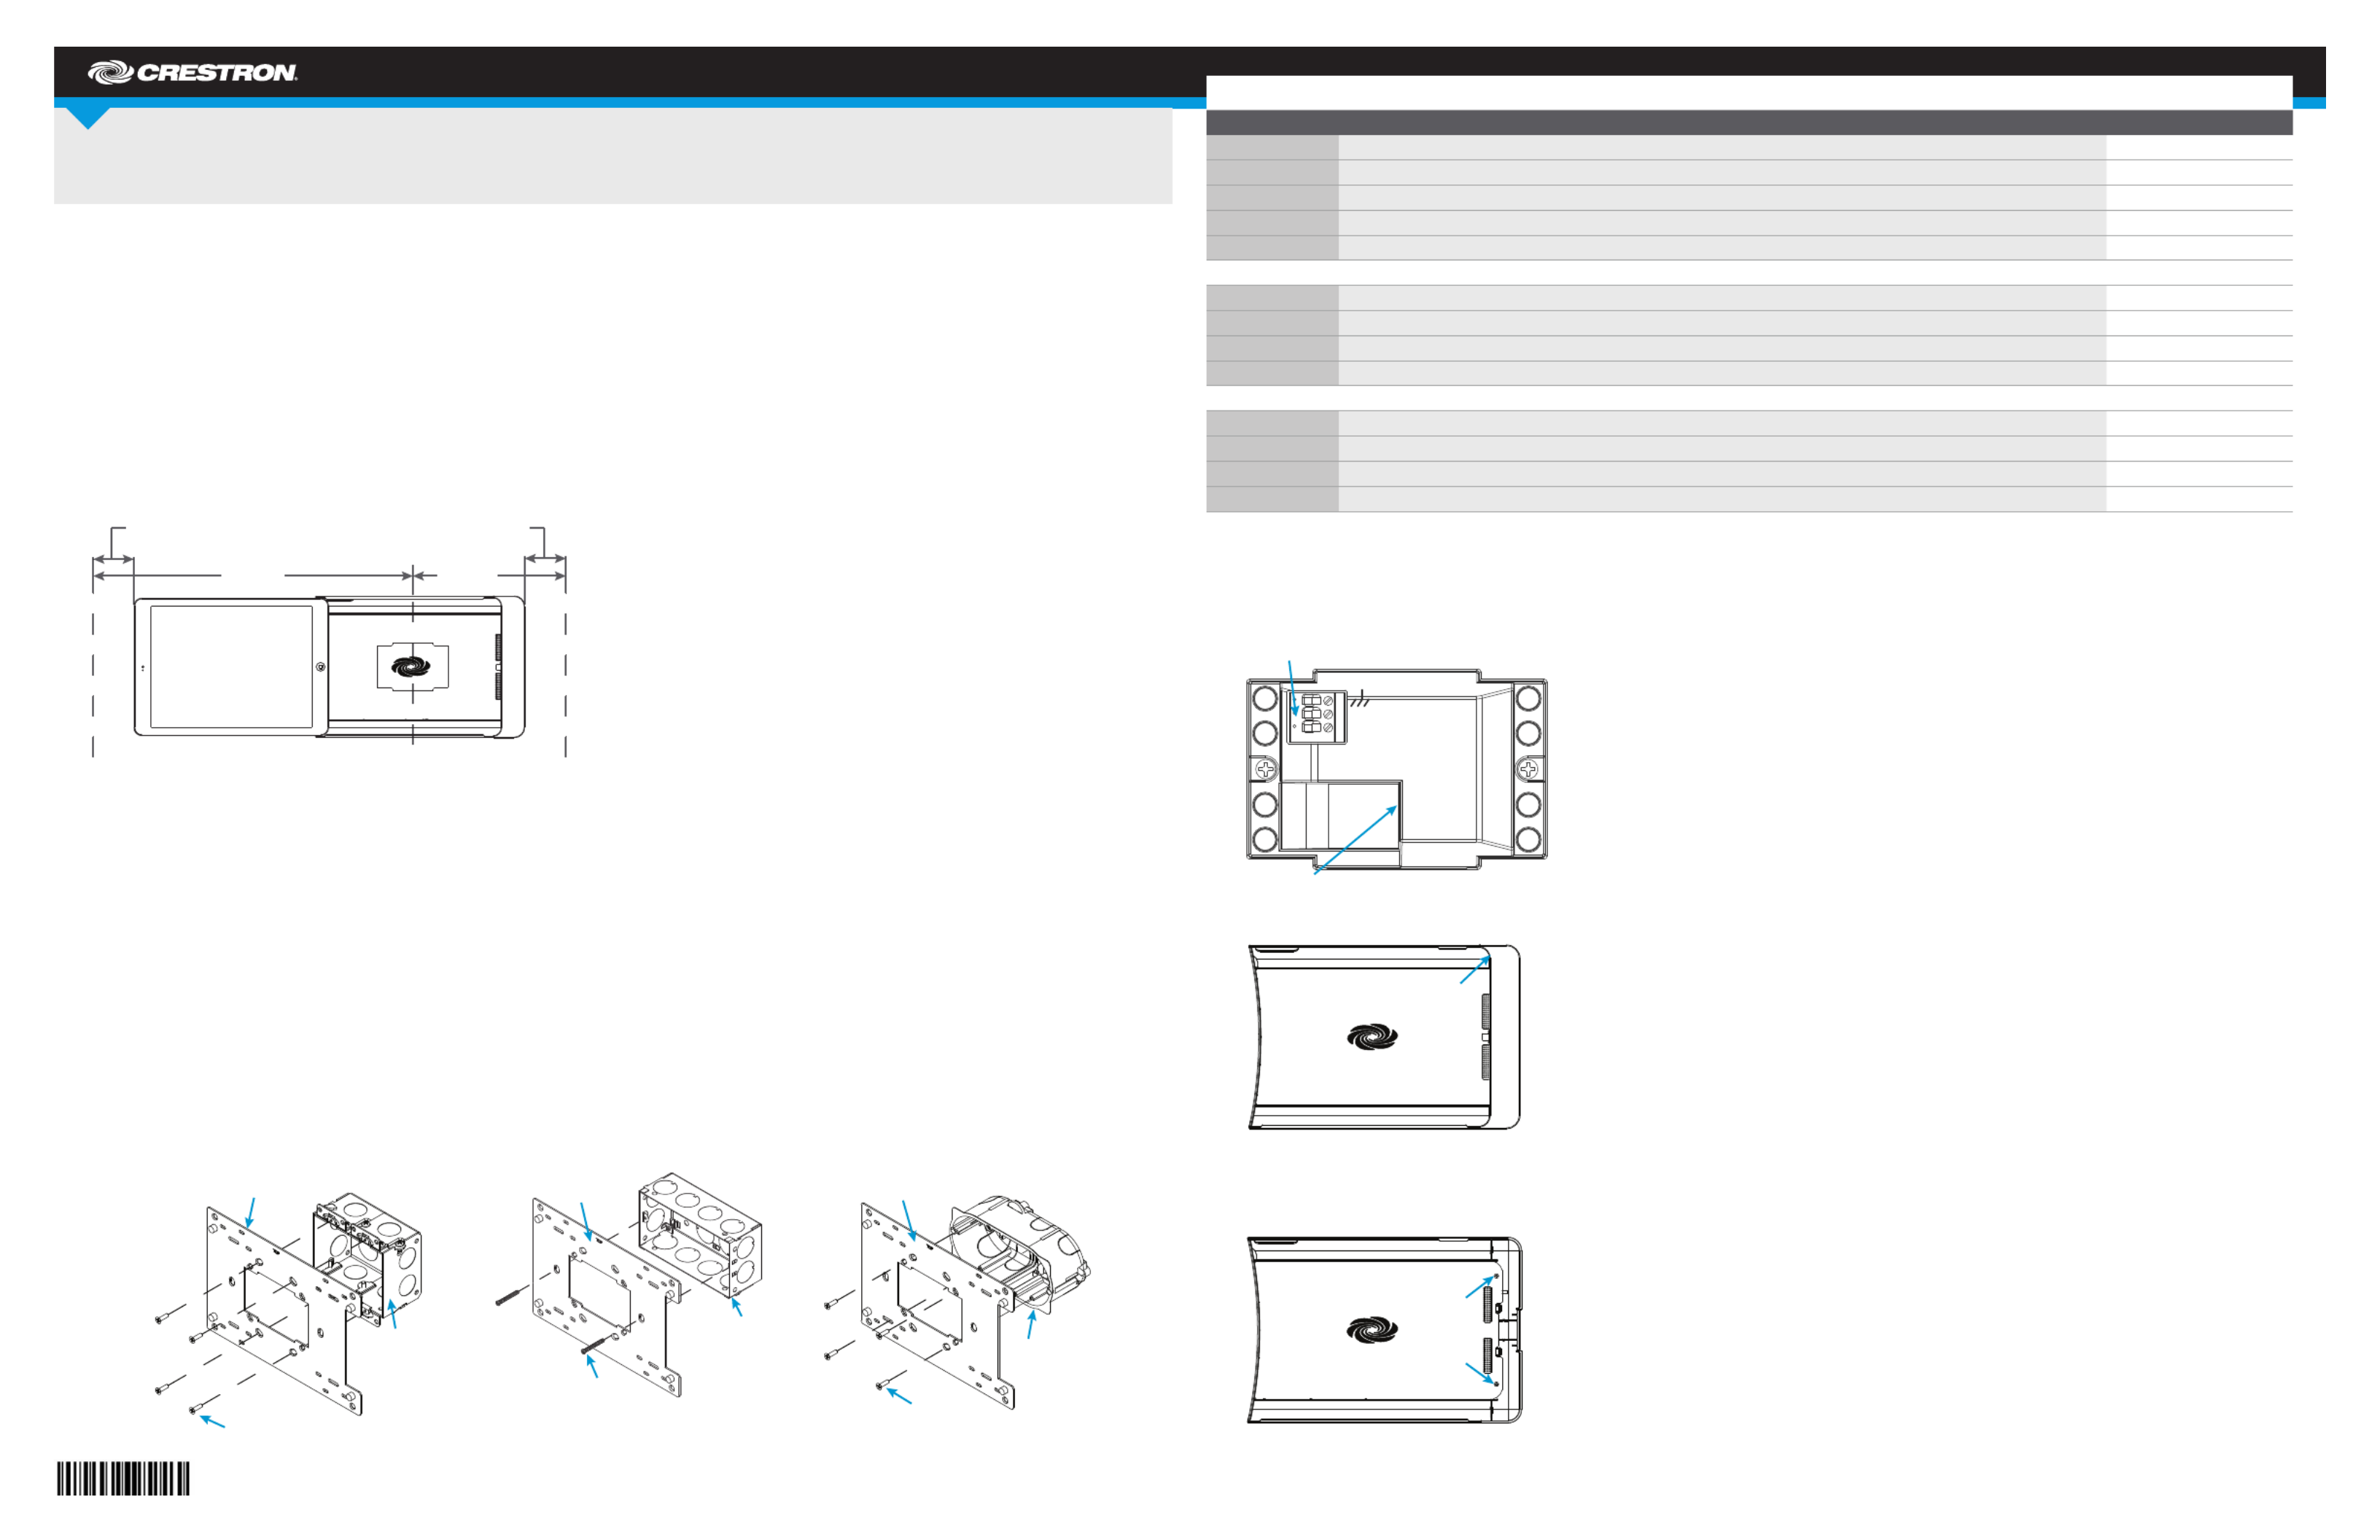
2. Connect the 24 Vdc or PoE line and earth ground to the rear of the iPanel.
NOTE: Ensure the unit is properly grounded by connecting the chassis ground terminal to an earth ground (building steel). If PoE is used, an earth
ground connection must still be made to the terminal block connector.
NOTE: The iPanel can be connected to 24 Vdc and and PoE simultaneously.
3. Lift and remove the plastic cover from the iPanel.
4. Use the Phillips screwdriver to remove the screws and washers that hold the metal plate in place, and remove the metal plate.
NOTE: If necessary, remove the cable holder.
IDOC-PAD-LCA(2)-DSWC
iPanel® Wall Dock for iPad Air® Devices
DO Install the Device
The Crestron® IDOC-PAD-LCA-DSWC and IDOC-PAD-LCA2-DSWC iPanel® Wall Docks feature similar operation. For simplicity within this guide, the
term “iPanel” is used except where noted. Similarly, the word “iPad” is used to denote iPad Air and iPad Air
2. The iPad® is sold separately.
For the iPad Air, use the IDOC-PAD-LCA-DSWC. For the iPad Air 2, use the IDOC-PAD-LCA2-DSWC.
The Crestron iPanel installs into a standard 2-gang U.S., U.K., or European electrical box. It can also be attached directly to drywall and other surfaces
over the front of a 2-3/8" H x 3-3/8" W (60 mm H x 86 mm W) cutout. When installed, it protrudes just 1" (26 mm) from the mounting surface and secures
to its included mounting plate with included screws.
Choose a Location
To allow installation and removal of the iPad, the iPanel requires a minimum amount of clearance on both sides. When choosing an installation location,
make sure the center of the mounting location has a minimum of 7-7/16" (189 mm) clearance on the closed side of the iPanel and 15-1/2" (394 mm)
clearance on the open side of the iPanel, as shown below.
NOTE: Although the iPanel can be mounted with the opening oriented to the right, note that the iPad Air volume buttons face downward in this
conguration. This may not be optimal for the end user.
Required Tools
The following are required to install the iPanel.
•#2 Phillips screwdriver
•Torx bit (included) and driver (not included)
Install the Device into an Electrical Box
NOTE: A 24 Vdc or PoE cable should already be in the electrical box. The iPanel can use only one source for power.
1. Use the included screws to attach the mounting plate to the electrical box.
•For U.S.-style installations, use the included 06-32 x 3/4" screws.
•For U.K.-style installations, use the included 3.5 x 25 mm screws.
•For European-style installations, use the included 3 x 16 mm screws.
24 Vdc
PoE
24
G
Lift here.
Remove
screws and
washers.
Minimum Wall DistanceMinimum Wall Distance
2 in
(51 mm)
2 in
(51 mm)
15-1/2 in
(394 mm)
7-7/16 in
(189 mm)
Center Box Cutout
U.S. Electrical Box
Mounting Plate
Screws (4) 6-32 X 3/4"
Screws (2) 3.5 X 25 mm
U.K. Electrical Box
Mounting Plate
European
Electrical Box
Mounting Plate
Screws (4) 3 X 16 mm
Produktspecifikationer
| Varumärke: | Crestron |
| Kategori: | Vagga/dockningsstation |
| Modell: | IDOC-PAD-LCA-DSWC-B-S |
| Vikt: | 417 g |
| Bredd: | 258 mm |
| Djup: | 61 mm |
| Höjd: | 175 mm |
| Strömförbrukning (max): | 17 W |
| Ljudutgång: | Nej |
| Material: | Plast |
| HDMI: | Nej |
| Kompatibilitet: | iPad Air, iPad 7 |
| Produktens färg: | Svart |
| Antal LAN (RJ-45) anslutningar: | 1 |
| DC-utgång volt: | +24V |
| Brand kompatibilitet: | Apple |
| Bluetooth: | Nej |
| Antal: | 1 |
| DC utgående ström: | 0.71 A |
| Grundläggande enhetstyp: | Surfplatta |
Behöver du hjälp?
Om du behöver hjälp med Crestron IDOC-PAD-LCA-DSWC-B-S ställ en fråga nedan och andra användare kommer att svara dig
Vagga/dockningsstation Crestron Manualer

26 Mars 2025
10 September 2024
9 September 2024
8 September 2024
8 September 2024
8 September 2024
30 Juli 2024
Vagga/dockningsstation Manualer
Nyaste Vagga/dockningsstation Manualer
5 April 2025
31 Mars 2025
12 Mars 2025
12 Mars 2025
10 Mars 2025
27 Februari 2025
27 Februari 2025
16 Februari 2025
11 Februari 2025
8 Februari 2025