Drayton Erie Digistat 3 Bruksanvisning
Drayton Erie
Termostat
Digistat 3
Läs gratis den bruksanvisning för Drayton Erie Digistat 3 (2 sidor) i kategorin Termostat. Guiden har ansetts hjälpsam av 17 personer och har ett genomsnittsbetyg på 4.9 stjärnor baserat på 9 recensioner. Har du en fråga om Drayton Erie Digistat 3 eller vill du ställa frågor till andra användare av produkten? Ställ en fråga
Sida 1/2

+
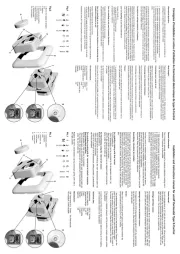
13 . Continue to press the “SET?” button to
advance through the week (1 – 5).When
the display is as shown here, press the
Yes (–) button if you wish to view or alter
the times for Sat.-Sun. (6-7). Repeat steps
9-12 as required.
14 . Continue to press “SET?” button until you
return to normal operating mode with a
display similar to the one shown here.
TO VIEW OR CHANGE THE FACTORY SETTINGS
(steps 6-14)
6. Press the “SET?” button until this
display is shown.
7. Press the Yes (–) button.You have
selected the Monday to Friday part of the
programme.
8. Press the Yes (–) button again.This tells
you that at 6.30 a.m., the heating system
will control your home at 20°C. If you wish
to alter the temperature use the + and –
buttons.
9. Press the “SET?” button.The time will now
flash. If you wish to alter the switching time
use the + and – buttons.This will change
the switching time in 10 minute steps.
10. Press the “SET?” button, this tells you that
at 8.30 a.m., the heating system will control
your home at 16°C. If you wish to alter
this temperature use the + and – buttons.
11. Continue to press the “SET?” button as in
steps 9 and 10 above to advance through
the times and temperatures for Mon. to Fri.
(1-5). If you wish to alter any of the times
and temperatures use the + and – button,
when the one you wish to alter is flashing.
12. Once Mon. to Fri. have been set, the
display will show as here.This means do
you want to set the times for Monday (1)
differently from the rest of the week? If
you do, press the Yes (–) Button, and
follow the routine as steps 9 to 11.
Drayton
Digistat 3
7 Day programmable
room thermostat
Installation and
operating instructions
CONFORMS TO THE ESSENTIAL REQUIREMENTS
OF THE FOLLOWING DIRECTIVES:
89/336/EEC – Electromagnetic compatibility
73/23/EEC – Low voltage directive
Siebe Climate Controls Limited
Chantry Close, West Drayton, Middlesex UB7 7SP
Telephone: (01895) 444012 Sales Fax: (01895) 421901
Technical Helpline Telephone: (01895) 460444
A Invensys product
Siebe Climate Controls continuously seek to improve products and reserve the right 090 714
to make changes without notice 1099
OPERATING MODES
The Digistat can be operated in one of three modes.
1) – Timed, all preset times and temperatures
2) – Continuous night temperature (useful for low
limit temperature protection when on holiday)
3) – Continuous ‘DAY 1’ temperature
Use the SELECT button to change the operating mode to suit your require-
ments, the symbols are positioned on the right hand side of the display.
TEMPERATURE OVERRIDE
If at anytime during normal operation, you wish to temporarily increase or
decrease the set temperature use the + or – buttons to change to your
desired setting. This can be done without entering the SET mode. Five
seconds after releasing the + or – button the display will revert to showing
the actual room temperature.The Digistat will now control the temperature
to the override setting until the next programmed switching time, when it
will revert to the times and temperatures you have already programmed.
BATTERY REPLACEMENT
30 days before the batteries need re-placing, a
battery symbol will flash in the right hand side of the
display (Diagram C). This signifies that two 1.5V
type AA alkaline batteries will be needed to
replace the existing ones. If battery replacement is
carried out in this condition the programmed
settings will only be held in the memory for a
maximum of one minute, after which re-programming may be necessary.
IMPORTANT
To avoid the possibility of having to re-programme
the switching times and temperatures, it is advisable
to wait until the display with a flashing battery
symbol changes to a continuous battery only
display (after 30 days – Diagram D). In this
condition the unit will remain OFF but your
programmed settings will be held in memory for a number of weeks. The
battery compartment can now be left open, to replace the batteries, for
approximately one hour. If the compartment is left open for longer, the unit
will revert to the factory preset times and temperatures. It may be necessary
to reset the correct time of day after changing the batteries.
The battery compartment is situated at the bottom of the unit (press to
unlatch and slide down). Ensure new batteries are installed correctly.
HELPFUL HINTS
1) First/Last Set Times The Day 1 setting cannot be programmed
before 12.00 am.The night setting can be programmed at whatever time
you require, even after 12.00 am (midnight) so long as it is not programmed
more than 23 hours 50 minutes after the Day 1 setting.
2) Part or Full Day Omission If during programming the Digistat one of
the symbols on the left hand side of the screen starts to flash, this indicates
that two or more of the switching times have been set to the same time.
This facility enables you to omit one or more of the switched periods.
When one or more switching times are programmed together the later setting
takes precedent. For example, if all four switching times were set together
the Digistat would control continuously at the fourth (night) temperature
setting .
3) Programme Sequence The Digistat will not allow you to program the
switched periods out of sequence but will hold the times together as stated
above.
4) Reset If at any time during the programming you get confused and would
like to start the procedure from the beginning press the SELECT and –
buttons at the same time and hold for two seconds.This resets the Digistat to
the factory preset times and temperatures shown in the table (overleaf).
5) Self Revert
If during programming no button is pressed for between one and two minutes
the Digistat will revert automatically to its normal operating mode.
1
Diagram C
Diagram D
1
Produktspecifikationer
| Varumärke: | Drayton Erie |
| Kategori: | Termostat |
| Modell: | Digistat 3 |
Behöver du hjälp?
Om du behöver hjälp med Drayton Erie Digistat 3 ställ en fråga nedan och andra användare kommer att svara dig
Termostat Drayton Erie Manualer

14 September 2024

13 September 2024

13 September 2024

12 September 2024

12 September 2024
Termostat Manualer
- Hunter
- Honeywell
- Bticino
- Westfalia
- Technoline
- Schwaiger
- Hager
- Baxi
- Magnum
- Amfra
- Homematic IP
- Aube
- Innogy
- Remeha
Nyaste Termostat Manualer
13 Oktober 2025
12 Oktober 2025

12 Oktober 2025
5 Oktober 2025

2 Oktober 2025
2 Oktober 2025
29 September 2025
28 September 2025
28 September 2025
28 September 2025