Exibel L303-A Bruksanvisning
Exibel Lamineringssystem L303-A
Läs gratis den bruksanvisning för Exibel L303-A (5 sidor) i kategorin Lamineringssystem. Guiden har ansetts hjälpsam av 34 personer och har ett genomsnittsbetyg på 4.1 stjärnor baserat på 7 recensioner. Har du en fråga om Exibel L303-A eller vill du ställa frågor till andra användare av produkten? Ställ en fråga
Sida 1/5
GREAT BRITAIN - CUSTOMER SERVICEcontact number: 020 8247 9300 e-mail: customerser[email protected] internet: www.clasohlson.co.uk postal: 10 – 13 Market Place, Kingston Upon Thames, Surrey, KT1 1JZ
English
Ver. 20180205
A3 Laminator
Art.no 34-1402 Model L303-A
Please read theentire instruction manual before using theproduct and
save it for future reference. We reserve theright for any errors in text
or images and any necessary changes made to technical data. If you
have any questions regarding technical problems please contact our
Customer Services.
Safety
• Unplug thelead before cleaning.
• The laminator may not be used by children without thesupervision
of anadult.
• Do not insert any metal objects like paperclips, coins, etc. into
themachine.
• Do not insert anything other than lamination film into themachine.
• Do not disassemble thelaminator or attempt to repair it yourself.
Thelaminator must not be modified in anyway.
• The laminator may produce aburnt odour when first used.
Thisis completely normal.
• Do not touch any of themachine’s hot surfaces. Burninjuries
may result.
• Never use thelaminator in humid environments or near sources
of water, e.g sinks, taps, etc.
• The mains lead should be checked regularly. Neveruse theproduct
if themains lead or its plug is damaged or if theproduct is not
functioning properly.
• If themains lead is damaged, it must only be replaced by aqualified
service technician in order to prevent any risk of fire or electric shock.
• Never lay themains lead over hot surfaces or pull it round sharp
edges or corners. Position themains lead in such away that it will
not be trodden on or tripped over.
Product description
• Two rollers
• Capacity: 250 mm/min 80–100 µm, maxA3
• 3–4 min warm-uptime
• Max. paper thickness: 0.5mm
• Reverse feature for correcting misfeeds
• Power output: 300W
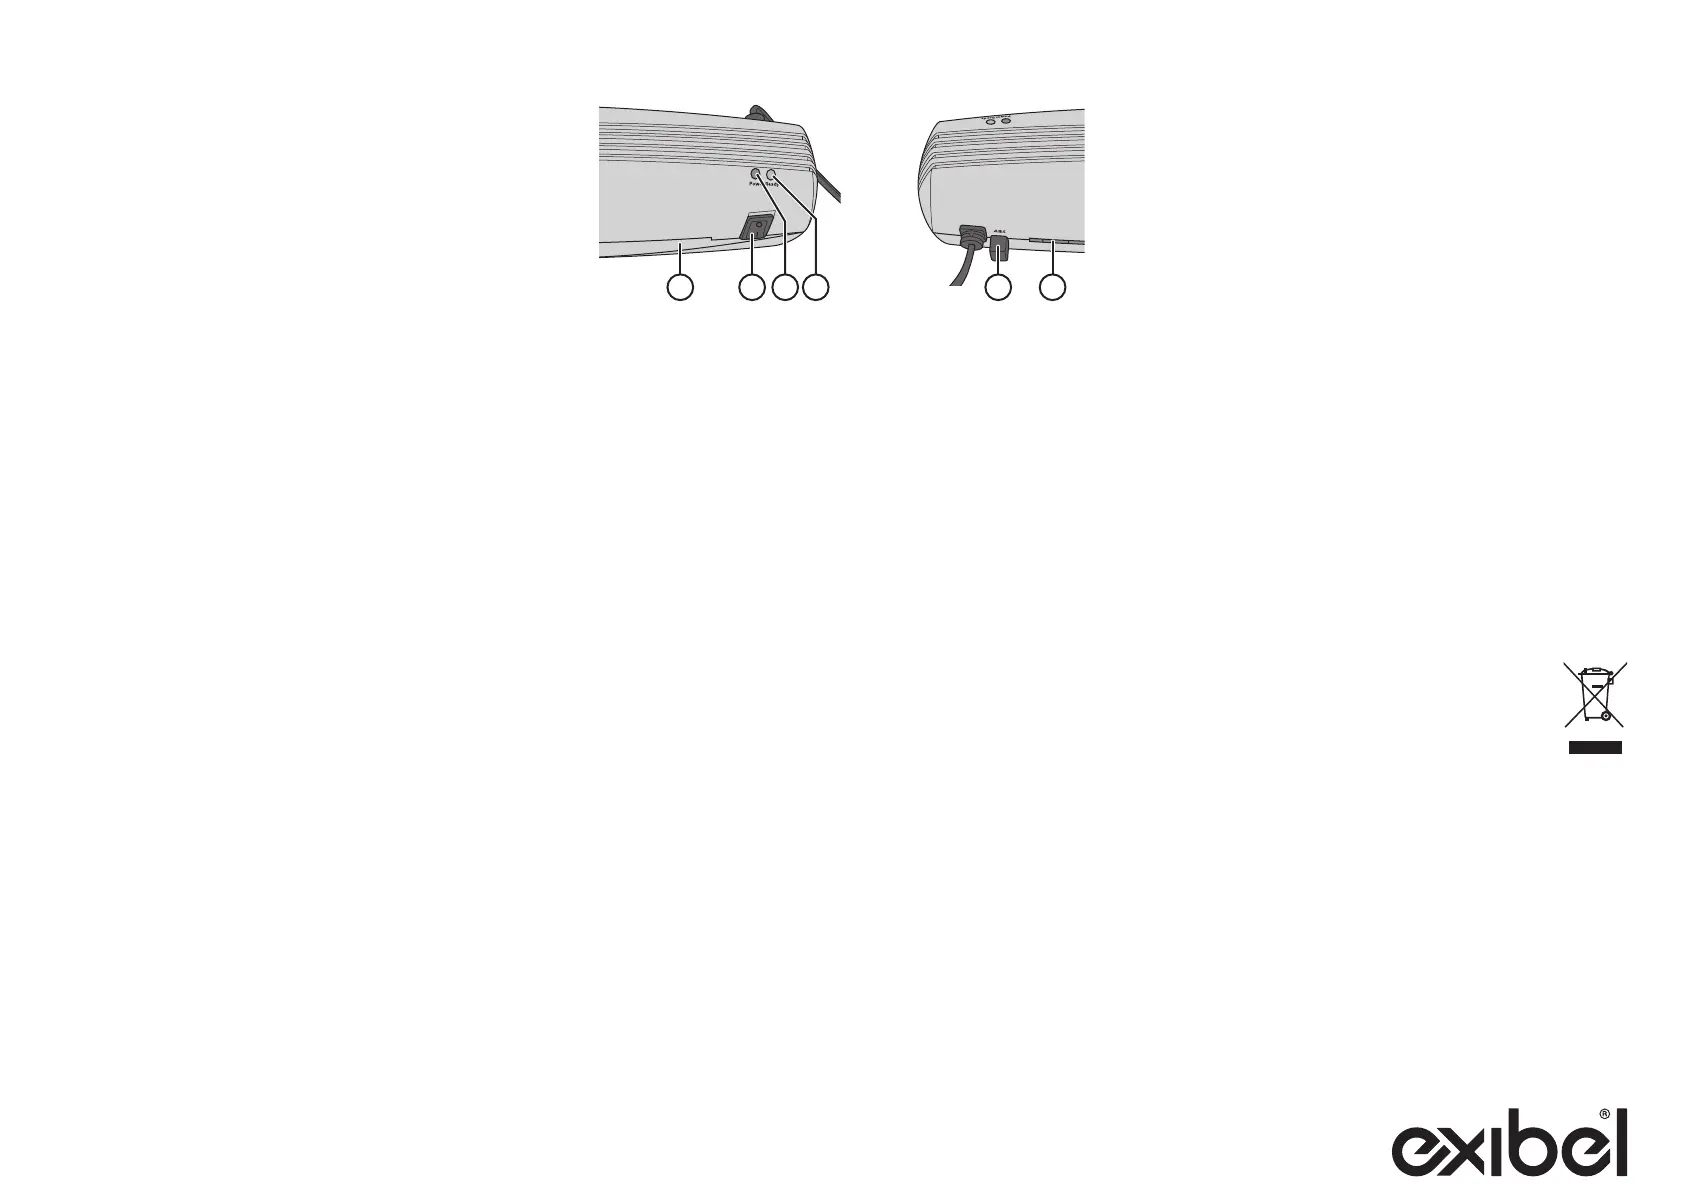
1. Film feedslot
2. [ 0/1 ] Power switch
3. POWER Red LED indicator
4. READY Green LED indicator
5. [ ABS ] Reverse function
6. Output chute
Operation
Make sure thepower switch (2) is set to 0 before plugging it into
awall socket.
1. Plugit into awall socket and set thepower switch (2) to theIposition.
Thered LED (3) will light to indicate that thewarm-up phase hasbegun.
2. Thegreen LED will light after about 3–4 minutes indicating
that thelaminator is ready for use. Makesure that there is
sufficient room behind themachine to allow thelamination to exit
themachine freely.
3. Flipopen thelamination film and insert thepaper to be laminated.
Allowat least 3–10 mm clearance at thesealed edge when
inserting. Makesure thepaper is not crooked.
4. Feedthesealed end of thelamination film into thefeed slotfirst.
Note: Thisis very important; otherwise, thelamination film can
become caught in therollers.
5. Lettheentire lamination exit freely. Donot pull it out with force.
Letit cool before handling it. Placeaflat heavy object, like abook
over thelaminate while cooling if you want your results to be extra
smooth andflat.
6. Setthepower switch to 0 and unplug thelaminator when you have
finished usingit.
Note:
• Selectthecorrect size of lamination film so that it fits theobject to
be laminated.
• Avoidplacing several small pieces of paper into asingle lamination
sheet.
• Remember that thelaminate’s total thickness may not exceed0.5mm.
• Donot feed in empty lamination film.
• Donot cut thelamination film into smaller pieces before feeding it
through themachine.
• Donot feed thefilm into themachine at anangle. Itcanbecome
caught in themachine during thelaminationprocess.
• Useonly lamination film. Nevertry to feed in any other typeof material.
• Ifyou intend to laminate in series, remember themachine needs to
rest at least 15 seconds between every lamination.
• Donot feed in any material that is sensitive toheat.
The laminator is intended for personal use only and should not be
used continuously. Werecommend that you turn off themachine and
let it cool down for approximately 30 minutes after 2 hours ofuse.
Reverse feature for correcting misfeeds
The machine has a feature which allows the laminate to be pulled out
from the front. If the lamination film misfeeds or jams:
1. Turn off the laminator immediately by turning the power switch to
the 0 position and then unplug it.
2. Hold in the [ ABS ] button and extract the laminate.
Care and maintenance
Unplug thelaminator from thewall socket and wipe it with asoft,
damp cloth when needed. Neveruse strong detergents orsolvents.
Responsible disposal
This symbol indicates that this product should not be
disposed of with general household waste. This applies
throughout theentire EU. In order to prevent any harm to
theenvironment or health hazards caused by incorrect
waste disposal, theproduct must be handed in for recycling
so that thematerial can be disposed of in aresponsible
manner. When recycling your product, take it to your local collection
facility or contact theplace of purchase. They will ensure that
theproduct is disposed of in anenvironmentally sound manner.
Specifications
Rated voltage220–240 V AC, 50Hz
Power300 W, 1.4A
Max lamination width 320mm
Speed 250 mm/minute
Recommended
lamination film thickness 80–100 microns
Dimensions 425×125×100mm
123456
Produktspecifikationer
| Varumärke: | Exibel |
| Kategori: | Lamineringssystem |
| Modell: | L303-A |
Behöver du hjälp?
Om du behöver hjälp med Exibel L303-A ställ en fråga nedan och andra användare kommer att svara dig
Lamineringssystem Exibel Manualer

2 Mars 2025
11 September 2024
11 September 2024
Lamineringssystem Manualer
Nyaste Lamineringssystem Manualer
9 Februari 2025
8 Januari 2025
5 Januari 2025
5 Januari 2025
5 December 2024
21 Oktober 2024
7 Oktober 2024
30 September 2024
29 September 2024
27 September 2024