EXSYS EX-6002POE Bruksanvisning
EXSYS Wifi-repeater EX-6002POE
Läs gratis den bruksanvisning för EXSYS EX-6002POE (4 sidor) i kategorin Wifi-repeater. Guiden har ansetts hjälpsam av 30 personer och har ett genomsnittsbetyg på 4.0 stjärnor baserat på 8 recensioner. Har du en fråga om EXSYS EX-6002POE eller vill du ställa frågor till andra användare av produkten? Ställ en fråga
Sida 1/4
65
Die EX-6002 ist mit 4 USB 2.0 A-Buchsen für Endgeräte, 1 USB 2.0 B-Buchse und 1 RJ45
Anschluss für den PC ausgestattet. Die EX-6002 ermöglicht Ihnen auf einfachste Weise, exter-
ne USB Festplatten, USB Sticks, USB Scanner, Drucker, Tastaturen etc. über das Netzwerk zu
verbinden. Sie können bis zu 4 USB Geräte an die EX-6002 anschließen. Sie ermöglicht Ihnen
somit eine erweiterte Flexibilität und Reichweite zum Anschluss der USB Geräte. Durch die
externe Stromversorgung per Netzteil werden an jedem Port die vollen 500mA zur Verfügung
gestellt. Sie können die EX-6002 einfach in jedes bestehende Netzwerk einbinden. Die Daten-
übertragungsrate beträgt bis zu 1000Mbit/s. Das Einbinden und die Ansteuerung der Geräte
erfolgt über die beiliegende Software.
1
ANSCHLÜSSE
BESCHREIBUNG & TECHNISCHE DATEN
AUFBAU
Anleitung
Vers. 1.5 / 10.03.17
EX-6002
Kompatibilität:USB 2.0, 3.0 & 3.1 & TCP/IP 10/100/1000
Betriebssysteme:Windows XP/ Vista/ 7/ 8.x/ 10/ Server 20xx
Anschlüsse:4x USB 2.0 A-Buchse, 1x USB 2.0 B-Buchse, 1x RJ45 Ethernet
Anschluss, 1x T-Block 7-24V, 1x 5V Buchse
Lieferumfang:EX-6002, Treiber CD, Anleitung, Netzteil
Zertifikate:
CE
/ FCC / RoHS / WEEE DE97424562 / WHQL
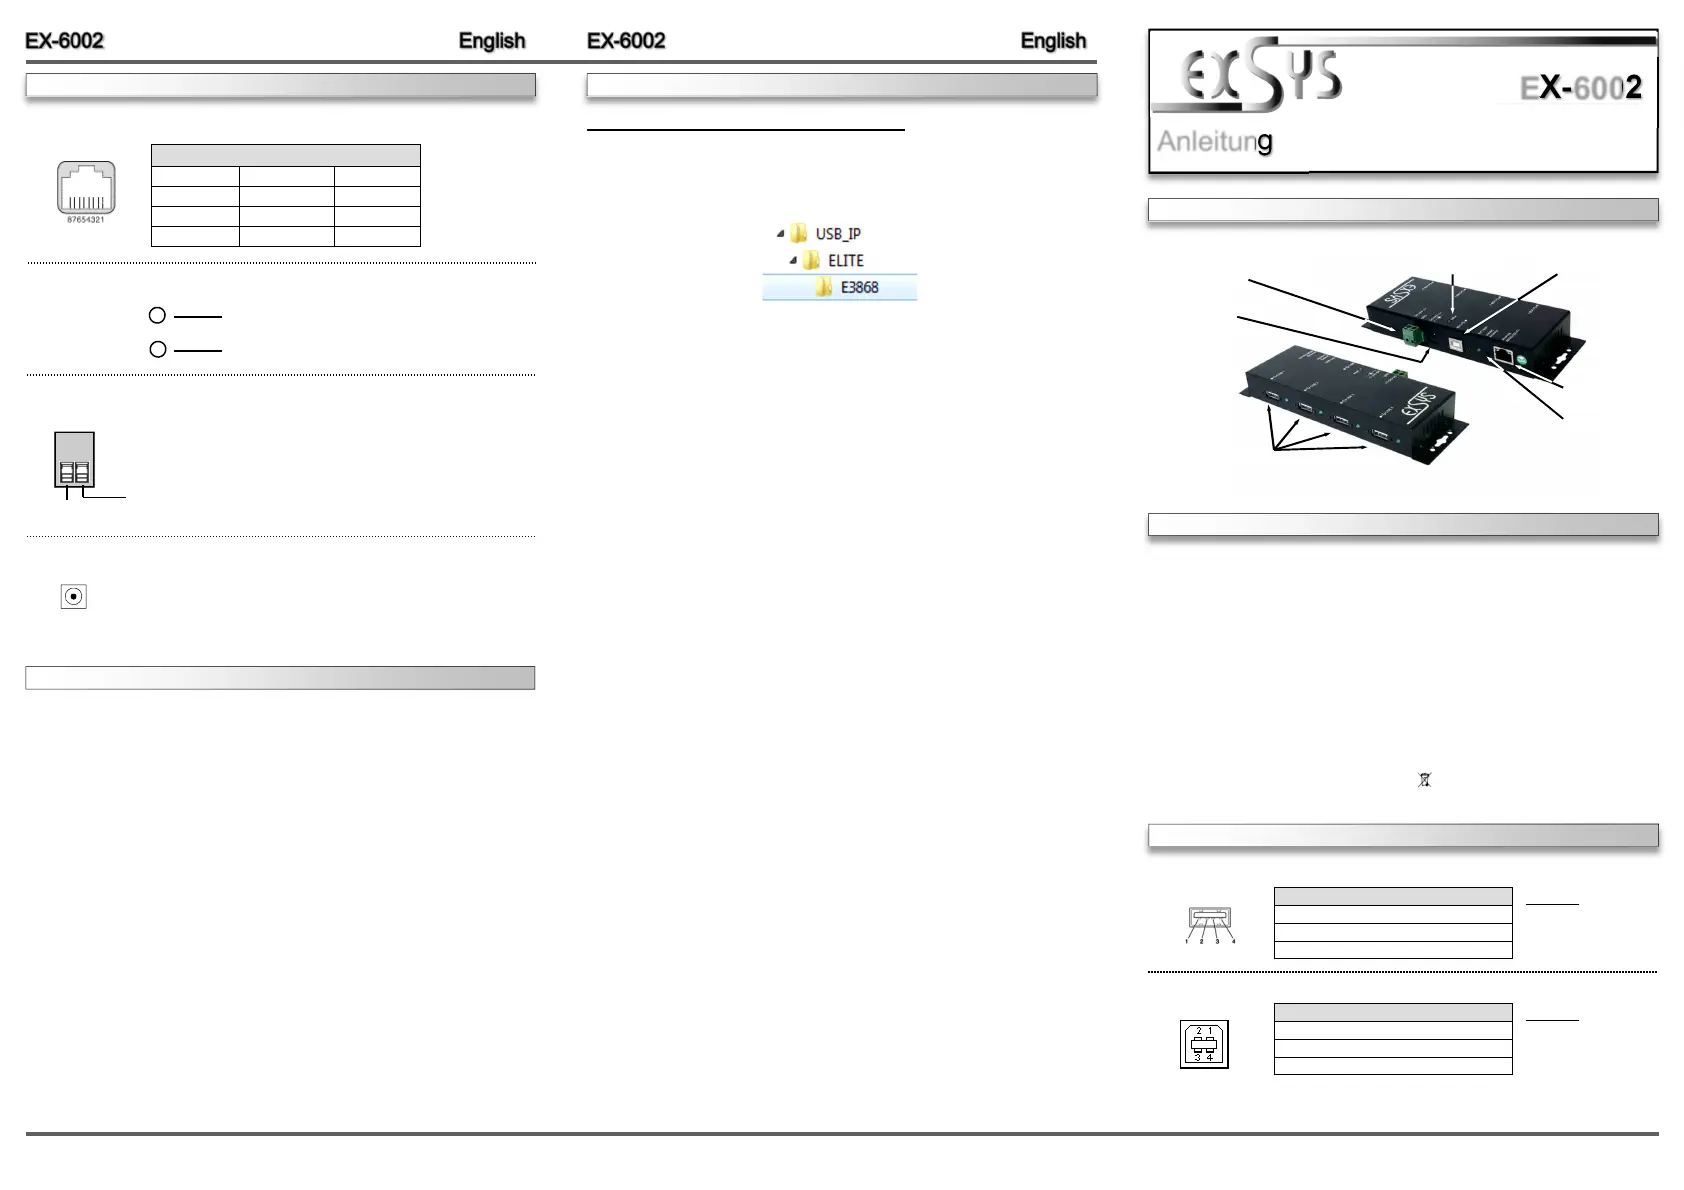
4 x USB 2.0 A-Buchse
7-24V T-Block für optionales
externes Netzteil
RJ45 Anschluss
mit Status LED´s
Reset Knopf
USB B-Buchse
5V DC Buchse
für beiliegendes
Netzteil
Betriebs LED
USB 2.0 A-Buchse
PinSignalPinSignal
1VCC3DATA+
2DATA- 4GND
USB 2.0 A-Buchse:
USB 2.0 B-Buchse:
Achtung!
Stecker nie umge-
kehrt oder mit
Gewalt einstecken.
Achtung!
Stecker nie umge-
kehrt oder mit
Gewalt einstecken.
USB 2.0 B-Buchse
PinSignalPinSignal
1VCC3DATA+
2DATA- 4GND
CONNECTORS SOFTWARE INSTALLATION
RJ45 Connector:
PinSignalPinSignalPinSignal
1BI_DA+4BI_DC+7BI_DD+
2BI_DA- 5BI_DC- 8BI_DD-
3BI_DB+6BI_DB-
RJ45 Connector
ATTENTION!!!
Use only with included power supply!!!
5 Volt Connector:
LINK / Connected
ACT / LAN Data
Status LED´s:
+7V ~ 24V T-Block:
+7V ~ 24V
GND (Ground)
ATTENTION!!!
Never connect power to GND it will destroy your Hardware!!!
HARDWAREINSTALLATION
Because there are large differences between PC’s and network’s, we can give you only a general
installation guide for the EX-6002. Please refer your computer’s reference manual or contact your
network admin whenever in doubt.
1.Connect the EX-6002 with the included power supply then connect it to the wall outlet.
2.Now connect a RJ45 patch cable (optional) with the device server and the other end to your
network switch or directly in your PC.
3.If you use a DHCP network the EX-6002 will now be automatically configured and set to your
predefined IP range.
4.If you use a non DHCP network it is necessary to change the IP address of the EX-6002
(169.254.10.10) manually to your IP range. In order to do so please change the IP address of
the computer you are using to 169.254.10.10 and the Subnet mask to 255.255.0.0. Only then
you can change the address later by the configuration tool.
5.Now you can install the software as described at software installation.
Windows XP/ Vista/ 7/ 8.x/ 10/ Server 20xx
After you already installed the Hardware you can now install the USB Server Software to any
client PC that should be able to access the USB devices who connected to the EX-6002.
Please insert the Driver CD into your CD-Rom drive and start the „USBServer_Setup“ who is
located in the „E3868“ folder (see picture):
Please note that you can access each device only with one client PC at a time.
The manual with details for the USB Server Software is located in the same “E3868” folder on
the driver CD. To read it please open the following file on the CD:
USBServer_UserManual.pdf
Produktspecifikationer
| Varumärke: | EXSYS |
| Kategori: | Wifi-repeater |
| Modell: | EX-6002POE |
Behöver du hjälp?
Om du behöver hjälp med EXSYS EX-6002POE ställ en fråga nedan och andra användare kommer att svara dig
Wifi-repeater EXSYS Manualer

18 September 2024
18 September 2024
18 September 2024
18 September 2024
Wifi-repeater Manualer
Nyaste Wifi-repeater Manualer
18 Mars 2026
17 Mars 2026
13 Mars 2026
7 Februari 2026
7 Februari 2026
6 Februari 2026
6 Februari 2026
5 Februari 2026
2 Februari 2026
1 Februari 2026