Gigaset A160 Cuarteto Bruksanvisning
Läs gratis den bruksanvisning för Gigaset A160 Cuarteto (16 sidor) i kategorin Telefon. Guiden har ansetts hjälpsam av 19 personer och har ett genomsnittsbetyg på 4.4 stjärnor baserat på 8 recensioner. Har du en fråga om Gigaset A160 Cuarteto eller vill du ställa frågor till andra användare av produkten? Ställ en fråga
Sida 1/16
1
Athen / IM-Nord-en / A31008-M1801-R201-2-9W19 / Athen_Kombi_en_neu.fm / 17.09.2008
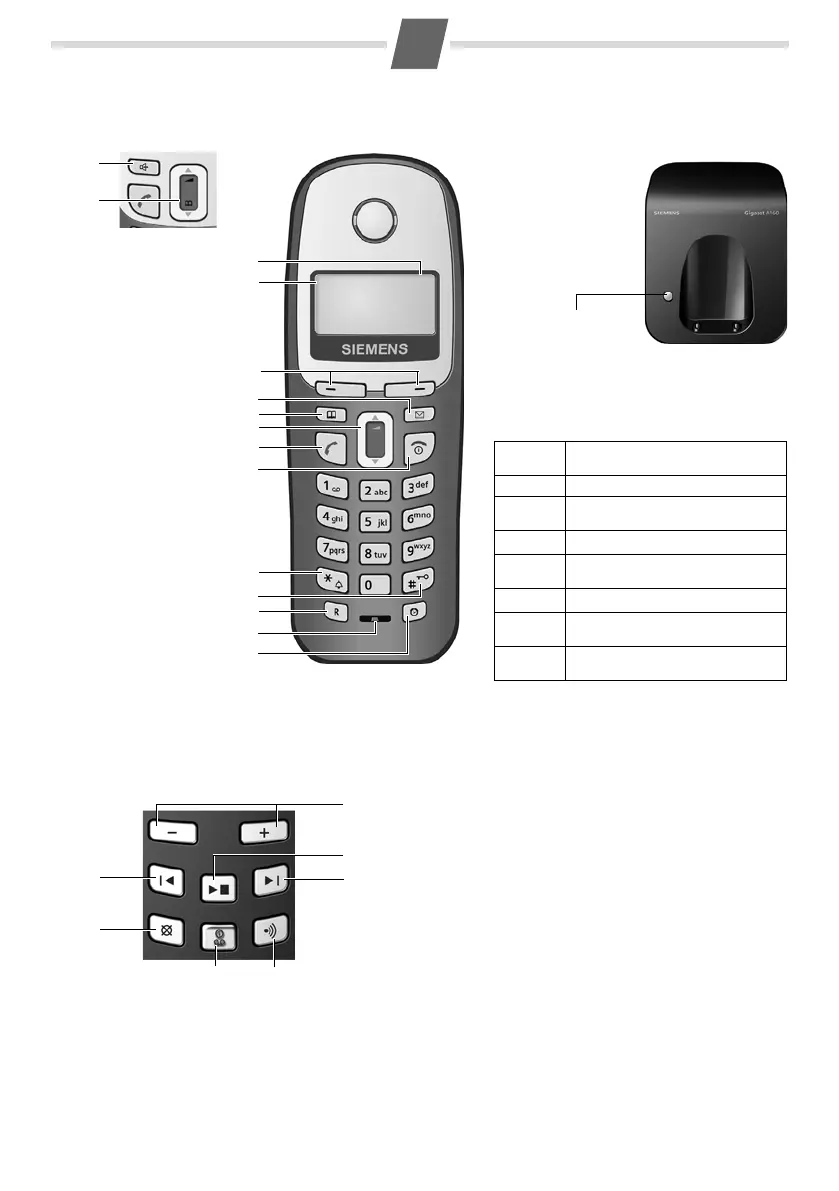
Gigaset A160/A260/A165/A265english
Base station with answering
machine at a glance
1Registration/Paging key:
Page handsets (press briefly, "Paging", page7).
Register handsets (press and hold, page7).
2On/Off key: activate and deactivate answering
machine.
Lights up: answering machine is activated.
Flashes: there is at least one new message or
message is in the process of being recorded.
Flickers for about four seconds: memory is full.
During message playback:
3Delete current message.
4Skip to previous message.
5Adjust volume (
ð = quieter; ñ = louder):
During message playback: adjust volume.
While an external call is being signalled: adjust
ringtone volume.
6Playback/stop key:
Play back messages from the answering ma-
chine, or cancel playback.
7Skip to next message.
Please note:
◆If the answering machine is being operated
from a handset or if it is recording a message, it
cannot be operated from the base station.
◆If the On/Off key flashes although the answer-
ing machine is switched off, it means that there
is still at least one new message that has not
been played back yet.
2V
11.12.11:56
INTMENU
1Charge status of the
battery pack
2Internal number
of the handset
3Display keys
4Message key
5Directory key
6Control key
7Talk key
8End call and
On/Off key
9Ringtone on/off (press
andhold in idle status)
10Key lock on/off
(press and hold)
11Recall key
- Confer (flash)
- Dialling pause
(press and hold)
12Microphone
13Alarm clock key
14Handsfree key
(only Gigaset A260/A265)
Base station without answering
machine
Display keys:
Pressing the keys launches whichever function
that appears above them in the display.
Display
icon
Function when pressed
INT
Call all registered handsets.
MENU
Open main/submenu
(see Menu tree, page10).
“
Go back one menu level.
U
Scroll up/down or adjust volume
with u.
T
Move cursor to left/right with u.
˜
Backspace deletes one character at
a time.
OK
Confirm menu function or save
entry.
Registration/Paging key
(page7/page7)
10
2
3
5
7
4
6
8
9
12
1
Handset for A160/A165
5
14
Handset for A260/A265
11
13
3
7
6
1
5
4
2
Produktspecifikationer
| Varumärke: | Gigaset |
| Kategori: | Telefon |
| Modell: | A160 Cuarteto |
| Antal färger: | monokrom |
| Modell: | DECT-telefon |
| Väckarklocka: | Ja |
| Antal melodier: | 10 |
| Telefonbokskapacitet: | 40 poster |
| Trådlösa anslutningar: | Ja |
| Maximal räckvidd inomhus: | 50 m |
| VIP-grupp med egen melodi: | Nej |
| Batterityp: | Accu |
| Produktens färg: | Svart |
| Produktstorlek (BxDxH): | 51 x 144 x 29 mm |
| Nummerpresentation: | Ja |
| Textrader: | 2 linjer |
| Maximal räckvidd utomhus: | 300 m |
| Snabbuppringning: | Ja |
| Mac-kompatibel: | Nej |
| Funktion för återuppringningslista: | 10 |
| Återuppringning: | Ja |
| Färg på bakgrundsbelysning: | Orange |
| Samtalstid: | 13 h |
| Ringsignalens placering: | Telefonlur |
| Klarar konferenssamtal: | Ja |
| Stand-by tid: | 200 h |
| Kamera inkluderad: | Nej |
| Sidfunktion: | Ja |
| Funktioner för flera telefonlurar: | 4 |
| Överflyttning av samtal (ECT): | Ja |
| Lägg till nya kontakter från handenhet: | Ja |
Behöver du hjälp?
Om du behöver hjälp med Gigaset A160 Cuarteto ställ en fråga nedan och andra användare kommer att svara dig
Telefon Gigaset Manualer

4 September 2025
31 Augusti 2025
5 Augusti 2025
5 Augusti 2025
5 Augusti 2025
5 Augusti 2025
4 Augusti 2025
4 Augusti 2025
4 Augusti 2025
4 Augusti 2025
Telefon Manualer
Nyaste Telefon Manualer
2 April 2026
2 April 2026
27 Mars 2026
26 Mars 2026
16 Mars 2026
14 Mars 2026
13 Mars 2026
4 Mars 2026
30 Januari 2026
25 Januari 2026