Gill TDMC+ Bruksanvisning
Gill
Inte kategoriserad
TDMC+
Läs gratis den bruksanvisning för Gill TDMC+ (14 sidor) i kategorin Inte kategoriserad. Guiden har ansetts hjälpsam av 13 personer och har ett genomsnittsbetyg på 5.0 stjärnor baserat på 7 recensioner. Har du en fråga om Gill TDMC+ eller vill du ställa frågor till andra användare av produkten? Ställ en fråga
Sida 1/14

Copyright © Teledyne Battery Products 2020, all rights reserved
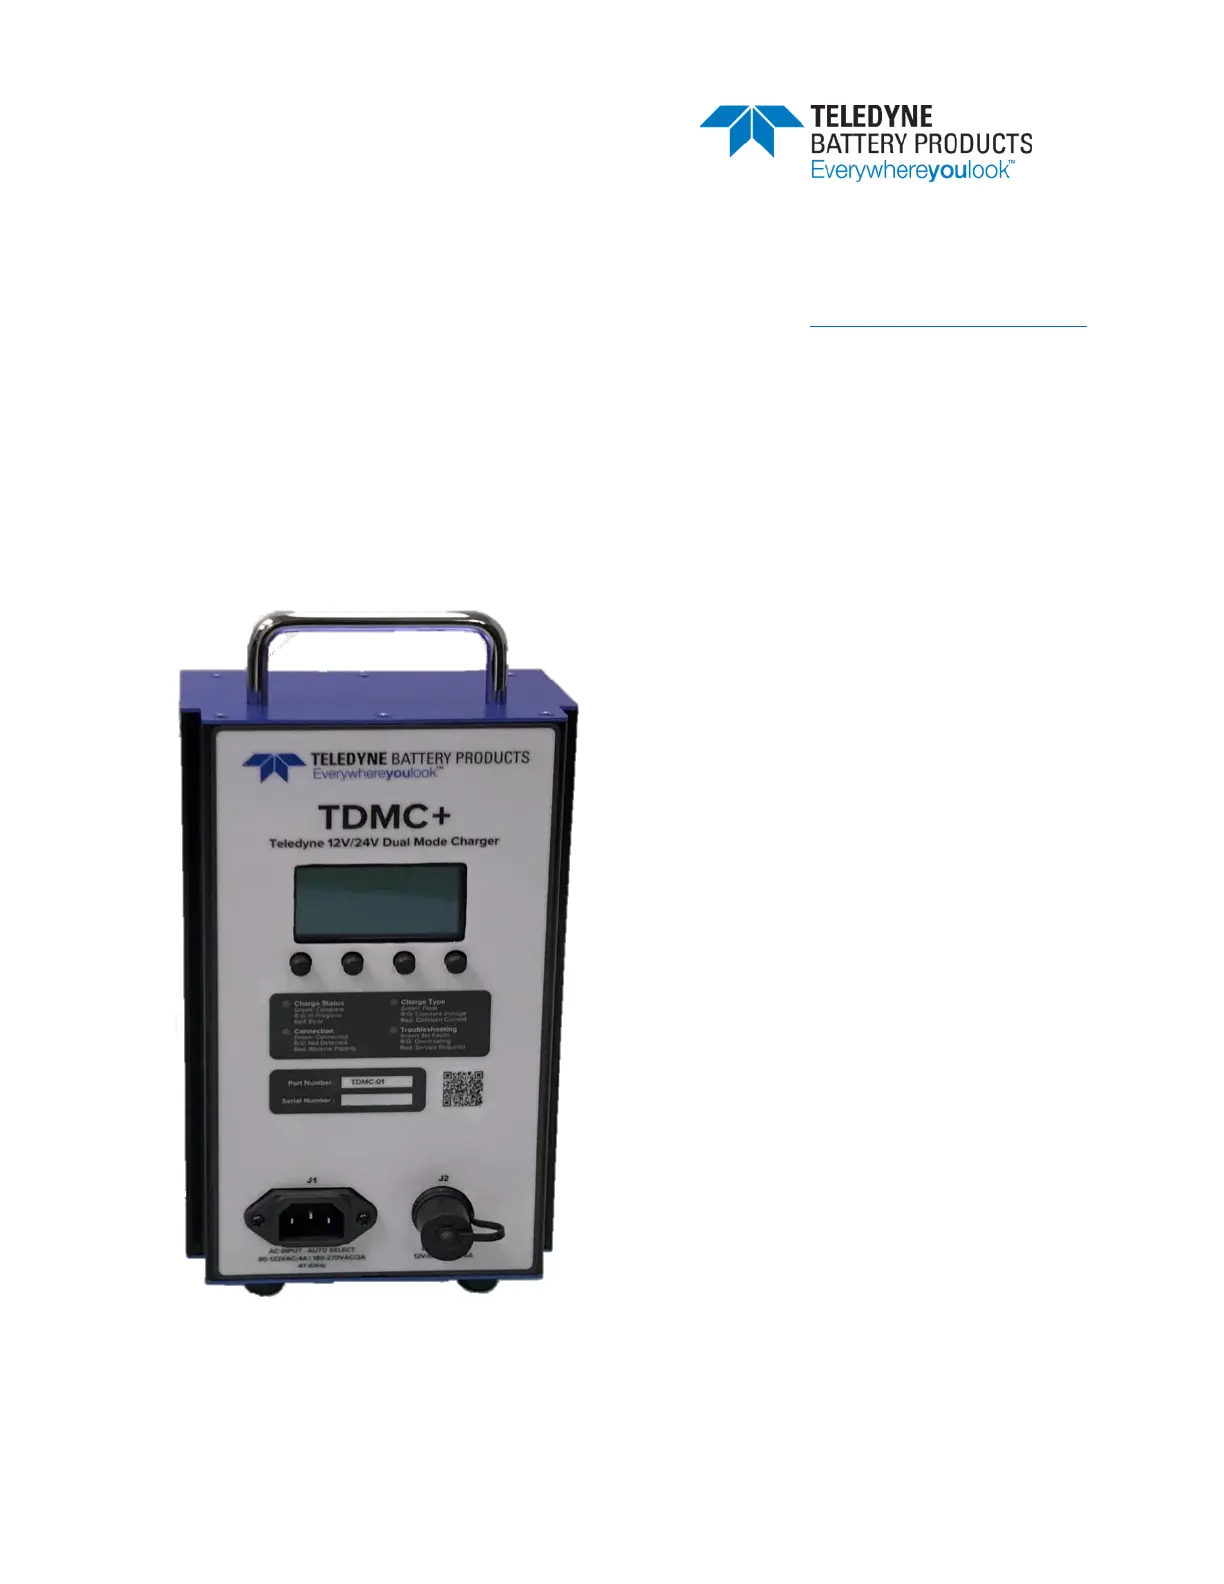
TDMC+
Teledyne Dual Mode
12 and 24 VDC, Lead-Acid Battery Charger
Redlands, CA 92374
1 (800) 456 0070
1 (909) 793 3131
support@teledynebattery.com
Product Name: TDMC+
Part Number: TDMC- 01
Document:
Revision: A
Revision Date: 10 September 2021

TDMC+ Teledyne Dual Mode Charger
Questions? Write to: support@teledynebattery.com Page 2/ 15
Or call: 1 (800) 456 0070 / 1 (909) 793 3131.
Teledyne Battery Products recommends you read the entire user manual before assembling and using
the battery charger. For any questions or concerns please email support:
support@teledynebattery.com or cal 1 (800) 456 0070 / 1 (909) 793 3131. l
Contents
Quick Reference .......................................................................................................................................... 3
Product Description .................................................................................................................................... 4
Precautions and Warnings .......................................................................................................................... 5
Batteries .................................................................................................................................................. 5
Location ................................................................................................................................................... 5
Grounding and AC Power Cord ............................................................................................................... 5
DC Output Connection ............................................................................................................................ 6
Charger .................................................................................................................................................... 6
Personal Precautions 6 ..............................................................................................................................
Charger Operation ...................................................................................................................................... 7
Organization of the Screen and Options ................................................................................................. 7
LED Indicators 9 .........................................................................................................................................
Charging Methods ..................................................................................................................................... 10
Normally Discharged Lead-Acid Battery Three Stage Charge Method ................................................. 10
Details of Three Stage Charge Method ................................................................................................. 10
Deeply Discharged or Sulphated Lead-Acid Battery Two Stage Charge Method ................................. 11
Details of the Two Stage Charge Mode ................................................................................................ 12
Charging Specifications ......................................................................................................................... 13
Unit Specifications .................................................................................................................................... 13
Charger Settings .................................................................................................................................... 14
Field Test / Calibration Check ................................................................................................................... 15

TDMC+ Teledyne Dual Mode Charger
Questions? Write to: support@teledynebattery.com Page 3/ 15
Or call: 1 (800) 456 0070 / 1 (909) 793 3131.
Teledyne Battery Products recommends you read the entire user manual before assembling and using
the battery charger. For any questions or concerns please email support:
support@teledynebattery.com or cal 1 (800) 456 0070 / 1 (909) 793 3131 l
Quick Reference
• Connect (or Disconnect) a battery only when the charger is either
unplugged from AC (off) or when the display indicates “-not
charging-“.
• For proper polarity connect the Positive (Red / +) charging cable to
the Positive terminal on the battery. Connect the Negative (Black /
-) charging cable to the Negative terminal on the battery.
Reversing these connections will result in the charger displaying a
“Reverse Polarity” error.
• When t charging, the charger screen looks similar to the no
illustration shown on the right. The screen is organized in 6 sections as denoted by letters A- F:
• Battery Voltage and Battery Current shown in Screen Section E: this information is shown in
all modes and updates continuously.
▪ Indicated Voltage will be 00.0V when a battery is not connected; or will reflect the
voltage of a connected battery.
▪ Indicated Amperage will be 00.0A
• Charger Operational Status shown in Screen Section F: indicates whether the charger is “not
charging” and idle, or if a charge cycle is in process.
• Charger Voltage mode charger voltage for 12V or 24V operation as appropriate : User selects
for the battery to be charged by pressing the button in Screen Section A.
▪ Caution: If a 12V battery is charged with a 24V charge curve the battery may be
overcharged causing potentially serious damage.
▪ Caution: if a 24V battery is charged with a 12V charge curve the battery may be
undercharged, potentially damaging the battery. Please refer to the LT batteries CMM,
Section 5.1.2, 5.1.3, and section 5.1.4 page 11.
• Charger Current mode: User selects for 6A to 1A as appropriate for the battery to be charged
by pressing the button in Screen Section B.
▪ Caution: Always follow battery Component Maintenance Manual (CMM) guidance.
• Charge Cycle End Condition: User selects amperage or time limited charge by pressing the
button in Screen Section C.
▪ Amperage (.5A) the charger will follow a three-stage charge mode recommended for –
use with all normally discharged lead-acid batteries.
The final stage of the three-stage mode is a constant float maintenance charge. The
battery may be left on constant float and will maintain charge until use.
▪ Time-Limited (65 hours to 10 hours) the charger will follow a two-stage charge mode –
recommended for use with deeply discharged or sulphated lead-acid batteries. Follow
CMM and see guidance (section 6) for calculating the recommended time limit.
• Go! Button: User initiated charge cycle
▪ After confirming charger configuration, press the button in Screen Section to start the D
charge cycle.
00.0V 00.0A
- Not Connected -
Volt Cur End At
24V 6A .5A
A DB C
E
F
A B C C
Idle Screen
Produktspecifikationer
Varumärke: | Gill |
Kategori: | Inte kategoriserad |
Modell: | TDMC+ |
Behöver du hjälp?
Om du behöver hjälp med Gill TDMC+ ställ en fråga nedan och andra användare kommer att svara dig
Inte kategoriserad Gill Manualer
15 September 2024
Inte kategoriserad Manualer
- Hover-1
- Echo
- Winchester
- Hagor
- Bebob
- OBH Nordica
- Swan
- Callpod
- Renogy
- FIAP
- Westcott
- Colonial Elegance
- SetonixSynth
- Hammond
- Sanitec
Nyaste Inte kategoriserad Manualer
9 April 2025
9 April 2025
9 April 2025
9 April 2025
9 April 2025
9 April 2025
9 April 2025
9 April 2025
9 April 2025
9 April 2025