Gloria 3003 Bruksanvisning
Gloria rökdetektor 3003
Läs gratis den bruksanvisning för Gloria 3003 (2 sidor) i kategorin rökdetektor. Guiden har ansetts hjälpsam av 19 personer och har ett genomsnittsbetyg på 4.6 stjärnor baserat på 8 recensioner. Har du en fråga om Gloria 3003 eller vill du ställa frågor till andra användare av produkten? Ställ en fråga
Sida 1/2
Installation of alarm:
1. Detach the alarm from the mounting base by twisting
counter clockwise. Use the mounting base to mark the
screw holes on the ceiling. Use the enclosed screws and
plugs to install the mounting base. Once the mounting
base is installed on ceiling or wall, attach the alarm by
twisting clockwise.
127617 rev6
2.After mounting, test the alarm by pushing the test but-
ton on the top and get a loud alarm tone.
Please note: The label in the product must not be removed
as it contains important information regarding the product.
Heat alarm signal: The heat alarm has a visual and
acoustic signal. In the passive state, the LED will ash
every 48 seconds to indicate normal function. In alarm
state the LED will speed up flash, and the alarm will
emit a sweeping sound pattern design to alert oc-
cupants.
Hush function:In case of unintentional or false alarms,
push button for 2 seconds.This will mute the alarm for
10 minutes, after which time the alarm will automatically
resume its normal function.
Maintenance: Test the heat alarm at least once per
quarter, by pushing the test button. The heat alarm
should give a loud alarm tone.
Fault nding: If the heat alarm activates without visible
cause, then possible cause could be:
You may have your heat alarm too close to the cooking
hobs and stove. Try reinstalling slightly further away to
alleviate any issues.
If the heat alarm does not work, when the test button is
pushed, the probably cause is a faulty battery, and the
heat alarm must be replaced.
Other information: Do not paint the heat alarm.
Disposal:For product, please dispose properly at end
of life. This is electronic waste that should be recycled.
WARNING: All alarms should be assumed as due to
actual re and the dwelling should be evacuated imme-
diately.
WARNING: To prevent injury, this apparatus must be
securely attached to the ceiling/wall in accordance with
the installation instructions.
WARNING: Batteries shall not be exposed to excessive
heat such as shine, re, or the like. Note the local coun-
try regulations regarding installation.
The
CE mark to confirms its affixed this product compliance
with the European Directives which applytotheproduct.
Alarm condition aural ISO 8201.signal pattern according to
CAVIUS assumes no responsibility for any errors, which may
appear in this manual. Furthermore, CAVIUS reserves the
right to alter the hardware, software, and/or specifications de-
tailed herein at any time without notice, and CAVIUS does not
make any commitment to update the information contained
herein.
Developed by CAVIUS
Jens Juuls Vej 28 K,DK-8260
Manufactured in P.R.C.
Commercial reference: 3003
Developed by CAVIUS
PLEASE READ THE USER GUIDE
CAREFULLY BEFORE USE AND
RETAIN FOR FUTURE USE!
This Thermal Heat Alarm is designed for areas not suitable
for smoke alarms due to high risk of false alarms such
as; kitchens, garages or workshops.
Safety instructions:
The device comes with a 3V lithium battery. Batteries
are to be handled with care and battery powered devices
should be kept out of reach of children. Do not try to
recharge or burn the batteries.
Technical information:
Type of alarm: CAVIUS heat alarm detects
1) rapidly increased temperature level
2) absolute heat level of 58 degrees C.
Sound output: The minimum sound level is 85dB at 3
meter.
Battery:Powered by a non-replaceable 3v CR123A Lithium
battery with 10-year life (included).
Low battery indicator: A short acoustic “beep” will
sound and the LED will ash every 48 seconds when
the battery is near the end of its life. In this stage it will
continue for minimum 30 days.
The heat alarm is not active unless it is inserted in the
mounting base.
The best areas to mount the alarm:
•Areas not suitable for smoke alarms due to high
risk of false alarms
• Kitchen area
• Bathroom
• Garage or workshop
Additional alarms increase the security.
The alarm may NOT be placed:
• In rooms where the temperature goes outside
-10ºC to +50ºC.
• Bedrooms
• Lounge
• Dining room
• Hallway
• Family room
NOTE: In areas where smoldering res occur over aming
res, photoelectric smoke alarms are still the best to be in-
stalled.
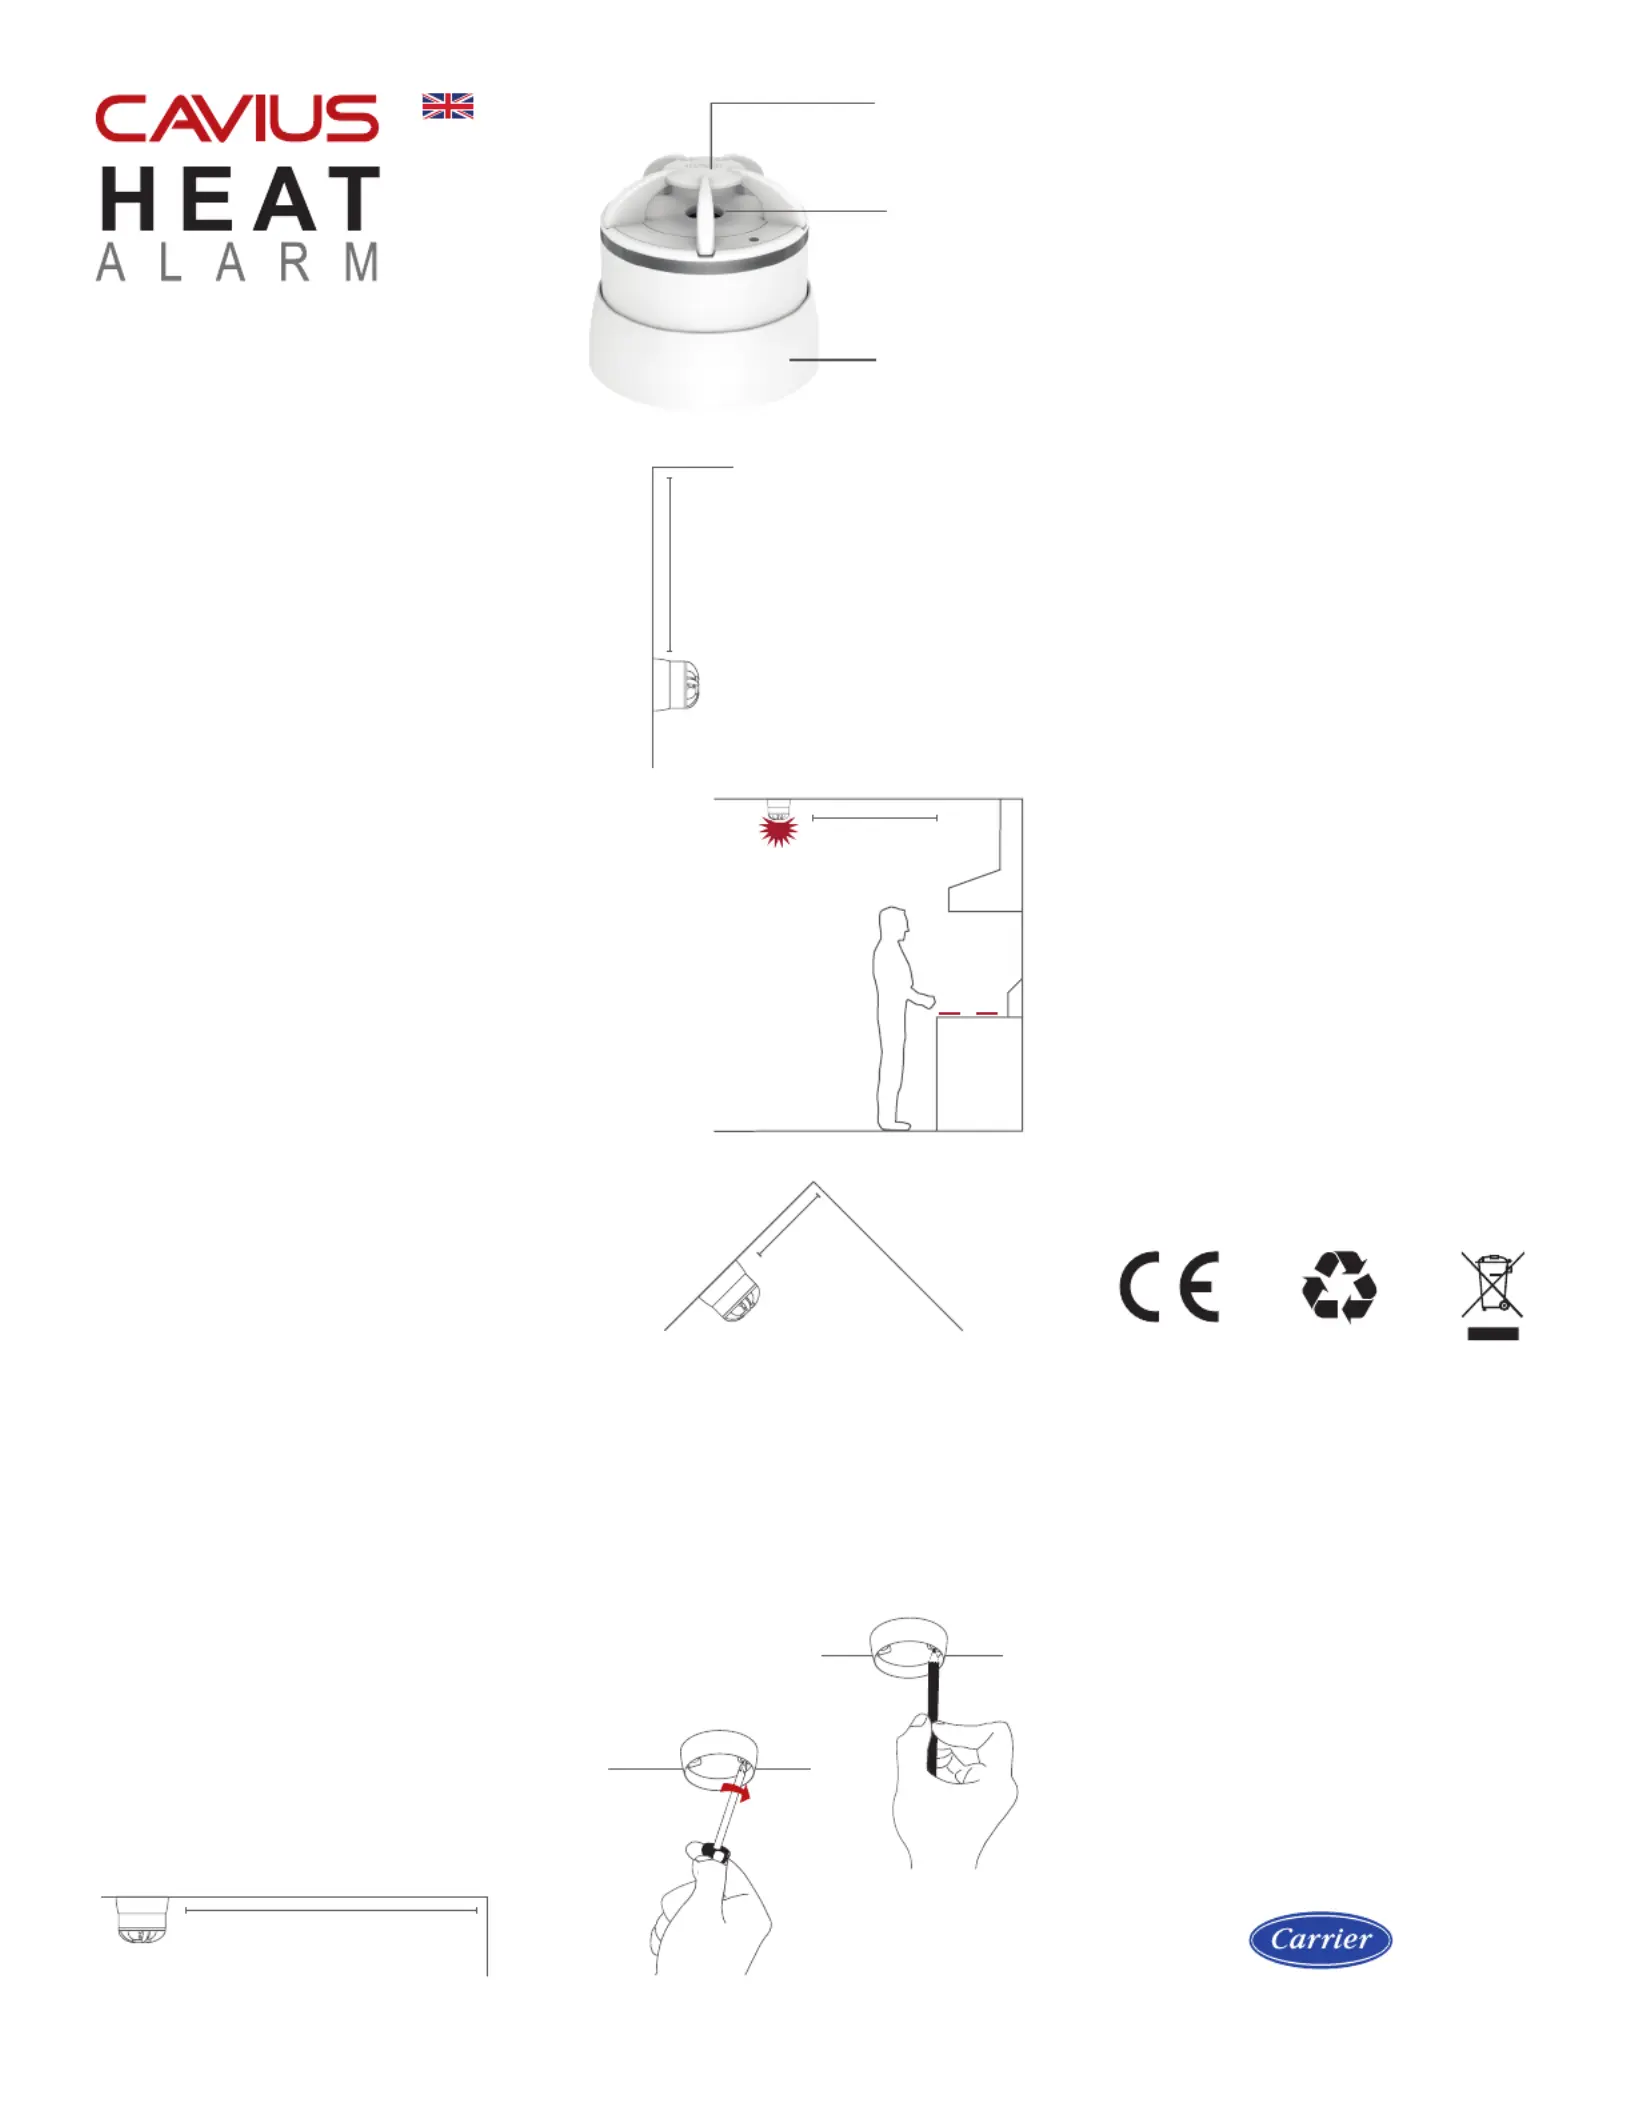
Placement:
The heat alarm is designed to be installed on a ceiling
or wall. Never install directly above an oven/hob/stove.
Test/Hush button
Alarm audible alert
Mounting base
UK
Use the enclosed screws and
plugs for installation
Mark up screw holes with a pen
Minimum 50cm
from wall
Wall
Ceiling
Minimum 30cm and
maximum 50cm from
ceiling
Ceiling
Wall
Minimum 30cm
and maximum 50cm
from stove
Ceiling
Minimum 50cm
from peak
Peak ceiling
©2023 Carrier. All Rights Reserved.
All trademarks and service marks referred herein are property of their respective owners.
Produktspecifikationer
| Varumärke: | Gloria |
| Kategori: | rökdetektor |
| Modell: | 3003 |
Behöver du hjälp?
Om du behöver hjälp med Gloria 3003 ställ en fråga nedan och andra användare kommer att svara dig
rökdetektor Gloria Manualer

13 Augusti 2025
29 Juli 2025
24 Juli 2025
24 Juli 2025
rökdetektor Manualer
Nyaste rökdetektor Manualer
22 Mars 2026
11 Mars 2026
2 Mars 2026
1 Mars 2026
19 September 2025
19 September 2025
19 September 2025
19 September 2025
19 September 2025
19 September 2025