Hotpoint SMP9 D2Z X H Bruksanvisning
Hotpoint
Kyl-frys kombinationer
SMP9 D2Z X H
Läs gratis den bruksanvisning för Hotpoint SMP9 D2Z X H (4 sidor) i kategorin Kyl-frys kombinationer. Guiden har ansetts hjälpsam av 23 personer och har ett genomsnittsbetyg på 5.0 stjärnor baserat på 12 recensioner. Har du en fråga om Hotpoint SMP9 D2Z X H eller vill du ställa frågor till andra användare av produkten? Ställ en fråga
Sida 1/4

EN
1
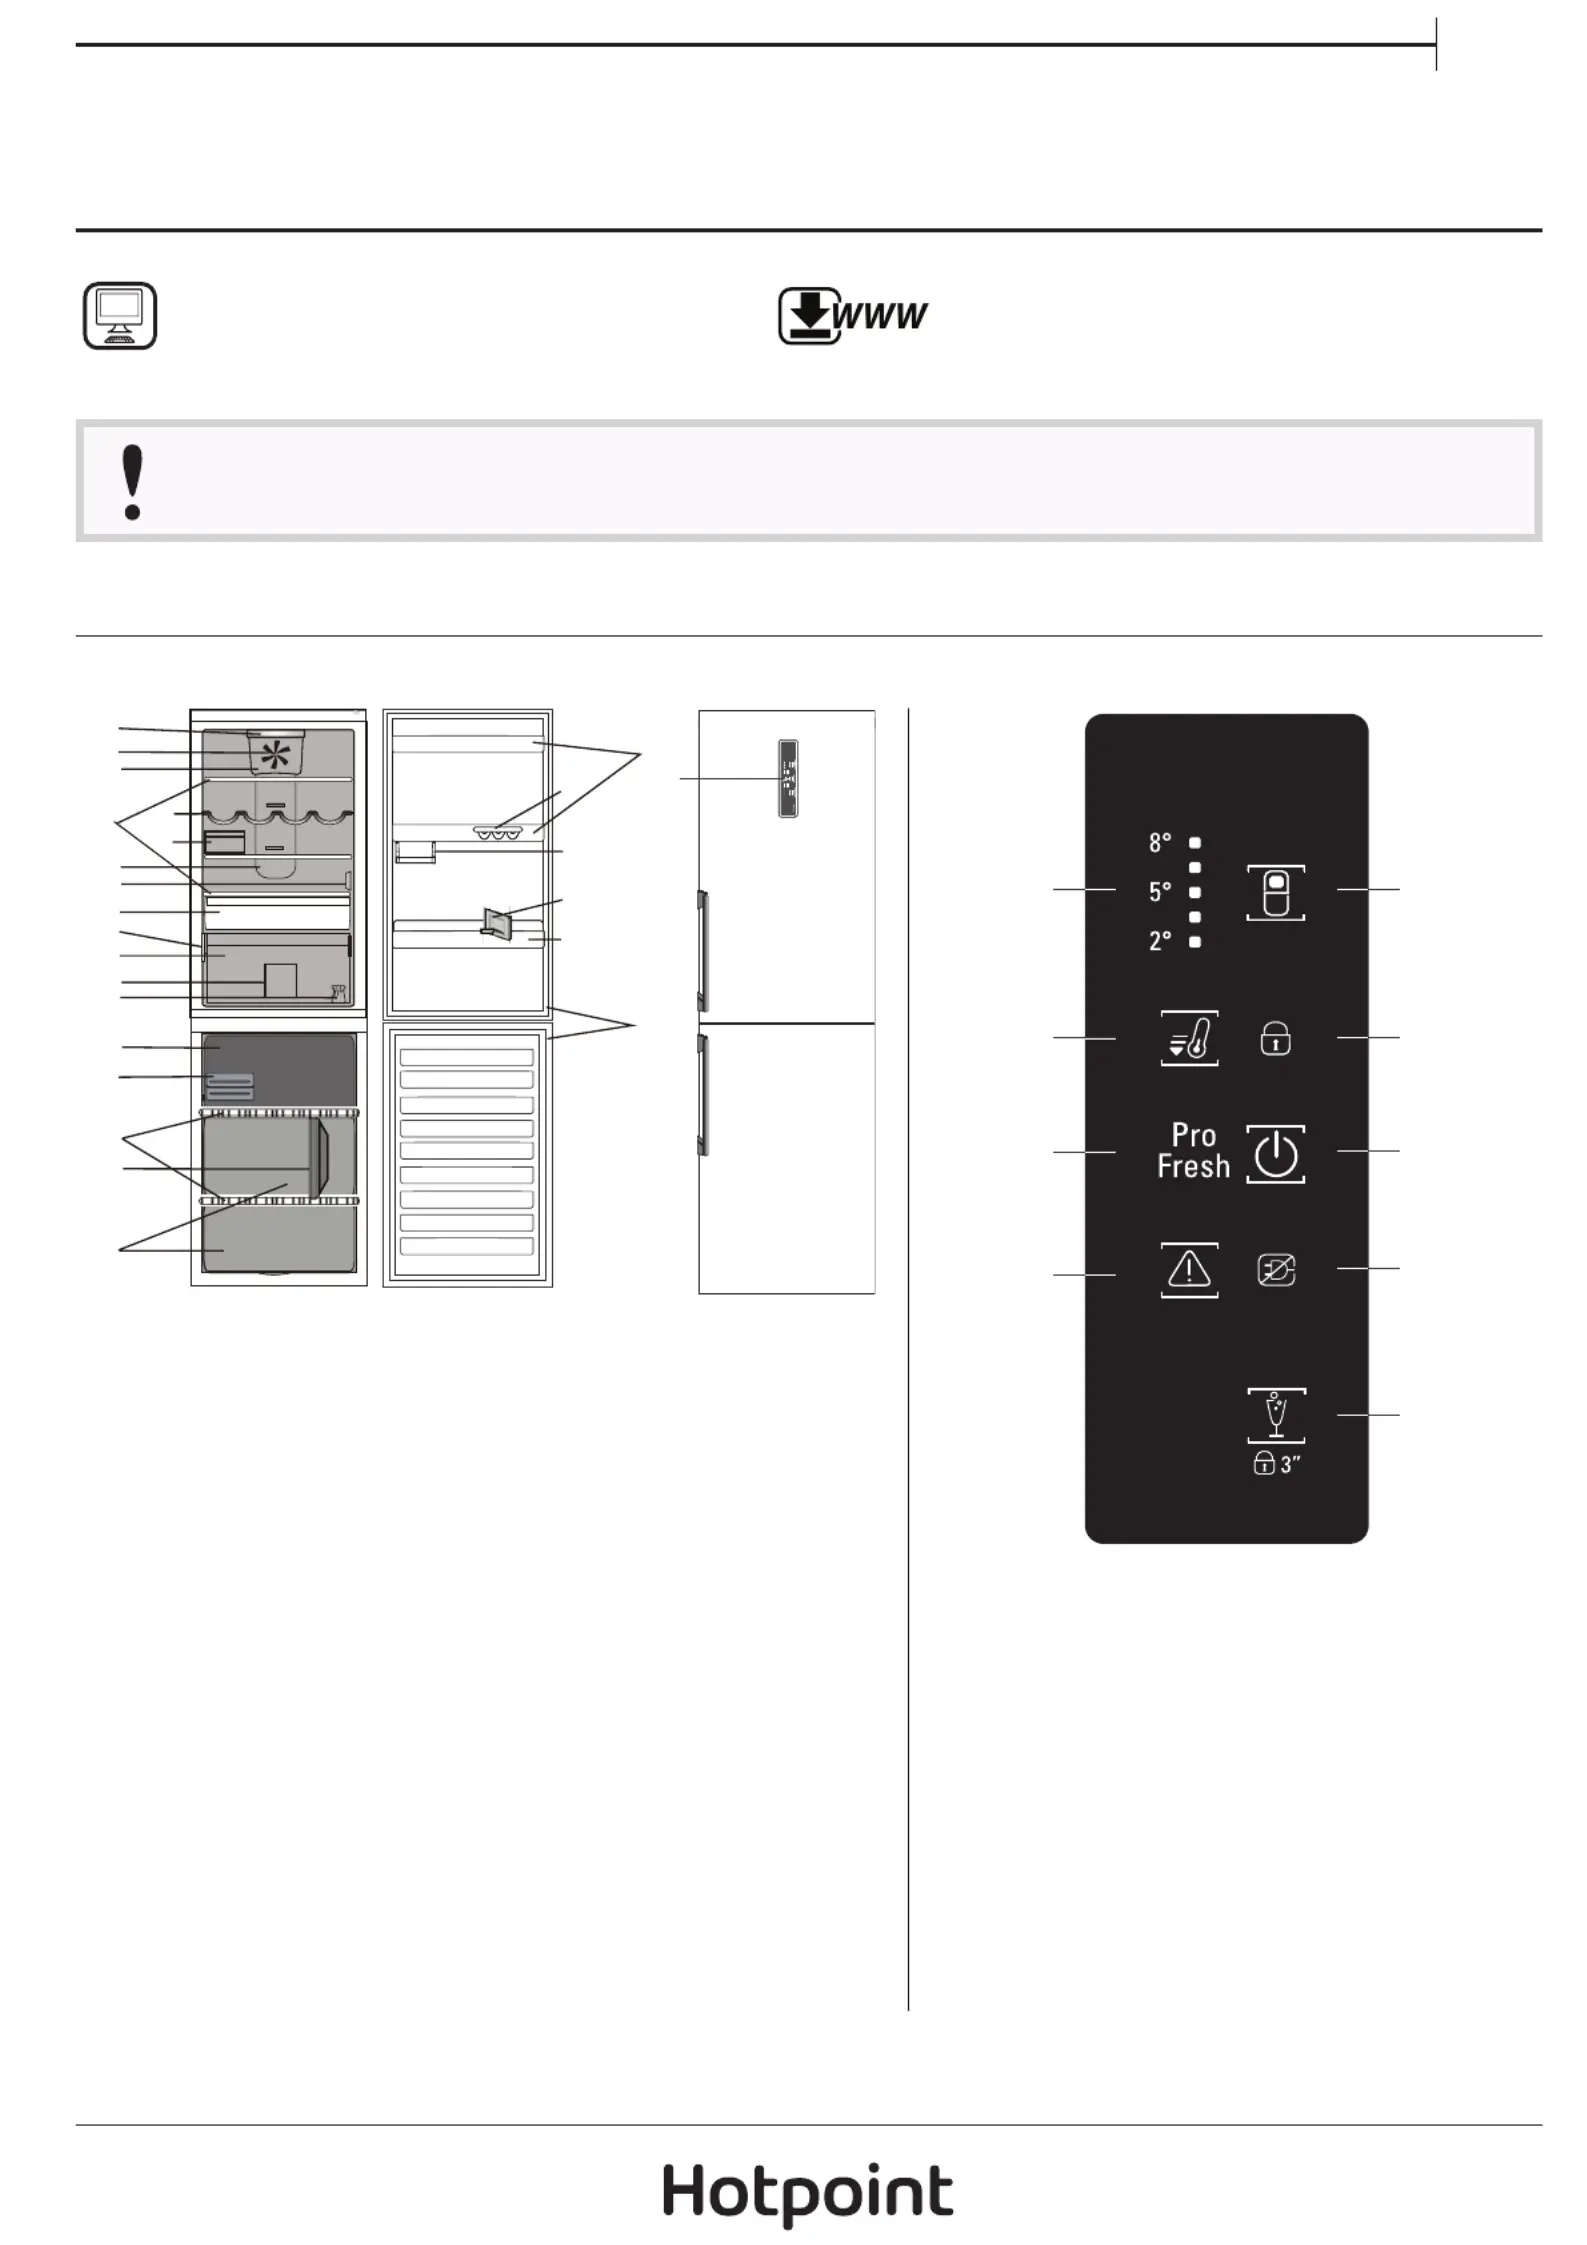
1. FRIDGE TEMPERATURE
LEDs
2. FAST COOL button
3. PROFRESH indicator
4. STOP ALARM button /
ALARM indicator
5. FRIDGE TEMPERATURE
button
6. KEY LOCK indicator
7. ON/STAND-BY button
8. BLACK OUT ALARM
indicator
9. PARTY MODE button /KEY
LOCK button
CONTROL PANEL
1. Control panel
Refrigerator compartment
2. LED lighting
3. Fan
4. Fan cover and
antibacterial lter area
5. Shelves
6. Bottle rack
7. Cheese box + Lid
8. Multi-ow cold air area
9. Sensor cover
10. Cooler compartment
(best for meat and sh)
11. Rating plate with
commercial name
12. Fruits and vegetables
crisper
13. Fridge drawer divider
PRODUCT DESCRIPTION
APPLIANCE
3
56
9
10
11
13
20
21
2
22
8
23
25
24
1
7
12
15
16
18
19
17
4
14
1
2
3
4
5
6
7
8
9
14. Door reversibility kit
15. Door trays
16. Egg tray
17. Small items half balcony
18. Bottle separator
19. Bottle balcony
20. Door seal
Freezer compartment
20. Door seals
21. Upper drawer: coolest
zone best for freezing
fresh food
22. Quick Ice / Eutetics
23. Shelves
24. Freezer drawer divider
25. Freezer drawers
DAILY REFERENCE
GUIDE
Before using the appliance carefully read the Health and Safety guide.
THANK YOU FOR PURCHASING AN HOTPOINT
PRODUCT
To receive more comprehensive help and support,
please register your product at
www.hotpoint.eu/register
WWW
You can download the Safety Instructions and the
Use and Care Guide by visiting our website
docs.hotpoint.eu and following the instructions
on the back of this booklet.

2
FIRST TIME USE
HOW TO START THE APPLIANCE
After plugging the appliance to the mains, it starts the
operation automatically.
After starting the appliance, wait at least 4-6 hours
before placing food into the fridge and into the freezer
compartment.
When the appliance is connected to the power supply, the
display lights up and all the icons appear on the display for
approximately 1 second. The default (factory) values of the
fridge compartment settings light-up.
ACCESSORIES
EGG TRAY CHEESE BOX BOTTLE RACK BOTTLE SEPARATOR
FREEZER DRAWER DIVIDER FRIDGE DRAWER DIVIDER QUICK ICE
COMPARTMENT
EUTETICS/QUICK ICE
TRAYS
QUICK ICE
HOW TO MAKE ICE CUBES
Put the empty ice cube trays into the freezer 24 hours before
using the Quick Ice feature to cool them down. To achieve the
best performance of the Quick Ice trays it is recommended
to keep them permanently in the freezer and maintain
temperature setting at -18°C or colder.
Remove a Quick Ice tray by pulling it towards you.
Remove the cover and ll the tray with potable water
(maximum level = 2/3 of the overall capacity of the tray).
Insert the cover back into the tray and insert it back into the
dedicated slots in the top freezer drawer. Take care not to spill
water.
Wait at least 30 minutes until the ice cubes are formed (this
time can be slightly longer if the trays are used immediately
after the rst use).

EN
3
ON/STANDBY FUNCTION
To put the product in Stand-by, press and hold the On/
Stand By button for 3 seconds. All the indicators turn o
except On/Standby indicator.
Press again to reactivate the appliance.
SMART DISPLAY
This optional function can be used to save energy. To activate
the Smart Display, press Fridge Temperature and Party Mode
buttons at the same time for 3 seconds until an audible
signal sounds. To deactivate this function repeat the same
procedure. Remember that this function does not disconnect
the appliance from the power supply, but only reduce the
power consumed by external display.
TEMPERATURE SETTING
To adjust the Fridge Temperature, press the Fridge
Temperature button. The Fridge Temperature can be
adjusted between +2°C and + 8°C, as shown by the Fridge
Temperature LEDs.
PARTY MODE
Press to activate/deactivate the Party Mode function. Use this
function to chill drinks inside the freezer compartment.
Important: do not leave the bottle inside the freezer
compartment longer than the function is active (30 minutes)
KEY LOCK
To lock/unlock the keys of the Control Panel, press the Party
Mode button for 3 seconds: the Key Lock indicator will be
displayed for a short time and an acoustical signal will be
played.
PRO FRESH
This function automatically works to ensure the optimal
conditions to preserve the stored food. If there are any
variations, Pro Fresh immediately restores the ideal
conditions. Results are outstanding: freshness preserved at
best throughout the fridge cavity up to 4 times longer.
FAST COOL FUNCTION
Using Fast Cool function it is possible to increase the cooling
in the refrigerator compartment. The use of this function is
recommended when placing a very high quantity of food
in the refrigerator compartment. Press the Fast Cool button
to activate Fast Cool function. When activated, the Fast Cool
indicator will turn on. The function is automatically disabled
after 6 hours, or can be manually disabled by pressing Fridge
°C button.
REFRIGERATOR LIGHT
The light system inside the refrigerator compartment uses
LEDs light, allowing a better lightning as well as a very low
energy consumption.
If the LED light system does not work, please contact the
Service to replace it.
Important: The refrigerator compartment light switches
on when the refrigerator door is opened. If the door is kept
open for more then 10 minutes the light will be automatically
switched o.
FAN + ANTIBACTERIAL FILTER
The Fan improves temperature distribution inside the
refrigerator compartment, allowing better preservation of
stored food. If the appliance has the Fan it can be equipped
with the antibacterial lter.
Remove it from the box placed in the crisper drawer and
insert into the fan cover - as in the picture.
The replacement procedure is included in the lter box.
ALARM TABLE
ALARM TYPE Signal Cause Cure
Door open
alarm The acoustical alarm is activated
and the Alarm Indicator blinks. The Fridge or Freezer door has
remained open for more than 2
minutes.
Close the door or press the Stop
Alarm to mute the acoustical alarm.
Temperature
alarm The acoustical alarm is activated
and the Alarm Indicator remains
on.
Inside the Freezer the temperature
is not adequate Press the Stop Alarm button ;
the acoustical alarm stops, the
Alarm Indicator remains on until a
temperature < -10°C is reached.
Party Mode
alarm The Party Mode Indicator blinks
and the acoustical alarm is
activated.
30 min. elapsed since Party Mode
function has been activated. It is
time to take out the bottle from
the freezer (see Use and Care
Guide for more details).
Press the Party Mode button to stop
the alarm.
Long black-out
alarm The Black Out Alarm icon remains
on, the Alarm indicator blinks. Prolonged power failure, able to
cause the inside temperature to
increase to 0°C.
Press the Stop Alarm button ; the
acoustical alarm stops.
Malfunction 3 central LEDs in the Fridge
Temperature LEDs blinks on the
display.
Product malfunction. Contact the After-sales Service.
DAILY USE
FUNCTIONS
See Use and Care Guide for more details on functions / see
last page for information on how to obtain the Use and Care
Guide
Produktspecifikationer
Varumärke: | Hotpoint |
Kategori: | Kyl-frys kombinationer |
Modell: | SMP9 D2Z X H |
Färg på produkten: | Zwart |
Vikt: | 550 g |
Bredd: | 117 mm |
Djup: | 193 mm |
Höjd: | 10 mm |
Förpackningens bredd: | 125 mm |
Djuppackning: | 214 mm |
Förpackningshöjd: | 45 mm |
Batterikapacitet: | 2400 mAh |
Skärm diagonal: | 7 " |
Upplösning: | 1024 x 600 Pixels |
Original bildförhållande: | 16:9 |
Accelerometer: | Ja |
Processorfrekvens: | 1.2 GHz |
Antal processorkärnor: | 4 |
Intern lagringskapacitet: | 8 GB |
Minneskortets maximala kapacitet: | 32 GB |
Wi-Fi-standarder: | 802.11b, 802.11g, Wi-Fi 4 (802.11n) |
Plats position: | Nee |
Vormfaktor: | Slate |
Bakre kameraupplösning (numerisk): | - MP |
Främre kameraupplösning (numerisk): | 2 MP |
Inkluderar operativsystem: | Android 8.1 Go edition |
Plattform: | Android |
Typ av anslutningskontakt: | 3,5 mm |
Integrerad minneskortläsare: | Ja |
Kompatibla minneskort: | MicroSD (TransFlash) |
Touch-teknik: | Multi-touch |
Pekskärmstyp: | Capacitief |
Assisterad GPS (A-GPS): | Nee |
Google-applikationer: | Google Play |
LED-bakgrundsbelysning: | Ja |
Inbyggda högtalare: | Ja |
Anslutning för nätadapter: | Ja |
Inbyggd mikrofon: | Ja |
Internminne: | 1 GB |
Förvarings media: | Flash |
Batteritid/batteritid: | - uur |
Internminnestyp: | DDR3-SDRAM |
Displayteknik: | LCD |
WiFi-standard: | Wi-Fi 4 (802.11n) |
Typ av enhet: | Minitablet |
Fram kamera: | Ja |
Backkamera: | Nee |
Hörlurarna avstängda: | Ja |
Antal mikro-USB 2.0-portar: | 1 |
Power högtalare: | 1 W |
Batteriteknik: | Lithium-Polymeer (LiPo) |
Produkter per intermodal container (40 fot - High Cube): | 26802 stuk(s) |
Produkter per intermodal container (20 fot): | 11052 stuk(s) |
Behöver du hjälp?
Om du behöver hjälp med Hotpoint SMP9 D2Z X H ställ en fråga nedan och andra användare kommer att svara dig
Kyl-frys kombinationer Hotpoint Manualer
18 Oktober 2024
16 Oktober 2024
9 Oktober 2024
1 Augusti 2024
31 Juli 2024
30 Juli 2024
30 Juli 2024
30 Juli 2024
29 Juli 2024
28 Juli 2024
Kyl-frys kombinationer Manualer
- Benavent
- ECG
- Hoover
- AEG
- Orima
- Kenmore
- Arcelik
- BEKO
- Hotpoint-Ariston
- Zanussi-electrolux
- Tecnolux
- Proline
- Cobal
- Hanseatic
- Concept
Nyaste Kyl-frys kombinationer Manualer
3 April 2025
2 April 2025
25 Februari 2025
25 Februari 2025
6 Februari 2025
25 Januari 2025
10 Januari 2025
10 Januari 2025
10 Januari 2025
10 Januari 2025