Keenetic Buddy 4 KN-3211 Bruksanvisning
Keenetic
Wifi-repeater
Buddy 4 KN-3211
Läs gratis den bruksanvisning för Keenetic Buddy 4 KN-3211 (2 sidor) i kategorin Wifi-repeater. Guiden har ansetts hjälpsam av 16 personer och har ett genomsnittsbetyg på 4.7 stjärnor baserat på 8.5 recensioner. Har du en fråga om Keenetic Buddy 4 KN-3211 eller vill du ställa frågor till andra användare av produkten? Ställ en fråga
Sida 1/2

2
1
10:00
Welcome to Your
Keenetic
Next
3
A
2
10:00
Mesh Wi-Fi
System
Acquire
4
1
3
B
1 023
KEENETIC
BUDDY Â
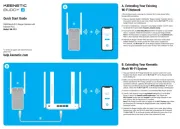
Quick Start Guide
N300 Mesh Wi-Fi Range Extender with
Ethernet Port
Model: KN-3211
A. Extending Your Existing
Wi-Fi Network
If the existing network is running on a Keenetic Wi-Fi router, please follow
Scenario for installation.B
1 Plug your Keenetic Buddy 4 (hereinafter ‘Range Extender’, ‘Keenetic device’)
into a power socket next to your router. Check that the on the Wi-Fi LED D
Range Extender starts blinking red.
2 Сonnect a mobile device / computer to your Range Extender via Wi-Fi using
the default Wi-Fi name (SSID): .Keenetic_Extender_Setup
3 Initial Setup WizardOnce connected, an window will appear on your mobile
device / computer. Follow the instructions to set up your Range Extender.
Note: If the Wizard does not appear, using a browser go to my.keenetic.net.
Refer to the Frequently Asked Questions section for more information.
4 Relocate the Range Extender within the range of your main router, about
halfway between your router and the Wi-Fi dead zone to expand your
Wi-Fi on the Range Extender will illuminate green network. The Wi-Fi LED D
when it has good connection to your router or blue if the connection is weak.
B. Extending Your Keenetic
Mesh Wi-Fi System
1 Plug your Keenetic Wi-Fi Range Extender into a power socket next to your
Keenetic Main Router. Check that the on the Range Extender Wi-Fi LED D
starts blinking red.
2 Make sure your Keenetic Main Router is active and has an Internet connection.
Connect the Keenetic W Range Extender to your Keenetic Main Router using i-Fi
an Ethernet cable (as supplied). Alternatively you can connect the devices
wirelessly by simultaneously pressing the Wi-Fi Control Buttons on both D
devices. Check that the on the Range Extender is blinking blue.Wi-Fi LED D
3 Сonnect a mobile device / computer to your Keenetic Main Router network.
4 my.keenetic.netLaunch a web browser and go to and log in the Main to
Router or launch the . Then choose the Keenetic mobile application
Wi-Fi System Acquiresection and click to add the Range Extender to your
Wi-Fi System. Wait for the process to complete.
Note: Wi-Fi System If the Range Extender does not appear on the page, follow
the instructions for resetting the Range Extender in the Frequently Asked
Questions section.
5 Relocate the Range Extender within the range of your router, about halfway
between your router and the Wi-Fi dead zone to expand your Wi-Fi network.
The on the Range Extender will illuminate green when it has Wi-Fi LED D
good connection to your router or blue if the connection is weak.
For technical support and other information,
please visit
help.keenetic.com
Produktspecifikationer
| Varumärke: | Keenetic |
| Kategori: | Wifi-repeater |
| Modell: | Buddy 4 KN-3211 |
Behöver du hjälp?
Om du behöver hjälp med Keenetic Buddy 4 KN-3211 ställ en fråga nedan och andra användare kommer att svara dig
Wifi-repeater Keenetic Manualer

6 Augusti 2025
10 Juli 2025
Wifi-repeater Manualer
- Vision
- Verint
- Steren
- Envivo
- Silvercrest
- Black Box
- Optex
- Heatit
- Maxxter
- Renkforce
- Netgear
- Tenda
- Multi-link
- Axing
- Allnet
Nyaste Wifi-repeater Manualer
3 Oktober 2025
28 September 2025
28 September 2025

28 September 2025
21 September 2025
19 September 2025
11 September 2025

9 September 2025
8 September 2025

24 Augusti 2025