Klein Tools 3000CRKIT Bruksanvisning
Klein Tools hand verktyg 3000CRKIT
Läs gratis den bruksanvisning för Klein Tools 3000CRKIT (1 sidor) i kategorin hand verktyg. Guiden har ansetts hjälpsam av 22 personer och har ett genomsnittsbetyg på 4.4 stjärnor baserat på 5 recensioner. Har du en fråga om Klein Tools 3000CRKIT eller vill du ställa frågor till andra användare av produkten? Ställ en fråga
Sida 1/1
3005CR
3006CR
3007CR
3000CRKIT
SYMBOLS ON PRODUCT
Warning or Caution
Wear Approved Eye Protection
NOT insulated - Will NOT protect against electric shock
Read Instructions
INSTRUCTIONS
CRIMPING TERMINALS FIG. A
1. Strip stranded copper wire to the terminal manufacturer’s
suggested length.
2. Insert stripped wire into the appropriate sized terminal, as
designated by the terminal manufacturer.
3. Place wire and terminal into the appropriate cavity of the
crimping dies (1), as indicated by the markings on the tool.
4. Line up the terminal so that the collar will be compressed by
the crimping tool.
5. Squeeze the handles together until they release, indicating a
complete crimp cycle.
NOTE: Once a crimping cycle has been started, the handles
will not release until a complete crimp cycle has been
achieved.
6. Remove the crimped assembly from the tool and verify that
the terminal is securely crimped onto the wire.
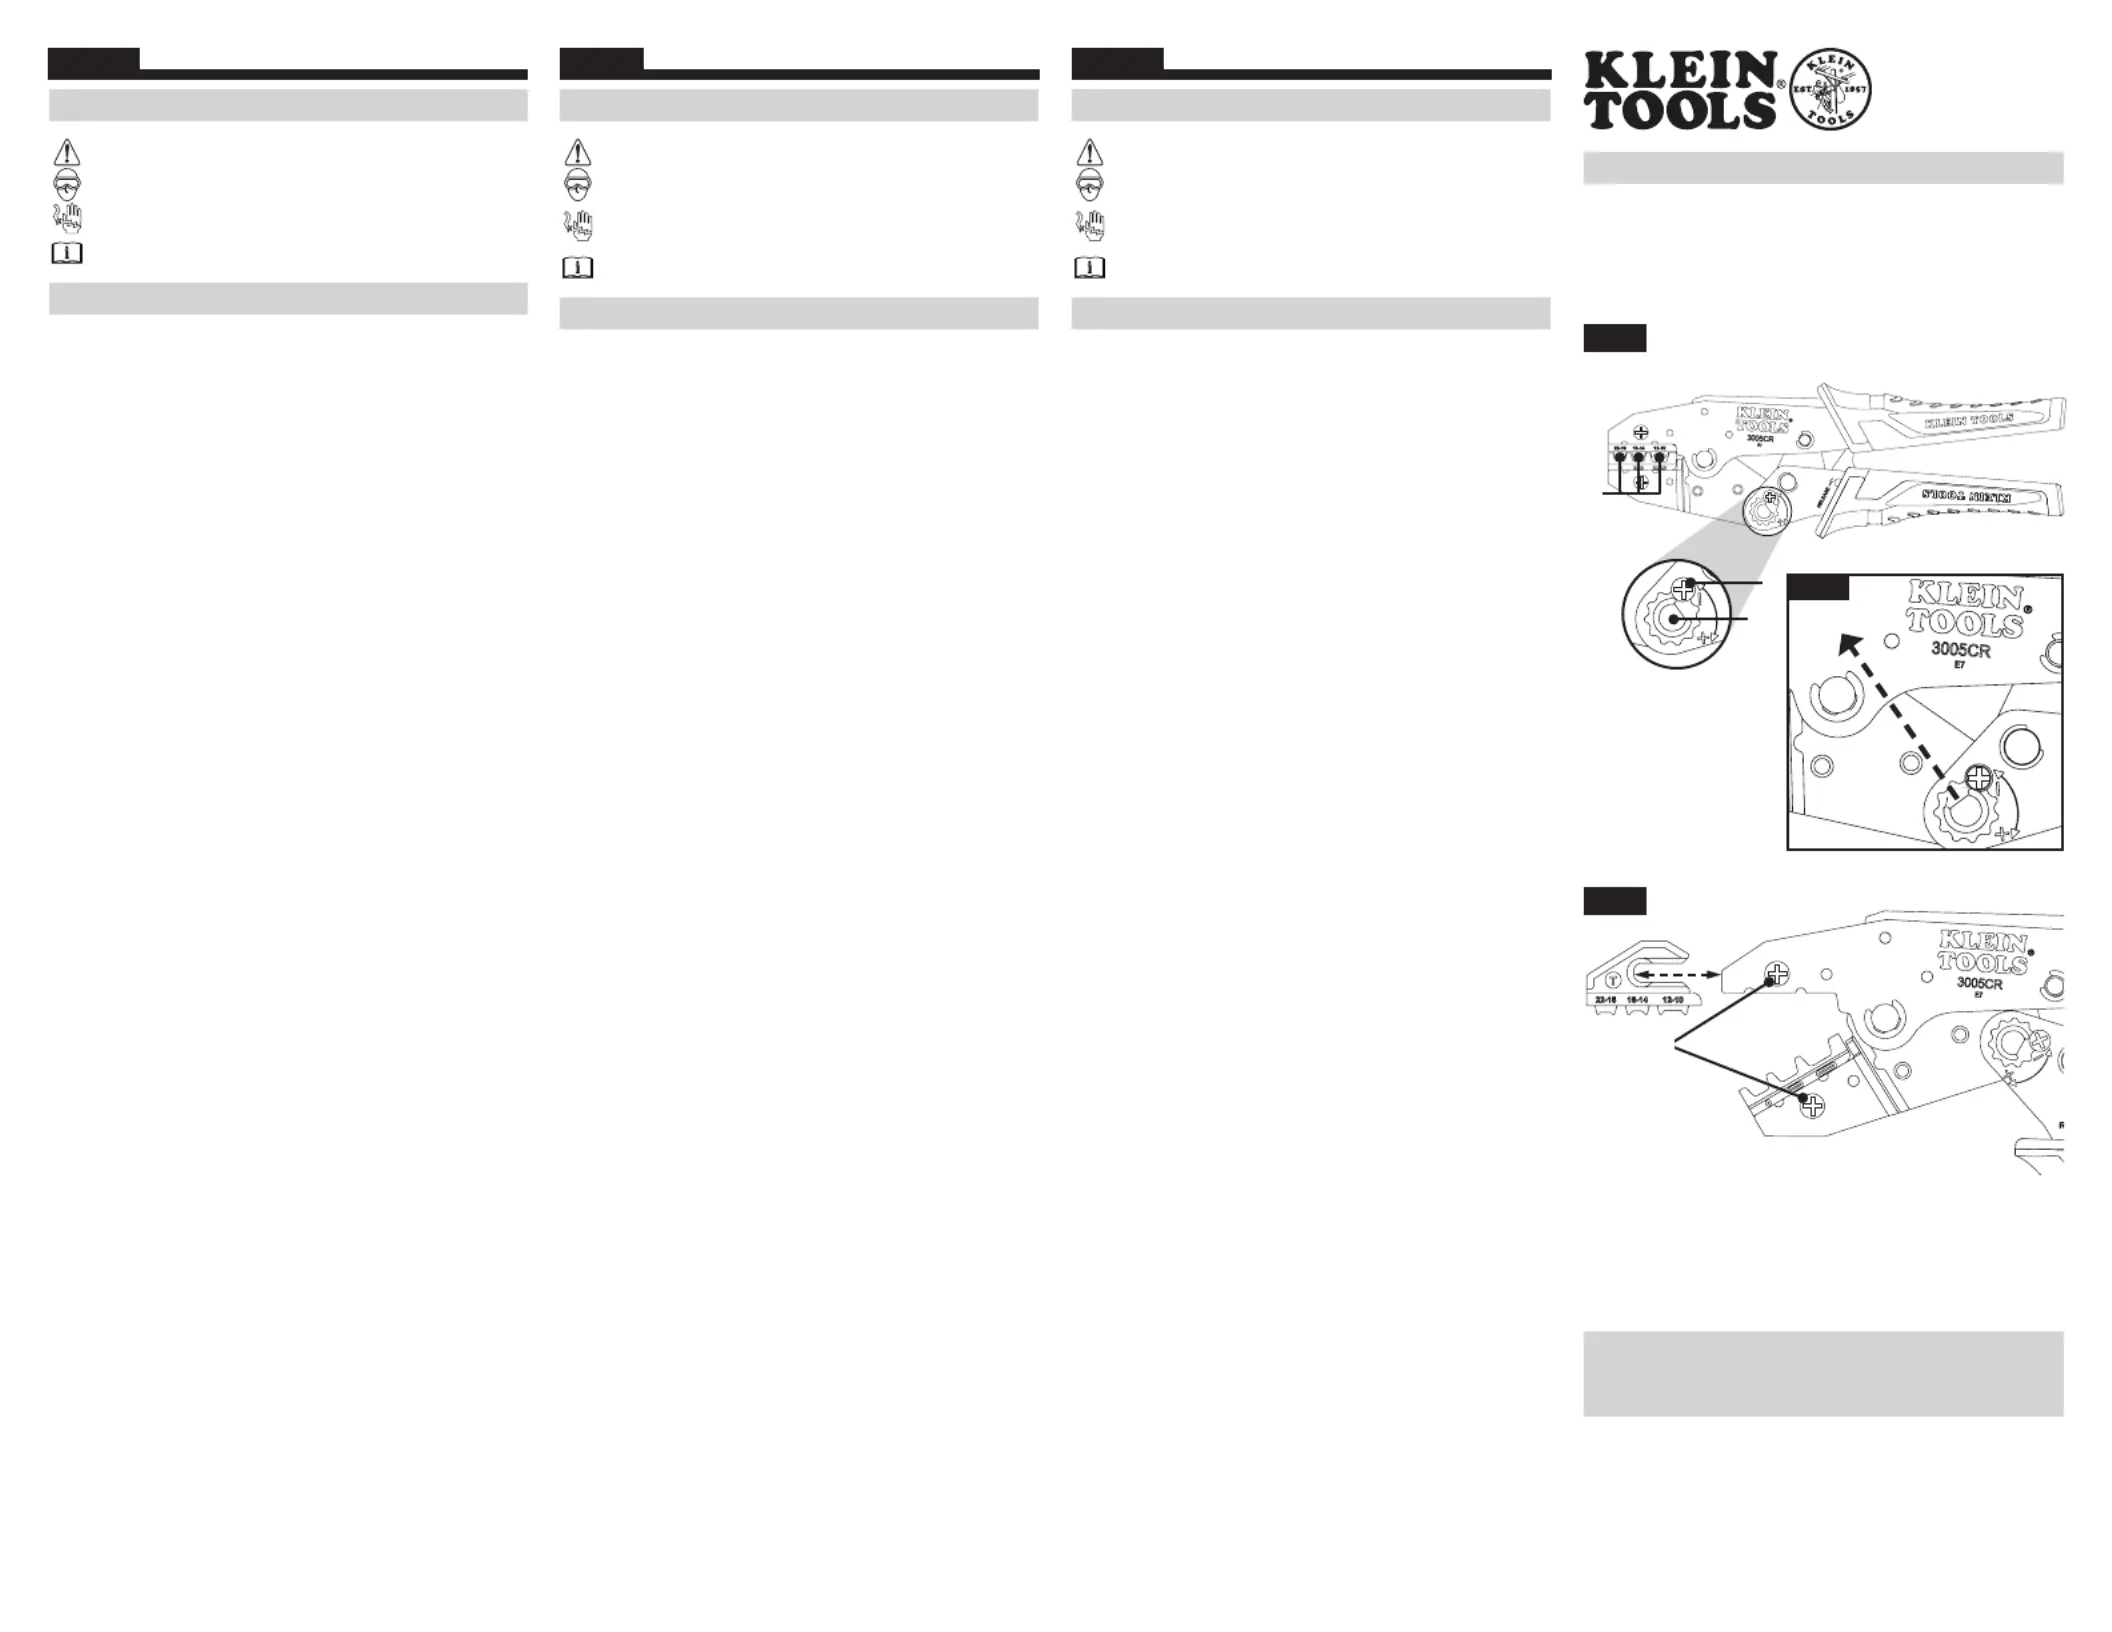
ADJUSTING CRIMPING FORCE (FIG. B)
1. Make sure the tool is completely open.
2. Using a #2 Phillips screwdriver, remove the screw (2) holding
the adjustment knob (3) in place.
3. Turn the adjustment knob to the desired setting, then replace
and tighten the screw.
4. Test the tool’s actuation and repeat steps 1 – 3 until the desired
crimp force is achieved.
NOTE: As indicated by the "+" and "-" symbols, clockwise
adjustment will increase crimping force, counterclockwise
adjustment will reduce crimping force.
TIP: The lowest crimping force is achieved when the flat of the
adjustment knob points between the Klein Tools logo and the
center pivot (FIG. B).
CHANGING DIES
1. Using a #2 Phillips screwdriver, loosen the two screws (4)
holding the top & bottom dies in place and remove the dies
from the tool (FIG. C).
2. Insert new die set into tool until fully seated and re-tighten
screws, taking care not to over-tighten.
ENGLISH
RATCHETING FERRULE CRIMPERS
PINZA PONCHADORA DE FÉRULAS
PINCE À SERTIR À CLIQUET POUR VIROLES
FIG. A
4
FIG. C
SYMBOLES SUR LE PRODUIT
Avertissement ou mise en garde
Porter une protection oculaire approuvée
NON ISOLÉ; NE PROTÈGE PAS contre les chocs électriques
Lire les instructions
INSTRUCTIONS
SERTISSAGE DES BORNES FIG. A
1. Dénudez le fil de cuivre multibrin à la longueur suggérée par
le fabricant de la borne.
2. Insérez l’extrémité dénudée du fil dans la borne de la taille
appropriée, comme indiqué par le fabricant de la borne.
3. Placez le fil et la borne dans la cavité appropriée des matrices
de sertissage (1), comme l’indiquent les marques sur l’outil.
4. Alignez la borne de manière à ce que le collier soit compressé
par l’outil à sertir.
5. Serrez les poignées fermement jusqu’à ce qu’elles se
relâchent, ce qui indique que le cycle de sertissage est
complet.
REMARQUE: Une fois le sertissage commencé, les poignées
ne se relâchent pas tant que le cycle n’est pas terminé.
6. Retirez l’assemblage serti de l’outil pour vérifier que la borne
est solidement sertie sur le fil.
RÉGLAGE DE LA FORCE DE SERTISSAGE (FIG. B)
1. Assurez-vous que l’outil est complètement ouvert.
2. À l’aide d’un tournevis à tête cruciforme n°2, retirez la vis (2)
qui maintient le bouton d’ajustement (3) en place.
3. Tournez le bouton d’ajustement jusqu’au réglage désiré, puis
replacez et serrez la vis.
4. Testez l’actionnement de l’outil et répétez les étapes1 à 3
jusqu’à l’obtention de la force de sertissage désirée.
REMARQUE: Comme l’indiquent les symboles «+» et «-», le
réglage dans le sens horaire augmente la force de sertissage et le
réglage dans le sens antihoraire réduit la force de sertissage.
CONSEIL: On obtient la force de sertissage la plus faible lorsque
le côté plat du bouton d’ajustement est orienté vers l’espace
entre le logo KleinTools et le pivot central (FIG. B).
CHANGEMENT DE MATRICES
5. À l’aide d’un tournevis à tête cruciforme n°2, desserrez les
deux vis (4) qui maintiennent les matrices supérieure et
inférieure en place, puis retirez les matrices de l’outil (FIG. C).
6. Insérez le nouveau jeu de matrices dans l’outil jusqu’à ce qu’il
soit bien en place et resserrez les vis, sans trop serrer.
SÍMBOLOS EN EL PRODUCTO
Advertencia o precaución
Use protección para ojos aprobada
SIN aislamiento - NO brinda protección contrachoque
eléctrico
Lea las instrucciones
INSTRUCCIONES
TERMINALES PARA PONCHADO FIG. A:
1. Pele el cable de cobre trenzado hasta la longitud sugerida por
el fabricante de la terminal.
2. Inserte el cable pelado en la terminal del tamaño correcto,
según las indicaciones del fabricante de la terminal.
3. Coloque el cable y la terminal en la cavidad de las matrices
ponchadoras (1) correcta, como lo indican las marcas en la
herramienta.
4. Alinee la terminal de manera que la herramienta de ponchado
comprima el collarín.
5. Presione ambos mangos hasta que queden juntos y se
suelten, indicando un ciclo de ponchado completo.
NOTA: una vez que comience un ciclo de ponchado, los
mangos no se podrán liberar hasta que se complete el ciclo
de ponchado.
6. Retire el conjunto ponchado de la herramienta y verifique que
la terminal esté firmemente ponchada en el cable.
AJUSTAR LA FUERZA DE PONCHADO FIG. B:
1. Asegúrese de que la herramienta esté completamente abierta.
2. Con un desarmador de punta Phillips n.º2, retire el tornillo (2)
que sostiene la perilla de ajuste (3) en su lugar.
3. Gire la perilla de ajuste a la posición deseada, luego reemplace
y ajuste el tornillo.
4. Pruebe el funcionamiento de la herramienta y repita lospasos
1 a 3 hasta que alcance la fuerza de ponchado deseada.
NOTA: Como indican los símbolos “+” y “-”, el ajuste en sentido
a las agujas del reloj aumentará la fuerza de ponchado y el ajuste
en sentido contrario a las agujas del reloj reducirá la fuerza de
ponchado.
SUGERENCIA: La fuerza de ponchado menor se logra cuando la
parte plana de la perilla de ajuste apunte en medio del logotipo
de Klein Tools y el pivote central (FIG. B).
MATRICES CAMBIANTES
5. Con un desarmador de punta Phillips n.º2, afloje los dos
tornillos (4) que sujetan las matrices superior e inferior en su
lugar y retire las matrices de la herramienta (FIG. C).
6. Inserte el nuevo juego de matrices en la herramienta hasta que
esté completamente asentado y vuelva a ajustar los tornillos,
tenga cuidado de no ajustar excesivamente.
1391016 Rev. 07/25 A
2
3
FIG. B
CUSTOMER SERVICE
SERVICIO AL CLIENTE
SERVICE À LA CLIENTÈLE
KLEIN TOOLS, INC.
450 Bond Street, Lincolnshire, IL 60069
1-800-553-4676
customerservice@kleintools.com
www.kleintools.com
INSTRUCTIONS / INSTRUCCIONES / INSTRUCTIONS
FRANÇAIS
ESPAÑOL
1
Produktspecifikationer
| Varumärke: | Klein Tools |
| Kategori: | hand verktyg |
| Modell: | 3000CRKIT |
Behöver du hjälp?
Om du behöver hjälp med Klein Tools 3000CRKIT ställ en fråga nedan och andra användare kommer att svara dig
hand verktyg Klein Tools Manualer

21 September 2025
20 September 2025
14 Augusti 2025
13 Augusti 2025
12 Juni 2025
hand verktyg Manualer
Nyaste hand verktyg Manualer
29 Mars 2026
24 September 2025
3 September 2025
2 September 2025
29 Augusti 2025
16 Augusti 2025
14 Augusti 2025
8 Augusti 2025
6 Augusti 2025
15 Juli 2025