Korg MicroKEY25 Bruksanvisning
Korg Midi-keyboard MicroKEY25
Läs gratis den bruksanvisning för Korg MicroKEY25 (4 sidor) i kategorin Midi-keyboard. Guiden har ansetts hjälpsam av 39 personer och har ett genomsnittsbetyg på 4.4 stjärnor baserat på 6 recensioner. Har du en fråga om Korg MicroKEY25 eller vill du ställa frågor till andra användare av produkten? Ställ en fråga
Sida 1/4
Introduction
Thank you for purchasing the Korg microKEY USB Powered Keyboard.
To help you get the most out of your new instrument, please read this
manual carefully.
In order to take full advantage of this product, you’ll need to create
seings in the host application that you’re using. Please follow the
directions as described in the owner’s manual of your host applica-
tion to dene these seings.
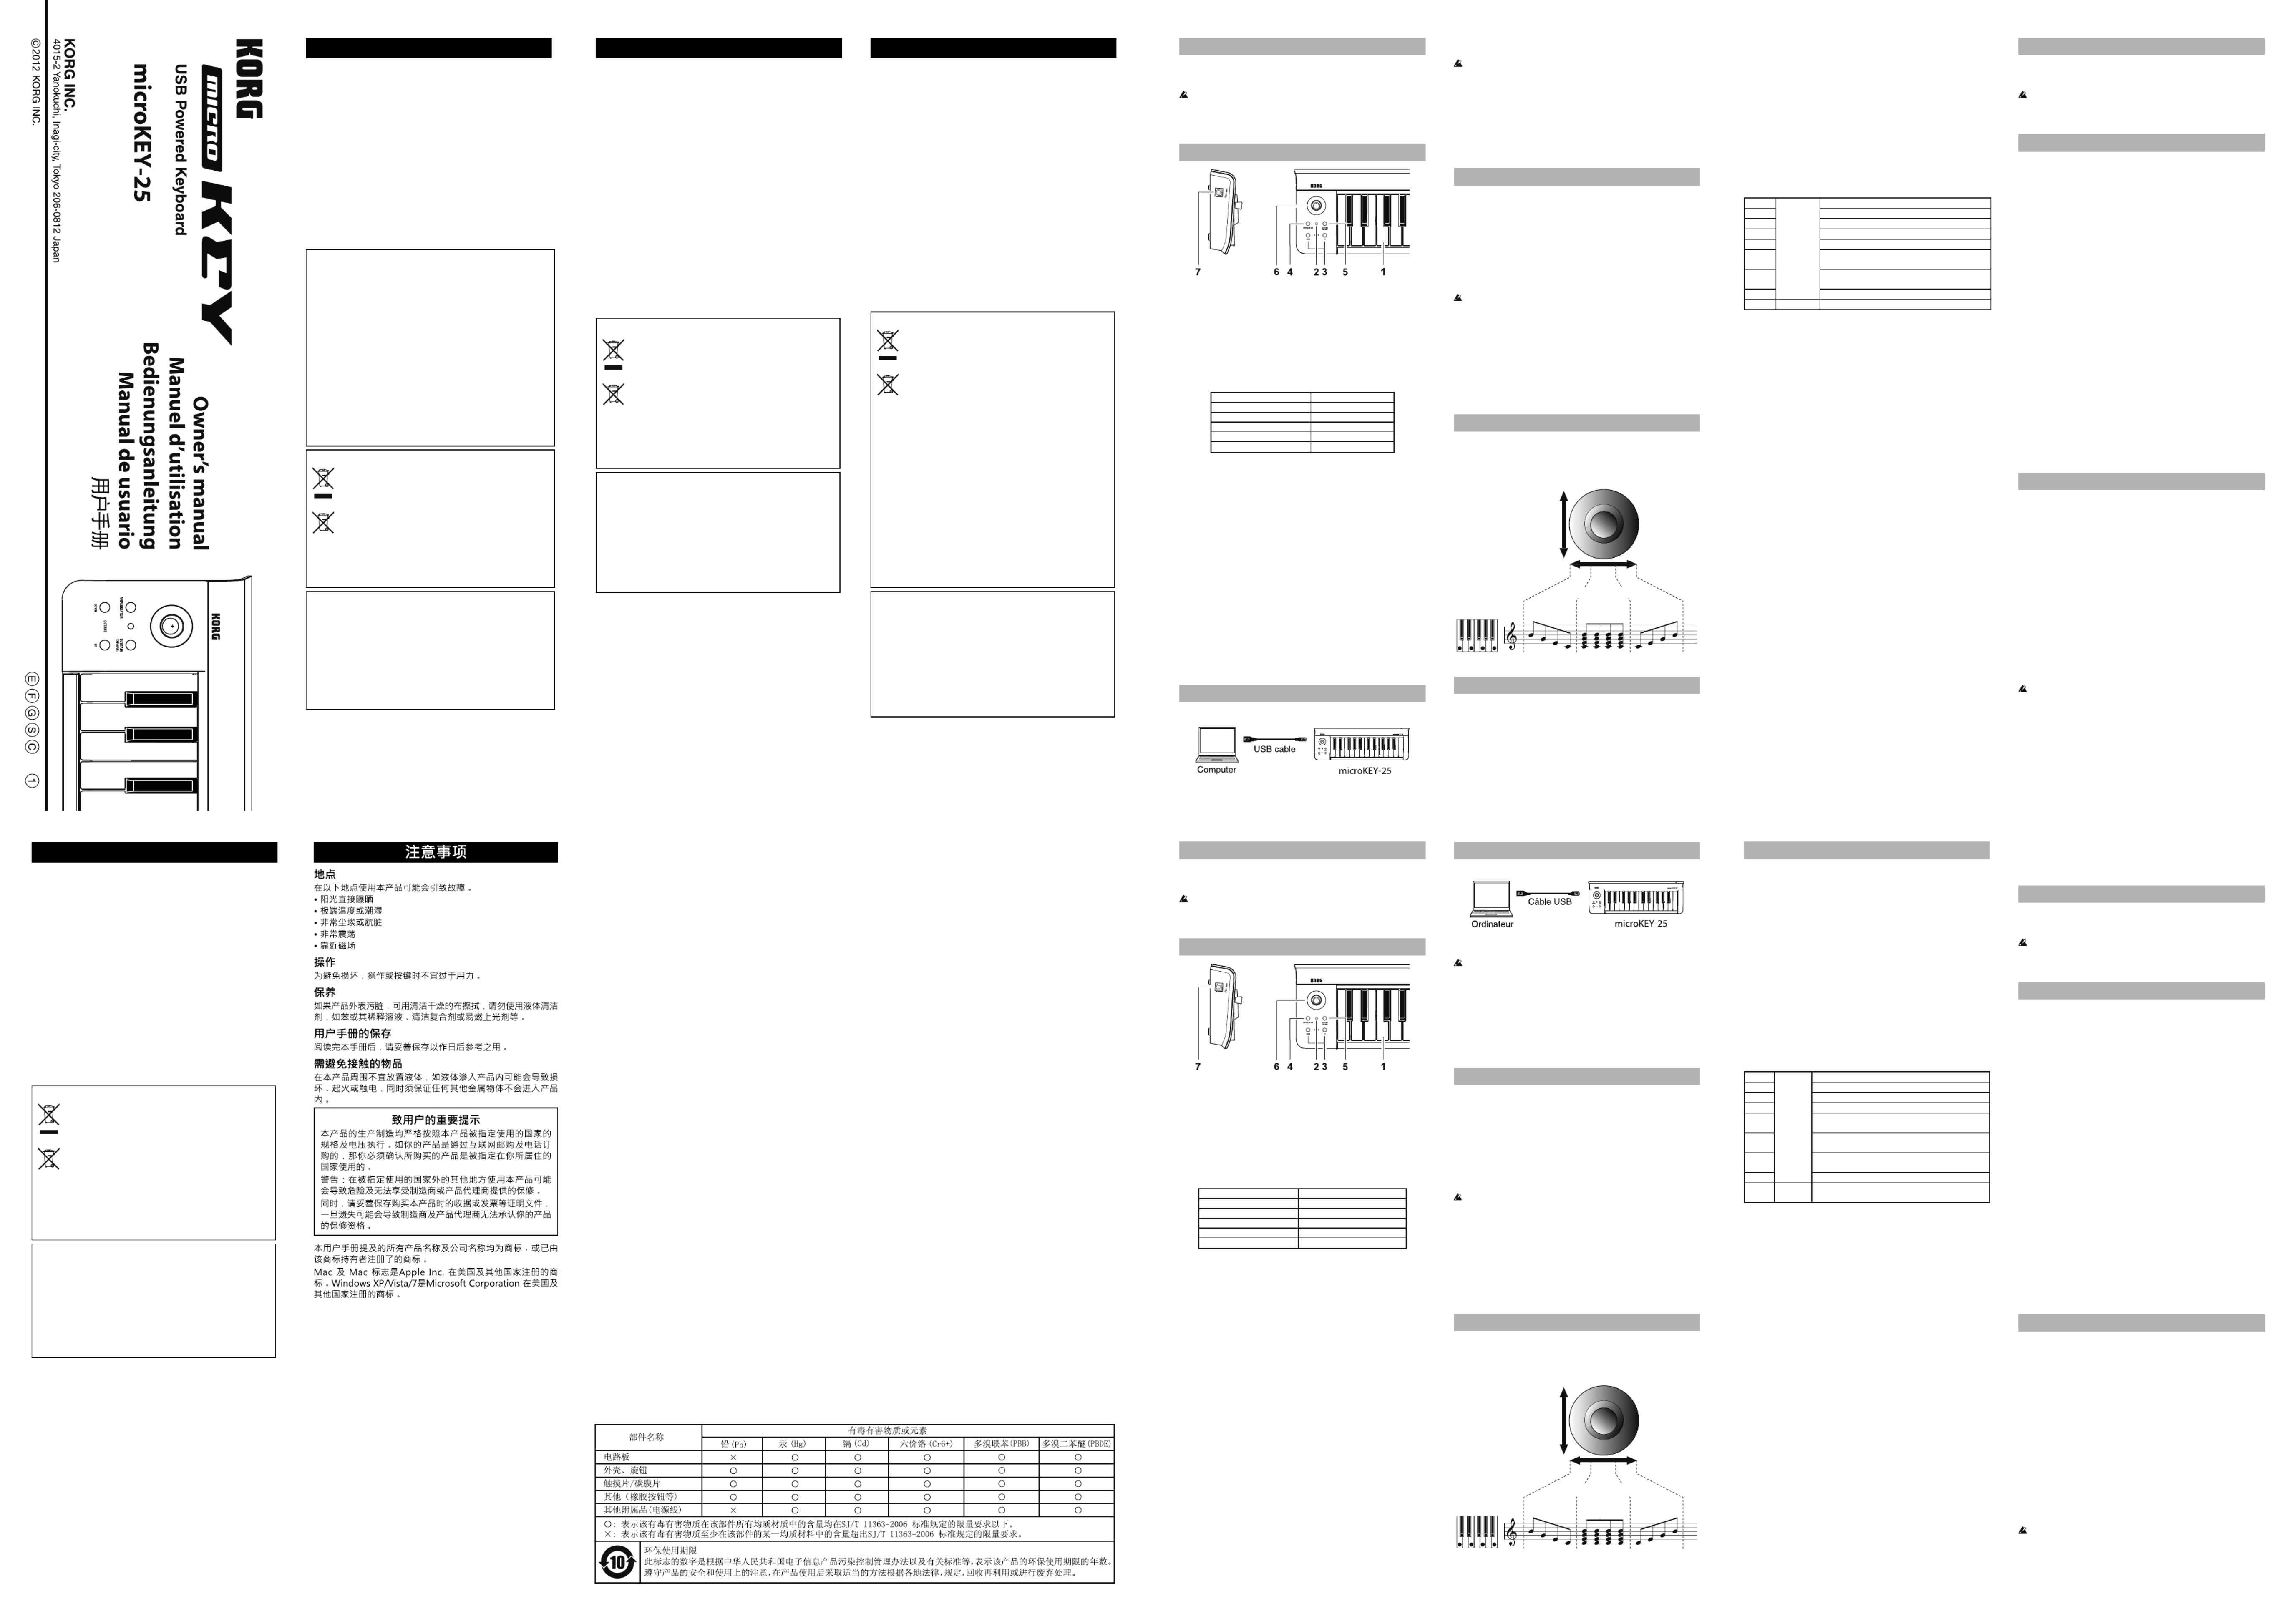
Parts and their functions
1. Keyboard
This is a velocity-sensitive 25 keys mini-keyboard. It transmits note
messages.
2. Power LED
This indicator lights up when the power is turned on.
3. OCTAVE DOWN / OCTAVE UP buttons
These select the pitch of the keyboard in steps of an octave.
The pitch will shi downward by one octave each time you press the
OCTAVE DOWN buon. The pitch will shi upward by one octave
each time you press the OCTAVE UP buon.
Octave shi statusOctave LED color
±0 Unlit
+1 / -1Green
+2 / -2Orange
+3 / -3Red
+4 / -4Blinking red
TIP By pressing the OCTAVE DOWN buon and OCTAVE UP buon
simultaneously you can reset the octave shi to +/-0.
4. ARPEGGIATOR button
This turns the arpeggiator on or off. When it is on, the buon will
blink in time with the tempo. (”Arpeggiator”)
5. SUSTAIN/TAP (ARP) button
This transmits a sustain message.
When the arpeggiator is on, you can set the tempo by pressing this
buon several times at the desired interval.
6. Joystick and joystick button
Moving the joystick in the X-axis will transmit pitch bend messages.
With the factory seings, the +Y axis is assigned to transmit control
change number 1 (modulation), and the -Y axis is assigned to transmit
control change number 2. Pressing the joystick buon will transmit a
control change message. When the arpeggiator is on, the joystick’s X-axis
controls the type, and the Y-axis controls the duration (gate time) of the
notes. By pressing the joystick buon you can switch the Latch function
on/off. If the Latch function is on, the arpeggiator will continue playing
even aer you take your hand off the keyboard. (”Arpeggiator”)
7. USB-B connectors
Connect the microKEY to your computer with a USB cable via this port.
Setup
Connections and powering-on
Use a USB cable to connect the microKEY to the USB port of your com-
puter. The power will turn on, and the power LED will light.
Use only the included USB cable.
TIP If you’re using Windows XP/Vista/7, the standard USB-MIDI driver
provided by the operating system will be installed automatically the
rst time you connect the microKEY to your computer.
Turning off the power
Disconnect the USB cable that's between the microKEY and your com-
puter. The power to the microKEY will turn off, and the power LED will
go dark.
microKEY and driver ports
Driver ports
MIDI IN port
This is where MIDI messages from the microKEY’s various controllers
are received. If you want to use the microKEY to control an application
on your computer, then select this port in the MIDI input seings of your
application.
This is also used by the Korg Kontrol Editor to control the microKEY.
MIDI OUT port
This port is used by the Korg Kontrol Editor to control the microKEY.
If you're using Windows XP/Vista/7, the standard USB-MIDI driver
provided by the operating system will not allow multiple applica-
tions to simultaneously use the microKEY. If you want to use the
microKEY simultaneously from multiple applications, you'll have to
install the Korg USB-MIDI driver.
Download the Korg USB-MIDI driver from the Korg website, and
install it as described in the included documentation.
hp://www.korg.co.jp/English/Distributors/ or hp://www.korg.com/
TIP Even if you don't need to use the microKEY from multiple appli-
cations simultaneously, we recommend that you install the Korg
USB-MIDI driver for more stable operation.
Arpeggiator
When you turn on the arpeggiator, an arpeggio will be automatically
produced when you hold down a chord on the keyboard.
By operating the joystick in the X-axis you can control the type of arpeg-
gio, and by operating it in the Y-axis you can control the duration (gate
time) of the notes.
Longer
Shorter
Gate time
Down TriggerUp
Arpeggiator type
Making detailed settings
TIP The following seings cannot be edited from the microKEY itself, so
you’ll need to use the Korg Kontrol Editor. You can download the
Korg Kontrol Editor from the Korg website.
hp://www.korg.co.jp/English/Distributors/ or hp://www.korg.com/
MIDI channel
MIDI Channel [1...16]
Species the MIDI channel on which MIDI messages will be transmied
when you use the keyboard or joystick. This should be set to match the
MIDI channel of the MIDI application that you are controlling.
Keyboard
Transpose [-12...+12]
Use this to transpose the pitch of the keyboard up or down in semitone
steps. The range is -12 to +12.
Velocity Curve [Velocity Curve 1...8 / Const Velocity]
The velocity curve determines how the force used when you play the
keyboard will affect the output level. You can choose one of three veloc-
ity curves, or select a xed velocity.
1Heavy Requires strong strikes to produce an effect.
2|A curve that's closer to normal than 1.
3A curve that's closer to normal than 2.
4Normal A normal curve.
5
|
Allows even so strikes to produce an effect.
6A curve that allows even soer strikes than 5 to
produce an effect.
7Allows medium-strength strikes to produce a
constant but less dynamic effect.
8Light A curve that is aer than 7.
Const– The velocity value will always be constant.
Const Velocity Value [1...127]
This species the velocity value that is transmied if the velocity curve is
set to Const. This is useful for sounds such as organ, etc.
Joystick (+Y axis, -Y axis)
Joystick Enable [Disable/Enable]
Enables or disables the joystick.
If the joystick is disabled, using the joystick will not transmit MIDI mes-
sages.
Control Change Number [0...127]
Species the CC number of the control change message that will be
transmied.
Upper Value/Lower Value [0...127]
Species the values of the control change messages that are transmied
when you move the joystick to the full extent of the Y-axis (forward and
backward).
Center Value [0...127]
Species the value of the control change message that is transmied
when you return the joystick to the center position.
Joystick button, Sustain/TAP(ARP) button
Button Enable [Disable/Enable]
This species whether the buons will be enabled or disabled.
If the buons are disabled, no MIDI message will be transmied when
they are pressed.
Button Behavior [Momentary/Toggle]
Selects one of the following two types of behavior for the buon.
MomentaryA message with the On Value will be transmied when
you press the buon, and with the Off Value will be
transmied when you release the buon.
ToggleA message with the On Value or Off Value will be trans-
mied alternately each time you press the buon.
Control Change Number [0...127]
Species the CC number of the control change message that will be
transmied.
On Value [0...127]
This species the value of the control change message that is transmied
when the buon is turned on.
Off Value [0...127]
This species the value of the control change message that is transmied
when the buon is turned off.
Restoring the factory settings
If you turn on the power while holding down the OCTAVE DOWN but-
ton and OCTAVE UP buon, the seings of the microKEY will return to
their factory-set default values, and the power LED will light up.
The process of restoring the factory seings will take several sec-
onds aer you turn on the power. You must not turn off the power
during this time.
Troubleshooting
Power does not turn on
• If you’re using a passive (non-powered) USB hub, the microKEY may
fail to power-on because it is not geing enough power. If this is so,
please connect the microKEY to a powered USB hub or directly to your
computer.
Software does not respond
Make sure that the microKEY has been detected by the connected
computer. If you are using Windows XP, go to the Control Panel, open
“Sounds, Speech, and Audio Devices” “Sounds and Audio De-
vices,” and check the “Hardware” tab page.
If you are using Windows Vista/7, go to the Control Panel, open
“Hardware and Sounds” “Device Manager,” and check the “Sound,
Video, and Game Controllers” tab.
If you are using Mac OS X, open “Applications” “Utilities,” then
start “Audio MIDI Setup.”
For Mac OS X 10.5 or earlier, check the “MIDI Devices” tab.
For Mac OS X 10.6 or later, open and check the “MIDI Studio” window
by selecting “Show MIDI Window” from the “Window” menu.
• Make sure that the microKEY is selected in the MIDI port seings of
the application you’re using.
• The application you’re using might not support a specic function.
Please check the owner’s manual of your host application.
• If the microKEY is connected to a computer via a USB hub and it does
not function properly, connect the microKEY directly to the USB-B con-
nector, bypassing the USB hub.
Keyboard does not respond to velocity
• Check the velocity curve seing of the keyboard.
Specifi cations
Connectors: USB-B connector (for computer connection)
Power supply: USB bus power mode
Current consumption: 100 mA or less
Dimensions(WxDxH): 15.55 × 5.16 × 2.05 inches / 395 × 131 × 52 mm
Weight: 22.93 oz. / 650 g
Included items: USB cable, Owner’s manual
Operating requirements
Windows
Computer: Computer that has a USB port and satises the
requirements for running Microso Windows
XP/Vista/7.
Operating system: Microso Windows XP SP3(32bit) or later, or
Microso Windows Vista SP2 (32bits, 64bit) or
Windows 7 SP1 (32bit, 64bit).
Mac OS X
Computer: Apple Macintosh computer with an Intel
processor that has a USB port and satises the
requirements for running Mac OS X.
Operating system: Mac OS X 10.5 or later.
Keyboard functionality is not guaranteed with all computers that
satisfy these system requirements.
* Speci cations and appearance are subject to change without notice for
improvement.
Introduction
Merci d’avoir choisi le clavier microKEY de Korg, alimenté par USB. An
de pouvoir exploiter au mieux toutes les possibilités offertes par l’instru-
ment, veuillez lire aentivement ce manuel.
Pour pouvoir utiliser les fonctions de ce produit, il faut effectuer des
réglages au sein du logiciel que vous utilisez. Effectuez les réglages
décrits dans le mode d’emploi de votre logiciel.
Description et fonction des éléments
1. Clavier
Ce mini-clavier est sensible au toucher. Il transmet des messages de
note.
2. Témoin d’alimentation
Ce témoin s’allume lorsque l’instrument est sous tension.
3. Boutons OCTAVE DOWN / OCTAVE UP
Ces boutons permeent de changer la hauteur du clavier par octaves.
Chaque pression sur le bouton OCTAVE DOWN diminue la hauteur
d’une octave. Chaque pression sur le bouton OCTAVE UP augmente
la hauteur d’une octave.
Transposition par octavesCouleur du témoin OCTAVE
±0 Eteint
+1 / -1Vert
+2 / -2Orange
+3 / -3Rouge
+4 / -4Rouge clignotant
Astuce Une pression simultanée sur les boutons OCTAVE DOWN et
OCTAVE UP coupe la transposition par octave (valeur: ±0).
4. Bouton ARPEGGIATOR
Permet d’activer et de désactiver l’arpégiateur. Quand l’arpégiateur
est actif, ce bouton clignote sur le tempo. (”Arpégiateur”)
5. Bouton SUSTAIN/TAP (ARP)
Transmet un message de maintien («sustain»).
Par défaut, la commande de contrôle 1 (modulation) est assignée à
cee molee.
6. Joystick et bouton de joystick
L’action du joystick sur l’axe X transmet des messages de pitch bend.
Par défaut, l’axe +Y est affecté à la transmission de la commande de
contrôle 1 (modulation) et l’axe -Y à la transmission de la commande
de contrôle 2. Enfoncer le bouton du joystick transmet une com-
mande de contrôle. Quand l’arpégiateur est actif, l’axe X du joystick
commande le type et son axe Y la durée (gate time) des notes. Vous
pouvez activer/couper la fonction de verrouillage (Latch) en appuyant
sur le bouton du joystick. Quand la fonction de verrouillage est active,
l’arpégiateur continue de jouer même lorsque vous relâchez toutes les
touches du clavier. ( ”Arpégiateur”)
7. Prise USB-B
Branchez le microKEY à votre ordinateur en connectant un câble USB
à cee prise.
Confi guration
Connexions et alimentation
Reliez le microKEY au port USB de votre ordinateur avec un câble USB.
L’instrument est mis sous tension et son témoin d’alimentation s’allume.
Utilisez exclusivement le câble USB fourni.
Astuce Si vous utilisez Windows XP/Vista/7, le pilote USB-MIDI
standard fourni avec votre système d’exploitation sera installé
automatiquement la première fois que vous branchez le microKEY
à l’ordinateur.
Mise hors tension
Débranchez le câble USB reliant le microKEY à votre ordinateur. Le
microKEY est mis hors tension et son témoin d’alimentation s’éteint.
microKEY et ports de pilote
Ports du pilote
Port MIDI IN
Les messages MIDI provenant des différents contrôleurs du microKEY
arrivent ici. Si vous voulez utiliser le microKEY pour piloter un logiciel
sur ordinateur, sélectionnez ce port dans les réglages d’entrée MIDI du
logiciel. Il est également utilisé par le logiciel Korg Kontrol Editor pour
piloter le microKEY.
Port MIDI OUT
Ce port est utilisé par le Korg Kontrol Editor pour piloter le microKEY.
Si vous utilisez Windows XP/Vista/7 avec le pilote USB-MIDI stan-
dard du système d’exploitation, vous ne pourrez pas employer le
microKEY simultanément avec plusieurs applications. Pour pouvoir
utiliser le microKEY simultanément depuis plusieurs logiciels,
vous devez installer le pilote USB-MIDI Korg. Téléchargez le pilote
USB MIDI Korg du site Internet de Korg et installez-le en suivant les
instructions fournies.
hp://www.korg.co.jp/English/Distributors/ or hp://www.korg.com/
Astuce Même si vous n’avez pas besoin d’utiliser le microKEY avec
plusieurs logiciels, nous vous recommandons l’installation du pilote
USB-MIDI Korg pour bénécier d’un fonctionnement plus stable.
Arpégiateur
Quand l’arpégiateur est actif et que vous jouez un accord sur le clavier,
l’instrument produit automatiquement un arpège.
L’axe X du joystick permet de commander le type d’arpège et son axe Y
la durée (gate time) des notes.
Plus longue
Plus courte
Durée (gate time)
Descendant
Déclenchement
Ascendant
Type d'arpège
Régler les moindres détails
Astuce Les paramètres suivants ne peuvent pas être réglés sur le micro-
KEY même. Il faut donc utiliser le logiciel “Korg Kontrol Editor”.
Vous pouvez télécharger “Korg Kontrol Editor” du site Internet Korg.
hp://www.korg.co.jp/English/Distributors/ or hp://www.korg
Canal MIDI
MIDI Channel [1...16]
Dénit le canal MIDI pour la transmission des messages MIDI produits
quand vous jouez sur le clavier ou manipulez le joystick. Réglez ce canal
en fonction du canal MIDI du logiciel que vous pilotez.
Clavier
Transpose [-12...+12]
Ce paramètre permet de transposer la hauteur du clavier par demi-tons
vers le haut ou le bas. La plage de réglage est de -12 à +12.
Velocity Curve [Velocity Curve 1...8 / Const Velocity]
La courbe de toucher détermine la façon dont la force exercée sur les
touches affecte le niveau de sortie. Vous avez le choix entre huit courbes
de toucher plus une réponse au toucher xe.
1Lourd Il faut jouer plus fort des notes d’un niveau élevé.
2(Heavy) Courbe de réponse plus normale que la courbe 1.
3| Courbe de réponse plus normale que la courbe 2.
4Normal Courbe de réponse normale.
5Les différences se remarquent même pour de
faibles valeurs de toucher.
6|Courbe produisant un effet avec un toucher plus
léger encore que pour la courbe 5.
7Léger
Une force de frappe moyenne produit un effet
constant mais moins dynamique.
8(Light) Courbe de réponse plus plate que la courbe 7.
Const –
La réponse au toucher a une valeur xe
(constante).
Const Velocity Value [1...127]
Ce paramètre détermine la valeur de toucher transmise lorsque la courbe de
toucher est réglée sur “Const”. Ce réglage est utile pour sons d’orgue etc.
Joystick (axe +Y, axe -Y)
Joystick Enable [Disable/Enable]
Active ou désactive le joystick. Quand le joystick est désactivé, le fait de
le manipuler ne transmet aucun message MIDI.
Control Change Number [0...127]
Détermine le numéro CC de la commande de contrôle transmise.
Upper Value/Lower Value [0...127]
Dénit les valeurs des commandes de contrôle transmises quand vous
déplacez le joystick en bout de course sur l’axe Y (vers l’avant et vers
l’arrière).
Center Value [0...127]
Détermine la valeur de la commande de contrôle transmise quand le
joystick retourne en position centrale.
Bouton joystick, Bouton SUSTAIN/TAP (ARP)
Button Enable [Disable/Enable]
Détermine si les boutons sont actifs ou désactivés. Lorsque les boutons sont
désactivés, leur manipulation ne transmet aucun message MIDI.
Button Behavior [Momentary/Toggle]
Choisissez une des deux actions suivantes pour le bouton.
MomentaryUn message On Value (actif) est transmis quand vous
appuyez sur le bouton, et un message de Off Value (dé-
sactivé) est transmis quand vous relâchez le bouton.
ToggleUn message On Value (actif) ou Off Value (désactivé) est
transmis alternativement chaque fois que vous appuyez
sur le bouton.
Control Change Number [0...127]
Détermine le numéro CC de la commande de contrôle transmise.
On Value [0...127]
Détermine la valeur de la commande de contrôle transmise quand le
bouton est activé.
Off Value [0...127]
Détermine la valeur de la commande de contrôle transmise quand le
bouton est désactivé.
Rétablir les réglages d’usine
Si vous meez le microKEY sous tension en maintenant les boutons
OCTAVE DOWN et OCTAVE UP enfoncés, ses paramètres retrouvent
leur réglage d’usine et le témoin d’alimentation s’allume.
Le rétablissement des réglages d’usine dure quelques secondes
après la mise sous tension. Ne coupez jamais l’alimentation durant
cee opération.
Dépannage
L’instrument ne s’allume pas
• Si vous utilisez un hub USB passif (non alimenté) pour la connexion
à l’ordinateur, le microKEY risque de ne pas s’allumer suite à une
alimentation insuffi sante. Dans ce cas, branchez le microKEY à un hub
USB actif ou directement à l’ordinateur.
Le logiciel ne répond pas
• Vériez que le microKEY a été détecté par l’ordinateur. Si vous utilisez
Windows XP, allez dans le Panneau de conguration, ouvrez “Sons,
voix et périphériques audio” “Sons et périphériques audio” et
cliquez sur l’onglet [Matériel]. Si vous utilisez Windows Vista/7, allez
dans le Panneau de conguration, ouvrez “Matériel et audio”
“Gestionnaires de périphériques” et vériez l’onglet “Contrôleurs son,
vidéo et jeu”. Si vous utilisez Mac OS X, ouvrez “Applications” “Uti-
litaires” et lancez “Conguration audio et MIDI”. Sous Mac OS X 10.5
ou plus ancien, cliquez sur l’onglet “Périphériques MIDI”. Sous Mac
OS X 10.6 ou plus récent, ouvrez la fenêtre “Studio MIDI” en choisis-
sant [Affi cher la fenêtre MIDI] dans le menu “Fenêtre”.
• Vériez que le microKEY est sélectionné dans les réglages de port
MIDI du logiciel que vous utilisez.
• Le logiciel utilisé peut ne pas disposer d’une fonction spécique. Voyez
le mode d’emploi de votre logiciel.
• Si le microKEY est branché à l’ordinateur par l’intermédiaire d’un hub
USB et ne se comporte pas de façon escomptée, branchez le microKEY
directement à un port USB-B sans passer par le hub USB.
Le clavier ne réagit pas au toucher
• Vériez le réglage de courbe de toucher du clavier.
Fiche technique
Prises: Prise USB-B (connexion à l’ordinateur)
Alimentation: Alimentation par le bus USB
Consommation électrique: 100mA ou moins
Dimensions (LxPxH): 395 x 131 x 52 mm
Poids: 650 g
Accessoires inclus: Câble USB, Manuel d’utilisation
Système requis
Windows
Ordinateur: Ordinateur: Ordinateur doté d’une prise
USB et pouvant tourner sous Microso
Windows XP/Vista/7.
Système d’exploitation: Microso Windows XP SP3 (32 bits) ou plus
récent, Microso Windows Vista SP2 (32
bits, 64 bits) ou Windows 7 SP1 (32 bits, 64
bits).
Mac OS X
Ordinateur: Apple Macintosh avec processeur Intel doté
d’une prise USB et tournant sous Mac OS X.
Système d’exploitation: Mac OS X 10.5 voire plus récent.
Même si votre ordinateur répond aux exigences citées plus haut, il
peut arriver que le clavier ne fonctionne pas.
* Les caractéristiques et l’aspect du produit sont susceptibles d’être
modiés sans avis préalable en vue d’une amélioration.
Precautions
Location
Using the unit in the following locations can result in a malfunction.
• In direct sunlight
• Locations of extreme temperature or humidity
• Excessively dusty or dirty locations
• Locations of excessive vibration
• Close to magnetic fields
Handling
To avoid breakage, do not apply excessive force to the switches or controls.
Care
If the exterior becomes dirty, wipe it with a clean, dry cloth. Do not use liquid
cleaners such as benzene or thinner, or cleaning compounds or flammable polishes.
Keep this manual
After reading this manual, please keep it for later reference.
Keeping foreign matter out of your equipment
Never set any container with liquid in it near this equipment. If liquid gets into
the equipment, it could cause a breakdown, fire, or electrical shock. Be careful
not to let metal objects get into the equipment.
THE FCC REGULATION WARNING (for USA)
This equipment has been tested and found to comply with the limits for a
Class B digital device, pursuant to Part 15 of the FCC Rules. These limits are
designed to provide reasonable protection against harmful interference in
a residential installation. This equipment generates, uses, and can radiate
radio frequency energy and, if not installed and used in accordance with
the instructions, may cause harmful interference to radio communications.
However, there is no guarantee that interference will not occur in a particular
installation. If this equipment does cause harmful interference to radio or
television reception, which can be determined by turning the equipment off
and on, the user is encouraged to try to correct the interference by one or more
of the following measures:
● Reorient or relocate the receiving antenna.
● Increase the separation between the equipment and receiver.
●Connect the equipment into an outlet on a circuit different from that to
which the receiver is connected.
● Consult the dealer or an experienced radio/TV technician for help.
Unauthorized changes or modification to this system can void the user’s
authority to operate this equipment.
Notice regarding disposal (EU only)
When this “crossed-out wheeled bin” symbol is displayed on the
product, owner’s manual, battery, or battery package, it signifies that
when you wish to dispose of this product, manual, package or battery
you must do so in an approved manner. Do not discard this product,
manual, package or battery along with ordinary household waste.
Disposing in the correct manner will prevent harm to human health
and potential damage to the environment. Since the correct method
of disposal will depend on the applicable laws and regulations in
your locality, please contact your local administrative body for details. If the
battery contains heavy metals in excess of the regulated amount, a chemical
symbol is displayed below the “crossed-out wheeled bin” symbol on the bat-
tery or battery package.
IMPORTANT NOTICE TO CONSUMERS
This product has been manufactured according to strict specifications and
voltage requirements that are applicable in the country in which it is intended
that this product should be used. If you have purchased this product via the
internet, through mail order, and/or via a telephone sale, you must verify
that this product is intended to be used in the country in which you reside.
WARNING: Use of this product in any country other than that for which it
is intended could be dangerous and could invalidate the manufacturer’s or
distributor’s warranty. Please also retain your receipt as proof of purchase
otherwise your product may be disqualified from the manufacturer’s or
distributor’s warranty.
- Mac, Mac logo and Mac OS are trademarks of Apple Inc., registered in the U.S.
and other countries.
- Windows XP, Windows Vista and Windows 7 are trademarks of Microsoft
Corporation in the U.S. and other countries.
- All product names and company names are the trademarks or registered
trademarks of their respective owners.
Précautions
Emplacement
L’utilisation de cet instrument dans les endroits suivants peut en entraîner
le mauvais fonctionnement.
• En plein soleil
• Endroits très chauds ou très humides
• Endroits sales ou fort poussiéreux
• Endroits soumis à de fortes vibrations
• A proximité de champs magnétiques
Maniement
Pour éviter de les endommager, manipulez les commandes et les boutons
de cet instrument avec soin.
Entretien
Lorsque l’instrument se salit, nettoyez-le avec un chiffon propre et sec. Ne
vous servez pas d’agents de nettoyage liquides tels que du benzène ou du
diluant, voire des produits inflammables.
Conservez ce manuel
Après avoir lu ce manuel, veuillez le conserver soigneusement pour toute
référence ultérieure.
Evitez toute intrusion d’objets ou de liquide
Ne placez jamais de récipient contenant du liquide près de l’instrument. Si
le liquide se renverse ou coule, il risque de provoquer des dommages, un
court-circuit ou une électrocution. Veillez à ne pas laisser tomber des
objets métalliques dans le boîtier (trombones, par ex.).
Note concernant les dispositions (Seulement EU)
Quand un symbole avec une poubelle barrée d’une croix
apparait sur le produit, le mode d’emploi, les piles ou le pack
de piles, cela signifie que ce produit, manuel ou piles doit
être déposé chez un représentant compétent, et non pas dans
une poubelle ou toute autre déchetterie conventionnelle.
Disposer de cette manière, de prévenir les dommages pour
la santé humaine et les dommages potentiels pour
l’environnement. La bonne méthode d’élimination dépendra
des lois et règlements applicables dans votre localité, s’il vous plaît,
contactez votre organisme administratif pour plus de détails.
Si la pile contient des métaux lourds au-delà du seuil réglementé, un
symbole chimique est affiché en dessous du symbole de la poubelle
barrée d’une croix sur la pile ou le pack de piles.
REMARQUE IMPORTANTE POUR LES CLIENTS
Ce produit a été fabriqué suivant des spécifications sévères et des bes-
oins en tension applicables dans le pays où ce produit doit être utilisé.
Si vous avez acheté ce produit via l’internet, par vente par correspon-
dance ou/et vente par téléphone, vous devez vérifier que ce produit
est bien utilisable dans le pays où vous résidez.
ATTENTION: L’utilisation de ce produit dans un pays autre que celui
pour lequel il a été conçu peut être dangereuse et annulera la garantie
du fabricant ou du distributeur. Conservez bien votre récépissé qui
est la preuve de votre achat, faute de quoi votre produit ne risque de
ne plus être couvert par la garantie du fabricant ou du distributeur.
- Mac, Mac logo et Mac OS sont des marques commerciales de Apple
Inc., déposées aux États-Unis et dans d´autres pays.
- Windows XP, Windows Vista et Windows 7 sont des marques deposees
de Microsoft Corporation aux Etats-Unis et dans d´autres pays.
- Tous les noms de produits et de sociétés sont des marques commerciales
ou déposées de leur détenteur respectif.
Vorsichtsmaßnahmen
Aufstellungsort
Vermeiden Sie das Aufstellen des Geräts an Orten, an denen
• es direkter Sonneneinstrahlung ausgesetzt ist;
• hohe Feuchtigkeit oder Extremtemperaturen auftreten können;
• Staub oder Schmutz in großen Mengen vorhanden sind;
• das Gerät Erschütterungen ausgesetzt sein kann.
• in der Nähe eines Magnetfeldes.
Bedienung
Vermeiden Sie bei der Bedienung von Schaltern und Reglern unange-
messenen Kraftaufwand.
Reinigung
Bei auftretender Verschmutzung können Sie das Gehäuse mit einem troc-
kenen, sauberen Tuch abwischen. Verwenden Sie keinerlei Flüssigreiniger
wie beispielsweise Reinigungsbenzin, Verdünnungs- oder Spülmittel.
Verwenden Sie niemals brennbare Reiniger.
Bedienungsanleitung
Bewahren Sie diese Bedienungsanleitung gut auf, falls Sie sie später noch
einmal benötigen.
Flüssigkeiten und Fremdkörper
Stellen Sie niemals Behältnisse mit Flüssigkeiten in der Nähe des Geräts
auf. Wenn Flüssigkeit in das Gerät gelangt, können Beschädigung des
Geräts, Feuer oder ein elek-trischer Schlag die Folge sein. Beachten Sie,
daß keinerlei Fremdkörper in das Gerät gelangen.
Hinweis zur Entsorgung (Nur EU)
Wenn Sie das Symbol mit der „durchgekreuzten Mülltonne“
auf Ihrem Produkt, der dazugehörigen Bedienungsanleitung,
der Batterie oder dem Batteriefach sehen, müssen Sie das
Produkt in der vorgeschriebenen Art und Weise entsorgen.
Dies bedeutet, dass dieses Produkt mit elektrischen und
elektronischen Komponenten nicht mit dem normalen
Hausmüll entsorgt werden darf. Für Produkte dieser Art
existiert ein separates, gesetzlich festgelegtes Entsorgungs-
system. Gebrauchte elektrische und elektronische Geräte müssen
separat entsorgt werden, um ein umweltgerechtes Recycling sicher-
zustellen. Diese Produkte müssen bei benannten Sammelstellen
abgegeben werden. Die Entsorgung ist für den Endverbraucher
kostenfrei! Bitte erkundigen sie sich bei ihrer zuständigen Behörde,
wo sie diese Produkte zur fachgerechten Entsorgung abgeben kön-
nen. Falls ihr Produkt mit Batterien oder Akkumulatoren ausgerüs-
tet ist, müssen sie diese vor Abgabe des Produktes entfernen und
separat entsorgen (siehe oben). Die Abgabe dieses Produktes bei
einer zuständigen Stelle hilft ihnen, dass das Produkt umweltgerecht
entsorgt wird. Damit leisten sie persönlich einen nicht unerheblichen
Beitrag zum Schutz der Umwelt und der menschlichen Gesundheit
vor möglichen negativen Effekten durch unsachgemäße Entsorgung
von Müll. Batterien oder Akkus, die Schadstoffe enthalten, sind auch
mit dem Symbol einer durchgekreuzten Mülltonne gekennzeichnet.
In der Nähe zum Mülltonnensymbol befindet sich die chemische
Bezeichnung des Schadstoffes. Cd oder NiCd steht für Cadmium,
Pb für Blei und Hg für Quecksilber.
WICHTIGER HINWEIS FÜR KUNDEN
Dieses Produkt wurde unter strenger Beachtung von Spezifikationen
und Spannungsanforderungen hergestellt, die im Bestimmungsland
gelten. Wenn Sie dieses Produkt über das Internet, per Postversand
und/oder mit telefonischer Bestellung gekauft haben, müssen Sie
bestätigen, dass dieses Produkt für Ihr Wohngebiet ausgelegt ist.
WARNUNG: Verwendung dieses Produkts in einem anderen Land
als dem, für das es bestimmt ist, verwendet wird, kann gefährlich
sein und die Garantie des Herstellers oder Importeurs hinfällig
lassen werden. Bitte bewahren Sie diese Quittung als Kaufbeleg auf,
da andernfalls das Produkt von der Garantie des Herstellers oder
Importeurs ausgeschlossen werden kann.
- Mac, Mac logo und Mac OS sind in den USA und anderen Ländern
eingetragene Warenzeichen der Apple Inc..
-
Windows XP, Windows Vista und Windows 7 sind eingetragene Marken-
zeichen der Microsoft Corporation in den USA und anderen Landern.
- Alle Produkt- und Firmennamen sind Warenzeichen oder eingetragene
Warenzeichen der betreffenden Eigentümer.
Precauciones
Ubicación
El uso de la unidad en las siguientes ubicaciones puede dar como resultado
un mal funcionamiento:
• Expuesto a la luz directa del sol
• Zonas de extremada temperatura o humedad
• Zonas con exceso de suciedad o polvo
• Zonas con excesiva vibración
• Cercano a campos magnéticos
Manejo
Para evitar una rotura, no aplique excesiva fuerza a los conmutadores o
controles.
Cuidado
Si exterior se ensucia, límpiese con un trapo seco. No use líquidos lim-
piadores como disolvente, ni compuestos inflamables.
Guarde este manual
Después de leer este manual, guárdelo para futuras consultas.
Mantenga los elementos externos alejados del equipo
Nunca coloque ningún recipiente con líquido cerca de este equipo, podría
causar un cortocircuito, fuero o descarga eléctrica. Cuide de que no caiga
ningún objeto metálico dentro del equipo.
Nota respecto a residuos y deshechos (solo UE)
Cuando aparezca el símbolo del cubo de basura tachado
sobre un producto, su manual de usuario, la batería, o el
embalaje de cualquiera de éstos, significa que cuando quie-
re tire dichos artículos a la basura, p1-ha de hacerlo en acuerdo
con la normativa vigente de la Unión Europea. No debe
verter dichos artículos junto con la basura de casa. Verter
este producto de manera adecuada ayudará a evitar daños
a su salud pública y posibles daños al medioambiente. Cada
país tiene una normativa específica acerca de cómo verter productos
potencialmente tóxicos, por tanto le rogamos que se ponga en con-
tacto con su oficina o ministerio de medioambiente para más detalles.
Si la batería contiene metales pesados por encima del límite permi-
tido, habrá un símbolo de un material químico, debajo del símbolo
del cubo de basura tachado.
NOTA IMPORTANTE PARA EL CONSUMIDOR
Este producto ha sido fabricado de acuerdo a estrictas especificaciones
y requerimientos de voltaje aplicables en el país para el cual está
destinado. Si ha comprado este producto por internet, a través de
correo, y/o venta telefónica, debe usted verificar que el uso de este
producto está destinado al país en el cual reside.
AVISO: El uso de este producto en un país distinto al cual está de-
stinado podría resultar peligroso y podría invalidar la garantía del
fabricante o distribuidor. Por favor guarde su recibo como prueba
de compra ya que de otro modo el producto puede verse privado de
la garantía del fabricante o distribuidor.
- Mac, Mac logo y Mac OS de Mac son marcas comerciales de Apple Inc.
registradas en los EE.UU. y en otros países.
- Windows XP/Vista/7 son marcas comerciales de Microsoft Corporation
registradas en los EE.UU. y en otros países.
- Todos los nombres de productos y compañías son marcas comerciales
o marcas registradas de sus respectivos propietarios.
Produktspecifikationer
| Varumärke: | Korg |
| Kategori: | Midi-keyboard |
| Modell: | MicroKEY25 |
Behöver du hjälp?
Om du behöver hjälp med Korg MicroKEY25 ställ en fråga nedan och andra användare kommer att svara dig
Midi-keyboard Korg Manualer

13 Oktober 2024
19 September 2024
16 September 2024
4 September 2024
26 Augusti 2024
20 Augusti 2024
20 Augusti 2024
19 Augusti 2024
16 Augusti 2024
13 Augusti 2024
Midi-keyboard Manualer
Nyaste Midi-keyboard Manualer
4 Mars 2025
4 Mars 2025
30 December 2025
16 December 2024
19 Oktober 2024
3 Oktober 2024
23 September 2024
23 September 2024
23 September 2024
23 September 2024