Milwaukee 2200-20 Bruksanvisning
Läs gratis den bruksanvisning för Milwaukee 2200-20 (2 sidor) i kategorin Detektor. Guiden har ansetts hjälpsam av 49 personer och har ett genomsnittsbetyg på 4.6 stjärnor baserat på 4 recensioner. Har du en fråga om Milwaukee 2200-20 eller vill du ställa frågor till andra användare av produkten? Ställ en fråga
Sida 1/2
VOLTAGE DETECTOR
DÉTECTEUR DE TENSION
DETECTOR DE VOLTAJE
Cat. No. / No de Cat.
2200-20
IMPORTANT SAFETY
INSTRUCTIONS
WARNING
Read all safety warnings, instruc-
tions, illustrations and specica-
tions provided with this product. Failure to follow
all instructions listed below may result in electric
shock, re and/or serious injury. Save these in-
structions.
•Do not use the detector without battery housing
in place.
•Test the detector on a known live circuit before
using.
•Verify no-voltage reading with a suitable measure-
ment before beginning work on a circuit.
•Shut o appropriate circuit breakers before
beginning work.
•Do not use the detector to test wire that has
been shielded.
•Indoor use.
•This tool is rated measurement category IV, for
measurements performed at the source of a
low-voltage installation and outside line.
WARNING
This tool is designed to be pow-
ered by 2-AAA battery properly
inserted into the detector. Do not attempt to use
with any other voltage or power supply.
•Install battery according to polarity (+ and –)
diagrams.
•Do not leave batteries within the reach of children.
•Properly dispose of used batteries.
•Do not incinerate or dismantle batteries.
•Under abusive conditions, liquid may be ejected
from the battery, avoid contact. If contact ac-
cidentally occurs, ush contacted area with
water. If liquid contacts eyes, additionally seek
medical help. Liquid ejected from the battery
may cause irritation or burns.
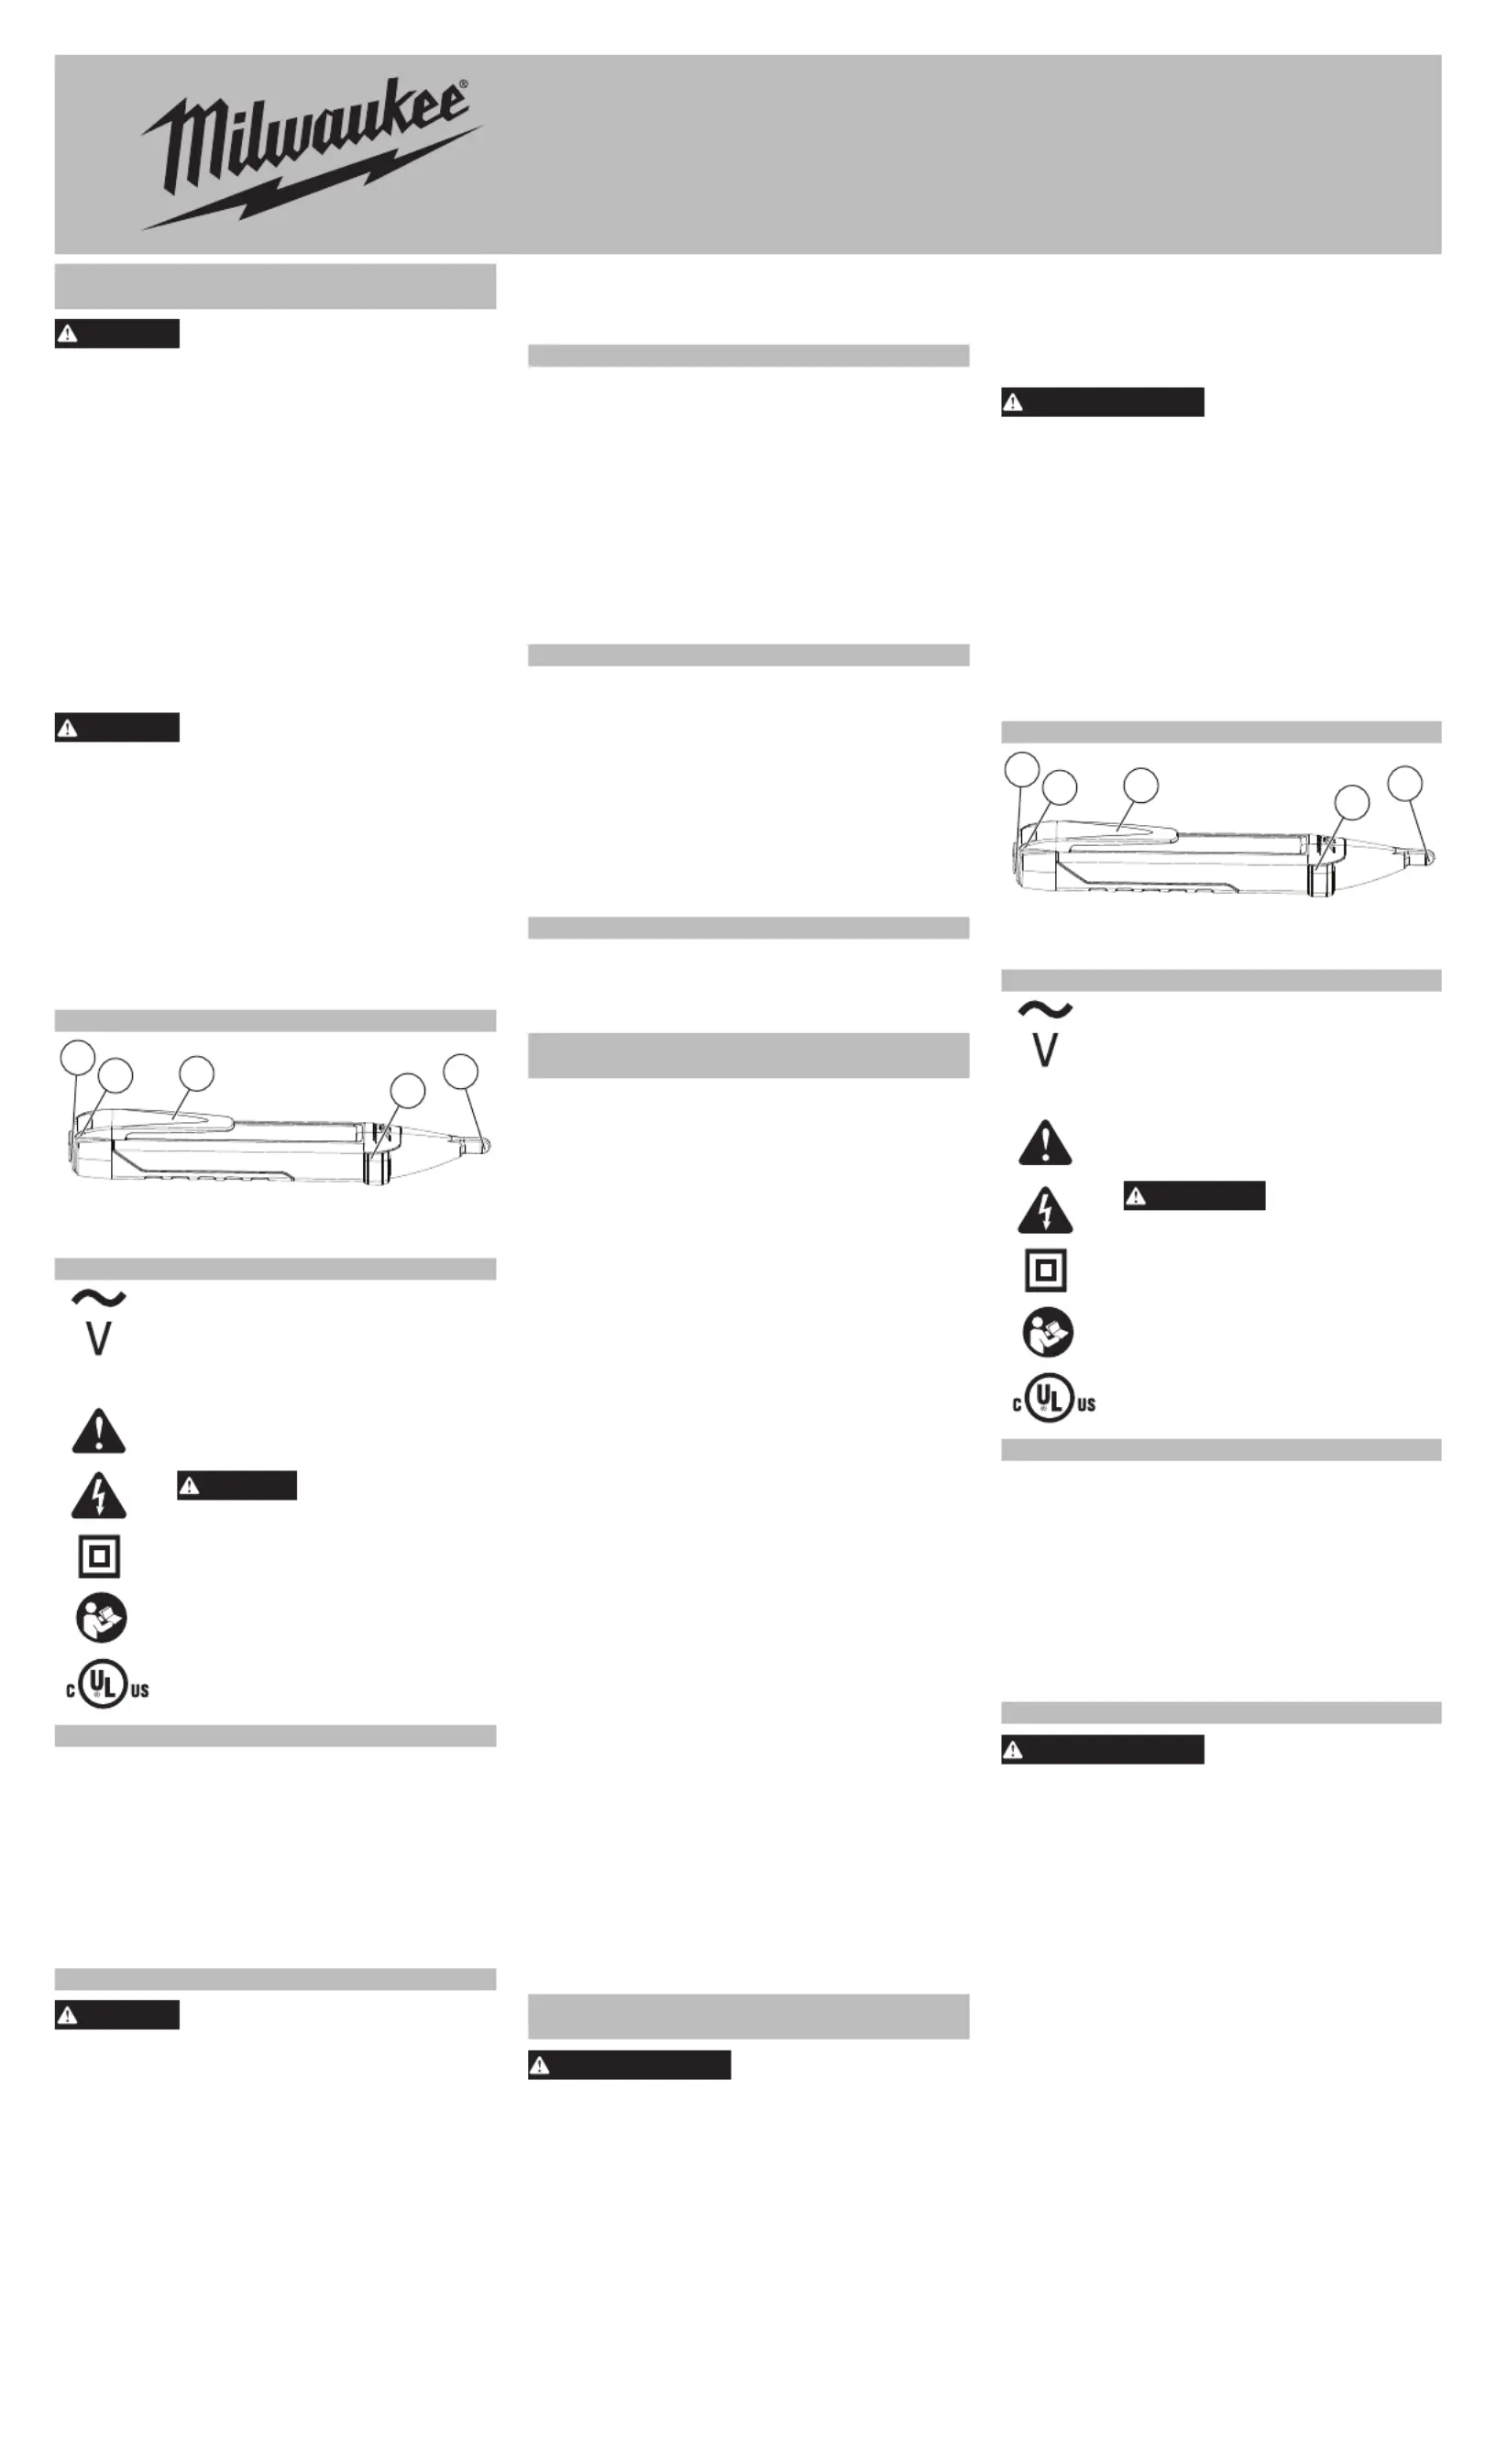
FUNCTIONAL DESCRIPTION
1
2
3
4
5
1. On/O button
2. Battery door button
3. Pocket clip
4. Indicator LED
5. Tip
SYMBOLOGY
AC Current
Volts
CAT IV
Measurement Category IV
Caution
CAUTION
Possibility of
Electric Shock
Double Insulated
Read Operator's Manual
UL Listing for Canada and U.S.
SPECIFICATIONS
Voltage Measurement Range50 to 1000V AC........
Safety Rating..............................CAT IV 1000V AC
Battery2 x 1.5V AAA Alkaline Batteries...................
Operating Altitude6562' or less...............................
Relative Humidity0% to 85%...................................
Product Certication
UL/CSA/IEC/EN 61010-1 3rd Ed
UL/CSA/IEC/EN 61010-2-030 2nd Ed
EMC EN61326-1, FCC Part 15 Class B
Recommended Ambient
Operating Temperature14ºF to 122ºF..................
ASSEMBLY
WARNING
This tool is designed to be pow-
ered by 2-AAA battery properly
inserted into the detector. Do not attempt to use
with any other voltage or power supply.
•Install battery according to polarity (+ and –)
diagrams.
•Do not leave batteries within the reach of children.
•Properly dispose of used batteries.
•Do not incinerate or dismantle batteries.
•Under abusive conditions, liquid may be ejected
from the battery, avoid contact. If contact ac-
cidentally occurs, ush contacted area with
water. If liquid contacts eyes, additionally seek
medical help. Liquid ejected from the battery
may cause irritation or burns.
Installing the Batteries:
1. Press battery door button at top of pocket clip to
release battery door.
2. Slide the battery housing away from the red
housing.
3. Install the batteries according to the polarity
marked on the tool.
4. Slide the housings back together.
5. Test the detector on a known electrical source.
OPERATION
Using the Detector
Press the On/O button for one second to turn the
detector on and o. The indicator LED will light green
while the tool is on.
To check for AC voltage in a power outlet, place the
tip of the detector into each side of the outlet.
To check for AC voltage in any other part of a circuit,
place the tip of the detector against the circuit. When
voltage is detected, the indicator LED and the tip will
light up red and the tool will beep repeatedly.
Cleaning
Keep handles clean, dry and free of oil or grease. Use
only mild soap and a damp cloth to clean.
SERVICE - UNITED STATES
1-800-SAWDUST(1.800.729.3878)
Monday-Friday, 7:00 AM - 6:30 PM CST
or visit www.milwaukeetool.com
Contact Corporate After Sales Service Technical
Support with technical, service/repair, or warranty
questions.
Email: [email protected]
Become a Heavy Duty Club Member at
www.milwaukeetool.com to receive important
notications regarding your tool purchases.
SERVICE - CANADA
Milwaukee Tool (Canada) Ltd
1.877.948.2360
Monday-Friday, 7:00 AM - 4:30 PM CST
or visit www.milwaukeetool.ca
LIMITED WARRANTY
USA & CANADA
This MILWAUKEE power tool* is warranted to the original purchaser
from an authorized MILWAUKEE distributor only to be free from
defects in material and workmanship. Subject to certain exceptions,
MILWAUKEE will repair or replace any part on this power tool which,
after examination, is determined by MILWAUKEE to be defective in
material or workmanship for a period of one (1) year after the date
of purchase unless otherwise noted. Return of the power tool to a
MILWAUKEE factory Service Center location or MILWAUKEE Author-
ized Service Station, freight prepaid and insured, is required. A copy of
the proof of purchase should be included with the return product. This
warranty does not apply to damage that MILWAUKEE determines to
be from repairs made or attempted by anyone other than MILWAUKEE
authorized personnel, misuse, alterations, abuse, normal wear and
tear, lack of maintenance, or accidents.
Normal Wear: Many power tools need periodic parts replacement and
service to achieve best performance. This warranty does not cover
repair when normal use has exhausted the life of a part including,
but not limited to, chucks, brushes, cords, saw shoes, blade clamps,
o-rings, seals, bumpers, driver blades, pistons, strikers, lifters, and
bumper cover washers.
*This warranty does not cover battery packs or all power tools. Refer
to the separate and distinct warranties available for those products.
The warranty period for the LED in the LED Work Light (49-24-0171)
and the LED Upgrade Bulb (49-81-0090) is the lifetime of the product
subject to the limitations above. If during normal use the LED or LED
Upgrade Bulb fails, the part will be replaced free of charge.
Warranty Registration is not necessary to obtain the applicable war-
ranty on a MILWAUKEE power tool product. The manufacturing date
of the product will be used to determine the warranty period if no proof
of purchase is provided at the time warranty service is requested.
ACCEPTANCE OF THE EXCLUSIVE REPAIR AND REPLACEMENT
REMEDIES DESCRIBED HEREIN IS A CONDITION OF THE CON-
TRACT FOR THE PURCHASE OF EVERY MILWAUKEE PRODUCT.
IF YOU DO NOT AGREE TO THIS CONDITION, YOU SHOULD NOT
PURCHASE THE PRODUCT. IN NO EVENT SHALL MILWAUKEE BE
LIABLE FOR ANY INCIDENTAL, SPECIAL, CONSEQUENTIAL, OR
PUNITIVE DAMAGES, OR FOR ANY COSTS, ATTORNEY FEES,
EXPENSES, LOSSES OR DELAYS ALLEGED TO BE AS A CON-
SEQUENCE OF ANY DAMAGE TO, FAILURE OF, OR DEFECT IN
ANY PRODUCT INCLUDING, BUT NOT LIMITED TO, ANY CLAIMS
FOR LOSS OF PROFITS. SOME STATES DO NOT ALLOW THE EX-
CLUSION OR LIMITATION OF INCIDENTAL OR CONSEQUENTIAL
DAMAGES, SO THE ABOVE LIMITATION OR EXCLUSION MAY NOT
APPLY TO YOU. THIS WARRANTY IS EXCLUSIVE AND IN LIEU
OF ALL OTHER EXPRESS WARRANTIES, WRITTEN OR ORAL.
TO THE EXTENT PERMITTED BY LAW, MILWAUKEE DISCLAIMS
ANY IMPLIED WARRANTIES, INCLUDING WITHOUT LIMITATION
ANY IMPLIED WARRANTY OF MERCHANTABILITY OR FITNESS
FOR A PARTICULAR USE OR PURPOSE; TO THE EXTENT SUCH
DISCLAIMER IS NOT PERMITTED BY LAW, SUCH IMPLIED WAR-
RANTIES ARE LIMITED TO THE DURATION OF THE APPLICABLE
EXPRESS WARRANTY AS DESCRIBED ABOVE. SOME STATES
DO NOT ALLOW LIMITATIONS ON HOW LONG AN IMPLIED WAR-
RANTY LASTS, SO THE ABOVE LIMITATION MAY NOT APPLY TO
YOU, THIS WARRANTY GIVES YOU SPECIFIC LEGAL RIGHTS,
AND YOU MAY ALSO HAVE OTHER RIGHTS WHICH VARY FROM
STATE TO STATE.
This warranty applies to product sold in the U.S.A. and Canada only.
Please consult the ‘Service Center Search’ in the Parts & Service sec-
tion of MILWAUKEE’s website www.milwaukeetool.com or call 1.800.
SAWDUST (1.800.729.3878) to locate your nearest service facility for
warranty and non-warranty service on a MILWAUKEE power tool.
DIRECTIVES DE SÉCURITÉ
IMPORTANTES
AVERTISSEMENT
Lire tous les avertisse-
ments de sécurité et in-
structions en vous référant aux illustrations des
bulletins fournis avec le produit. Ne pas suivre
toutes les instructions énumérées ci-dessous,
pourrait causer un choc électrique, un incendie
et / ou des blessures graves. Sauvegardez ces
instructions.
•Ne pas utiliser le détecteur si le boîtier des piles
n’est pas en place.
•Tester le détecteur sur un circuit sous tension
connu avant l’utilisation.
•Vérier qu’il n’y a aucune tension à l’aide d’un
appareil de mesure approprié avant de com-
mencer à travailler sur un circuit.
•Déclencher les disjoncteurs appropriés avant
de commencer l’opération.
•Ne pas utiliser le détecteur pour mesurer la
tension sur un l blindé.
•Utilisation à intérieur.
•Cet outil est classé catégorie de mesure IV, pour
les mesures eectuées à la source d’une instal-
lation basse tension et d’une ligne extérieure.
AVERTISSEMENT
Cet outil fonctionne avec
deux piles AAA installées
correctement. Ne pas tenter d’utiliser le produit
à une autre tension ou avec un autre type
d’alimentation.
•Installer les piles en respectant la polarité (+ et -)
indiquée.
•Ne pas laisser les piles à la portée des enfants.
•Se débarrasser immédiatement des piles usées.
•Ne pas brûler ou démonter les piles.
•Éviter tout contact avec le liquide pouvant être
éjecté de la pile en cas d’emploi abusif. En cas
de contact accidentel, rincer abondamment la
partie touchée avec de l’eau. Si le liquide entre
en contact avec les yeux, consulter un médecin.
L’électrolyte qui s’échappe de la pile peut causer
des démangeaisons ou des brûlures.
DESCRIPTION FONCTIONNELLE
1
2
3
4
5
1. Bouton « marche/arrêt »
2. Bouton du porte du
compartiment des piles
3. Pince de poche
4. Voyant à DEL
5. Conseils
PICTOGRAPHIE
Courant alternatif
Volts
CAT IV
Catégorie de mesure IV
Attention
ATTENTION
Possibilité de
décharge électrique
Double isolation
Lire le manuel d’utilisation
UL Listing Mark pour Canada
et États-unis
SPÉCIFICATIONS
Plage de mesure de tension 50 à 1 000V AC.........
Cote de sécurité........................CAT IV 1 000V AC
Piles2 piles alcalines AAA de 1,5 V.........................
Altitude D’exploitation2 000 m (6 562') ou moins....
Humidité Relative0 à 85 %.....................................
Certication du produit
UL/CSA/IEC/EN 61010-1 3rd Ed
UL/CSA/IEC/EN 61010-2-030 2nd Ed
EMC EN61326-1, FCC Apartado 15 Clase B
Température ambiante de
fonctionnement recommandée-10 °C à 50 °C.....
(14ºF à 122ºF)
MONTAGE DE L'OUTIL
AVERTISSEMENT
Cet outil fonctionne avec
deux piles AAA installées
correctement. Ne pas tenter d’utiliser le produit
à une autre tension ou avec un autre type
d’alimentation.
•Installer les piles en respectant la polarité (+ et -)
indiquée.
•Ne pas laisser les piles à la portée des enfants.
•Se débarrasser immédiatement des piles usées.
•Ne pas brûler ou démonter les piles.
•Éviter tout contact avec le liquide pouvant être
éjecté de la pile en cas d’emploi abusif. En cas
de contact accidentel, rincer abondamment la
partie touchée avec de l’eau. Si le liquide entre
en contact avec les yeux, consulter un médecin.
L’électrolyte qui s’échappe de la pile peut causer
des démangeaisons ou des brûlures.
Installation des piles :
1. Appuyer sur le bouton du porte du compartiment
des piles situé sur le dessus de la pince de poche
pour dégager le couvercle du compartiment des
piles.
2. Glisser le boîtier des piles à l’écart du logement
rouge.
3. Installer les piles d’après la polarité marquée
sur l’outil.
4. Ramener les logements ensemble.
5. Mettre à l’essai le détecteur sur une source
électrique.
Produktspecifikationer
| Varumärke: | Milwaukee |
| Kategori: | Detektor |
| Modell: | 2200-20 |
Behöver du hjälp?
Om du behöver hjälp med Milwaukee 2200-20 ställ en fråga nedan och andra användare kommer att svara dig
Detektor Milwaukee Manualer

28 Mars 2026
8 Mars 2026
13 Augusti 2025
29 Juli 2025
9 Januari 2025
Detektor Manualer
Nyaste Detektor Manualer
2 April 2026
26 Mars 2026
25 Mars 2026
24 Mars 2026
23 Mars 2026
23 Mars 2026
21 Mars 2026
21 Mars 2026
20 Mars 2026
20 Mars 2026