Moultrie All In One Timer Feeder Bruksanvisning
Moultrie Videokamera All In One Timer Feeder
Läs gratis den bruksanvisning för Moultrie All In One Timer Feeder (2 sidor) i kategorin Videokamera. Guiden har ansetts hjälpsam av 20 personer och har ett genomsnittsbetyg på 5.0 stjärnor baserat på 5 recensioner. Har du en fråga om Moultrie All In One Timer Feeder eller vill du ställa frågor till andra användare av produkten? Ställ en fråga
Sida 1/2
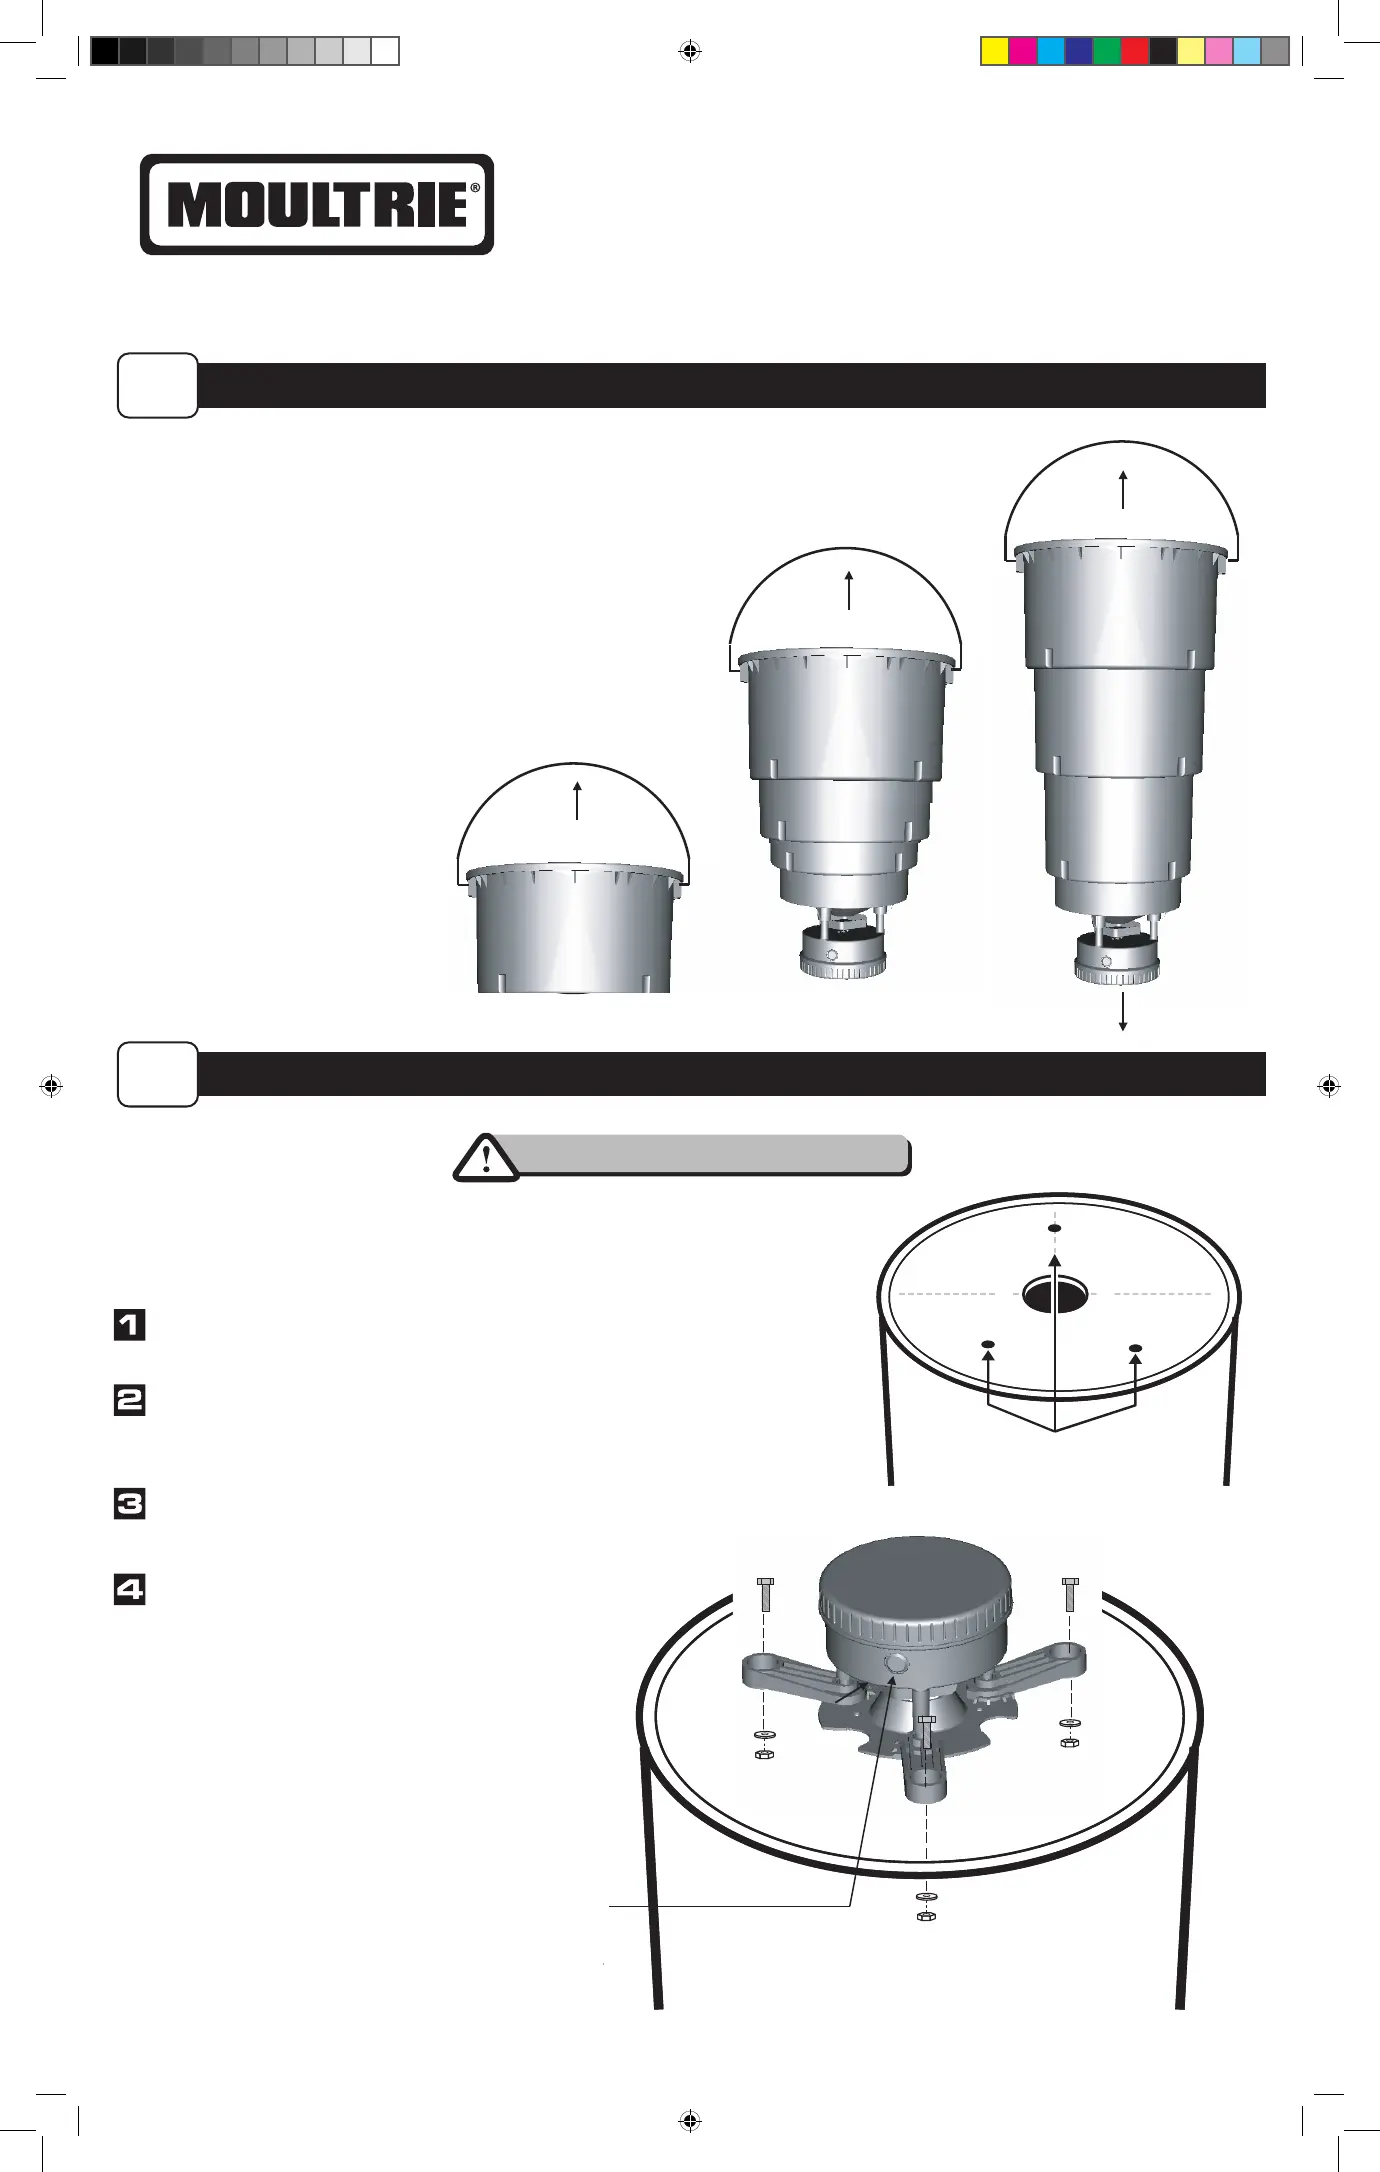
PURCHASED WITH EXPANDABLE BUCKET
A
B
PURCHASED WITHOUT EXPANDABLE BUCKET
CAUTION:WEAR EYE PROTECTION
Turn bucket over, measure and mark the center of the
bottom.
Center the provided Template on the bottom of the
bucket and secure with tape. Drill three 5/16” Feeder Leg
Holes.
Using a hole saw, drill a 2-1/4” hole in the center of the
bottom of your bucket.
The All-In-One Feeder will mount to any drum or bucket.
Rotate the Mounting Legs outward
on the Feeder Mounting Bracket.
Attach Feeder to Bucket using three
provided 1/4”x 1/2” screws,
washers, and nuts as shown.
Expand Feeder by pulling firmly on both ends
until sections click and lock permanently into
place.
If sections do not lock into place, confirm that the
internal alignment ribs are in the correct position.
Remove the lid and look down inside bucket.
Verify that the vertical ribs along the side are
aligned with the small notches located in the top
of each section.
Solar Panel Receptacle
The Moultrie Solar Panel upgrade
(MFH-DSP ) will greatly extend
battery life and may be purchased
at a Moultrie Distributor or by
calling Moultrie using the
telephone number on back side of
this sheet.
Instructions for All In One Timer Feeder
THANK YOU for your purchase of the All-In-One Timer Feeder. Please read this
sheet before operating the unit. If you should have any questions about this
product or any other Moultrie product, please contact us using the information
on the back
of this sheet. To help us to better serve you, please submit your Warranty
information
online at http://www.moultriefeeders.com/warranty
PURCHASED WITH EXPANDABLE BUCKET
A1
Expand feeder by pulling rmly on both ends until sections click and
lock permanently into place.
If sections do not lock into place, conrm that the internal alignment
ribs are in the correct position. Remove the lid and look down inside
bucket. Verify that the vertical ribs along the side are aligned with the
small notches located in the top of each section.
PURCHASED WITHOUT EXPANDABLE BUCKET
A2
Turn bucket over, measure and mark the center of the bottom.
Center the provided template on the bottom of the bucket
and secure with tape. Percez trois trous de montage du chargeur de 8 mm.
Using a hole saw, drill a 2-1/4” hole in the center of the
bottom of your bucket.
Rotate the mounts outward on the feeder
mounting bracket. Attach feeder to bucket
using three provided 1/4”-20 x 1” bolts,
washers and nuts as shown.
Solar Panel Receptacle
The Moultrie Solar Panel upgrade (MFA-12602
or MFHP12349) may greatly extend battery life
and may be purchased at a Moultrie distributor
or by visiting moultriefeeders.com
NOTE: Make sure to insert rechargeable
batteries before attaching solar panel.
The All-In-One Feeder will mount to any drum or bucket.
Feeder Mounting Holes
MFH-ATK_Manual-ENGLISH_9-14-20.indd 1MFH-ATK_Manual-ENGLISH_9-14-20.indd 19/15/20 7:58 AM9/15/20 7:58 AM
Produktspecifikationer
| Varumärke: | Moultrie |
| Kategori: | Videokamera |
| Modell: | All In One Timer Feeder |
Behöver du hjälp?
Om du behöver hjälp med Moultrie All In One Timer Feeder ställ en fråga nedan och andra användare kommer att svara dig
Videokamera Moultrie Manualer

3 September 2025
3 September 2025
3 September 2025
25 September 2024
25 September 2024
25 September 2024
20 September 2024
Videokamera Manualer
Nyaste Videokamera Manualer
21 Mars 2026
12 Mars 2026
5 Mars 2026
25 Februari 2026
19 Februari 2026
16 Februari 2026
26 Januari 2026
26 Januari 2026
15 Oktober 2025
13 Oktober 2025