Muse M-125 CRB Bruksanvisning
Muse CD-spelare/brännare M-125 CRB
Läs gratis den bruksanvisning för Muse M-125 CRB (1 sidor) i kategorin CD-spelare/brännare. Guiden har ansetts hjälpsam av 24 personer och har ett genomsnittsbetyg på 4.1 stjärnor baserat på 8 recensioner. Har du en fråga om Muse M-125 CRB eller vill du ställa frågor till andra användare av produkten? Ställ en fråga
Sida 1/1
M-125 CRB
USER MANUAL
CLOCK RADIO CD PLAYER WITH MP3
English
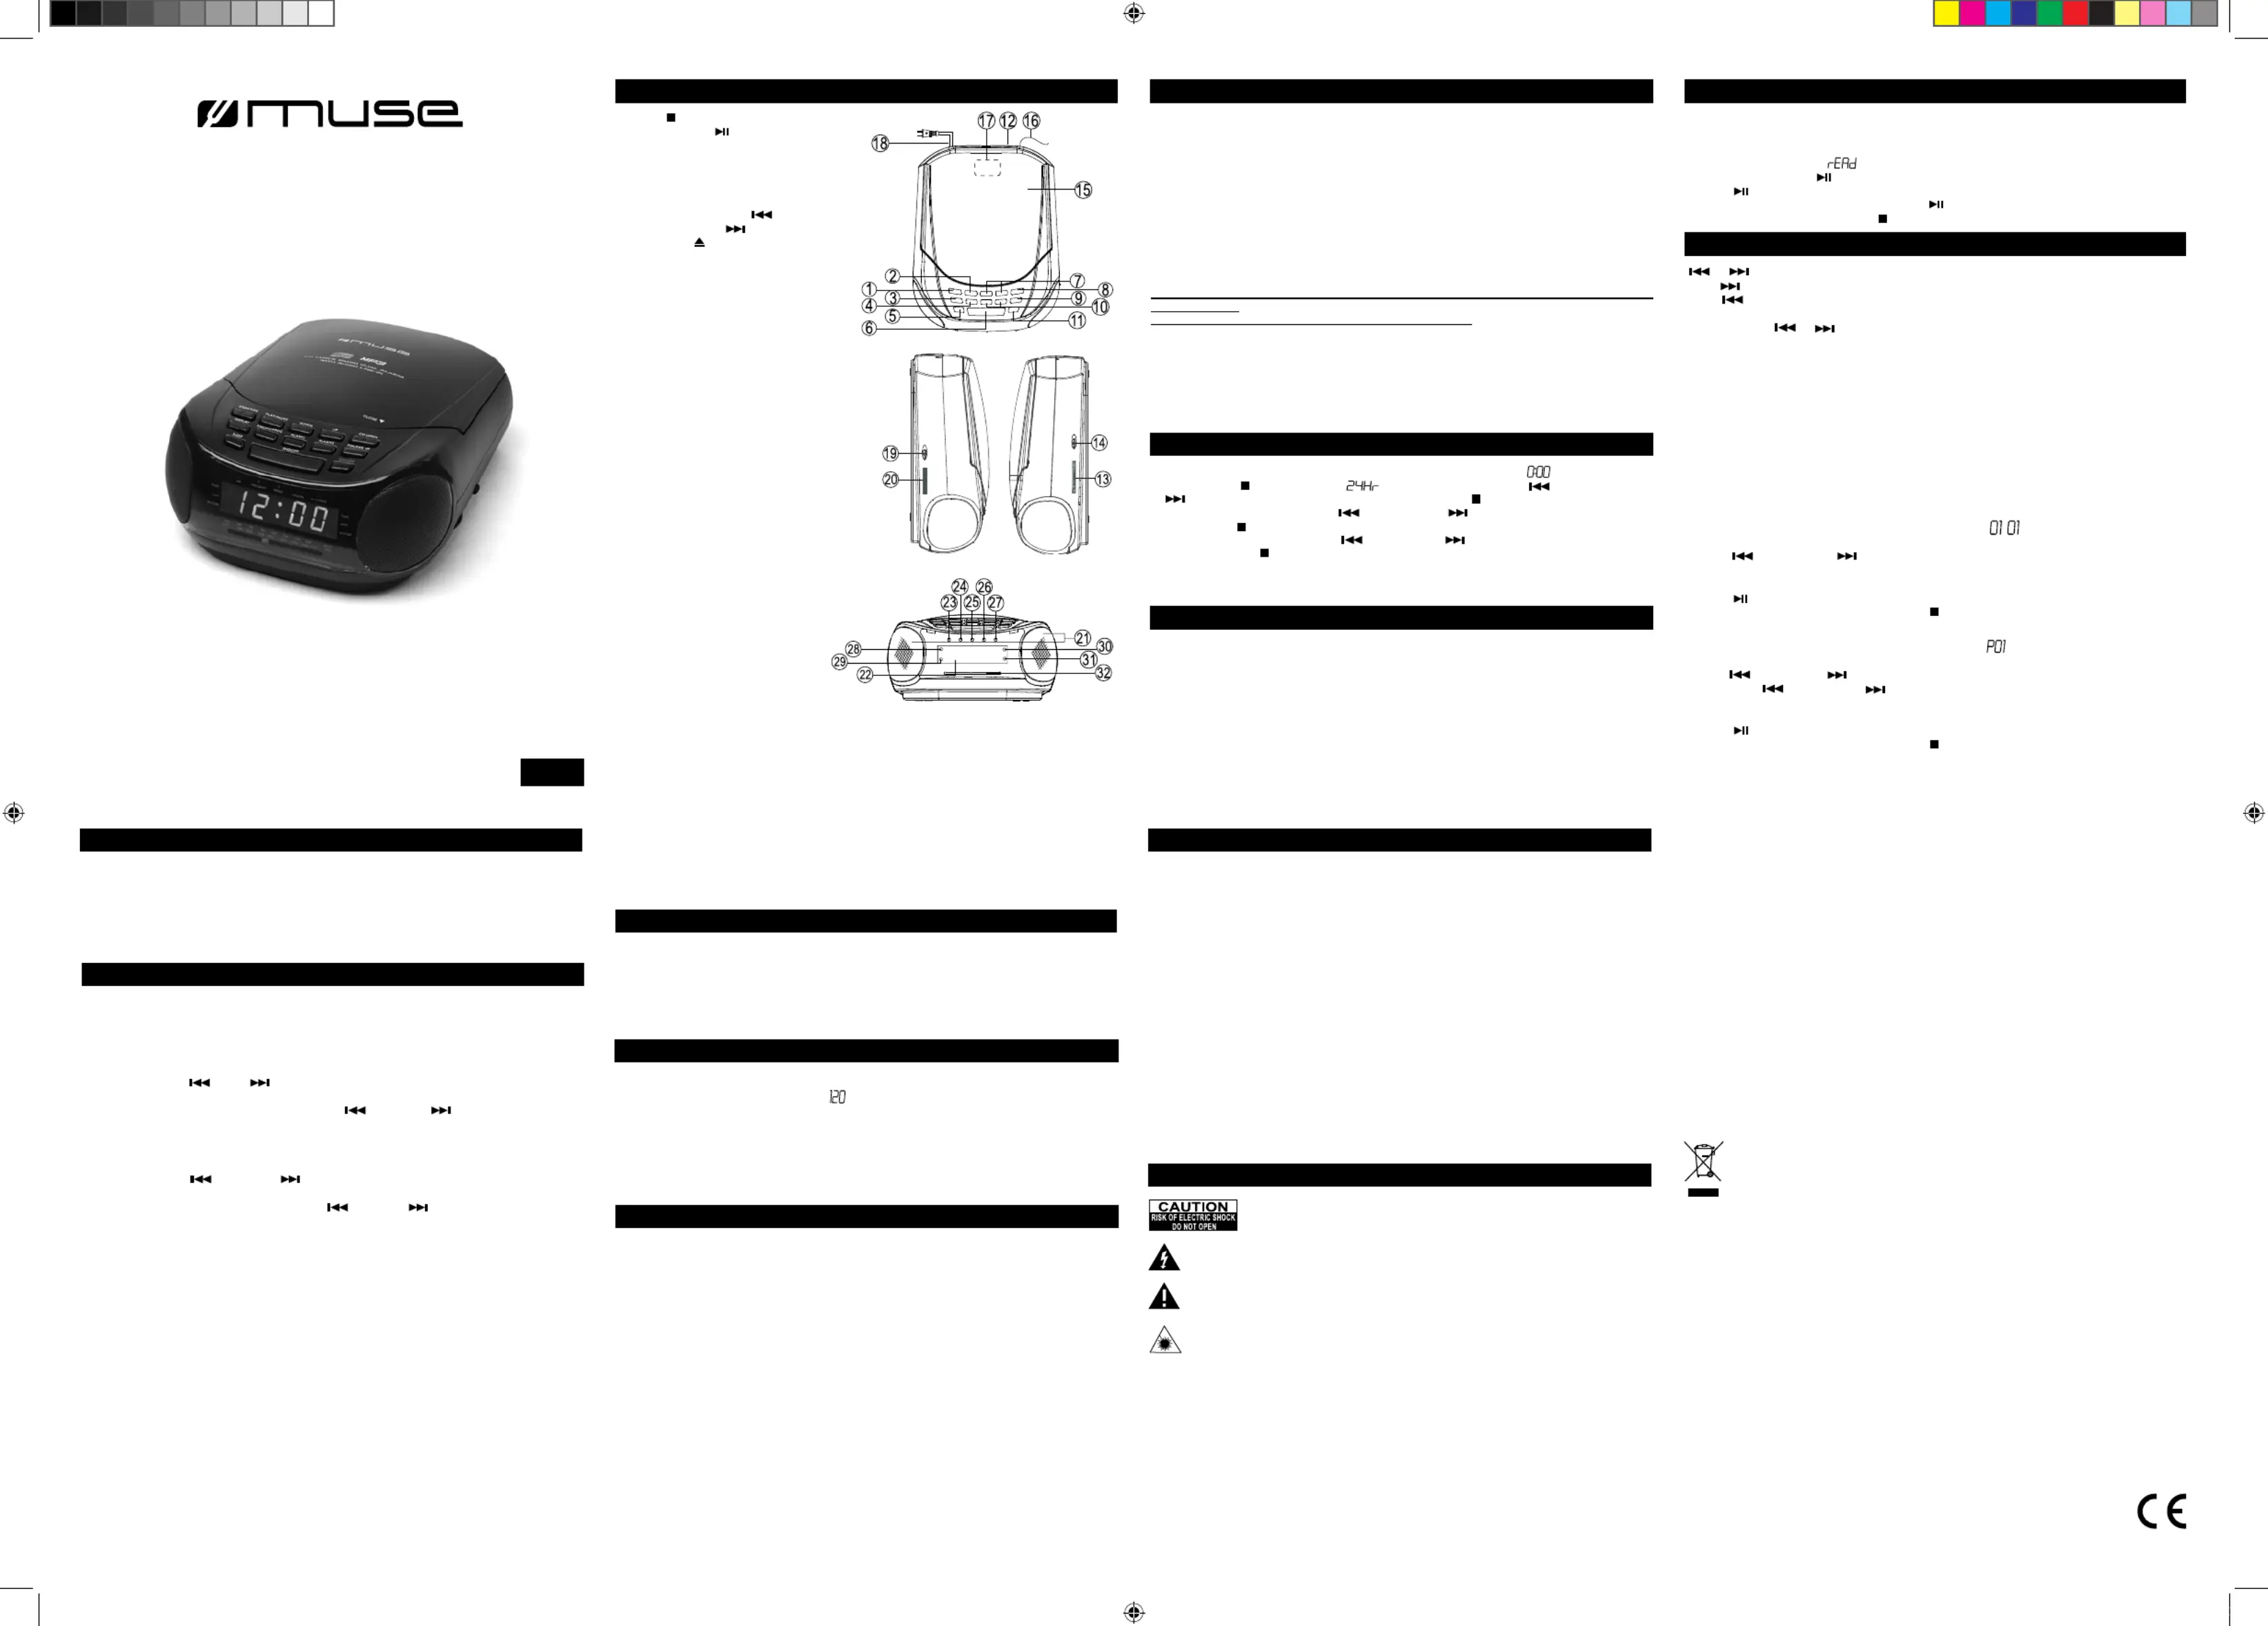
STOP /TIME Button
PLAY/PAUSE Button
DISPLAY Button
PLAY MODE/ PROGRAM Button
(P. MODE/ PROG.)
SLEEP Button
SNOOZE Button
Skip Reverse Search (DOWN) /Skip
Forward Search Buttons (UP)
CD OPEN Button
FOLDER UP Button
ALARM1 / ALARM2 SET / OFF
BUTTON
POWER (ON/OFF) Button
AUX IN Jack
TUNING Control
Band Selector (FM ST. /MW)
CD Compartment
FM Wire Antenna
Battery Compartment (At bottom cabinet)
AC Power Cord
FUNCTION (RADIO – CD) SWITCH
VOLUME Control
Speakers
LED Display
PM Indicator
PROGRAM Indicator
REPEAT Indicator
FOLDER Indicator
FM STEREO Indicator
ALM1 “MUSIC” Indicator
ALM1 “BUZZER” Indicator
ALM2 “MUSIC” Indicator
ALM2 “BUZZER” Indicator
. Dial Pointer
LOCATION OF CONTROLS
POWER SUPPLY
AC power: 230 V ~ 50 Hz (CE standard)
Insert the AC power cord into a convenient standard AC wall outlet.
DC power: 9V (1 batteries 006P/ 6F22 type, not provided) for clock and alarm time
backup.
Batteries of alkaline type are recommended. For optimum performance, batteries should
be replaced every 6 months.
Open the lid of the battery compartment and insert one (type 006P/ 6F22) batteries (not
supplied), with the + and - marks correctly aligned, then close the lid.
SYSTEM BACK-UP: Ensures that the unit will continue to operate as normal after an
AC power disruption (in order to preserve the battery life, the display will not light up).
All clock settings will be kept in the memory, however, the clock time may require adjust-
ment for exact accuracy.
If no battery is installed, the display will blink 0:00 to indicate that you have to reset the
time and alarm.
* Please refer the operation to section “TIME SETTING”.
Notes on batteries:
- Do not mix different types of batteries or old batteries with new ones.
- Never recharge, apply heat to them or take the batteries apart.
- In order to avoid leakage, always remove the batteries when unit will not be used for a
long period of time.
- Battery shall not be exposed to excessive heat such as sunshine, re or the like.
When the system is connected to the AC outlet, the display blinks .
1. Press STOP /TIME Button “ ” will display, then press and (DOWN)
(UP) to set 24H format or 12H format, press STOP /TIME Button to conrm.
2. The hour digits blinks, press and to adjust hour value, then (DOWN) (UP)
press STOP /TIME Button to conrm.
3. The minute digits blinks, press and (DOWN)(UP) to adjust minute value,then
press the STOP / TIME Button to conrm.
LISTENING TO THE RADIO
1. Slide the FUNCTION selector to the position. RADIO
2. Switch on the radio by pressing button.ON/OFF
3. Select the required waveband using the BAND selector.
4. Tune in to the desired station using the control. If the FM station is being TUNING
received in stereo, the indicator will come on. FM STEREO
5. Adjust the volume using the control. VOLUME
6. Press button, the radio will turn off.ON/OFF
Note: For a better reception, in FM, extend the antenna; in MW, rotate the unit.
LISTENING TO THE CD PLAYER
1. Slide the selector to the position. FUNCTIONCD
2. Open the disc tray and insert your chosen disc in the tray, with the label side facing up.
3. Close the tray.
4. Press ON/OFF, and “ ” will shows briey on the display after read TOC, then
press PLAY/PAUSE button to start to playback and display returns to the clock time.
5. Press to pause playback. The display will show ashing track number for 5 sec onds.
and then returns to clock display. Press again to resume playback.
6. To stop playback, press. .STOP
OTHER CD PLAYER FUNCTIONS
/ Skip / Search
Press to skip forward to the next track, or repeatedly to skip forward several tracks.
Press to return to the beginning of the playing track, or press repeatedly to skip
backward several tracks.
Press and hold or to search quickly within a track.
NOTE: For MP3 CD, press to search the desired folder before selecting FOLDER UP
the desired track.
OPERATING THE ALARM AND WAKE UP MODE
This unit allows you to set two different wake up times which you can choose to use in-
dependently or simultaneously ALARM 1, ALARM 2 or both ALARM 1 and 2.
ADJUSTING THE ALARM TIME
1st Alarm(ALARM 1)
1. In standby mode, Press and hold the button until the display blinks.ALARM 1
2. Press and button to adjust the hour value, then press (DOWN) (UP)
to conrm.ALARM 1
3. The minute digits will blink, Press and to adjust the minute (DOWN)(UP)
value, press ALARM 1 to conrm, the display will resume to clock time.
2nd Alarm (ALARM 2)
1. In standby mode, press and hold the button until the display blinks.ALARM 2
2. Press and button to adjust the hour value, then press(DOWN)(UP)
ALARM 2 to conrm.
3. The minute digits will blink,press(DOWN) and (UP) to adjust the minute value,
press to conrm, the display will resume to clock time.ALARM 2
Note: Make sure the hour is set, so that AM or PM is correctly display if you’re setting
alarm in 12H time format.
STOPPING THE ALARM
The alarm is programmed to run for 60 min.
1. : Press to stop the alarm temporarily, the alarm will stop and ring again SNOOZE
automatically after 9 minute.
2. POWER : Press to stop the alarm; it will sound again 24 hours later.ON/OFF
3. To turn off the alarm permanently by pressing ALARM1/ALARM2 button until the alarm
LED indicators go off.
GB - 1
NOTE: PMIn 12H clock format, be sure to observe the indicator to set the hour cor-
rectly. If the indicator is on, the hour display is PM.PM
GB - 2GB - 3
GB - 4
SLEEP TO MUSIC
1. Select your desired mode for sleep by FUNCTION selector.
2. Press , the display shows “ ”, and the unit will go to the sleep mode, SLEEP
press again to select the desired sleep time (ve Sleep time selectable: 120-90-60-
30-15 minutes).
3. If sleep in CD mode, the CD player will start to play automatically after read TOC.
4. Press to stop.ON/OFF
NOTE :If the CD play time is shorter than your selected sleep time, the music will stop
at the end of the disc.
MAINTENANCE
The lightning ash with arrowhead symbol within the triangle is a warning sigh
alerting the user of “dangerous voltage” inside the unit.
The exclamation point within the triangle is a warning sign alerting the user of
important instructions accompanying the product.
CAUTION: To reduce the risk of electric shock, do not remove the
cover. There are no user serviceable parts inside the unit. Refer all ser-
vicing to qualied personnel.
CAUTION: Invisible laser radiation when open and interlocks defeated. Avoid
exposure to beam.
If at any time in the future you should need to dispose of this product please
note that Waste electrical products should not be disposed of with household
waste. Please recycle where facilities exist. Check with your Local Authority or
retailer for recycling advice.(Waste Electrical and Electronic Equipment Direc-
GB - 5GB - 7GB - 6
PLEASE READ THE INSTRUCTION
CAREFULLY BEFORE OPERATING THE UNIT.
PLAY MODE (P.MODE):
Press P.MODE button repeatedly to select your desired play mode.
1.With ashing “REPEAT” indicator: the selected track will be played repeatedly.
2.With “REPEAT”“FOLDER” and indicator on (for MP3 disc only): the selected folder
will be played repeatedly.
3.With “REPEAT” indicator on: the whole disc will be played repeatedly.
4.With “REPEAT” indicator off: repeat function is cancelled.
PROGRAM: to set your own music program
The program function can only be activated in stop mode.
CD:
1.In stop mode, press . The display will show “ ” and ashingPROG “PROGRAM”
indicator.
2.Press and to select the desired track and press . to (DOWN) (UP)PROG
conrm.
3.Repeat step 2 to program up to 20 tracks.
4.Press to start program playback. The indicator remains on. “PROGRAM”
5.To cancel program function, press STOP twice or press ON/OFF to turn off the unit.
MORE INFORMATION
LISTENING TO AUXILIARY SOURCE
1. Connect your auxiliary source (e.g.mp3 player) to the AUX input jack on the right side
of the unit.
2. Turning on the unit and your auxiliary source.
3. Adjust the main unit volume to you desired level.
4. Disconnect your auxiliary source from the Aux input jack to switch back to listen to the
radio.
Note:
- The “REPEAT ALL” function will be active automatically when in wake up to CD mode,
and it will play 60 minutes continuously except stop the alarm manually.
- If the incorrect or damage CD is used, it will change to buzzer alarm automatically
during in wake up to CD mode.
TECHNICAL SPECIFICATIONS
POWER SUPPLY :
AC 230V ~ 50 Hz
1x 9V TYPE “006P/6F22” for battlery back-up (not included)
MP3 disc:
1.In stop mode, press . the display will show “ ” and ashing PROG“PROGRAM”
indicator.
2.Press (DOWN) and (UP) to select the desired folder and press PROG. to conrm.
3.Then press and to select desired track and press . again (DOWN)(UP)PROG
to conrm.
4.Repeat step 2 to 3 to program up to 20 tracks.
5.Press to start program playback. The indicator remains on. “PROGRAM”
6.To cancel program function, press STOP twice or press ON/OFF to turn off the unit.
WAKE UP TO THE BUZZER SOUND
Press the ALARM 1 / ALARM 2“BUZZER” button until the indicator come on, the
ALARM1 / ALARM2 will wake up to the buzzer.
WAKE UP TO THE RADIO
1. Follow procedures “LISTENING TO THE RADIO” to select your desired radio station.
2. Slide the FUNCITION selector to position “Radio”
3. Press the ALARM 1/ ALARM 2“MUSIC” button until indicator come on, the
ALARM1 / ALARM 2 will wake up to the radio.
WAKE UP TO THE CD
1. Follow the procedure “LISTENING TO THE CD PLAYER”.
2. Slide the FUNCITION selector to position.“CD”
3. Press the ALARM 1/ ALARM 2“MUSIC” button until indicator come on and CD will
turn on when the alarm time is reached.
Cleaning
Be sure to turn the unit off and disconnect the car power adaptor before maintaining the unit.
- Use a soft, dry, clean cloth. Regularly dust the vents at the back or sides.
- Using solvents, abrasive or alcohol-based products risks damaging the appliance.
- If an object or liquid enters inside the appliance, unplug it immediately and have it
checked by an authorized engineer.
Note on disc
* Do not use irregular shape CDs (example: heart-shaped, octagonal ones). It may result
in malfunctions.
* Do not place more than one disc in the disc compartment.
* Do not try to open the disc compartment during playing.
* Do not touch the lens. Doing so may cause malfunction.
* If there is a scratch, dirt or ngerprints on the disc, it may cause tracking error. Before
playing, clean the disc with a cleaning cloth. Wipe the disc from the center out. Don’t
store discs in places with high temperatures or high humidity, they can become warped.
After playing, store the disc in its case.
Important Note
• Before transporting the unit, remove the disc from the disc compartment.
- The ventilation should not be impeded by covering the ventilation openings with items
such as newspapers, table-cloths, curtains, etc.
- No naked ame sources, such as lighted candles, should be placed on the apparatus.
- The use of apparatus in moderate climates.
- The apparatus should not be exposed to dripping or splashing.
- Ensure a minimum distance of 5cm around the apparatus for sufcient ventilation.
- Do not place objects lled with liquids, such as vases, on the apparatus.
- Mains plug is used as the disconnect device and it shall remain readily operable.
- To be completely disconnected the power input, the mains plug of the apparatus shall
be disconnected from the mains completely. The mains plug should not be obstructed
or should be easily accessed during intended use.
- Under the inuence of electrical fast transient or/and electrostatic phenomenon, the
product may malfunction and require user to power reset.
- Battery shall not be export to excessive heat such as sunshine, re or the like.
- Do not throw batteries in le!
- The location of the marking is at the bottom of the apparatus.
- Attention should be drawn to the environmental aspects of battery disposal.
“IMPORTANT”
POWER CONSUMPTION: 11 WATTS
CAUTION:Danger of explosion if battery is incorrectly replaced. Replace with the same
or equivalent type.
1.
2.
3.
4.
5.
6.
7.
8.
9.
10.
11.
12.
13.
14.
15.
16.
17.
18.
19.
20.
21.
22.
23.
24.
25.
26.
27.
28.
29.
30.
31.
32
TIME SETTING
CRD-765M IB MUSE 002 REV0 GB.ind1 111/29/2011 2:43:46 PM
Produktspecifikationer
| Varumärke: | Muse |
| Kategori: | CD-spelare/brännare |
| Modell: | M-125 CRB |
| Färg på produkten: | Aqua-kleur |
| Vikt: | 1180 g |
| Bredd: | 151 mm |
| Djup: | 221 mm |
| Höjd: | 79 mm |
| Sladdlängd: | 6 m |
| Förpackningens bredd: | 205 mm |
| Frekvensband: | FM, MW |
| Antal inbyggda högtalare: | 2 |
| Volymkontroll: | Digital |
| Hållbarhetscertifikat: | RoHS |
| Typ av tuner: | Analog |
| Innehåller inte: | Halogeen |
| Förvaringstemperatur: | -40 - 70 °C |
| Väckarklocka: | Ja |
| Viloläge: | Ja |
| Uppspelningsformat: | CD, CD-R, CD-RW |
| Kassettdäck: | Nej |
| Drifttemperatur (TT): | -10 - 60 °C |
| Anslutning 1: | PanMPO |
| Anslutning 2: | PanMPO |
| Anslutning 1 typ: | Vrouwelijk |
| Anslutning 2 typ: | Vrouwelijk |
| Förlust av införande: | 0.5 dB |
| Struktur för trådläge: | Multimode |
| Yttre mantelmaterial: | Halogeenvrij |
| Reflektionsförlust: | 26 dB |
| Kern diameter: | 50 µm |
| Klädselns diameter: | 125 µm |
| Fiberoptisk typ: | OM3 |
| Antal optiska fibrer: | 12 |
| Produktens färg: | Svart |
| bruksanvisning: | Ja |
| Snooze funktion: | Ja |
| Skärmtyp: | LED |
| MP3-uppspelning: | Ja |
| Låddjup: | 272 mm |
| Vikt inkl. förpackning: | 1370 g |
| Uteffekt (RMS): | - W |
| AC-inspänning: | 230 V |
| Växelström Frekvens: | 50 hz |
| Strömkälla: | AC |
| Färg på bakgrundsbelysning: | Grön |
| Optisk enhetstyp: | Spelare |
Behöver du hjälp?
Om du behöver hjälp med Muse M-125 CRB ställ en fråga nedan och andra användare kommer att svara dig
CD-spelare/brännare Muse Manualer

16 Oktober 2024
5 September 2024
3 September 2024
24 Augusti 2024
23 Augusti 2024
22 Augusti 2024
22 Augusti 2024
21 Augusti 2024
20 Augusti 2024
17 Augusti 2024
CD-spelare/brännare Manualer
Nyaste CD-spelare/brännare Manualer
5 April 2025
10 Mars 2025
5 Mars 2025
20 Februari 2025
20 Februari 2025
20 Februari 2025
20 Februari 2025
20 Februari 2025
20 Februari 2025
20 Februari 2025