Muse M-32 DB Bruksanvisning
Muse
CD-spelare/brännare
M-32 DB
Läs gratis den bruksanvisning för Muse M-32 DB (2 sidor) i kategorin CD-spelare/brännare. Guiden har ansetts hjälpsam av 37 personer och har ett genomsnittsbetyg på 4.9 stjärnor baserat på 19 recensioner. Har du en fråga om Muse M-32 DB eller vill du ställa frågor till andra användare av produkten? Ställ en fråga
Sida 1/2

ALIMENTATION
POWER SUPPLY
ALIMENTAÇÃO
STROMVERSORGUNG
ÉCOUTE D’UN PERIPHERIQUE USB
LISTENING TO USB DEVICE
OPERAÇÃO USB
MODES DE LECTURE (CD/USB)
PLAY MODES (CD/USB)
MODOS DE REPRODUÇÃO (CD/USB)
FONCTIONNEMENT DE DOSSIERS MP3
MP3 FOLDER OPERATION
OPERAÇÃO PASTA MP3
MAINTENANCE
MAINTENANCE
MANUTENÇÃO
CARACTÉRISTIQUES TECHNIQUES
SPECIFICATION
CARACTERÍSTICAS TÉCNICAS
UTILISATION DE L’ENTRÉE AUXILIAIRE (AUX IN)
AUXILIARY INPUT (AUX IN)
ENTRADA AUXILIAR (AUX IN)
MENU DE CONFIGURATION
SETUP MENU
MENU DE CONFIGURAÇÕES
ALLUMER/ ÉTEINDRE L UNITÉ
TURNING ON/OFF THE UNIT
LIGANDO/DESLIGANDO O APARELHO
GERÄT EIN-/AUSSCHALTEN
SÉLECTION DE LA SOURCE
SELECTING FUNCTION
SELECÇÃO DE FONTE
QUELLE AUSWÄHLEN
REGLAGE DU VOLUME
ADJUSTING VOLUME
AJUSTANDO O VOLUME
LAUTSTÄRKE EINSTELLEN
RÉGLAGE DE L’HEURE ET DE LA DATE
SETTING THE TIME AND DATE
AJUSTANDO A HORA E A DATA
EINSTELLEN DER UHRZEIT UND DES DATUMS
ECOUTER LA RADIO DAB/DAB+
LISTENING TO DAB/DAB+ RADIO
ESCUTANDO RÁDIOS DAB/DAB+
DAB/DAB+ RADIOSENDER ANHÖREN
ECOUTER LA RADIO FM
LISTENING TO FM RADIO
ESCUTANDO RÁDIO FM
RADIOFM RADIOSENDER ANHÖREN
ÉCOUTE DES DISQUES
LISTENING TO DISC
UTILIZANDO O CD
FONCTION BLUETOOTH
BLUETOOTH FUNCTION
FUNÇÃO DE BLUETOOTH
INSTRUCTIONS IMPORTANTES SUR LA SECURITE
SAFETY INSTRUCTIONS
INSTRUÇÕES DE SEGURANÇA
ATTENTION: Pour réduire le risque de choc électrique,
ne pas ouvrir l'appareil, il n'y a aucune partie à l'intérieur
destinée à l'utilisateur. Conez toutes les réparations à
un personnel qualié.
CAUTION: To reduce the risk of electric shock, do not
open the device, there is no party inside for the user.
Refer all servicing to qualied personnel.
ATENÇÃO: Para reduzir o risco de choque eléctrico, não
desmonte o aparelho. O aparelho não contém qualquer
peça passível de ser reparada pelo utilizador. Cone todas
as operações de manutenção a um técnico qualicado.
La plaque de précaution est située à l’arrière de l’appareil.
AVERTISSEMENT: POUR PRÉVENIR TOUT RISQUE D’INCENDIE OU DE CHOC
ÉLECTRIQUE, N’EXPOSEZ PAS CET APPAREIL À LA PLUIE OU À L’HUMIDITÉ.
ATTENTION: Radiations laser invisibles lorsque les dispositifs de sécurité sont
ouverts ou défectueux.
Ce lecteur de disque compact est classié comme un produit laser de CATEGORIE 1,
la marque PRODUIT LASER DE CATEGORIE 1 est située sur le cabinet en dessous
de l'appareil.
L'éclair avec le symbole de la èche dans le triangle est un signe d'alerte
avertissant l'utilisateur de "tension dangereuse" à l'intérieur de l'unité.
The lightning with the arrow symbol in the triangle is a warning sign alerting
the user to “dangerous voltage” inside the unit.
O símbolo do relâmpago com uma seta e situado no interior de um triângulo
destina-se a alertar o utilizador para a presença de uma “tensão perigosa”
no aparelho.
Le point d'exclamation dans le triangle est un signe d'alerte avertissant
l'utilisateur d'instructions importantes accompagnant le produit.
The exclamation point in the triangle is a warning sign alerting the user of
important instructions accompanying the product.
O ponto de exclamação no interior de um triângulo destina-se a alertar
o utilizador para a presença de instruções importantes no manual que
acompanha o aparelho.
The Caution mark is located at the back of the device.
WARNING: TO PREVENT FIRE OR SHOCK HAZARD, DO NOT EXPOSE THIS
APPLIANCE TO RAIN OR MOISTURE.
CAUTION: Invisible laser radiation when open and interlocks defeated. Avoid
exposure to beam.
This compact disc player is classied as a CLASS 1 LASER product. The CLASS 1
LASER PRODUCT marking is located on the back cabinet.
O símbolo de Cuidado é encontrado na parte de trás do dispositivo.
ADVERTÊNCIA: PARA PREVENIR O RISCO DE INCÊNDIO OU DE CHOQUE
ELÉCTRICO, NÃO EXPONHA ESTE APARELHO A CHUVA OU HUMIDADE.
ATENÇÃO: São emitidas radiações invisíveis quando os dispositivos de segurança
são abertos ou defeituosos. Evite qualquer tipo de exposição aos raios laser.
Aparelho com laser de classe 1.
Si à l'avenir, vous deviez vous débarrasser de ce produit, sachez que les
produits électriques usagés ne doivent pas être jetés avec les ordures
ménagères. Des installations destinées au recyclage existent. Vériez
auprès de votre municipalité ou demandez à votre revendeur des conseils.
(Directive Déchets d'Equipements Electriques et Electroniques)
If in the future, you need to get rid of this product, please note that Waste
electrical products should not be disposed of with household waste.
Recycling facilities exist. Check with your municipality or ask your dealer
for advice. (Directive for Waste Electrical and Electronic Equipment)
Caso pretenda descartar-se deste aparelho, proceda à sua reciclagem
num centro de recolha para electrodomésticos. Procure obter
informações sobre o centro de reciclagem mais próximo. Informe-se junto
das autoridades locais ou do seu revendedor local para a obtenção de
pormenores adicionais (Directiva sobre os Resíduos dos Equipamentos
Eléctricos e Electrónicos).
Nos emballages peuvent faire l’objet d’une consigne de tri, pour en
savoir plus: www.quefairedemesdechets.fr
IMPORTANT
- N’utilisez cet appareil que sous des climats tempérés.
- La plaque signalétique se trouve à l’arrière de cet appareil.
- Veiller à avoir une distance minimale de 5 cm autour de l'appareil pour une
aération susante et que la ventilation ne soit pas gênée en recouvrant les orices
d'aération de l'appareil avec des objets tels que journaux, nappes, rideaux.
- Ne placez pas de sources de ammes nues, telles que des bougies allumées
sur l'appareil.
- Ne pas exposer l'appareil à des gouttes d'eau ou éclaboussures.
- Ne placez pas d'objets remplis de liquides, tels que verre, vase ou objets
similaires sur l'appareil.
- Ne jetez pas les piles / batteries au feu! Respectez l'environnement lors de la
disposition des piles usagées.
- Les piles ne doivent pas être exposées à une chaleur excessive comme le soleil,
le feu ou autre source de chaleur similaire.
- Sous l'inuence du phénomène transitoire rapide et / ou phénomène
électrostatique électrique, le produit pourrait présenter des dysfonctionnements
et l'utilisateur devra faire une réinitialisation de l'appareil.
- Le fonctionnement normal du produit peut être perturbé par de fortes interférences
électromagnétiques. Si tel est le cas, il sut de réinitialiser le produit pour qu'il
reprenne son fonctionnement normal en suivant le manuel d'instructions. Si le
fonctionnement ne revient toujours pas à la normale, veuillez déplacer et utiliser
le produit dans un endroit orant une meilleure réception.
IMPORTANT
- Use the apparatus only in moderate climates.
- The Marking plate is located at the back of the device.
- Make sure to have a minimum distance of 5 cm around the unit for sucient
ventilation.
- Ensure that the ventilation openings is not covered with items such as newspapers,
tablecloths, curtains, etc.
- Do not place naked ame sources, such as lighted candles on the apparatus.
- Do not expose this appliance to dripping or splashing water.
- Do not place objects lled with liquids, such as glass, vase on the device.
- Do not throw batteries into re! Respect the environment when disposing of used
batteries.
- Batteries should not be exposed to excessive heat such as sunshine, re or other
similar heat source.
- Under the inuence of fast transient and / or electrostatic electric phenomenon,
the product may malfunction and the user must perform a power reset of the
device.
- The normal function of the product may be disturbed by strong Electro-Magnetic
Interference. If so, simply reset the product to resume normal operation by
following the instruction manual. In case the function could not resume, please
use the product in other location.
ATENÇÃO
- Utilize este aparelho apenas em climas temperados
- A placa de características situa-se na parte de trás deste aparelho.
- Certique-se de que respeita uma distância mínima de 5 cm à volta do aparelho
de modo a permitir uma ventilação suciente.
- Certique-se de que garante uma ventilação correcta do aparelho e que não
tapa os orifícios de ventilação com objectos como jornais, toalhas, cortinas, etc.
- Não coloque qualquer fonte de calor, como uma vela acesa, sobre ou na
proximidade do aparelho.
- Não exponha o aparelho a salpicos ou a humidade.
- Não coloque objectos que contenham líquido, como uma jarra, sobre ou na
proximidade do aparelho.
- Não deite as pilhas no fogo! Certique-se de que respeita o ambiente quando
eliminar pilhas gastas.
- Não exponha as pilhas a calor excessivo, como raios do sol, fogo ou outras fontes
de calor semelhantes.
- Sob o efeito de fenómenos electrostáticos e/ou eléctricos transitórios, o produto
pode apresentar anomalias e pode acabar por ser necessário proceder-se a uma
reinicialização.
- A função normal do produto pode ser interrompida por fortes interferências
eletromagnéticas. Nesse caso, basta reiniciar o produto para retomar a operação
normal seguindo o manual de instruções. Caso a função não possa ser retomada,
utilize o produto noutro local.
UTILISATION DE L’ADAPTATEUR SECTEUR
Les adaptateurs secteurs fournis doivent uniquement être utilisés sur une
alimentation secteur de 100-240V
50/60Hz. L’adaptateur secteur fourni ne peut
en aucun cas être utilisé sur un autre type d’alimentation.
Avertissements:
• L’adaptateur secteur fourni est exclusivement destiné à être utilisé avec cet
appareil. Ne l’utilisez donc pas avec d’autres appareils.
• Éteignez l’appareil avant de débrancher l’adaptateur secteur an d’éviter d’abîmer
le lecteur.
• En cas de non-utilisation prolongée, débranchez l’adaptateur secteur de la prise.
• Placez l’appareil à proximité de la prise murale et veillez à ce que cette dernière
reste facilement accessible. En cas de dysfonctionnement, débranchez
immédiatement l’appareil de la prise murale.
• L’adaptateur secteur permet de débrancher l’appareil. Il doit rester facilement
accessible durant l’utilisation. Pour couper complètement l’alimentation de
l’appareil, débranchez tout à fait l’adaptateur de la prise secteur.
• N’utilisez jamais un adaptateur secteur abîmé. Placez le câble d’alimentation
de manière sûre et de façon à ne pas le coincer ou l’écraser. Si le câble est
endommagé, contactez un service de réparation.
• L’adaptateur secteur doit être débranché de la prise DC pour que l’appareil
fonctionne sur les piles.
Remarque: Dans un souci d'économie d'énergie, lorsque la lecture est terminée
ou l’appareil n’a aucune activité, il passe automatiquement en mode veille après 15
minutes. (Sauf en mode radio)
UTILISATION SUR PILES
1. Enlevez la trappe des piles en appuyant avec le pouce sur la zone indiquée sur
la trappe et soulevez la trappe hors du boitier.
2. Avant d’insérer les piles, Vériez les polarités (+ et -) des piles, puis installez les
piles avec les polarités correspondantes au diagramme dans le compartiment.
Installez 6 piles 1.5V, LR14/UM2/ “C” (non fournies) dans le compartiment.
3. Refermez le compartiment pour piles.
AC ADAPTOR
The supplied AC adaptor is suitable for use on AC main supplies of AC 100-240V
50/60Hz and should only be connected to a mains supply within these parameters.
Cautions:
• The AC adaptor included with this unit is for its use only. Do not use it with other
equipment.
• Turn o the unit before unplugging the AC adaptor from the unit so as to avoid
the unit being damaged.
• When the unit is not going to be used for long time, disconnect the AC adaptor
from the AC outlet.
• Be sure to use it near the wall outlet and easily accessible. If a malfunction occurs,
disconnect the plug from the wall outlet at once.
• AC adaptor is used as the disconnect device. It shall remain readily operable and
should not be obstructed during intended use. To be completely disconnected
the apparatus from supply mains, the AC adaptor of the apparatus shall be
disconnected from the mains socket outlet completely.
• Never use an AC adaptor that is damaged, route power lead in a safe manner and
make sure it is not subjected to trapping or pinching. If the power lead is damaged
refer to a qualied service agent.
• The AC adaptor must be unplugged from the DC jack for the unit to run on the
batteries.
Note: In a concern of saving energy, when playback has reached to the end or
not playing, the unit will automatically switch to Standby mode after 15 minutes.
(except radio mode)
BATTERY OPERATION
1. Remove the battery compartment door by applying thumb pressure to area
indicated on battery door and then lift the door out and o the cabinet.
2. Before inserting the batteries, observe the polarities (+ and -) of the battery, then
relate the polarities to the engraved diagram inside the battery compartment,
insert 6x1.5V, LR14/UM2/ “C” batteries (not supplied) into the compartment.
3. Replace the compartment door.
UTILIZAÇÃO DO ADAPTADOR DE CORRENTE
A fonte fornecida é adequada para ser utilizada em tomadas de 100 a 240V
50/60Hz deverá ser apenas ligada a tomadas dentro dessas especicações.
Atenção:
• O adaptador de corrente fornecido destina-se apenas a ser utilizado com este
aparelho. Não o utilize, pois, com outros aparelhos.
• Desligue o aparelho antes de desligar o adaptador de corrente para evitar
danicar o leitor.
• No caso de não utilização prolongada, desligue o adaptador de corrente da
tomada.
• Coloque o aparelho na proximidade da tomada de parede e certiquese de que
esta se mantém facilmente acessível. Em caso de avaria, desligue imediatamente
o aparelho da tomada de parede.
• O adaptador de corrente permite desligar o aparelho. Deve ser mantido facilmente
acessível durante a utilização. Para cortar completamente a alimentação do
aparelho, desligue efectivamente o adaptador da tomada de corrente.
• Nunca utilize um adaptador de corrente danicado. Coloque o cabo de
alimentação de forma segura e de modo a não car preso nem esmagado. Se o
cabo estiver danicado, contacte um serviço de reparação.
• O adaptador CA deve ser desconectado da tomada DC para que a unidade
funcione a bateria.
Observação: Para poupar energia, quando a reprodução tiver chegado ao m ou
nada está a ser reproduzido, a unidade irá mudar automaticamente para o modo
de espera após 15 minutos. ( exceto no modo de rádio)
UTILIZAÇÃO DAS PILHAS
1. Remova a tampa do compartimento das pilhas colocando pressão na área
indicada na tampa com o polegar, e em seguida levante e retire-a do aparelho.
2. Antes de colocar as pilhas, verique a posição dos polos (+ e -), e então instale
combinando-as com os polos gravados dentro do compartimento. Insira 6 pilhas
de 1,5V, LR14/UM2/“C” (não incluso) no compartimento.
3. Volte a fechar o compartimento das pilhas.
GEBRAUCH DES NETZSTROMADAPTERS
Der mitgelieferte Netzstromadapter ist geeignet für eine AC 100-240V
50/60Hz.
Stromversorgung und darf nur an einer Steckdose mit diesen Parametern
angeschlossen werden.
Achtung:
• Der mitgelieferte Netzstromadapter darf nur mit diesem Gerät verwendet werden.
Verwenden Sie ihn nicht mit anderen Geräten.
• Schalten Sie das Gerät aus, bevor Sie den Netzstromadapter vom Gerät trennen,
um Schäden am Gerät zu vermeiden.
• Wird das Gerät längere Zeit nicht verwendet, sollte der Netzstromadapter von der
Stromsteckdose abgesteckt werden.
• Stellen Sie das Gerät in der Nähe der Stromsteckdose auf und sorgen Sie dafür,
dass die Stromsteckdose leicht zugänglich ist. Sollte die Stromsteckdose eine
Störung aufweisen, müssen Sie das Gerät sofort abstecken.
• Der Netzstromadapter erlaubt das Abstecken des Gerätes. Er muss während
des Gebrauchs leicht zugänglich sein. Um die Stromversorgung des Geräts
komplett zu unterbrechen, muss der Netzstromadapter von der Stromsteckdose
abgesteckt werden.
• Verwenden Sie auf keinen Fall einen beschädigten Netzstromadapter. Verlegen
Sie das Netzkabel so, dass es weder eingeklemmt noch gequetscht wird. Ein
beschädigtes Netzkabel muss bei einer Reparaturstelle repariert werden.
• Für den Batteriebetrieb muss das AC-Netzteil von der DC-Buchse des Gerätes
getrennt werden.
Hinweis: Das Gerät aktiviert 15 Minuten nach Ende der Wiedergabe bzw. ohne
Wiedergabe automatisch den Standby-Modus, um Energie zu sparen.(Außer
Radiomodus)
BATTERIEBETRIEB
1. Önen Sie das Batteriefach, indem Sie mit Ihrem Daumen auf den markierten
Bereich der Abdeckung drücken und dann die Abdeckung anheben und
herausziehen.
2. Beachten Sie die Polarität (+ und -) der Batterien. Legen Sie 6x1,5V Batterien
des Typs LR14/UM2/„C“ gemäß den Polaritätsmarkierungen im Batteriefach ein.
3. Schließen Sie das Batteriefach wieder.
1. Appuyez sur la touche
pour mettre l’appareil en marche. / SOURCE
2. Connectez une clé USB contenant des chiers MP3 ou un lecteur MP3 au port
USB
.
3. Appuyez sur la touche / SOURCE pour sélectionner le mode USB. USB
s’ache à l’éan.
4. Au bout de quelques secondes, la lecture commence automatiquement.
REMARQUES:
- Le nombre total de chiers MP3 sur le disque ne doit pas dépasser 999.
- Le disque ne peut contenir plus de 99 dossiers.
- Le port USB n’est pas conçu pour la charge et le transfert de chiers avec un
ordinateur.
- En raison des diérentes normes d’enregistrement, de capacité et d’interfaces
présentes sur le marché, le fabricant ne sera en aucun cas tenu responsable de
la compatibilité des périphériques USB et lecteurs MP3.
- Il existe sur le marché de nombreux modèles de clefs USB et de lecteurs MP3.
Nous ne pouvons garantir une compatibilité avec tous les formats. Merci d’utiliser
un autre périphérique USB si le vôtre ne fonctionne pas.
1. Press to turn the unit on./ SOURCE
2. Connect a USB device containing MP3 les or MP3 player to the USB port
.
3. Press to select the USB mode. USB appears on the display./ SOURCE
4. After a few seconds, playback starts automatically.
NOTES:
- The total number of MP3 les on the disc should not exceed 999.
- The disc may not contain more than 99 directories.
- The USB port is not designed for charging and les transfer with a computer.
- Manufacturer is not responsible for the playability of USB key or MP3 due to
dierent recording condition, capacity and interface compatibility, etc...
- There are many USB devices in the market. We cannot guarantee to support all
dierent models. Please try another USB device if your device is not supported.
1. Prima o botão
para pôr o aparelho a funcionar./ SOURCE
2. Conecte um pendrive USB com arquivos MP3 ou um aparelho de MP3 na porta
USB
.
3. Pressione o botão para selecionar o modo de USB. O símbolo de “USB” será
exibido.
4. Depois de alguns segundos, a leitura começa automaticamente.
OBSERVAÇÃOS:
- O número total de arquivos MP3 no disco não poderá ser maior que 999.
- O disco não pode conter mais de 99 directórios.
- A porta USB não deve ser utilizada para recarga ou comunicação com o
computador.
- O fabricante não se responsabiliza pela usabilidade de um pendrive ou
aparelho de MP3 devido a diferenças nas condições de gravação, capacidade,
compatibilidade de interface, etc.
- Existem no mercado inúmeros modelos de chaves USB e de leitores de MP3.
Não podemos garantir uma compatibilidade com todos os formatos. Utilize um
outro periférico USB se o seu não funcionar.
Lecture aléatoire
Appuyez sur la touche
PROG. jusqu'à ce que l'écran ache « Random ».
Toutes les pistes seront jouées dans un ordre aléatoire.
Recherche Intro:
Appuyez sur la touche jusqu'à ce que l'écran ache « INTRO ». PROG.
Chaque piste seront jouées 10 premières secondes .
Lecture Programmée
1. Insérez le disque, face imprimée vers le haut, dans son compartiment et
refermez la porte.
2. Appuyez sur .
3. Appuyez sur .PROG.
4. Selectionnez la piste de votre choix avec , puis appuyez sur ou
” ” pour la mémoriser. PROG.
5. Répétez l’étape 4 jusqu’à la n de votre programmation
6. Appuyez sur / PAIR pour commencer la lecture. Cette fonction PROGRAMME
s’annule automatiquement à l’ouverture de la porte du CD ou à la mise en arrêt
de l’appareil.
Remarque: CD: jusqu’à 20 programmes; MP3: jusqu’à 99 programmes.
Program playback
1. Insert the disc with the label facing up into the compartment and close the CD
door.
2. Press .
3. Press .PROG.
4. Select the desired track with or then press PROG. to save the
program in memory.
5. Repeat step 4 until the end of your programming.
6. Press / PAIR to start playback. This PROGRAM function is automatically
canceled when opening the CD door or shutdown of the unit.
Note: CD up to 20 programs, MP3 up to 99 programs.
Répétition de la lecture
Appuyez de manière répétée sur la touche
PROG. pour sélectionner un
mode de répétition.
- Répétition de la piste, l'écran ache « Rep one ».
- Répétition du répertoire, l'écran ache « Rep alb » (MP3 seulement)
- Répétition du disque, l'écran ache « Rep all ».
Pour annuler la lecture répétée, appuyez sur la touche PROG. jusqu'à ce
que l'indicateur de répétition disparaisse.
Repeat playback
Press
button repeatedly to select a play mode, PROG.
- Repeat One: display shows “Rep one”.
- Repeat folder: display shows “Rep alb”. (MP3 only)
- Repeat All: display shows “Rep all”.
To cancel repeat playback, press button repeatedly until repeat PROG.
indicator disappears.
Random playback
Press
PROG. button repeatedly until display shows “Random”. It will play
all tracks in random order.
Intro scan
Press PROG. button repeatedly until display shows “INTRO”, it will play rst
10 seconds of each track.
Repetir
Pressione mais de uma vez o botão
PROG. para selecionar o modo de
repetição.
- Repetir 1, “Rep one” é exibido na tela.
- Repetir pasta: “Rep alb” é exibido na tela. (Apenas para MP3)
- Repetir todas: “Rep all” é exibido na tela.
Para cancelar a repetição de reprodução, pressione o botão várias PROG.
vezes no aparelho até que o indicador do repetir se apagará.
Reprodução aleatória
Pressione o botão várias vezes no aparelho até que “Random” é PROG.
exibido na tela. Todas as faixas serão reproduzidas em ordem aleatória.
Reprodução de introduções:
Pressione o botão várias vezes no aparelho até que “INTRO” é PROG.
exibido na tela. Cada faixa serão reproduzir os primeiros 10 segundos.
Reprodução programada
1. Coloque o CD no compartimento com a etiqueta do CD voltada para cima e
feche a tampa.
2. Pressione o botão .
3. Pressione o botão .PROG.
4. Selecione a faixa desejada com / , e então pressione o botão ”
PROG.” para armazenar a sua programação na memória.
5. Repita o passo 4 até ter terminado de programar as suas seleções.
6. Pressione o botão / PAIR para inciar a reprodução. Abra a tampa do CD ou
desligue o aparelho para cancelar a programação.
Observação: CD-até 20 programas; MP3-até 99 programas.
1. Appuyez sur
pour mettre l’appareil en route./ SOURCE
2. Insérez le CD-MP3,face imprimée vers le haut, dans son compartiment et
refermez la porte ou, connectez une clé USB avec des chiers audio MP3 dans
le port USB
3. Appuyez sur / SOURCE pour choisir le mode CD ou USB, après quelques
secondes, lecture commence automatiquement.
4. S’il y a plus d’un dossier, appuyez pendant plusieurs secondes sur
PROG. pour choisir le dossier de votre choix.
1. Press
to turn the unit on./ SOURCE
2. Place the CD-MP3 disc with label side facing up inside the CD compartment and
close the CD door, or, connect a USB key with MP3 audio les into the USB port
3. Press / SOURCE to select CD or USB mode. After few seconds, the unit will
start to play automatically.
4. If there is more than one folder, press and hold PROG. to select the
desired folder.
1. Pressione o botão
para ligar o aparelho./ SOURCE
2. Coloque um disco de CD-MP3, com a etiqueta voltada para cima, dentro do
compartimento do CD e feche a tampa, ou, conecte um dispositivo USB com
arquivos de áudio em MP3 na porta USB.
3. Pressione o botão / SOURCE para selecionar o modo de CD ou USB. Depois
de alguns segundos. O aparelho então começará a tocar automaticamente.
4. Caso existam mais de uma pasta, mantenha o botão para PROG.
selecionar a pasta desejada.
NETTOYAGE
ATTENTION: Déconnectez cet appareil de toute source d’alimentation avant
de le nettoyer.
- Utilisez un chiondoux, propre et sec. Dépoussiérez régulièrement les orices de
ventilation à l’arrière ou sur les côtés de l’appareil.
- L’utilisation de solvants ou de produits abrasifs ou à base d’alcool peut
endommager l’appareil.
- Si un objet ou un liquide entre dans l’appareil, débranchez immédiatement ce
dernier et faites-le contrôler par un ingénieur agréé.
Remarques sur les disques
- N’utilisez pas de disques de forme irrégulière (exemple : en forme de cœur,
octogonaux). L’appareil pourrait présenter des dysfonctionnements.
- Ne placez pas plusieurs disques dans le compartiment.
- N’essayez pas d’ouvrir le compartiment du disque pendant la lecture.
- Ne touchez pas la lentille. Vous pourriez provoquer un dysfonctionnement.
- Si le disque est rayé, sale ou maculé de traces de doigts, l’appareil peut ne pas
fonctionner. Avant la lecture, essuyez le disque avec un chion Procédez du
centre vers l’extérieur. Ne rangez pas les disques dans des endroits présentant
des températures élevées ou une humidité importante. Ils pourraient se déformer.
Après la lecture, replacez vos disques dans leur boîtier.
REMARQUE IMPORTANTE
Retirez le disque du compartiment si l’appareil doit être transporté.
CLEANING
CAUTION: Disconnect this device from any power source before cleaning.
- Use a soft, clean, dry cloth. Dust regularly ventilation holes on the back or sides
of the apparatus.
- The use of solvents or abrasive products or with a basis of alcohol can damage
the unit.
- If an object or liquid enters the unit, unplug it immediately and have it checked by
an authorized engineer.
Notes on discs
- Do not use irregularly shaped discs (example: heart-shaped, octagonal ones).
The unit may malfunction.
- Do not place more than one disc in the compartment.
- Do not attempt to open the disc tray during playback.
- Do not touch the lens. You could cause a malfunction.
- If the disc is scratched, dirty or smudged with ngerprints, the device may not work.
Before playing, wipe the disc with a cloth. Proceed from the center outwards. Do
not store discs in places with high temperature or high humidity. They could bend.
After reading, replace the disc in its case.
IMPORTANT NOTE
Remove the disc from its compartment if the device is to be transported.
LIMPEZA
ATENÇÃO: Desligue este aparelho de qualquer fonte de alimentação antes
de proceder à sua limpeza.
- Utilize um pano macio, limpo e seco. Limpe regularmente os orifícios de ventilação
na parte de trás ou nos lados do aparelho para eliminar as partículas de pó.
- A utilização de solventes ou de produtos abrasivos ou à base de álcool pode
danicar o aparelho
- Se um objecto ou líquido entrar no aparelho, desligue-o de imediato e solicite a
sua inspecção por um técnico autorizado.
Observações relativas aos discos
- Não utilize discos de forma irregular (exemplo: em forma de coração, octogonais).
O aparelho pode car avariado
- Não coloque mais do que um disco no compartimento.
- Não tente abrir o compartimento do disco durante a reprodução.
- Não toque na lente dado que pode causar uma avaria no aparelho.
- Se o disco estiver riscado, sujo ou marcado com dedadas, o aparelho pode
não funcionar. Antes da reprodução, limpe o disco com um pano. Proceda do
centro para fora. Não arrume os discos em locais com temperaturas altas ou
uma humidade signicativa. Podem car deformados. Após a reprodução, volte a
colocar os discos nas respectivas caixa
OBSERVAÇÃO IMPORTANTE
Retire o disco do compartimento se o aparelho tiver de ser transportado.
ALIMENTATION:
DC 9.0V
0.8A, 7.2W
Piles: 9V 6 x 1,5V type UM-2/LR14/ ‘C’ POWER
BLUETOOTH
Version Bluetooth: V5.0
Bluetooth: 2.402-2.48GHz
Puissance de sortie des RF (fréquences radios): 0 dBm
Distance de fonctionnement: Jusqu'à 10 mètres mesurés en espace ouvert (les
murs et les structures peuvent aecter la portée de l'appareil)
RADIO
FM: 87.5-108 MHz
DAB/DAB+: 174.928 -239.2 MHz
Les caractéristiques et les spécications sont sujettes à modication sans préavis.
POWER SUPPLY:
DC 9.0V 0.8A, 7.2W
Batteries: 9V 6 x 1,5 V type UM-2/LR14/ ‘C’
BLUETOOTH
Bluetooth Version: V5.0
Bluetooth: 2.402-2.48GHz
RF Output Power: 0 dBm
Working Distance: Up to 10 meters measured in open space (wall and structures
may aect range of device)
RADIO
FM: 87.5-108 MHz
DAB/DAB+: 174.928 -239.2 MHz
Design and specications are subject to change without notice.
ALIMENTAÇÃO:
DC 9.0V
0.8A, 7.2W
Pilhas: 9V (UM-2 1.5V x 6)
BLUETOOTH
Versão do Bluetooth: V5.0
Bluetooth: 2.402-2.48GHz
Potência de saíde de RF (Rádio Frequência): 0 dBm
Distância de Funcionamento: Até 10 metros, medido em espaço aberto (paredes e
estruturas poderão afetar a distância de funcionamento do dispositivo).
RÁDIO
FM: 87.5-108 MHz
DAB/DAB+: 174.928 -239.2 MHz
O desenho e as especicações estão sujeitas a mudanças sem aviso prévio.
1. Raccordez une extrémité du cordon (non fourni) au connecteur d’entrée
auxiliaire de l’appareil
.
2. Raccordez l’autre extrémité du cordon sur la prise casque ou la Sortie audio de
l’appareil que vous désirez écouter.
3. Appuyez sur la touche / SOURCE pour sélectionner le mode Auxiliaire,
« AUX » s’achà l’écran. Utilisez normalement votre appareil audio externe, le
son passe automatiquement par les haut-parleurs de votre appareil.
4. Réglez le volume sonore au niveau souhaité.
5. Pour arrêter la lecture, déconnectez votre appareil audio externe de l’entrée
auxiliaire.
1. Connect one end of the cable (not supplied) to the auxiliary input connector of
the device
.
2. Connect the other end of the cable to the headphones jack or the line out jack of
your external audio appliance.
3. Press / SOURCE to select the auxiliary mode. « AUX » appears on the
display. Normally use your external audio appliance, the sound automatically
goes through the speakers of your device.
4. Adjust the volume to the desired level.
5. Disconnect the external appliance from the auxiliary input to stop playback.
1. Conecte um dos terminais do cabo (não incluído) na conexão AUX IN
(ENTRADA) do aparelho .
2. Conecte o outro terminal do cabo nos fones de ouvido ou na conexão Line Out
(Saída) da origem externa..
3. Pressione o botão / SOURCE para selecionar o modo Auxiliar. O símbolo
do modo auxiliar “AUX” será exibido. Utilizar normalmente o aparelho áudio
externo.
4. Ajustar o volume para o nível pretendido.
5. Desligar o dispositivo externo da entrada auxiliar para parar a leitura.
Naviguez dans le menu de conguration.
1. En mode CD, USB, Bluetooth, AUX IN, DAB ou FM, tenez la touche MENU/INFO
pour entrer dans le menu de conguration.
2. Utilisez ou pour sélectionner l’une des options soit disponibles.
Mode CD: Système
Mode USB: Système
Mode Bluetooth: Système
Mode AUX IN: Système
Mode DAB: Recherche totale/ Réglage manuel/ Ecréter/ Système
Mode FM: Régl. recherche/ Réglage audio/ Système
3. Appuyez sur la touche SELECT/SCAN pour entrer dans la conguration associée.
Le symole “ “ s’ache à côté du réglage actuel.
Menu de paramètres FM
Régl. recherche
Stations fortes: La recherche automatique ne situe que les recherches au signal fort.
Toutes chaines: La recherche automatique situe toutes les stations disponibles.
Réglage audio
Pour sélectionner entre “Stéréo admis” et “Stations mono” pour la radio FM.
Système
Permet de sélectionner les options de conguration système: Heure, Langue, Régl.
en usine, Version logiciel.
• Heure
Vous pouvez régler les paramètres de l'horloge et de la date.
• Langue
Pour sélectionner la langue souhaitée du menu de l’appareil: English, Deutsch,
Nederlands, Français
• Régl. en usine
Pour restaurer les paramètres par défaut.
• Version logiciel
Pour consulter la version actuelle du logiciel.
Menu de paramètres DAB/DAB+
Recherche totale
Cette fonction vous permet de numériser automatiquement et de créer une liste des
émissions DAB/DAB+ recevables.
Réglage manuel
Cette fonction peut être utilisée pour faciliter le positionnement de l'antenne ou de
l'appareil, an d'améliorer la capacité spécique de réception de la chaîne ou de
la fréquence.
Ecréter (Supprimez les stations répertoriées mais indisponibles)
Appuyez sur
ou pour sélectionner "<Non>" ou "<Oui>", puis appuyez sur
la touche SELECT/SCAN pour conrmer ou annuler la suppression de toutes les
stations invalides.
Système
Reportez-vous aux opérations sous "Menu de réglage FM".
RÉVISION DE PLUS D’INFORMATIONS (MODE FM / DAB)
Appuyez à plusieurs reprises sur la touche MENU/INFO pour examiner certains
paramètres de l’appareil (par exemple, l’heure, la date) ou les informations
disponibles (par exemple, un texte radio, un nom) pour la station que vous écoutez.
Navigating the setup menu.
1. In CD, USB, Bluetooth, AUX IN, DAB or FM mode, press and hold MENU/INFO
to enter into setup menu.
2. Press or to select one of the available options.
CD mode: System
USB mode: System
Bluetooth mode: System
AUX IN mode: System
DAB mode: Full scan/ Manual Tune/ Prune/ System
FM mode: Scan setting/ Audio setting/ System
3. Press SELECT/SCAN button to enter related setup. The “ ” will be displayed
next to the current setting.
FM Setting Menu
Scan setting
All stations: The automatic search locates at any available station.
Strong stations only: The automatic search only locates at strong stations.
Audio setting
To select between “Stereo allowed” and “Forced mono” for the FM radio.
System
To select the system setting options: Time, Language, Factory Reset, SW version.
• Time
You can adjust the time and date setting.
• Language
To select the desired language of the unit’s menu: English, Deutsch, Nederlands,
Français
• Factory Reset
To restore to factory default settings.
• SW version (software version)
To review the current software version.
DAB/DAB+ Setting Menu
Full Scan
This function allows you to automatically scan and create a list of receivable DAB/
DAB+ broadcasts.
Manual Tune
This function can be used to assist the positioning of the antenna or the unit to
obtain the optimum reception for a specic channel or frequency.
Prune (remove stations that are listed but unavailable)
Press
or to select “No” or “Yes”, then press button to SELECT/SCAN
conrm or cancel removing all invalid stations.
System
Please refer to the system of FM Setting Menu.
REVIEWING MORE INFORMATION (FM/ DAB MODE)
Repeatedly press button to review some unit settings or available MENU/INFO
information for the station you are listening.
Navegando no menu de congurações.
1. No modo CD, USB, Bluetooth, AUX IN (ENTRADA AUXILIAR), DAB, FM,
mantenha pressionado MENU/INFO para entrar no menu de congurações.
2. Prima ou para uma das opções disponíveis.
Modo CD: System (Sistema)
Modo USB: System (Sistema)
Modo Bluetooth: System (Sistema)
Modo AUX IN: System (Sistema)
Modo DAB: Full scan (Sintonia Completa)/ Manual Tune (Sintonia Manual)/
Prune (Remover)/ System (Sistema)
Modo FM: Scan setting (Congurações de Sintonia)/ Audio setting (Congurações
de áudio)/ System (Sistema)
3. Pressione o botão para entrar na conguração relacionada. O SELECT/SCAN
símbolo “
“ será exibido ao lado da conguração atual.
Menu de Congurações FM
Scan setting (Congurações de Sintonia)
All stations (Todas as estações): A busca automática listará todas as estações
disponíveis.
Strong stations only (Apenas estações potentens): A busca automática listará
apenas estações com sinal potente.
Audio setting (Congurações de áudio)
Para selecionar entre “Stereo allowed” e “Forced mono” para o rádio FM.
System (Sistema)
Para selecionar as opções de congurações do sistema: Time (Hora), Language
(lingual), Factory Reset (Congurações de Fábrica), SW version (Versão do
Sistema).
• TIME (Hora)
Você pode ajustar a conguração da hora e data.
• Language(lingual)
Para selecionar o idioma desejado no menu da unidade: English, Deutsch,
Nederlands, Français
• Factory Reset (Congurações de Fábrica)
Para restaurar as congurações padrão de fábrica.
• SW version (Versão do Sistema)
Para vericar a versão atual do software.
Menu de congurações DAB/DAB+
Full Scan (Sintonia Completa)
Esta função permite sintonizar e criar automaticamente uma lista de transmissões
DAB/DAB+ a receber.
Manual Tune (Sintonia Manual)
Esta função pode ser usada para auxiliar o posicionamento da antena ou da
unidade, para melhorar a capacidade especíca de receção de canais ou
frequências.
Prune (Remover)
Prima ou para selecionar "No" (não) ou "Yes" (sim) e, em seguida, prima o
botão para conrmar ou cancelar a remoção de todas as estações SELECT/SCAN
inválidas.
System (Sistema)
Consulte as operações em "Menu de conguração de FM".
REVER MAIS INFORMAÇÕES (MODO FM / DAB)
Pressione repetidamente o botão para rever algumas congurações MENU/INFO
da unidade ou informações disponíveis para a estação que está a ouvir.
5. Appuyez sur la touche pour sauvegarder. “Mémorisé X Mém.SELECT/SCAN
sé.” sera aché («X» correspond au numéro de la présélection).
6. Répétez les étapes 2 à 5 pour sauvegarder d’autres stations.
Mémorisation automatique
Tenez la touche SELECT/SCAN en mode FM et l’appareil localisera et
sauvegardera automatiquement les stations de fortes puissances. Lorsque vous
mémorisez sur une station déjà préréglée, celle-ci sera eacée et remplacée par la
nouvelle station mise en mémoire.
ECOUTE DES STATIONS PRÉRÉGLÉES
Appuyez sur
PROG. successivement pour sélectionner une station
mémorisée.
Automatic storage
Press and hold button in FM mode, the unit will automatically SELECT/SCAN
locate and save the strong stations. When you store on a channel already been
preset, the previous station will automatically be cleared and replaced by the new
station.
LISTENING TO PRESET STATIONS
Press button to select a preset station. PROG.
En mode veille, appuyez sur
pour mettre l’appareil en marche./ SOURCE
Appuyez et maintenez pour éteindre l’unité./ SOURCE
In standby mode, press
to turn on the unit./ SOURCE
Press and hold / SOURCE to turn o the unit.
No modo de espera (standby), pressione
/ SOURCE uma vez para ligar o
aparelho.
Pressione e segure o botão para desligar o aparelho./ SOURCE
Drücken Sie im Standby-Modus einmal die Taste
/ SOURCE, um das Gerät
einzuschalten.
Halten Sie die / SOURCE -Taste gedrückt, um das Gerät auszuschalten.
Lorsque l’appareil est allumé, appuyez plusieurs fois sur le bouton
/ SOURCE
pour sélectionner le mode CD, USB, Bluetooth, AUX IN, DAB, FM.
When the unit is on, repeatedly press
/ SOURCE button to select desired mode:
CD, USB, Bluetooth, AUX IN, DAB, FM.
Quando a unidade estiver ligada, pressione repetidamente o botão
/ SOURCE
para selecionar o modo CD, USB, Bluetooth, AUX IN, DAB, FM.
Drücken Sie, wenn das Gerät eingeschaltet ist, wiederholt die Taste
/ SOURCE
zur Auswahl von CD, USB, Bluetooth, AUX IN, DAB, FM (UKW)-Modus.
Pour réglez le niveau sonore, appuyez sur
ou .
To adjust the volume level, press
or .
Utilize o botão ou para regular o volume.
Verwenden Sie die Taste oder , um die Lautstärke einzustellen.
La première fois que vous écoutez la radio DAB, l’heure et la date de votre produit
seront synchronisées automatiquement à celles diusées par le service DAB en
mode 24 heures, ce qui correspond à l’heure d’été, donc il n’est pas nécessaire de
dénir l’heure et la date manuellement.
Si vous souhaitez régler l’heure et la date manuellement, allumez la radio et suivez
les étapes ci-dessous:
1. Maintenez la touche MENU/INFO enfoncée.
2. Utilisez
ou pour sélectionner <Système>. Appuyez sur la touche
SELECT/SCAN pour entrer cette option.
3. <Heure> s'achera sur l’écran, appuyez à nouveau sur SELECT/SCAN pour
accéder au menu de réglage de l'heure.
4. <Régl. heure/date> s'achera, appuyez à nouveau sur SELECT/SCAN pour
accéder à cette option.
5. Les chires des heures clignoteront. Utilisez la touche ou pour régler
l’heure. Appuyez sur la touche pour conrmer. Ensuite, les SELECT/SCAN
chires des minutes clignoteront. Utilisez la touhe ou pour régler les
minutes. Appuyez sur la touche SELECT/SCAN pour conrmer.
6. Le jour clignotera. Utilisez la touche ou et la touche pour SELECT/SCAN
régler le jour, le mois et l’année.
Lorsque vous conrmez la date. “Heure Enregistré” s’achera et l’achage
reviendra à <Régl. heure/date>.
Vous pouvez maintenant utiliser la touche ou et la touche SELECT/SCAN
pour dénir ce qui suit:
- Régl. 12h/24h: Réglage du format 12/24 heures.
- Régl. format date: JJ-MM-AAAA ou MM-JJ-AAAA.
- MAJ Automatique
MAJ via FM: Mise à jour de l’heure depuis le FM.
MAJ via DAB: Mise à jour de l’heure depuis le DAB.
Toute MAJ: Mise à jour de l’heure depuis FM ou DAB.
Pas de MAJ: Ache l’heure du réglage du système.
Remarque: Lorsque vous eectuez le réglage dans le menu, appuyez sur le bouton
MENU/INFO pour revenir à l’étape précédente.
The rst time you listen to DAB radio, the time and date of your product will
synchronise automatically to that broadcast by the DAB service in 24 hour mode,
which is in line with daylight saving, so there is no need to set the time and date
manually.
If you do wish to set the time and date manually, turn on the radio and follow the
steps as below:
1. Press and hold the MENU/INFO button.
2. Press or to select <System>. Press button to enter this SELECT/SCAN
option.
3. <Time> is displayed, press again to enter time setting menu.SELECT/SCAN
4. <Set Time/Date> is displayed, press SELECT/SCAN again to enter this option.
5. The hour digits will ash. Use the or to set the hour. Press the SELECT/
SCAN button to conrm. Then the minute digits will ash. Use the or to
set the minutes. Press the SELECT/SCAN button to conrm.
6. Day will ash. Use the or and SELECT/SCAN button to set the day,
month and year.
When you conrm the date. “Time Saved” is displayed and the display returns to
<Set Time/Date>.
You can now use or and button to set followings: SELECT/SCAN
- Set 12/24 hour:12/ 24 hour clock display
- Set date format: DD-MM-YYYY or MM-DD-YYYY.
- Auto update:
Update from Any: Time update from FM or DAB/DAB+.
No update: Show the time from system setting.
Update from FM: Time update from FM.
Update from DAB: Time update form DAB/DAB+.
Note: when do the setting in the menu, press the button to return back MENU/INFO
to previous step.
A primeira vez que escutar o rádio em DAB, a hora e a data do seu produto será
sincronizada automaticamente com aquela transmitida pelo serviço DAB no modo 24
horas, e com a hora de Verão, portanto, não há necessidade de denir manualmente
a hora e a data.
Se desejar denir manualmente a hora e a data, ligue o rádio e siga os passos
abaixo:
1. Pressione o botão MENU/INFO.
2. Prima ou para selecionar “System” (Sistema). Pressione o botão SELECT/
SCAN para entrar na opção.
3. <Time> (Hora) é exibido, prima novamente SELECT/SCAN para entrar no menu
de denição da data e hora.
4. <Set Time/Date> (Denir hora/data) é exibido, prima novamente SELECT/SCAN
para entrar nesta opção.
5. Os dígitos das horas piscarão. Use o botão ou para ajustar a hora.
Pressione o botão SELECT/SCAN para conrmar. Em seguida, os dígitos dos
minutos piscarão. Use o botão ou para ajustar os minutos. Pressione o
botão SELECT/SCAN para conrmar.
6. O dia piscará. Utilize o botão ou e o botão SELECT/SCAN para ajustar
o dia, mês e ano.
Quando conrmar a data. “Time Saved” (Data guardada) é exibido e o visor retorna
para “Set Time/Date” (Denir hora/data).
Agora pode usar o botão e o botão ou SELECT/SCAN para denir os
seguintes itens:
- Set 12/24 hour (Ajustar 12/24 horas): Relógio de 12/24 horas;
- Dena o formato da data: DD-MM-AAAA ou MM-DD-AAAA.
- Auto update (Atualização automática):
Update from Any (Atualizar a partir de Qualquer Origem): Atualiza a hora a parir do
FM ou DAB/DAB+.
No update (Não atualizar): exibe a hora denida nas congurações de sistema.
Update from FM (Atualizar a partir da rádio FM): Atualiza a hora a partir do FM.
Update from DAB (Atualizar a partir de DAB): Atualiza a hora a parir do DAB/DAB+.
Nota: Quando zer a conguração no menu, pressione o botão MENU/INFO para
voltar ao passo anterior.
Das erste Mal, wenn Sie das DAB-Radio einschalten, werden das Datum und die
Uhrzeit des Geräts automatisch mit den Einstellungen der übertragenden DAB-
Sendeanstalt synchronisiert (24-Stundenformat). Dies geschieht im Einklang mit
der Sommerzeit oder Winterzeit, d.h., Sie müssen das Datum und die Uhrzeit nicht
manuell einstellen.
Falls Sie Datum und Uhrzeit dennoch manuell einstellen möchten, schalten Sie das
Radio ein und gehen Sie wie folgt vor:
1. Halten Sie die Taste gedrückt. MENU/INFO
2. Drücken Sie die , um wählen sie die <System>. Drücken Sie oder
SELECT/SCAN, um diese Option zu önen.
3. Im Display erscheint die Anzeige <Uhrzeit>; drücken Sie den SELECT/SCAN-
Regler erneut, um die Zeiteinstellungen aufzurufen.
4. Es erscheint die Anzeige <Zeit/Datum einstellen>; drücken Sie erneut den
SELECT/SCAN-Regler, um die Option auszuwählen.
5. Die Stundenanzeige blinkt. Verwenden Sie den oder -Regler, um die
Stunden einzustellen. Bestätigen Sie mit SELECT/SCAN. Die Minutenanzeige
blinkt. Verwenden Sie den oder -Regler, um die Minuten einzustellen.
Bestätigen Sie mit SELECT/SCAN.
6. Der Tag blinkt. Verwenden Sie den oder -Regler und die Taste SELECT/
SCAN, um Tag, Monat und Jahr einzustellen.
Wenn Sie das Datum bestätigen, erscheint im Display „Uhrzeit Gespeichert“ und
das Display kehrt zur Einstellung <Zeit/Datum einstellen> zurück.
Sie können dann mit dem -Regler und der Taste oder SELECT/SCAN
folgende Funktionen ausführen:
- 12/24 Std. einstellen: 12-/24-Stundenformat.
- Datumsformat einst.: TT-MM-JJJJ oder MM-TT-JJJJ.
- Autom. Update
Update alle: Uhrzeit wird entweder über UKW oder DAB/DAB+ aktualisiert.
Kein Update (Keine Aktualisierung): Die über die Systemeinstellung eingestellte
Uhrzeit wird angezeigt.
Update von FM: Uhrzeit wird über UKW aktualisiert.
Update von DAB: Uhrzeit wird über DAB/DAB+ aktualisiert.
Hinweis: Wenn Sie die Einstellungen im Menü vornehmen, drücken Sie die Taste
MENU/INFO, um zum vorherigen Schritt zurückzukehren.
1. Appuyez plusieurs fois sur la touche
/ SOURCE pour sélectionner le mode
DAB. La radio commencera la recherche automatique des stations DAB/DAB+ si
c’est la première fois que l’unité est utilisée. L’achage passe à “Recherche ...”.
Une barre de progression montrera la progression de l’analyse et le nombre de
stations trouvées pendant la recherche sera également achée.
2. Une fois la recherche terminée, la radio sélectionnera la première station
disponible et commencera à diuser. Les stations sont listées par ordre
numérique et par ordre alphabétique par défaut.
Remarque: La liste des stations de radio DAB/DAB+ est enregistrée dans la
mémoire et la prochaine fois que vous allumez votre radio, la recherche de la
station ne se fera plus. Il est possible d’eectuer la recherche manuellement des
stations en appuyant et en relâchant la touche .SELECT/SCAN
3. Appuyez sur ou pour sélectionner les stations dans la liste.
4. Lorsque la station souhaitée est achée, appuyez sur la touche SELECT/SCAN.
pour conrmer. Il y aura un court délai pendant lequel votre radio se calera à
votre station sélectionnée
Remarques:
- Si aucun programme n’est trouvé avec la recherche DAB/DAB+, «Pas de ch.
DAB» apparaitra sur l’écran.
- Pour une meilleure réception, étendez l’antenne télescopique ou procédez de
nouveau à une recherche totale à un autre endroit.
- Pendant l’opération de recherche, le niveau de son est automatiquement coupé.
1. Repeatedly press
/ SOURCE button to select DAB mode. The radio will start
automatic scan for DAB/DAB+ stations if it’s the rst time to use the unit. The
display will change to “Scanning…”. A progress bar will show the progress of the
scan and the number of stations found during the scan will also be displayed.
2. When the scan is complete, the radio will select the rst available station and
begin to broadcast. Stations are listed in numerical and then alphabetical order
by default.
Note: The DAB/DAB+ radio station list is stored in the memory and so the
next time you switch your radio on, the station search does not take place. It is
possible to scan manually for stations by pressing and releasing the SELECT/
SCAN button.
3. Press or to select the stations in the list.
4. When the desired station is displayed, press the SELECT/SCAN button to
conrm. There will be a short delay while your radio tunes to your selected
station.
Notes:
- If no broadcasts are found by DAB/DAB+ scan, “No DAB Station” appears in the
display.
- For a better reception, extend the telescopic antenna or do the full scan again in
another place.
- During the search operation, the sound level is automatically muted.
1. Pressione repetidamente o botão
/ SOURCE para selecionar o modo DAB. O
rádio iniciará a busca automática das estações DAB/DAB+ se for a primeira vez
que usar a unidade. O visor mudará para “Scanning…” (Sintonizar...). Uma barra
de progresso mostrará o progresso de sintonização e o número de estações
encontradas durante a sintonização também será exibido.
2. Quando a sintonização estiver concluída, o rádio selecionará a primeira estação
disponível e começará a emitir. Por padrão, as estações são listadas em ordem
numérica e, em seguida, em ordem alfabética.
Nota: A lista de estações de rádio DAB/DAB+ é armazenada na memória e,
assim, na próxima vez que ligar o seu rádio, a procura de estações não é
efetuada. É possível sintonizar manualmente estações pressionando e soltando
o botão SELECT/SCAN.
3. Prima ou para selecionar as estações da lista.
4. Quando a estação desejada for exibida, pressione o botão SELECT/SCAN para
conrmar. Haverá um pequeno atraso enquanto o seu rádio sintonizar a estação
selecionada.
Observaçãos:
- Caso nenhuma transmissão seja encontrada pela sintonia de DAB/DAB+, a frase
“No DAB Station” (Nenhuma estação DAB) será exibida na tela.
- Para ter uma melhor recepção, estique a antena ou realize uma busca completa
novamente depois de mudar de lugar.
- Durante o processo de busca, o volume será automaticamente colocado em
mudo.
1. Drücken Sie wiederholt die Taste
/ SOURCE zur Auswahl des DAB-Modus.
Beim erstmaligen Gebrauch des Geräts startet das Radio die automatische
Suche nach DAB-Sendern. Während der Suche erscheint die Anzeige
„Suchlauf... “. Ein Fortschrittsbalken weist auf den Suchfortschritt hin; außerdem
wird die Anzahl der gefundenen Sender angezeigt.
2. Nach Abschluss der Suche schaltet das Radio den ersten verfügbaren Sender
ein und startet die Übertragung. Sender werden per Werkseinstellung in
numerischer und dann in alphabetischer Reihenfolge angezeigt.
Hinweis: Die DAB-Senderliste wird gespeichert; beim nächsten Einschalten
des Geräts wird die Sendersuche daher nicht erneut durchgeführt. Sie können
manuell nach Sendern suchen, indem Sie die Taste SELECT/SCAN drücken
und loslassen.
3. Drücken Sie , um Sender in der Liste auszuwählen. oder
4. Wenn der gewünschte Radiosender angezeigt wird, drücken Sie die Taste
SELECT/SCAN zum Bestätigen. Das Radio schaltet den ausgewählten Sender
dann mit einer kurzen Verzögerung ein.
Hinweis:
- Falls während der DAB/DAB+ Suche keine Sender gefunden werden, erscheint
im Display die Anzeige „Kein DAB-Sender“.
- Im Hinblick auf einen besseren Empfang sollten Sie die Teleskopantenne
vollständig ausziehen oder die Sendersuche an einem anderen Ort wiederholen.
- Während der Suche ist der Ton automatisch ausgeschaltet.
En mode radio FM, appuyez sur la touche
ou pour le réglage manuel.
Maintenez enfoncée la touche ou pour eectuer une recherche automatique.
Remarque: Pour une meilleure réception, étirez l’antenne télescopique.
PRÉSÉLECTION DES STATIONS
Cette unité peut enregistrer 10 stations FM et 10 stations DAB/DAB+.
Mémorisation manuelle
1. Appuyez plusieurs fois sur la touche
/ SOURCE pour choisir le mode FM ou DAB.
2. Choisissez une station de radio.
3. Tenez la touche
PROG. appuyée pour passer en mode de sauvegarde de
présélection.
4. Utilisez la touche ou pour sélectionner un pré-réglage canal.
Remarque: Si vous choisissez une station qui n’a pas été allouée, «Vide» s’achera.
Si la station a déjà été allouée, la fréquence FM ou le nom radio DAB s’achera.
In FM radio mode, Press
or or button to manual tuning. Press and hold
to automatic search.
Note: For a better reception, extend the telescopic antenna
PRESET STATIONS
This unit can store 10 FM and 10 DAB/DAB+ stations.
Manual storage
1. Repeatedly press button to select FM or DAB mode. / SOURCE
2. Select a radio station.
3. Press and hold button to enter preset store mode. PROG.
4. Use
or button to select a preset channel.
Note: If you choose a station that hasn’t been allocated, “Empty” will be
displayed. If the station has been allocated before, the FM frequency or DAB
station name will be showed.
5. Press SELECT/SCAN button to save it. “Preset x Stored” will be displayed (x is
for preset number).
6. Repeat steps 2-5 to store other stations.
3. Mantenha o botão
PROG. para entrar no modo de armazenagem na
memória.
4. Utilize o botão para selecionar uma estação predenida. ou
Observação: Caso você escolha uma estação que ainda não tenha sido
armazenada, a frase “Empty” (Vazia) será exibida. Caso a estação já tenha sido
armazenada, a frequência FM ou o nome de rádio DAB será exibida.
5. Pressione o botão SELECT/SCAN para salvá-la. “Preset x Stored” será exibido
(x é para o número onde foi armazenada).
6. Repita os passos de 2 a 5 para armazenar outras estações.
Memorização automática
Mantenha SELECT/SCAN pressionada por alguns segundos no modo FM,
a unidade irá sintonizar e salvar automaticamente as estações com sinal forte.
Quando você armazena ou já tiver armazenado estações, as estações anteriores
serão automaticamente apagadas e substituidas pelas novas.
ESCUTANDO UMA ESTAÇÃO ARMAZENADA
Pressione os botões PROG. para selecionar o número da posição de
memória.
No modo de rádio FM, prima o botão
ou para efetuar a sintonização
manual. Pressione e segure ou para a busca automática.
Observação: Para uma melhor recepção, estique a antena extensível.
ESTAÇÕES PRÉ-INSTALADAS
Este aparelho pode armazenar até 10 estações de rádio FM e 10 estações DAB/
DAB+.
Armazengem manual
1. Pressione várias vezes o botão
/ SOURCE para selecionar o modo FM ou
DAB.
2. Selecione a estação de rádio através de uma busca manual ou automática.
Drücken Sie im UKW-Radiomodus
oder für die manuelle Sendersuche.
Halten Sie die Taste gedrückt um die automatische Suche zu starten. oder
Hinweis: Ziehen Sie die Teleskopantenne für einen besseren Empfang aus.
SENDERSPEICHER
Dieses Gerät kann bis zu 10 UKW- und 10 DAB/DAB+ Sender speichern.
Manuell speichern
1. Betätigen Sie die
/ SOURCE -Taste wiederholt, um das UKW- oder DAB -Band
zu wählen.
2. Wählen Sie die manuelle oder automatische Sendersuche.
3. Halten Sie die PROG. -Taste gedrückt, um in den Speichermodus zu
gelangen.
1. Appuyez sur
pour mettre l’appareil en marche./ SOURCE
2. Ouvrez la porte de CD.
3. Insérez le disque, face imprimée vers le haut, puis refermez le compartiment.
4. Appuyez sur pour sélectionner le mode CD./ SOURCE
5. Après quelques secondes, la lecture commence automatiquement.
Pour:
- Mettre la lecture en pause: Appuyez sur / PAIR
- Reprendre la lecture: Appuyez sur / PAIR
- Arrêter dénitivement la lecture: Appuyez sur
- Recherche dans un ordre décroissant ou croissant: Maintenez enfoncé ou
- Passer à la piste précédente ou suivante: Appuyez successivement sur ou
ERREUR DISQUE
Remarque: Si le disque est sale, endommagé ou illisible, ou si celui-ci est placé
à l’envers, « NO DISC » s’achà l’écran. Si cela se produit, nettoyez le disque,
insérez le disque correctement ou essayez un autre disque.
Si vous rencontrez un problème de lecture CD, l'une des deux solutions peut
s'avérer utile:
1. Éteignez l'unité. Débranchez l'adaptateur secteur de la prise secteur et
rebranchez-le.
2. Nettoyez votre disque CD.
1. Press
to turn the unit on. / SOURCE
2. Open the CD door.
3. Insert the disc with the label facing up and then close the compartment.
4. Press to select the CD mode. / SOURCE
5. After a few seconds, playback starts automatically.
To:
- Pause Playback: Press once / PAIR
- Resume playback: Press again / PAIR
- Permanently stop playback: Press
- Search backward or forward: Press and hold or
- To skip to previous or the next track: Press or
DISC ERROR
Note: If the disc is dirty, damaged or unreadable or if it is placed upside down, “NO
DISC” is displayed. If this happens, clean the disc, insert the disc correctly or try
another disc.
If you encounter CD playback problem, either of the following ways may help:
1. Turn o the unit. Disconnect the AC adaptor from AC outlet and reconnect it
again.
2. Clean your CD disc.
1. Prima o botão
para pôr o aparelho a funcionar./ SOURCE
2. Abra a porta do CD.
3. Insira o disco no compartimento, com a face impressa virada para cima, e volte
a fechar o compartimento.
4. Pressione o botão para selecionar a função de CD. / SOURCE
5. Depois de alguns segundos, a leitura começa automaticamente.
PARA:
- Colocar a reprodução em pausa: Prima uma primeira vez o botão / PAIR
- Retomar a reprodução: Prima uma segunda vez o botão / PAIR
- Parar a reprodução; Prima o botão
- Pesquisar para trás ou para frente; Mantenha premido o botão /
- Para ir para a faixa anterior ou seguinte: Prima o botão /
ERRO DO DISCO
Observação: Caso o disco esteja sujo, danicadoou ilegível, ou tenha sido
colocado de cabeça para baixo, o texto “NO DISC” será exibido na tela. Caso isso
ocorra, limpe o disco, e volte a colocá-lo de maneira correta ou tente outro disco.
Caso você encontre problemas quando for tocar um CD, uma das seguintes
soluções poderá ajudá-lo:
1. Desligue o aparelho. Desconecte o adaptador CA da tomada e reconecte-o
novamente.
2. Limpe o seu CD.
Le mot Bluetooth
®
ainsi que les marques et logo sont des marques commerciales
déposées détenues par Bluetooth SIG, Inc. et l'utilisation de ces marques par New
One S.A.S se fait dans le cadre d'une autorisation. Les autres marques et noms
commerciaux sont les propriétés de leurs titulaires respectifs.
Coupler un appareil Bluetooth
1. Appuyez sur la touche / SOURCE pour choisir le mode Bluetooth. L'écran
acher “Bluetooth” pendant quelques secondes. L'indicateur Bluetooth
commencera à clignoter rapidement.
2. Sur l'appareil Bluetooth, activez le Bluetooth et sélectionnez «MUSE M-32DB»
dans la liste des appareils. (consultez le manuel d'instruction de l'appareil pour
les détails de connexion). Si l'appareil Bluetooth vous demande un mot de
passe, utilisez '0000'. Certains appareils Bluetooth vous demanderont d'accepter
la connexion. Vous entendrez une voix vous indiquant que le couplage a réussi.
Astuce: Si vous souhaitez connecter votre enceinte Bluetooth à un autre appareil
Bluetooth,appuyez sur le bouton / PAIR et maintenez-le enfoncé pour
déconnecter l'appareil actuellement connecté avant de pouvoir suivre les étapes
ci-dessus pour établir une nouvelle connexion.
• Sur certains appareils, comme les ordinateurs, une fois couplé, vous devrez
sélectionner l'unité dans le menu Bluetooth et choisir « utiliser comme un dispositif
audio (Stéréo) » ou une phrase similaire.
• Le couplage reste intact lorsque l’unité et/ou l’appareil Bluetooth sont amenés
hors de la portée de liaison. Une connexion active sera rétablie lorsque votre
appareil Bluetooth reviendra dans la portée.
• Lorsque vous rallumez l'unité, elle essayera automatiquement de se reconnecter
avec le dernier appareil Bluetooth connecté.
Utiliser un appareil Bluetooth
1. Avec une unité couplée, (voir la section précédente), faites fonctionner votre
appareil Bluetooth et il diusera du son par le biais de l'enceinte M-32 DB.
2. Appuyez sur la touche / PAIR pour mettre la lecture en pause. Touchez à
nouveau pour reprendre la lecture.
3. Sélectionnez la piste de votre choix avec / .
4. Réglez le volume à l'aide des touches de volume / . Vous pouvez
également régler le volume sur l'appareil avec lequel vous êtes couplé.
Par la présente, NEW ONE S.A.S déclare que l'appareil "MUSE M-32 DB/
M-32 DBW" est conforme aux exigences essentielles et autres dispositions
pertinentes de la directive 2014/53/EU. La déclaration de conformité peut être
consultée sur le site www.muse-europe.com.
The Bluetooth
®
word mark and logos are registered trademarks owned by Bluetooth
SIG, Inc. and any use of such marks by New One S.A.S is under license. Other
trademarks and trade names are those of their respective owners.
Pairing a Bluetooth Device
1. Press to select Bluetooth mode. The display will show “Bluetooth” / SOURCE
and the Bluetooth indicator will start to blink.
2. On the Bluetooth device, enable Bluetooth and select “MUSE M-32DB” from
the Device List. (Refer to the user manual of the device to be connected for
detailed operations.) If the Bluetooth device prompts for a passcode, use“0000”.
Some Bluetooth devices will ask you to accept the connection. You will hear an
indication voice when pairing is successful.
Tip: If you want to connect your Bluetooth speaker to another Bluetooth audio
device, press and hold the / PAIR button to disconnect current device rst and
follow the steps above to make a new connection.
• On some devices such as computers, once paired you must select the unit from
the Bluetooth menu and choose “Use as Audio Device (stereo)” or similar.
• Pairing remains intact when the unit and/or your Bluetooth device is taken out
of communication range. An active connection will be re-established when your
Bluetooth device returns within range.
• When the unit is turned on again, it will automatically try to reconnect with the most
recently paired Bluetooth device.
Using a Bluetooth Device
1. With a unit paired (see previous section), operate your Bluetooth device and its
sound will be heard through the M-32 DB’s speakers.
2. Press the / PAIR button to pause playback. Press again to resume playback.
3. Select desired track with ./
4. Adjust the volume using the / volume buttons. You can also adjust the
volume on the device to which you are paired.
Hereby, NEW ONE S.A.S, declares that this MUSE M-32 DB/ M-32 DBW is in
compliance with the essential requirements and other relevant provisions
of Directive 2014/53/EU. The declaration of conformity may be consulted at
www.muse-europe.com
O nome Bluetooth
®
e logotipos são marcas registradas de propriedade da Bluetooth
SIG, Inc. e quaisquer usos destas marcas pela New One S.A.S estão licenciados.
Outras marcas e nomes registrados pertencem aos seus respectivos proprietários.
Pareando um dispositivo com Bluetooth
1. Pressione o botão / SOURCE para selecionar o modo de Bluetooth. O visor
mostrará "Bluetooth" e o indicador Bluetooth começará a piscar.
2. No dispositivo com Bluetooth, ative o Bluetooth e selecione "MUSE M-32DB" na
Lista de Dispositivos. (Consulte o manual de instruções do dispositivo que estiver
sendo conectado para mais detalhes). Caso o dispositivo com bluetooth solicite
uma senha, utilize "0000". Alguns dispositivos com Bluetooth solicitarão que você
aceite a conexão. Você ouvirá um aviso sonoro quando o emparelhamento for bem
sucedido.
Dica: Caso você queira conectar a sua caixa de som Bluetooth a outro dispositivo
com Bluetooth, Prima e segure o botão / PAIR para desconectar o dispositivo
atualmente conectado primeiro, e então seguir os passos acima para realizar a nova
conexão.
• Em alguns dispositivos, como computadores, uma vez pareado, você precisará
selecionar o aparelho em um Menu Bluetooth e escolher "Utilizar como Dispositivo
de Áudio (estéreo)" ou semelhante.
• O pareamento permanecerá intacto quando o aparelho ou o seu dispositivo
com Bluetooth for retirado da área de comunicação. Uma conexão ativa será
restabelecida quando o dispositivo com Bluetooth voltar à área de alcance.
• Quando o aparelho for ligado novamente, ele tentará automaticamente se reconectar
ao dispositivo de Bluetooth com o qual ele tenha sido mais recentemente pareado.
Utilizando um dispositivo com Bluetooth
1. Com o aparelho pareado (veja seção anterior), utilize o seu dispositivo com
Bluetooth e o seu som poderá ser escutado através das caixas de som do
M-32 DB.
2. Pressione o botão / PAIR para pausar uma reprodução. Pressione novamente
para continuar uma reprodução.
3. Selecione a faixa desejada com . /
4. Ajuste o volume através dos botões de Volume /. Você também poderá
ajustar o volume através do dispositivo com o qual você estiver pareado.
A NEW ONE S.A.S aqui declara que este produto «MUSE M-32 DB/ M-32 DBW»
cumpre os requisitos essenciais e outras disposições relevantes da Norma 2014/53/EU.
A declaração de conformidade pode ser consultada em www.muse-europe.com.
NEW ONE S.A.S
10, Rue de la Mission, 25480 Ecole Valentin, France
NEW ONE S.A.S
10, Rue de la Mission, 25480 Ecole Valentin, France
NEW ONE S.A.S
10, Rue de la Mission, 25480 Ecole Valentin, France
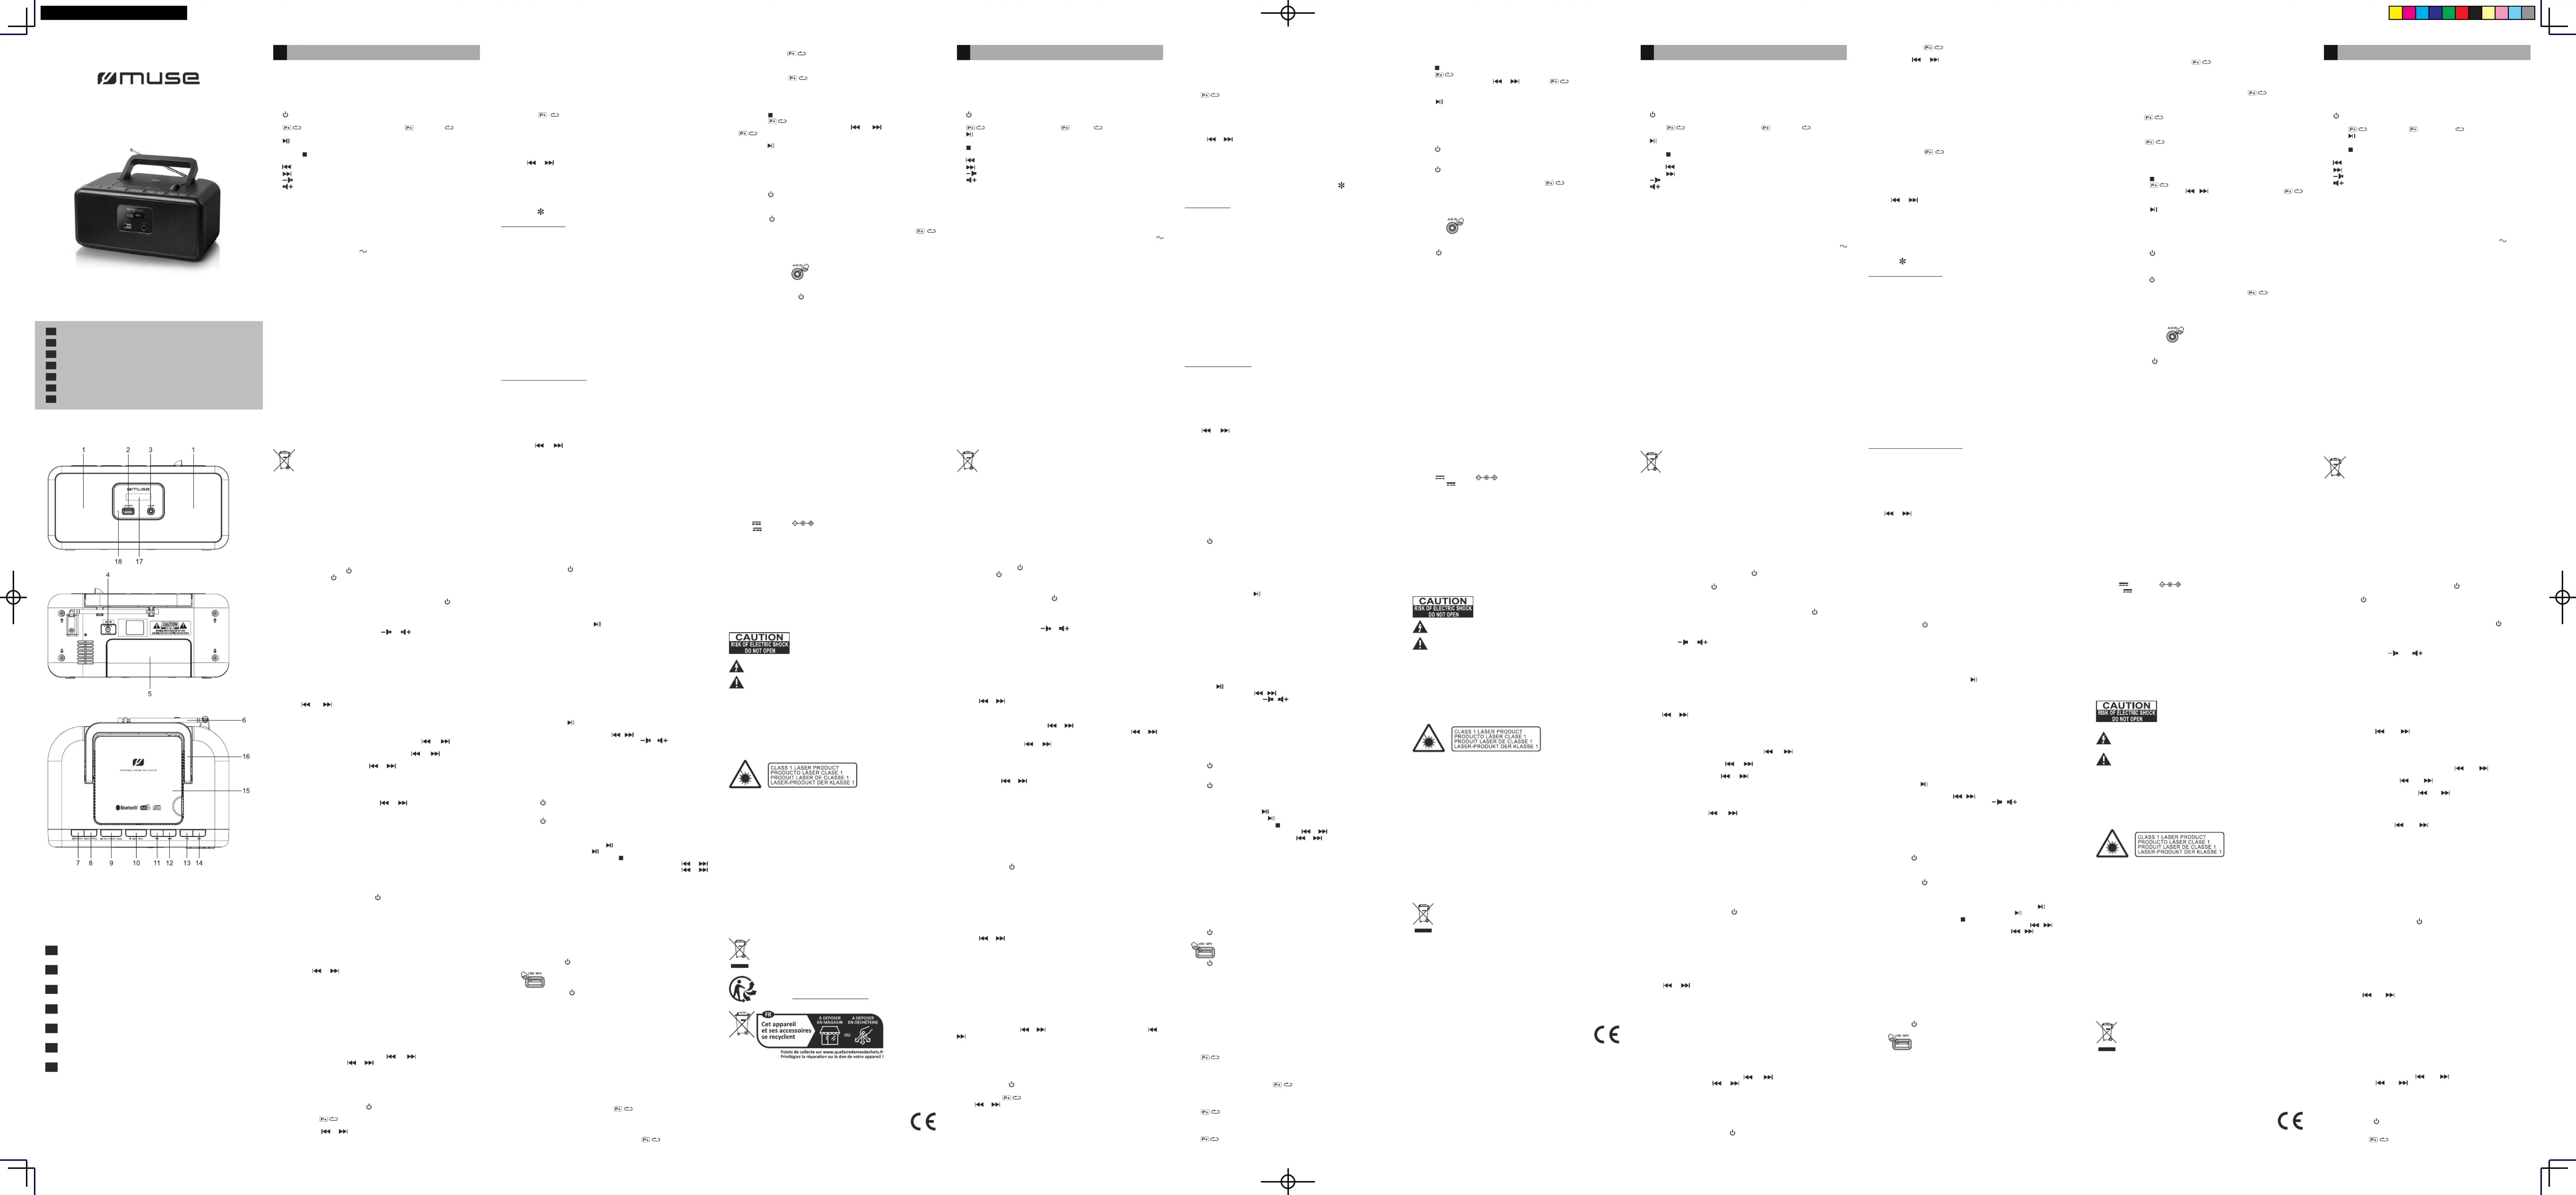
EMPLACEMENT ET DESCRIPTION DES COMMANDES LOCATION OF CONTROLS DESCRIÇÃO DO APARELHO BESCHREIBUNG DES GERÄTES
RADIO PORTABLE DAB+/FM LECTEUR DE CD
AVEC USB ET BLUETOOTH
PORTABLE BLUETOOTH DAB+/FM RADIO CD
PLAYER WITH USB
RÁDIO DAB+/FM PORTÁTIL BLUETOOTH COM
LEITOR DE CDS E USB
TRAGBARER CD-PLAYER MIT BLUETOOTH
DAB+/UKW RADIO UND USB
FR GB PT DE
1. Haut-parleurs
2. Port USB pour la lecture MP3
3. Entrée auxiliaire (AUX IN)
4. Prise d’alimentation CC
5. Compartiment à piles
6. Antenne télescopique
7. : Veille; Pour sélectionner le mode source: CD, USB, Bluetooth, / SOURCE
AUX IN, DAB, FM.
8. / Répétition / : Stations radio présélectionnées PROG.
Programme
9. / PAIR SELECT/ SCAN: Lecture/ Pause/ Couplage; : Conrmer la
sélection/ les réglages/ Recherche automatique
10. Touche : Arrêter la lecture/ Pour accéder au menu principal/ / MENU/ INFO
Pour consulter les informations de service
11. Recherche et Réglage arrière
12. Recherche et Réglage avant
13. Volume descendant
14. Volume ascendant
15. Compartiment CD
16. Poignée
17. Achage LCD
18. Indicateur Bluetooth
1. Speaker
2. USB port for MP3 playback
3. jackAUX IN
4. DC IN jack
5. Battery compartment
6. Telescopic antenna
7. / SOURCE: Standby; To select function mode: CD, USB, Bluetooth, AUX IN,
DAB, FM
8. / Repeat / Program Radio preset stations PROG.
9. / PAIR SELECT/SCAN: Play/ Pause/ Pair; button: Conrm the selection/
settings/ Auto scan
10. : Stop playback/ To access the main menu/ To preview further / MENU/ INFO
information
11. Skip/ Search/ Tuning backward
12. Skip/ Search/ Tuning forward
13. Volume down
14. Volume up
15. CD compartment
16. Carrying handle
17. LCD display
18. Bluetooth indicator
1. Altifalantes
2. Conexão USB para reprodução de MP3
3. Tomada de entrada AUX
4. Tomada DC IN
5. Compartimento para pilhas
6. Antena telescópica
7. : Espera; para selecionar a fonte: CD, USB, Bluetooth, AUX IN, / SOURCE
DAB, FM
8. Botão (Guardar na memória / Repetição / PROG.
Programação)
9. / PAIR SELECT/SCAN: Reproduzir/ Pausar/ Emparelhar; : Conrmar a
seleção/ denições/ Análise automática
10. Botão : Parar reprodução/Para aceder o menu principal/ / MENU/ INFO
Para rever as informações de serviço
11. Botão Pular - / Sintonizar
12. Botão Pular+ / Sintonizar+
13. Abaixar O Volume
14. Aumentar O Volume
15. Compartimento para CD
16. Pega
17. Visor LCD
18. Indicador Bluetooth
1. Lautsprecher
2. USB-Port für MP3-Wiedergabe
3. AUX-eingang
4. Stromanschluss
5. Batteriefach
6. Teleskopantenne
7. : Standby; Modus auswählen: CD, USB, Bluetooth, AUX IN, / SOURCE
DAB, FM (UKW)
8. Taste / Wiederholen / Programm) (Favorit PROG.
9. Taste / PAIR SELECT/SCAN: Wiedergabe/ Pause/ Pair; : Bestätigen und
Optionen-Menü önen/ Auto-scan
10. Taste : Wiedergabe beenden/Hauptmenü önen/ / MENU/ INFO
Informationen des Dienstes anzeigen
11. Suchlauf- / Tuning-
12. Suchlauf+ / Tuning+
13. Lautstärke verringern
14. Lautstärke erhöhen
15. CD-fach
16. Traggri
17. LCD-anzeige
18. Bluetooth-Anzeige
Avant de jeter les piles, consultez votre revendeur car celui-ci peut les
reprendre pour les recycler.
Before throwing any batteries away, consult your distributor who may be
able to take them back for specic recycling.
Antes de eliminar as pilhas, consulte o seu revendedor pois este pode
retomá-las para reciclagem.
Fragen Sie vor dem Entsorgen der Batterien Ihren Fachhändler vor
Ort um Rat, denn dieser kann sie zurücknehmen und sich um deren
fachgerechtes Entsorgen kümmern.
Remarques:
- Ne chargez jamais des piles non rechargeables. Ne chauez pas les piles et ne
les démontez pas.
- Pour éviter un écoulement, retirez les piles en cas de non-utilisation prolongée
de l’appareil.
- Pour des performances optimales, des piles de type Alcaline sont recommandées.
Ces piles doivent- être remplacées tous les 6 mois.
- Les piles doivent être remplacées lorsque: le volume sonore diminue ou le son
est déformé.
ATTENTION: Risque d’explosion si les piles ou batteries ne sont pas insérées
correctement. Utilisez uniquement des piles identiques ou de type équivalent.
Notes:
- Never recharge the batteries, apply heat to them or take them apart.
- In order to avoid leakage, always remove the batteries when unit will not be used
for a long period of time.
- For optimal performance, alkaline batteries are recommended. These batteries
must be replaced every six months.
- The batteries need to be replaced when: The volume decreases, or sound is
distorted during operation.
CAUTION: Danger of explosion if battery is incorrectly replaced. Replace only with
the same or equivalent type.
Observaçãos:
- Nunca carregue pilhas não recarregáveis. Não aqueça as pilhas e não as
desmonte.
- Para evitar que as pilhas vertam, retire-as no caso de não utilização prolongada
do aparelho.
- Recomenda-se a utilização de pilhas alcalinas. Para um funcionamento óptimo,
recomenda-se a substituição das pilhas todos os 6 meses.
- As pilhas devem ser substituídas quando: O volume diminuir, ou o som car
distorcido durante o funcionamento
ATENÇÃO: Risco de explosão se a pilha não for inserida correctamente.
Substitua-a apenas por uma pilha idêntica ou de tipo equivalente.
Hinweis:
- Nicht Wiederauadbare-Batterien dürfen nicht nochmals geladen werden.
Erhitzen Sie die Batterien nicht und demontieren Sie sie nicht.
- Um ein Ausießen der Batterien zu vermeiden, wenn Sie das Gerät während
längerer Zeit nicht verwenden, nehmen Sie die Batterien aus dem Gerät.
- Wir empfehlen den Gebrauch alkalischer Batterien. Damit das Gerät optimal
funktioniert, sollten Sie diese Batterien alle 6 Monate ersetzen.
- Batterien müssen ersetzt werden, wenn die Lautstärke nachlässt oder der Klang
während des Betriebs unklar wird.
ACHTUNG: Wenn die Batterie nicht richtig eingelegt wird, besteht die Gefahr, dass
die Batterie explodiert. Ersetzen Sie eine leere Batterie nur mit einer identischen
oder gleichwertigen Batterie.
FR
Manuel de l’utilisateur
GB
User Manual
PT
Manual do Utilizador
Benutzerhandbuch
DE
ES
Manual de instrucciones
Manuale di istruzioni
IT
NL
Handleiding
M-32 DB / M-32 DBW
Lire attentivement les instructions avant de faire
fonctionner l’appareil.
Please read the instruction carefully before operating the
unit.
Leia este manual com atenção antes de qualquer
utilização.
Bitte lesen sie dieses handbuch vor dem gebrauch des
gerätes sorgfältig durch.
Antes de utilizar este aparato, lea atentamente las
siguientes instrucciones.
Leggere attentamente questo manuale prima di utilizzare
l’apparecchio.
Lees deze handleiding aandachtig voor u het toestel
gebruikt.
FR
GB
PT
DE
ES
IT
NL

EIGENSCHAFTEN
CARACTERÍSTICAS TÉCNICAS
SPECIFICHE TECNICHE
SPECIFICATION
NETZSTROMVERSORGUNG:
DC 9.0V
0.8A, 7.2W
Batterien: 9V (UM-2 1.5V x 6)
BLUETOOTH
Bluetooth-Version: V5.0
Bluetooth: 2.402-2.48GHz
RF-Ausgangsleistung (Radiofrequenz-Augangsleistung): 0 dBm
Reichweite: bis zu 10 Meter in oenen Räumen (Wände und Hindernisse können
die Reichweite des Gerätes beeinträchtigen)
RADIO
FM: 87.5-108 MHz
DAB/DAB+: 174.928-239.2 MHz
Gestaltung und Ausführung bleiben Änderungen vorbehalten.
ALIMENTACIÓN:
DC 9.0V
0.8A, 7.2W
Pilas: 9V (UM-2 1.5V x 6)
BLUETOOTH
Versión Bluetooth: V5.0
Bluetooth: 2.402-2.48GHz
Salida de corriente RF (radiofrecuencia): 0 dBm
Distancia de rendimiento: Hasta 10 m medidos en espacio abierto (la pared y las
estructuras pueden afectar el rango del dispositivo)
RADIO
FM: 87.5-108 MHz
DAB/DAB+: 174.928 -239.2 MHz
Las especicaciones están sujetas a cambios sin previo aviso.
ALIMENTAZIONE:
DC 9.0V 0.8A, 7.2W
Batterie: 9V (UM-2 1.5V x 6)
BLUETOOTH
Versione del Bluetooth: V5.0
Bluetooth: 2.402-2.48GHz
Potenza RF (radiofrequenza) irradiata: 0 dBm
Raggio d’azione: no a 10 metri in spazi aperti (pareti e altre strutture possono
inuire sul raggio d’azione del dispositivo).
RADIO
FM: 87.5-108 MHz
DAB/DAB+: 174.928 -239.2 MHz
Il modello e le caratteristiche tecniche possono subire variazioni senza preavviso.
NETSTROOM:
DC 9.0V 0.8A, 7.2W
Batterijen: 9V (UM-2 1.5V x 6)
BLUETOOTH
Bluetooth-versie: V5.0
Bluetooth: 2.402-2.48GHz
RF-vermogen (radiofrequentievermogen): 0 dBm
Werkafstand: Tot 10 meter gemeten in een open ruimte (muren en bouwwerken
kunnen invloed hebben op het bereik van de luidspreker)
RADIO
FM: 87.5-108 MHz
DAB/DAB+: 174.928 -239.2 MHz
Ontwerp en specicaties zijn onderhevig aan verandering zonder kennisgeving.
DESCRIPCIÓN DEL APARATO DESCRIZIONE DEL PRODOTTO BESCHRIJVING VAN HET TOESTEL
REPRODUCTOR DE CD/RADIO DAB+/FM
BLUETOOTH PORTÁTIL CON USB
LETTORE PORTATILE CD RADIO DAB+/FM
CON BLUETOOTH E USB
DRAAGBARE BLUETOOTH DAB+/FM RADIO/CD-
SPELER MET USB
ES IT NL
1. Altavoces
2. Puerto USB para la reproducción MP3
3. Entrada auxiliar AUX IN
4. Entrada de alimentación
5. Compartimento para la pila
6. Antena telescópica
7. : Espera; Para seleccionar el modo de fuente: CD, USB, / SOURCE
Bluetooth, AUX IN, DAB, FM
8. Botón / Repetir / Reproducción (Presintonía PROG.
programada)
9. Botón / PAIR SELECT/SCAN: Reproduccion/ Pause/ Emparejamiento; :
Conrmar la selección/ ajustes/ Auto escáner
10. Botón : Detener la reproducción/ Para acceder al menú / MENU/ INFO
principal/ Para revisar la información del servicio
11. Botón Salto- / Sintonización- :
12. Botón : Salto+ / Sintonización+
13. Botón : Volumen –
14. Botón Volumen + :
15. Compartimento del disco
16. Asa de transporte
17. Pantalla LCD
18. Indicador de Bluetooth
1. Altoparlanti
2. Porta USB per la riproduzione di le MP3
3. Ingresso ausiliario AUX IN
4. Jack DC IN
5. Compartimento per pile
6. Antenna telescopica
7. : Pulsante di standby; Per selezionare la fonte: CD, USB, / SOURCE
Bluetooth, AUX IN, DAB, FM
9. / PAIR SELECT/SCAN: Riproduzione/ Pausa/ Pair; : Conferma della
selezione/ impostazioni/ Ricerca automatica
10. Tasto : Arresto della riproduzione/ Accesso al menu / MENU/ INFO
principale/ Per consultare le informazioni di servizio
11. Tasto Salta- / Sintonia- :
12. Tasto Salta+ / Sintonia+ :
13. Tasto : Volume –
14. Tasto Volume + :
15. Compartimento CD
16. Maniglia per trasporto
17. Quadrante LCD
18. Indicatore del Bluetooth
1. Luidsprekers
2. USB-poort voor afspelen MP3’s
3. AUX IN: Auxiliary input
4. Ingang voor DC (voeding)
5. Compartiment voor batterijen
6. Telescopische antenne
7. Toets : Standby; om de bronmodus te selecteren: CD, USB, / SOURCE
Bluetooth, AUX IN, DAB, FM
8. Toets (Voorkeurszender / Herhalen / Programmeren) PROG.
9. / PAIR: Afspelen/ Pauzeren/ Koppelen; : Bevestig selectie/ SELECT/SCAN
instellingen/ Auto aftasten
10. : Afspelen stoppen/ Om het hoofdmenu te openen/ om de / MENU/ INFO
service-informatie te bekijken
11. Skip- / Tune-
12. Skip+ / Tune+
13. Volume verlagen
14. Volume verhogen
15. CD compartment
16. Draagbeugel
17. LCD-scherm
18. Bluetooth-indicator
ALIMENTACIÓN
ALIMENTAZIONE VOEDING
WIEDERGABE EINER USB
PROGRAMACIÓN DE ARCHIVOS DE UN DISPOSITIVO USB
RIPRODUZIONE DI UNA PERIFERICA USB
EEN USB-SLEUTEL AFSPELEN
WIEDERGABE-MODUS (CD/USB) WEERGAVEMODI (CD/USB)MODOS DE REPRODUCCIÓN (CD/USB) MODALITÀ DI RIPRODUZIONE (CD/USB)
MP3 ORDNER BETRIEB OPERACIÓN DE CARPETA MP3
FUNZIONAMENTO CARTELLA MP3
MP3 MAP OPERATIE
WARTUNG MANTENIMIENTO
MANUTENZIONE
ONDERHOUD
AUX-EINGANG ENTRADA AUXILIAR (AUX IN)
INGRESSO AUSILIARIO (AUX IN)
HULPINGANG (AUX IN)
SETUP-MENÜ
MENÚ DE CONFIGURACIÓN
MENU DI IMPOSTAZIONE INSTELLINGENMENU
ENCENDIDO/ APAGADO DE LA UNIDAD
ACCENSIONE/ SPEGNIMENTO DELL’APPARECCHIO
HET APPARAAT IN-/ UITSCHAKELEN
SELECCIÓN DE FUENTE
SELEZIONE DELLA FONTE
SELECTEREN BRON
AJUSTE DE VOLUMEN
REGOLAZIONE DEL VOLUME
HET VOLUME INSTELLEN
AJUSTE DE FECHA Y HORA
REGOLAZIONE DELL’ORA E DELLA DATA
DE TIJD EN DATUM INSTELLEN
PARA ESCUCHAR LA RADIO DAB/DAB+
ASCOLTO DELLA RADIO DAB/DAB+
LUISTEREN NAAR DAB/DAB+ RADIO
PARA ESCUCHAR LA RADIO FM
ASCOLTO DELLA RADIO FM
LUISTEREN NAAR FM RADIO
CD-BETRIEB
FUNCIONAMIENTO CD
ASCOLTO DI CD
BEDIENING CD-SPELER
BLUETOOTH-FUNKTION
FUNCIÓN BLUETOOTH
FUNZIONALITÀ BLUETOOTH
BLUETOOTH-FUNCTIE
SICHERHEITSANWEISUNGEN
INSTRUCCIONES DE SEGURIDAD
AVVERTENZE DI SICUREZZA
VEILIGHEIDSINSTRUCTIES
ACHTUNG: Um Elektroschockgefahr zu vermeiden,
dürfen Sie dieses Gerät nicht demontieren. Das Gerät
enthält keine Teile, die der Benutzer selbst reparieren
kann. Vertrauen Sie die Instandhaltung des Geräts
einem Fachmann an.
ATENCIÓN: Para reducir el riesgo de descarga eléctrica,
no desmonte el aparato. En el interior de este aparato
no existe ninguna pieza que pueda ser reparada por el
usuario. Para cualquier operación de mantenimiento y
reparación, póngase en contacto con personal técnico
cualicado.
ATTENZIONE: Per ridurre il rischio di scossa elettrica,
non smontate l’apparecchio. Questo apparecchio non
contiene pezzi riparabili dall’utente. Per ogni riparazione
rivolgetevi esclusivamente a tecnici qualicati.
OPGEPAST: Om het risico op elektrische schokken
te vermijden, mag u het toestel niet demonteren. Het
toestel bevat geen enkel onderdeel dat door de gebruiker
zelf kan gerepareerd worden. Contacteer altijd een
gekwaliceerde technieker indien een reparatie nodig is.
Das in einem Pfeil endende Blitzsymbol innerhalb eines Dreiecks weist den
Benutzer auf die Gegenwart einer „gefährlichen Spannung“ im Gerät hin.
El símbolo del rayo con una echa dentro de un triángulo equilátero advierte
al usuario de la presencia de voltaje peligroso en el interior del aparato.
Il simbolo del fulmine con una freccia all’estremità all’interno di un triangolo
equilatero avverte l’utente della presenza di una “tensione pericolosa”
nell’apparecchio.
Het symbool van een zwarte driehoek met daarin een witte bliksemschicht
eindigend in een driehoek, waarschuwt de gebruiker dat er een gevaarlijke
spanning aanwezig is in het toestel.
Das Ausrufezeichen im Inneren eines Dreiecks weist den Benutzer
auf wichtige Anweisungen hin, die sich in dem das Gerät begleitenden
Handbuch benden.
El signo de exclamación dentro de un triángulo equilátero advierte al
usuario de la presencia de importantes instrucciones de funcionamiento y
mantenimiento en el manual que acompaña al producto.
Il punto esclamativo inscritto nel triangolo equilatero indica all'utente che
nel manuale di istruzioni si trovano importanti avvertenze per l'uso e la
manutenzione dell'apparecchio.
Het bovenstaande symbool (zwarte driehoek met daarin een wit
uitroepingsteken) waarschuwt de gebruiker dat er belangrijke
gebruiksaanwijzingen in verband met het gebruik en het onderhoud ter
beschikking zijn in de bijgeleverde handleiding.
Der Sicherheitshinweis bendet sich an der Rückseite des Geräts.
WARNUNG: UM BRAND- UND ELEKTROSCHOCKGEFAHR VORZUBEUGEN,
DÜRFEN SIE DIESES GERÄT WEDER REGEN NOCH FEUCHTIGKEIT
AUSSETZEN.
ACHTUNG: Beim Umgehen der Sicherheitsvorrichtungen oder wenn diese defekt
sind, kann aus dem Gerät unsichtbare Laserstrahlung austreten. Dieser CD-
Player wurde als Klasse I Laserprodukt eingestuft. Der Hinweis KLASSE 1 LASER
PRODUKT bendet sich auf der Unterseite des Gehäuses.
La marca de precaución se encuentra en la parte posterior del dispositivo.
ADVERTENCIA: PARA PREVENIR EL RIESGO DE INCENDIO O DE DESCARGA
ELÉCTRICA, NO EXPONGA ESTE APARATO A LA LLUVIA O A LA HUMEDAD.
ATENCIÓN: Radiación láser invisible en caso de apertura o fallo de los cierres de
seguridad. Evite la exposición al láser. Producto láser de clase 1.
Il simbolo di allerta è posto sul retro del dispositivo.
AVVERTENZA: PER EVITARE IL RISCHIO DI INCENDIO O SCOSSA ELETTRICA,
NON ESPONETE L’APPARECCHIO ALLA PIOGGIA O ALL’UMIDITÀ.
ATTENZIONE: Emissione di radiazioni laser invisibili quando i dispositivi di sicurezza
sono aperti o difettosi. Evitate l’esposizione diretta al fascio laser. Apparecchio laser
di classe 1.
De waarschuwingsmarketing zit op de achterkant van het apparaat.
WAARSCHUWING STEL HET TOESTEL NIET BLOOT AAN VOCHT OF REGEN
OM HET RISICO OP BRAND OF ELEKTRISCHE SCHOKKEN TE VERMIJDEN.
OPGEPAST: Onzichtbare laserstralen wanneer het veiligheidsmechanisme open of
stuk is. Vermijd blootstelling aan stralen product van laserklasse 1
Wenn Sie dieses Gerät entsorgen möchten, denken Sie daran, es bei
einer Sammelstelle für elektrische Haushaltsgeräte zu entsorgen.
Erkundigen Sie sich nach Ihrer nächstgelegenen Wertstosammelstelle.
Für detaillierte Informationen wenden Sie sich an die örtlichen Behörden
oder an Ihren Händler. (Richtlinie über elektrische und elektronische
Abfallgeräte).
Si desea deshacerse de este aparato, recuerde que p2-ha de depositarlo en
un lugar destinado al reciclado de electrodomésticos. Infórmese acerca
del centro de reciclaje más cercano. Consulte a las autoridades locales o
a su proveedor para obtener más información al respecto. (Directiva de
Residuos de Aparatos Eléctricos y Electrónicos)
Se in futuro si desidera gettare l'apparecchio, ricordare che le
apparecchiature elettroniche non devono essere smaltite insieme ai
riuti domestici. Informarsi su quale sia il centro di riciclaggio più vicino.
Per ulteriori dettagli, rivolgersi alle autorità locali o al proprio rivenditore
(direttiva sui riuti delle apparecchiature elettriche ed elettroniche).
Indien u dit toestel in de toekomst wilt weggooien, denk er dan aan om
het te recycleren via een inzamelpunt voor elektrische huishoudapparaten.
Informeer naar het dichtstbijzijnde recyclagecentrum. Voor meer informatie
wendt u zich tot de lokale overheden of uw verdeler (richtlijn met betrekking
tot Afval afkomstig van elektrische en elektronische apparaten).
ACHTUNG
- Verwenden Sie das Gerät nur in gemässigten Klimazonen.
- Das Typenschild bendet sich auf der Rückseite des Geräts.
- Achten Sie auf einen Mindestabstand von 5cm zu Ihrem Gerät, um eine
ausreichende Belüftung zu gewährleisten.
- Stellen Sie eine ausreichende Belüftung des Geräts sicher und behindern Sie die
Belüftungsönungen nicht mit Gegenständen wie z. B. Zeitungen, Tischdecken,
Vorhängen, usw.
- Stellen Sie keine Wärmequelle wie eine angezündete Kerze auf oder in der Nähe
des Geräts ab.
- Setzen Sie das Gerät niemals Wasserspritzern oder Feuchtigkeit aus.
- Stellen Sie kein mit Wasser gefülltes Gefäß, wie z. B. Vasen, in der Nähe des
Geräts ab.
- Werfen Sie Batterien nicht ins Feuer! Entsorgen Sie leere Batterien umweltgerecht.
- Batterien dürfen keiner übermäßigen Hitze ausgesetzt werden (wie zum Beispiel
praller Sonne, Feuer oder anderen ähnlichen Hitzequellen).
- Unter der Einwirkung von elektrostatischen und/oder elektrischen Phänomen
kann das Produkt Fehlfunktionen aufweisen. Ein Zurücksetzen auf die
Werkseinstellungen kann sich als notwendig erweisen.
- Der ordnungsgemäße Betrieb des Geräts kann durch starke elektromagnetische
Störungen beeinträchtigt werden. Setzen Sie das Gerät in solch einem Fall
gemäß den Angaben in der Bedienungsanleitung zurück, um den normalen
Betrieb wieder herzustellen. Falls der ordnungsgemäße Betrieb nicht fortgesetzt
werden kann, versuchen Sie das Gerät an einem anderen Ort zu verwenden.
ATENCIÓN
- Utilice este aparato únicamente en climas templados.
- La placa de datos técnicos está situada en la parte posterior del dispositivo.
- Deje libre alrededor del aparato una distancia mínima de 5 cm para garantizar una
correcta ventilación del mismo.
- Para asegurar una ventilación correcta del aparato, no cubra los oricios de
ventilación con objetos tales como periódicos, manteles, cortinas, etc.
- No coloque ninguna fuente de calor, como por ejemplo una vela encendida, sobre
el aparato o cerca de él.
- No exponga el aparato a salpicaduras o a la humedad.
- No coloque objetos que contengan líquido, como un jarrón, encima del aparato.
- No tire las pilas al fuego. Respete el medio ambiente cuando se deshaga de las
pilas usadas.
- No exponga las pilas a temperaturas demasiado altas, como las producidas por la
exposición directa a los rayos del sol, al fuego o a otras fuentes de calor.
- Como resultado de fenómenos electroestáticos y/o eléctricos transitorios, pueden
producirse fallos en el funcionamiento del producto. En estos casos, el usuario
deberá reiniciar el aparato desenchufándolo y volviéndolo a enchufar.
- El funcionamiento normal del producto podría verse alterado por fuertes
interferencias electromagnéticas. En caso de ocurrir, simplemente reinicie el
producto y continúe utilizándolo con normalidad siguiendo las indicaciones del
manual de instrucciones. En el caso de que no volviera a funcionar, utilícelo en
una ubicación diferente.
ATTENZIONE
- Utilizzate questo apparecchio solo in condizioni climatiche temperate.
- La targhetta segnaletica si trova nella parte posteriore dell'apparecchio.
- Lasciare uno spazio minimo di 5 cm intorno all’apparecchio per permettere una
ventilazione suciente.
- Garantire sempre una ventilazione corretta dell’apparecchio e non ostruire i fori di
ventilazione con oggetti come giornali, tovaglie, tende, ecc.
- Non collocare nessuna fonte di calore, come una candela accesa, sopra o nei
pressi dell’apparecchio.
- Non esporre l’apparecchio all'acqua o all’umidità.
- Non collocare nessun recipiente contenente liquidi, come ad esempio un vaso,
nelle vicinanze dell’apparecchio.
- Non gettare le pile nel fuoco! Gettare le pile nel rispetto dell'ambiente.
- Non esporre le pile a fonti di calore eccessivo, come raggi solari, fuoco o fonti di
calore analoghe.
- Per eetto di fenomeni transitori elettrostatici e/o elettrici, è possibile che il prodotto
non funzioni correttamente. In tal caso è opportuno reinizializzare l’apparecchio.
- Il normale funzionamento del prodotto può essere compromesso da forti
interferenze elettromagnetiche. In tal caso, segui le istruzioni nel manuale per
reimpostare il prodotto per riprendere il normale funzionamento. Nel caso in cui il
funzionamento non venga ripristinato, utilizzare il prodotto in altro luogo.
OPGELET
- Gebruik dit toestel enkel bij een gematigd klimaat.
- Het kenmerkenplaatje bevindt zich aan de achterkant van het toestel.
- Zorg voor een afstand van minimum 5 cm rondom uw toestel voor voldoende
ventilatie.
- Zorg voor een juiste ventilatie van het toestel en bedek de ventilatie-openingen
niet met voorwerpen zoals dagbladen, tafellakens, gordijnen, enz.
- Plaats geen warmtebron, zoals een brandende kaars, op of in de buurt van het
toestel.
- Stel het toestel niet bloot aan waterspatten of vochtigheid.
- Plaats geen voorwerpen met vloeistof, zoals een vaas, op of in de buurt van het
toestel.
- Gooi de batterijen niet in het vuur. Respecteer het milieu als u gebruikte batterijen
wegwerpt.
- Stel de batterijen niet bloot aan overdreven hitte zoals zonnestralen, vuur of
gelijkaardige warmtebronnen.
- Onder invloed van tijdelijke elektrostatische en/of elektrische verschijnselen kan
het product storingen ondervinden en kan een heropstart nodig blijken.
- De normale functie van het product kan worden verstoord door sterke
elektromagnetische storing. Als dit het geval is, reset het product dan gewoon
door de handleiding te volgen. Als het normale gebruik daarna niet kan worden
hervat, probeer het product dan op een andere locatie te gebruiken.
UTILIZACIÓN DEL ADAPTADOR DE RED
El adaptador de corriente suministrado es adecuado para el uso con una toma
de corriente AC de 100-240V
50/60Hz y deberá enchufarse solo a la red de
suministro dentro de estos parámetros.
Atención:
• El adaptador de red que se suministra p2-ha sido diseñado exclusivamente para
utilizarse con este aparato. No lo utilice con ningún otro aparato.
• Apague el aparato antes de desenchufarlo al adaptador de red para evitar que
se produzcan daños.
• Cuando no vaya a utilizar el aparato durante un período de tiempo prolongado,
desenchufe el adaptador de red de la toma de corriente.
• Coloque el aparato cerca de la toma de pared y compruebe que puede accederse
a esta última fácilmente. Si se produce un fallo en el funcionamiento del aparato,
desconéctelo inmediatamente de la toma de pared.
• El adaptador de red se utiliza para conectar y desconectar el aparato. El acceso al
mismo debe permanecer despejado en todo momento. Para cortar por completo
la alimentación del aparato, p2-ha de desenchufar el adaptador de red de la toma
de pared.
• No utilice nunca el adaptador si está dañado. Coloque el cable de alimentación de
forma segura de manera que no pueda ser aplastado o dañado de otro modo. Si
el cable está dañado, contacte con un servicio de reparación.
• El adaptador de corriente alterna (AC) deberá ser desconectado de la conexión
de corriente continua (CC) para que la unidad funcione con pilas.
Nota: Con el n de ahorrar energía, cuando la reproducción llegue al nal o no esté
reproduciendo, la unidad cambiará automáticamente al modo de espera después
de 15 minutos. (Excepto el modo radio)
INSTALACIÓN DE LAS PILAS
1. Retire la tapa del compartimento para pilas aplicando presión con el dedo pulgar
en el área indicada en la tapa, después levante esta y sáquela hacia fuera.
2. Antes de introducir las pilas, observe las polaridades (+ y -) de las pilas.
Asociándolas con el diagrama mostrado en el interior del compartimento,
introduzca 6 pilas C de 1,5V, LR14/UM2/ (no incluidas) en su interior.
3. Cierre el compartimento de las pilas.
ADATTATORE DI RETE
L’adattatore CA fornito è adatto per l’utilizzo con prese CA 100-240V
50/60Hz e
deve essere collegato solo a prese che rispettano questi parametri.
Attenzione:
• L’adattatore di rete fornito in dotazione è destinato esclusivamente all’uso con il
presente apparecchio. Non utilizzatelo con altri apparecchi.
• Per non danneggiare il lettore, spegnete l’apparecchio prima di scollegare
l’adattatore di rete.
• In caso di un prolungato periodo di non utilizzo, scollegate il cavo di alimentazione
dalla presa.
• Posizionate l’apparecchio nei pressi della presa a muro e fate in modo che
questa resti facilmente accessibile. In caso di malfunzionamento scollegate
immediatamente l’apparecchio dalla presa a muro.
• L’adattatore di rete permette di scollegare l’apparecchio. Deve essere facilmente
accessibile durante l’uso. Per mettere del tutto l’apparecchio fuori tensione,
scollegatelo dall’alimentazione di rete.
• Non utilizzate mai un adattatore di rete danneggiato. Posizionate il cavo di
alimentazione in modo sicuro e in modo che non venga calpestato o schiacciato.
Se il cavo è danneggiato, rivolgetevi ad un servizio di assistenza.
• Per alimentare l’apparecchio a batterie scollegate l’adattatore di rete dall’ingresso
DC IN.
N.B.: Per risparmiare energia, quando la riproduzione è giunta al termine o non è
in corso, l’unità passerà automaticamente alla modalità Standby dopo 15 minuti.
(Tranne la modalità radio)
UTILIZZO DELLE BATTERIE
1. Rimuovete lo sportellino del vano batterie premendo l’area indicata sullo
sportellino con il pollice, quindi sollevatelo.
2. Prima di inserire le batterie controllate i poli delle batterie (+ e -), quindi fateli
combaciare con le indicazioni di polarità sul vano batterie. Inserite nel vano
batterie 6 batterie C 1,5V (non fornite).
3. Richiudete il coperchio del vano batterie.
GEBRUIK VAN DE NETSTROOMADAPTER
De netstroomadapter gebruikt een netstroom van AC 100-240V 50/60Hz. De
meegeleverde netstroomadapter mag nooit gebruikt worden op een ander type
voeding.
Opgepast:
• De meegeleverde netstroomadapter mag uitsluitend met dit toestel gebruikt
worden. Gebruik hem niet met een ander toestel.
• Deactiveer het toestel vooraleer u de stekker uit het stopcontact trekt, om
beschadiging van het toestel te vermijden.
• Als het toestel lange tijd niet gebruikt wordt, trek de stekker van de netstroom-
adapter dan uit het stopcontact.
• Plaats uw toestel dicht bij een stopcontact en zorg ervoor dat het stopcontact
makkelijk bereikbaar blijft. Van zodra u een functiestoornis vaststelt, dient u de
stekker van het toestel uit het stopcontact te trekken.
• De netstroomadapter maakt het mogelijk om de stroomvoorziening naar het toestel
te onderbeken. Zorg ervoor dat deze altijd makkelijk bereikbaar blijft tijdens het
gebruik. Om de voeding van het toestel volledig te onderbreken, dient u de stekker
van de netstroomadapter uit het stopcontact te trekken.
• De netstroomadapter moet worden losgekoppeld van de DC-ingang als u het
apparaat wilt gebruiken op batterijstroom.
Opmerking: Als het afspelen is beëindigd of als er niets wordt afgespeeld, schakelt
het apparaat na 15 minuten automatisch over naar de stand-bymodus om energie
te besparen. (behalve radiomodus)
GEBRUIK MET BATTERIJEN
1. Verwijder de deur van het batterijvak door met de duim druk uit te oefenen op
het gebied dat is aangegeven op de batterijdeur en til de deur vervolgens uit en
van de behuizing.
2. Bekijk vóór het plaatsen van de batterijen de polariteiten (+ en -) van de batterij en
plaats de batterij vervolgens zoals aangegeven op de afbeelding in het batterijvak.
Plaats 6x 1,5V, LR14/UM2/ “C” batterijen (niet meegeleverd) in het vak.
3. Sluit het batterijcompartiment weer.
1. Drücken Sie die
/ SOURCE -Taste, um das Gerät einzuschalten.
2. Schließen Sie einen USB-Datenträger mit MP3-Inhalten oder einen MP3-Player
am USB-Anschluss an
.
3. Betätigen Sie die / SOURCE -Taste, um in den USB-Modus zu gelangen. Das
USB-Symbol “USB” wird angezeigt.
4. Nach wenigen Sekunden, wiedergabe beginnt automatisch.
HINWEIS:
- Auf der Disc dürfen höchstens 999 MP3-Dateien gespeichert sein.
- Die Disc darf insgesamt nicht mehr als 99 Verzeichnisse enthalten.
- Der USB-Anschluss ist nicht geeignet zum Auaden und zur Kommunikation mit
einem Computer
- Der Hersteller garantiert keine Kompatibilität mit USB-Medien oder MP3-Playern
aufgrund der unterschiedlichen Aufnahmebedingungen, Kapazität, Schnittstelle etc.
- Auf dem Markt sind zahlreiche USB-Sticks und MP3-Player erhältlich. Die
Kompatibilität mit allen Formaten kann daher nicht gewährleistet werden. Benutzen
Sie bitte einen anderen USB-Stick, falls der Ihre nicht funktionieren sollte.
1. Pulse el botón para encender el aparato. / SOURCE
2. Conecte un lápiz USB con contenido MP3 o un reproductor MP3 al puerto
USB
.
3. Pulse el botón para seleccionar el modo USB. El icono “USB” / SOURCE
se mostrará.
4. Tras unos segundos, reproducción comenzará automáticamente.
NOTAS:
- El número total de archivos MP3 del disco no deberá ser superior a 999.
- El disco no puede contener más de 99 carpetas.
- El puerto USB no está diseñado para una función de recarga y comunicación
con un ordenador.
- El fabricante no se hace responsable de la compatibilidad de las pistas del
dispositivo USB o del reproductor MP3 como consecuencia de las condiciones
de grabación, de la capacidad, etc.
- En el mercado pueden encontrarse numerosos modelos de dispositivos USB
y de reproductores MP3. No podemos garantizarle que este aparato sea
compatible con todos los formatos. En caso de que su dispositivo USB no
funcione, utilice otro.
1. Premete il tasto per accendere l’apparecchio. / SOURCE
2. Collegare un dispositiv USB contenente le MP3 o un lettore MP3 alla porta
.
3. Premere il tasto / SOURCE per selezionare la modalità USB. L’icona “USB”
apparirà sul quadrante.
4. Dopo alcuni secondi, riproduzione si avvia automaticamente.
N.B.:
- The total number of MP3 les on the disc should not exceed 999.
- Il numero totale di cartelle non può superare le 99 unità.
- La porta USB non è compatibile con la ricarica e il trasferimento dati tramite con
un computer.
- Il fabbricante non è responsabile per la compatibilità dei dispositivi USB e dei
lettori MP3 con l’apparecchio per cause che includono dierenze nel formato dei
dati, nella capacità e nella compatibilità dell’interfaccia
- Sul mercato esistono numerosi modelli di periferiche USB e di lettori MP3. Non
è possibile garantire la compatibilità con tutti i formati. Qualora un modello di
periferica USB non sia compatibile, provare con un’altro.
1. Druk op de toets om het toestel in werking te zetten. / SOURCE
2. Sluit een USB-stick met MP3’s of een MP3-speler aan op de USB-poort
.
3. Druk op de knop / SOURCE om de USB-modus te selecteren. Het USB-
icoontje “USB ” wordt getoond.
4. Na een paar seconden, afspelen begint automatisch.
OPMERKINGEN:
- Het totaal aantal MP3-bestanden op de disc mag niet hoger zijn dan 999.
- De schijf mag niet meer dan 99 mappen bevatten.
- De USB-poort is niet bedoeld voor de oplaadfunctie en communicatie met een
computer.
- De fabrikant is niet verantwoordelijk voor de afspeelbaarheid van USB-sticks of
MP3-spelers door opnameomstandigheden, capaciteit, interface compatibiliteit,
etc.
- Er bestaan verschillende USB-sleutels en MP3-spelers op de markt. Wij kunnen
niet garanderen dat het toestel compatibel is met alle formaten. Gebruik daarom
een andere USB-drager indien uw USB-drager niet werkt.
Wiederholung
Betätigen Sie die PROG. Taste mehrfach, um einen Wiederholungsmodus
zu wählen.
- Einzelwiederholung: Anzeige zeigt "Rep one"
- Verzeichnis wiederholen: Anzeige zeigt "Rep alb". (Nur MP3)
- Alles wiederholen: Anzeige zeigt "Rep all".
Um die wiederholte Wiedergabe zu beenden, drücken Sie die Taste PROG.
wiederholt, und die Anzeige für die wiederholte Wiedergabe erlischt.
Zufallswiedergabe
Drücken Sie die Taste PROG. wiederholt, Die Anzeige zeigt "Random". Die
Titel werden in willkürlicher Reihenfolge abgespielt.
Intro-Funktion:
Drücken Sie die Taste PROG. wiederholt, Die Anzeige zeigt "INTRO". Jedes
Titels werden wiederzugeben die ersten 10 Sekunden.
Programmierte Wiedergabe
1. Legen Sie eine CD mit der bedruckten Seite nach oben in das CD-Fach ein und
schließen Sie die Tür.
2. Drücken Sie die Taste .
3. Drücken Sie PROG..
4. Wählen Sie mit den Tasten / den gewünschten Track und drücken Sie „
PROG. “, um den Track zu speichern.
5. Wiederholen Sie Schritt 4, bis Sie alle gewünschten Tracks gespeichert haben.
6. Drücken Sie / PAIR für die Wiedergabe. Önen Sie das CD-Fach oder schalten
Sie das Gerät aus, um die programmierte Wiedergabe zu beenden.
Hinweis: CD-bis zu 20 programmierte Tracks; MP3 -bis zu 99 programmierte Tracks.
Reproducción repetida
Pulse el botón repetidamente para seleccionar un modo de PROG.
reproducción.
- Repetir 1, la pantalla muestra “Rep one”
- Repetir carpeta, la pantalla muestra “Rep alb” (Sólo MP3)
- Repetir todo, la pantalla muestra “Rep all”
Para cancelar la repetición de la reproducción, pulse el botón PROG.
repetidamente hasta que el indicador de repetición desaparezca.
Reproducción aleatoria
Pulse el botón repetidamente hasta que el la pantalla muestra PROG.
“Random”. Reproducirá todas las pistas en orden aleatorio.
Búsqueda introductoria
Pulse el botón repetidamente hasta que el la pantalla muestra PROG.
“INTRO”. Reproducirá los 10 primeros segundos de cada pista.
Reproducción programada
1. Coloque un CD con la cara impresa mirando hacia arriba en el interior del
alojamiento de CD y cierre la tapa.
2. Pulse el botón .
3. Pulse el botón .PROG.
4. Seleccione la pista que desee pulsando / , después pulse el botón ”
” para guardar su programa en la memoria.PROG.
5. Repita el paso 4 hasta que haya nalizado programando sus selecciones.
6. Pulse el botón / PAIR para iniciar la reproducción. Abra la tapa del alojamiento
de CD o apague la uindad para cancelar la programación.
Nota: Podrá programar hasta 20 pistas de un CD- y 99 pistas de MP3.
Riproduzione
Premere più volte il tasto PROG. per selezionare una modalità di ripetizione.
- Ripeti 1: icona “Rep one”.
- Ripeti cartella, icona “Rep alb”. (solo MP3)
- Ripeti tutto, icona “Rep all”.
Per annullare la funzione, premere più volte il tasto PROG. no a quando la
relativa icona non scompare dal display.
Riproduzione casuale
Premere più volte il tasto PROG. no a quando Sul display viene visualizzata
la dicitura Random” e l'apparecchio avvia la riproduzione casuale delle tracce.
Funzione Intro
Premere più volte il tasto no a quando Sul display viene PROG.
visualizzata la dicitura “INTRO”. l'apparecchio avvia la riprodurre i 10 secondi
iniziali di ogni brano.
Riproduzione programmata
1. Inserire un CD con l’etichetta verso l’alto e richiudere lo sportello.
2. Premere il tasto .
3. Premere il tasto .PROG.
4. Selezionare il brano desiderato premendo / , quindi premere il tasto “
PROG. ” per memorizzarlo nel programma.
5. Ripetere i quattro punti precedenti per aggiungere ulteriori brani.
6. Premere il tasto / PAIR per avviare la riproduzione. Aprendo il vano CD o
spegnendo l’apparecchio il programma verrà cancellato.
Nota: CD-no a 20 brani programmabili; MP3 -no a 99 brani programmabili.
Herhalen
Druk herhaaldelijk op de knop PROG. om een herhaalmodus te selecteren.
- Herhaal 1, display toont “Rep one”
- Herhaal map, display toont “Rep alb”. (Alleen MP3)
- Herhaal alle, display toont “Rep all”.
Druk om het herhalen te annuleren herhaaldelijk op tot de herhaal- PROG.
indicator niet langer wordt getoond.
Afspelen in willekeurige volgorde
Druk herhaaldelijk op de toets tot de Display toont “Random”. De PROG.
tracks worden nu in willekeurige volgorde afgespeeld.
Introscan
Druk herhaaldelijk op de toets tot de Display toont “INTRO”. De PROG.
tracks worden nu eerste 10 seconden van elke track af te spelen.
Geprogrammeerd afspelen
1. Plaats the CD met het label naar boven gericht in het CD-compartiment en sluit
de CD-deur.
2. Druk op .
3. Druk op . PROG.
4. Selecteer de gewenste track met behulp van / , en druk daarna op ”
PROG. ” om de track toe te voegen aan het programma en het programma
op te slaan in het geheugen.
5. Herhaal stap 4 tot u uw programma volledig heeft ingevoerd.
6. Druk op / PAIR om het afspelen te starten. Open de CD-deur of schakel het
apparaat uit om het programma te annuleren.
Opmerking: CD-tot 20 geprogrammeerde nummers; MP3-tot 99 geprogrammeerde
nummers.
1. Drücken Sie die Taste
/ SOURCE (QUELLE), um das Gerät einzuschalten.
2. Legen Sie die CD-/MP3-Disc mit der bedruckten Seite nach oben in das CD-
Fach ein und schließen Sie die Abdeckung. Oder schließen Sie einen USB-
Stickmit MP3-Audiodateien an den USB-Port an.
3. Wählen Sie mit der Taste / SOURCE (QUELLE) den CD- oder USB-Modus
aus. Nach einigen Sekunden, wiedergabe startet automatisch.
4. Falls mehr als ein Ordner vorhanden ist, Wählen Sie mit den gewünschten
Ordner mit halten Sie die Taste PROG. (PROGRAMMIEREN).
1. Pulse el botón para encender la unidad./ SOURCE
2. Coloque el disco CD-MP3 con la cara impresa mirando hacia arriba dentro del
compartimento para CD y después cierre la tapa de dicho compartimento. O
conecte una unidad USB con archivos de audio MP3 en el puerto USB.
3. Pulse el botón para seleccionar el modo CD o USB. Pasados unos / SOURCE
segundos, la unidad comenzará a reproducir automáticamente.
4. Si hubiera más de una carpeta, mantenga pulsado el botón PROG. para
seleccionar la carpeta que desee.
1. Premete il tasto
per accendere l’apparecchio./ SOURCE
2. Inserire un CD-MP3-disc con l’etichetta verso l’alto e richiudere lo sportello.o
collegare un dispositiv USB contenente le MP3 o un lettore MP3 alla porta.
3. Premere il tasto
/ SOURCE (FONTE) per selezionare la funzione CD o USB.
Dopo alcuni secondi, riproduzione si avvia automaticamente.
4. Se è presente più di una cartella, tenere premuto i tasti per PROG.
selezionare la cartella desiderata.
1. Druk op
om het apparaat in te schakelen./ SOURCE
2. Plaats de CD-MP3-disc met het label naar boven in het CD-compartiment en
sluit de CD-deur. Of, steek een USB-stick met MP3-bestanden in de USB-poort.
3. Druk op / SOURCE om de CD- of USB-modus te selecteren. Na een paar
seconden, apparaat zal het afspelen automatisch starten.
4. Als er meer dan een map is, houd dan PROG. om de gewenste map te
selecteren.
REINIGUNG
CHTUNG: Entfernen Sie alle Geräte von den vorhandenen Stromquellen,
bevor Sie das Gerät reinigen.
- Verwenden Sie ein weiches, trockenes und sauberes Tuch. Entfernen Sie
regelmäßig den Staub von den Lüftungsönungenhinten und an den Seiten.
- Die Verwendung von Lösungsmitteln, scharfen Reinigungsmitteln oder
alkoholhaltigen Reinigungsmitteln kann das Gerät beschädigen.
- Wenn ein Gegenstand oder eine Flüssigkeit in das Gerät gelangt, ziehen Sie
sofort den Netzstecker und lassen Sie das Gerät von einem zugelassenen
Fachmann prüfen.
Hinweise zu den disks
- Verwenden Sie keine CDs mit speziellen Formen (achteckige, herzförmige
CDs...), die Störungen des Gerätes hervorrufen könnten.
- Legen Sie nicht mehr als eine Disk in das CD-Fach ein.
- Versuchen Sie nicht, das CD-Fach während der Wiedergabe zu öfnen.
- Berühren Sie nicht die Linse, denn dadurch könnten Störungen des Gerätes
hervorgerufen werden.
- Eine CD, die Kratzer, Staub oder Fingerspuren aufweist, kann Störungen
verursachen. Nach dem Abspielen, reinigen Sie die CD mit einem Tuch. Reinigen
Sie die CD immer von innen nach außen. Räumen Sie CDs nicht an zu heißen
oder nassen Stellen auf, damit sie nicht verformt werden. Räumen Sie Ihre CDs
nach dem Abspielen in der zugehörigen Hülle auf.
WICHTIGER HINWEIS
Vor dem Transport des Geräts die eventuell vorhandene Disc herausnehmen.
Limpieza
ATENCIÓN: Desconecte este aparato de toda fuente de alimentación antes
de limpiarlo.
- Utilice un paño suave, limpio y seco. Limpie regularmente los oricios de
ventilación de la parte trasera del aparato y de los laterales.
- El uso de disolventes o productos abrasivos o a base de alcohol puede dañar
el aparato.
- Si un objeto o un líquido penetra en el aparato, desenchúfelo inmediatamente y
póngase en contacto con personal técnico cualicado.
Notas relativas a los disco
- No utilice discos con formas especiales (octogonales, en forma de corazón, etc.),
ya que podrían ocasionar un fallo en el funcionamiento del aparato.
- No introduzca más de un disco en el compartimento.
- No intente abrir el compartimento del disco durante la reproducción.
- No toque la lente del reproductor; si lo hace, podría producirse un fallo en el
funcionamiento del aparato.
- Un disco cuya supercie esté rayada, contenga polvo o huellas puede ocasionar
fallos en el funcionamiento del aparato. Antes de comenzar la reproducción,
limpie el disco con un paño limpio. Para ello, frótelo desde el centro hacia los
bordes. No guarde los discos en lugares con temperaturas elevadas o una
humedad considerable; podrían deformarse. Una vez que haya escuchado el
disco, guárdelo en su estuche.
NOTA IMPORTANTE
Retire el disco del compartimento cuando transporte el aparato.
PULIZIA
ATTENZIONE: Scollegare l’apparecchio dalla rete elettrica prima di pulirlo.
- Usare un panno morbido, asciutto e pulito per rimuovere con regolarità la polvere
dalle aperture di ventilazione posto sul retro e sui lati.
- L’uso di solventi, prodotti corrosivi o a base di alcool potrebbe danneggiare
l’apparecchio.
- Nel caso di ingresso accidentale di solidi o liquidi all’interno dell’apparecchio ,
staccare immediatamente la spina e rivolgersi a un riparatore autorizzato.
Notes on discs
- L’uso di CD di forma irregolare (ad es. ottagonali o a forma di cuore) potrebbero
compromettere il buon funzionamento dell’apparecchio.
- Non inserire più di un CD alla volta.
- Non aprire il vano CD durante la riproduzione.
- Non toccare le lenti, o si potrebbe compromettere il buon funzionamento
dell’apparecchio.
- Nel caso di gra, sporcizia o impronte sul CD, il lettore potrebbe saltare alcuni
punti. Prima della riproduzione è consigliabile pulire il CD con un panno apposito.
Pulire il CD partendo dal centro e stronando delicatamente verso l’esterno.
Non conservare i CD in locali con temperature estreme o con alta umidità, o
potrebbero deformarsi.Dopo l’ascolto, riporre il CD nella sua custodia.
NOTA IMPORTANTE
Prima di trasportare l’apparecchio, rimuovere il disco dal vano CD.
SCHOON
OPGEPAST: Koppel het toestel los van elke voedingsbron vooraleer het
schoon te maken.
- Gebruik een propere, zachte, droge doek. Stof de verluchtingsopeningen aan de
achterzijde of zijkanten van het toestel regelmatig af.
- Het gebruik van solventen of bijtende middelen op basis van alcohol kan het
toestel beschadigen.
- Als een object of een vloeistof in het toestel loopt, koppel het dan meteen los en
laat het nakijken door een gekwaliceerdtechnieker.
Opmerkingen ivm disks
- Gebruik geen disks met een speciale vorm (achthoek, hartvorm, enz.) die het
toestel slecht zou doen werken.
- Plaats maar 1 disk in het compartiment.
- Open het compartiment niet tijdens de weergave.
- Raak de lens niet aan om disfunctie van het toestel te vermijden.
- Een disk met krassen, stof of vingerafdrukken kan slecht werken. Gebruik een
zachte, droge doek om de disk schoon te maken, vooraleer de disk weer te geven.
Doe dit van het midden uit naar de zijkanten toe. Plaats de disks nooit bloot aan
vochtigheid of extreme temperaturen om ze niet te vervormen. Plaats uw disks na
de weergave opnieuw in hun doosjes.
BELANGRIJKE OPMERKING
Haal de disk uit het compartiment als het toestel vervoerd moet worden.
1. Stecken Sie das eine Ende des Kabels (nicht im Lieferumfang) am AUX IN-
Eingang des Geräts an
.
2. Schließen Sie das andere Ende des Kabels am Kopfhörer- oder Line-Out-
Ausgang des externen Audiogeräts an.
3. Betätigen Sie die / SOURCE -Taste, um in den Aux-Modus zu wechseln.
Die Aux-Symbol “AUX” erscheint in der Anzeige. Verwenden Sie Ihr externes
Audiogerät wie gewohnt.
4. Stellen Sie die Lautstärke auf das gewünschte Niveau ein.
5. Wenn Sie die Wiedergabe beenden möchten, trennen Sie die Verbindung des
externen Gerätes mit dem Aux-Eingang des Players.
1. Enchufe un extremo del cable (no incluido) en la entrada DE LÍNEA de la unidad
.
2. Enchufe le otro extremo del cable en la toma para auriculares o la salida de línea
de la fuente externa.
3. Pulse el botón para seleccionar el modo auxiliar. El icono de / SOURCE
auxiliar “AUX” se mostrará. Utilice el dispositivo de audio externo del modo
habitual.
4. Ajuste el volumen al nivel deseado.
5. Desconecte el dispositivo externo de la entrada auxiliar para detener la
reproducción.
1. Collegare un’estremità del cavo (non incluso) alla presa AUX IN dell’apparecchio
.
2. Collegare l’altra estremità alle cue o alla presa Line Out di un dispositivo
esterno.
3. Premere il tasto / SOURCE per selezionare la modalità Ausiliaria. La relativa
icona “AUX” apparirà sul quadrante. Utilizzate normalmente il vostro apparecchio
audio esterno.
4. Regolate il volume sul livello desiderato.
5. Scollegate il dispositivo esterno dall’ingresso ausiliario per interrompere la
lettura.
1. Steek een uiteinde van de kabel (niet meegeleverd) in de AUX IN-aansluiting van
het apparaat
.
2. Steek het andere uiteinde van de kabel in de HOOFDTELEFOON- of LINE OUT-
uitgang van de externe bron.
3. Druk op de knop / SOURCE om de Auxiliary-modus te selecteren. Het auxiliary-
icoontje “AUX” wordt getoond. Gebruik uw extern audiotoestel zoals normaal.
4. Stel het volume in op het gewenste niveau.
5. Koppel de externe apparatuur los van de hulpingang om het afspelen te beëindigen.
Navigation durch das Setup-Menü.
1. Halten Sie im CD, USB, Bluetooth, AUX IN, DAB, FM (UKW) Modus die Taste
MENU/INFO gedrückt, um das Setup-Menü zu önen.
2. Drücken Sie den -Regler, um eine der verfügbaren Optionen oder
auszuwählen.
CD Modus: System
USB Modus: System
Bluetooth Modus: System
AUX IN Modus: System
DAB Modus: Vollständiger Suchlauf/ Manuell einstellen/ inaktive Sender/ System
UKW Modus: Suchlauf-Einstellung/ Audio-Einstellung/ System
3. Drücken Sie die Taste SELECT/SCAN, um die jeweilige SetupEinstellung
einzugeben. Neben der aktuellen Einstellung erscheint das Symbol „ “.
FM (UKW) Einstellungsmenü
Suchlauf-Einstellung
Alle Sender: Die automatische Suche listet alle verfügbaren Sender auf.
Nur kräftige Sender: Die automatische Suche listet nur Sender mit starkem Signal
auf.
Audio-Einstellung
Wählen Sie für die UKW-Übertragung zwischen „Stereo moglich“ und „Nur Mono“.
System
Systemeinstellungen kongurieren: Uhrzeit, Sprache, Werkseinstellung, SW-
version.
• Uhrzeit
Mit dieser Funktion können Sie die Uhrzeit- und Datumseinstellungen kongurieren.
• Sprache
Wählen Sie eine Sprache für die Menüanzeige aus: English, Deutsch, Nederlands,
Français
• Werkseinstellung
Gerät auf die Werkseinstellungen zurücksetzen
• SW -version
Aktuelle Software-version anzeigen.
DAB/DAB+ Einstellungsmenü
Vollständiger Suchlauf
Mit dieser Funktion können Sie automatisch eine Liste mit verfügbaren DAB-
Sendern erstellen.
Manuell einstellen
Verwenden Sie diese Funktion für die Positionierung der Antenne und des Geräts,
um die Empfangsqualität eines bestimmten Senders oder einer Frequenz zu
verbessern.
Inaktive Sender (Löschen Sie Sender, die angezeigt, jedoch nicht mehr
empfangen werden)
Drücken Sie
oder zur Auswahl von „<Nein>“ oder „<Ja>“. Drücken Sie
dann SELECT/SCAN, um die Speicherung der ungültigen Sender abzubrechen
oder zu bestätigen.
System
Siehe Anleitungen unter „UKW-Einstellungsmenü“
INFORMATIONEN ANZEIGEN (UKW-/ DAB-MODUS)
Drücken Sie wiederholt die Taste um Geräteeinstellungen oder MENU/INFO
verfügbare Informationen für den aktuellen Sender anzuzeigen.
Navegación por el menú de conguración.
1. En el modo CD, USB, Bluetooth, AUX IN, DAB, FM, mantenga pulsado el botón
MENU/INFO para entrar en el menú de conguración.
2. Pulse o para seleccionar hasta una de las opciones disponibles.
Mode CD: System (Sistema )
Mode USB: System (Sistema )
Mode Bluetooth: System (Sistema )
Mode AUX IN: System (Sistema )
Mode DAB: Full scan (Búsqueda completa)/ Manual Tune (Sintonización manual)/
Prune (Limpiar)/ System (Sistema)
Mode FM: Scan setting (Congurar búsqueda)/ Audio setting (Congurar audio)/
System (Sistema)
3. Pulse el botón SELECT/SCAN para acceder al ajuste correspondiente. Se
mostrará el icono en la pantalla junto con la conguración actual.
Menú de ajuste de FM
Scan setting (Congurar búsqueda)
All stations (Todas las emisoras): la búsqueda automática e detendrá en cualquier
emisora disponible.
Strong stations only (Solo las emisoras con buena señal): la búsqueda automática
solo se detendrá cuando encuentre emisoras con una buena señal.
Audio setting (Congurar audio)
Para seleccionar entre “Stereo allowed (Habilitar estéreo)” y “Forced mono (Forzar
mono)” para la radio FM.
System (Sistema)
Para seleccionar las opciones de ajuste del sistema: TIME (Hora), Language (Idioma),
Factory Reset (Conguración de fábrica), SW Version (Versión de software).
• TIME (Hora)
Puede congurar la hora y la fecha.
• Language (Idioma)
Para seleccionar el idioma deseado para el menú de la unidad: English, Deutsch,
Nederlands, Français
• Factory Reset (Conguración de fábrica)
Para restablecer la conguración de fábrica por defecto.
• SW version (Versión de software)
Para revisar la versión de software actual.
Menú de ajustes DAB/DAB+
Full Scan (Búsqueda completa)
Esta función le permite buscar automáticamente y crear una lista de programas DAB/
DAB+ recibidos.
Manual Tune (Sintonización manual)
Esta función puede utilizarse para facilitar el posicionamiento de la antena o la
unidad, con el n de mejorar la recepción de un canal especíco o la frecuencia
de recepción.
Prune (Elimine emisoras que estén listadas pero no disponibles)
Pulse
o para seleccionar “No” o “Yes” (Si), a continuación pulse el botón
SELECT/SCAN para conrmar o cancelar la eliminación de todas las emisoras no
válidas.
System (Sistema)
Véase utilización en “Menú de conguración FM”.
REVISAR MÁS INFORMACIÓN (MODO FM/DAB)
Pulse repetidamente el botón MENU/INFO para revisar algunos ajustes de su unidad
o información disponible correspondiente a la emisora que esté escuchando.
Navigazione nel menu di impostazione
1. In modalità CD, USB, Bluetooth, AUX IN, DAB o FM, tenete premuto il tasto
MENU/INFO per accedere al menu di impostazione.
2. Premere il tasto per selezionare le opzioni disponibili. o
Modalità CD: System (Sistema)
Modalità USB: System (Sistema)
Modalità Bluetooth: System (Sistema)
Modalità AUX IN: System (Sistema)
Modalità DAB: Full scan (Ricerca completa)/ Manual Tune (Sintonizz. Manuale)/
Prune (Elimina)/ System (Sistema)
Modalità FM: Scan setting (Impostaz. di ricerca)/ Audio setting (Impostaz. Audio)/
System (Sistema)
3. Premete il tasto SELECT/SCAN per accedere al relativo sottomenu. L’icona “ ”
viene visualizzata a anco dell’impostazione corrente.
Menu di impostazione FM
Scan setting (Impostaz. di ricerca)
All stations (Tutte le stazioni): La ricerca automatica localizza qualsiasi stazione
disponibile.
Strong stations only (Solo stazioni forti): La ricerca automatica localizza solo stazioni
con segnale forte.
Audio setting (Impostaz. Audio)
Consente di selezionare un’opzione tra “Stereo allowed (Stereo consentito)” e
“Forced mono (Mono forzato)” pe la radio FM.
System (Sistema)
Consente di accedere alle opzioni di impostazione del sistema: Time (Ora),
Language (Lingua), Factory Reset (Ripristino valori di default), SW version (Versione
del software).
• TIME (Ora)
È possibile impostare l’ora e la data.
• Language(Lingua)
Consente di selezionare la lingua dei menu: English, Deutsch, Nederlands, Français
• Factory Reset (Ripristino valori di default)
Consente di ripristinare l'apparecchio alle impostazioni di fabbrica.
• SW version (Versione del software)
Consente di visualizzare la versione corrente del software.
Menu di impostazione DAB/DAB+
Full Scan (Ricerca completa)
Questa funzione consente la ricerca e la creazione di un elenco delle stazione DAB/
DAB+ disponibili in automatico.
Manual Tune (Sintonizzazione manuale)
Questa funzione può essere utilizzata come aiuto durante lo spostamento
dell'antenna o dell'apparecchio volto a migliorare la ricezione di un canale o una
frequenza specici.
Prune (Consente di rimuovere le stazioni non disponibili contenute nell’elenco)
Premere il tasto
o per selezionare “No” o “Yes” (Si), quindi premere il tasto
SELECT/SCAN per annullare o confermare l'eliminazione delle stazioni non valide.
System (Sistema)
Consultare le istruzioni fornite nella sezione “Menu di impostazione FM”
VISUALIZZAZIONE DI ULTERIORI INFORMAZIONI (MODALITÀ FM/ DAB)
Premere più volte il tasto MENU/INFO per vericare alcune delle impostazioni
dell'apparecchio oppure per visualizzare le informazioni disponibili per la stazione
corrente.
Navigeren door het instellingenmenu.
1. Houd in de CD, USB, Bluetooth, AUX IN, DAB of FM modus MENU/INFO
ingedrukt om het instellingenmenu te openen.
2. Druk op of om naar een van de beschikbare opties te selecteren.
CD modus: Systeem
USB modus: Systeem
Bluetooth modus: Systeem
AUX IN modus: Systeem
DAB modus: Volledige scan/ Handm. Afstmmn./ Inkorten/ Systeem
FM modus: Scaninstelling/ Audio-instelling/ Systeem
3. Druk op SELECT/SCAN om het instellen van de geselecteerde optie te openen.
Er wordt een “ ” getoond naast de huidige instelling.
Instellingenmenu FM
Scaninstelling
Alle stations: De automatisch scanfunctie zoekt naar alle beschikbare zenders.
Allen sterke stations: De automatische scanfunctie zoekt alleen naar zenders met
een sterk signaal.
Audio-instelling
Om een keuze te maken uit “Stereo toegestaan” en “Alleen mono” voor FM-radio.
Systeem
Om systeemopties te selecteren: Tijd, Talen, Fabrieksreset, SW-versie.
• Tijd
U kunt de instelling van de tijd en datum aanpassen.
• Talen
Om de taal waarin de menu’s worden weergegeven te selecteren: English,
Deutsch, Nederlands, Français
• Fabrieksreset
Om de fabrieksinstellingen te herstellen.
• SW-versie
Om de huidige softwareversie te bekijken.
Instellingenmenu DAB/DAB+
Volledige scan
Door gebruik te maken van deze functie kunt u een automatische scan uitvoeren en
een lijst maken van DAB/DAB+-zenders die ontvangen kunnen worden.
Handm. asfmmn.
Deze functie kan worden gebruikt om te assisteren bij het positioneren van de
antenne van de radio, of om nauwkeurig af te stemmen op een speciek kanaal of
een specieke frequentie.
Inkorten (Verwijder zenders die in de lijst voorkomen maar niet langer
beschikbaar zijn)
Druk op
of om “<Nee>” of “<Ja>” te selecteren en druk daarna op SELECT/
SCAN om het verwijderen van alle niet-beschikbare zenders te bevestigen of
annuleren.
Systeem
Zie “Instellingenmenu FM”
MEER INFORMATIE BEKIJKEN (FM/ DAB-MODUS)
Druk herhaaldelijk op om bepaalde radio-instellingen of informatie die MENU/INFO
beschikbaar is voor de huidige zender te bekijken.
En el modo en espera, pulse
/ SOURCE una vez para encender la unidad.
Mantenga pulsado para apagar la unidad./ SOURCE
In modalità standby, premere il tasto
per attivare l’apparecchio./ SOURCE
Tieni premuto il tasto per disattivarlo./ SOURCE
Druk in de standbymodus één keer op
/ SOURCE om het apparaat in te schakelen.
Houd / SOURCE ingedrukt om het apparaat uit te schakelen.
Cuando la unidad esté encendida, pulse repetidamente el botón
/ SOURCE para
seleccionar el modo CD, USB, Bluetooth, AUX IN, DAB, FM.
Da apparecchio acceso, premete più volte il tasto
/ SOURCE per selezionare
una modalità tra CD, USB, Bluetooth, AUX IN, DAB, FM.
Druk, als het apparaat is ingeschakeld, herhaaldelijk op
/ SOURCE om een
andere bron te selecteren: CD, USB, Bluetooth, AUX IN, DAB, FM.
Pulse
o para ajustar el volumen.
Regolare il volume sul livello desiderato con il tasto
o .
Stel het volume naar wens in met behulp van
of .
La primera vez que escuche la radio DAB, la fecha y la hora de su producto se
sincronizarán automáticamente con la emitida por el servicio DAB en modo 24
horas, que se ajusta automáticamente al horario de verano, por lo que no es
necesario congurarlas manualmente.
Si desea congurar la fecha y la hora manualmente, encienda la radio y siga los
pasos descritos a continuación:
1. Mantenga pulsado el botón MENU/INFO.
2. Pulse
o para seleccionar <System> (Sistema). Pulse el botón SELECT/
SCAN para acceder a esa opción.
3. Se mostrará <Time> (Hora). Presione nuevamente SELECT/SCAN (Seleccionar)
para acceder al menú de conguración de la hora.
4. Se mostrará <Set Time/Date> (Establecer hora/fecha). Presione nuevamente
SELECT/SCAN (Seleccionar) para ingresar a esta opción.
5. Los dígitos de la hora parpadearán. Utilice el dial de o para congurar la
hora. Pulse el botón SELECT/SCAN para conrmar. Entonces los dígitos de los
minutos parpadearán. Utilice el dial o para congurar los minutos. Pulse
el botón SELECT/SCAN para conrmar.
6. Los dígitos del día parpadearán. Utilice el dial de o y el botón SELECT/
SCAN para congurar el día, el mes y el año.
Una vez conrme la fecha, se mostrará “Time Saved (Hora Guardada)” y la pantalla
volverá a la opción <Set Time/Date> (Establecer Hora/Fecha).
Ahora puede utilizar el dial de o y el botón SELECT/SCAN para congurar
las siguientes opciones:
- Set 12/24 hour (Ajustar 12\24 horas): Ajustar 12\24 horas.
- Set date format (Congurar el formato de la fecha): DD-MM-AAAA o MM-DD-
AAAA
- Auto update (Actualización automática)
Update from Any (Actualización de cualquiera de las opciones): Actualización de
FM o DAB/DAB+.
No update (Sin actualización): Muestra la hora de los ajustes del sistema.
Update from FM (Actualización de FM): Actualización de la hora de FM.
Update from DAB (Actualización de DAB): Actualización de la hora de DAB/DAB+.
Nota: Cuando realice ajustes en el menú, pulse el botón para regresar MENU/INFO
al paso anterior.
Al primo utilizzo della radio DAB, l’apparecchio si sincronizza in automatico sull’ora e
la data del servizio DAB, nel formato a 24 ore e in linea con l’ora legale, pertanto non
è necessario impostare la data e l’ora manualmente.
Se desiderate impostare l’ora manualmente, accendete l’apparecchio ed eseguite i
seguenti passaggi:
1. Tenete premuto il tasto MENU/INFO.
2. Premere il tasto per selezionare la voce <System> (Sistema). Premete il o
tasto SELECT/SCAN per accedere al menu.
3. Verrà visualizzato <Time> (Ora), premi nuovamente SELECT/SCAN per accedere
al menu di impostazione dell’ora.
4. Verrà visualizzato <Set Time/Date> (Imposta ora/data), premi nuovamente
SELECT/SCAN per accedere.
5. La cifre dell’ora iniziano a lampeggiare. Utilizzate la manopola o per
impostare l’ora. Premete il tasto SELECT/SCAN per confermare: le cifre dei minuti
iniziano a lampeggiare. Utilizzate la manopola o per impostare i minuti.
Premete il tasto SELECT/SCAN per confermare.
6. La giorno inizia a lampeggiare. Utilizzate la manopola o e il tasto SELECT/
SCAN per impostare il giorno, il mese e l’anno.
Una volta confermata la data, sul display viene visualizzata la dicitura “Time Saved”
(Ora salvata), quindi l’apparecchio torna al menu <Set Time/Date> (Imposta ora/
data).
A quel punto potete utilizzare la manopola o e il tasto SELECT/SCAN per
impostare le seguenti opzioni:
- Set 12/24 hour (Impost. 12/24 ore): 12 o 24 ore.
- Set date format (Imposta formato data): GG-MM-AAAA o MM-GG-AAAA.
- Auto update (Aggiornamento automatico)
Update from any (Aggiornamento da qualsiasi): Aggiornamento dell’ora in base del
ricevitore radio FM o al DAB/DAB+.
No update (Nessun aggiornamento): Consente di visualizzare l’ora in base
all’impostazione di sistema.
Update from FM (Aggiornamento da FM): Aggiornamento dell’ora in base del
ricevitore radio FM.
Update from DAB (Aggiornamento da DAB): Aggiornamento dell’ora in base al DAB/
DAB+.
Nota: Durante l’impostazione, premete il tasto MENU/INFO per tornare all’interfaccia
precedente.
De eerste keer dat u naar DAB-radio luistert, zullen de tijd en datum van uw product
automatisch worden gesynchroniseerd met de tijd en datum die worden uitgezonden
door de DAB-dienst. Dit gebeurt in de 24-uursmodus in lijn met de zomertijd en het is
dus niet nodig om de tijd en datum handmatig in te stellen.
Als u de tijd en datum handmatig wilt instellen, schakel de radio dan in en volg de
onderstaande stappen:
1. Houd MENU/INFO ingedrukt.
2. Druk op of om <Systeem> te selecteren. Druk op SELECT/SCAN om
deze optie te openen.
3. <Tijd> wordt weergegeven, druk nogmaals op SELECT/SCAN om het menu voor
het instellen van de tijd te openen.
4. <Tijd/ datum instellen> wordt weergegeven, druk opnieuw op SELECT/SCAN om
deze optie te openen.
5. De uurcijfers knipperen. Gebruik de knop of om de uren in te stellen. Druk
ter bevestiging op SELECT/SCAN. Daarna zullen de minuutcijfers knipperen.
Gebruik de knop of om de minuten in te stellen. Druk ter bevestiging op
SELECT/SCAN.
6. De dag knippert. Gebruik de knoppen of en SELECT/SCAN om de dag,
maand en het jaar in te stellen.
Als u de datum bevestigt, zal de melding “Tijd opgeslagen” worden weergegeven op
het display en keert de radio terug naar <Tijd/ datum instellen>.
U kunt nu de knoppen of en SELECT/SCAN gebruiken om de volgende
zaken in te stellen:
- 12/24 uur instellen: 12/24-uursweergave.
- Datumnotatie instellen: De datumnotatie instellen op DD-MM-JJJJ of MM-DD-JJJJ.
- Autom. bijwerken (Automatisch bijwerken)
Update alles: Tijd bijwerken met behulp van FM of DAB/DAB+.
Geen update: Toon de tijd die is ingesteld in de systeeminstellingen.
Update van FM: Tijd bijwerken met behulp van FM.
Update van DAB: Tijd bijwerken met behulp van DAB/DAB+.
Opmerking: Als u instellingen maakt in het menu, druk dan op MENU/INFO om terug
te keren naar de voorgaande stap.
1. Pulse repetidamente el botón
/ SOURCE para seleccionar el modo DAB.
Si es la primera vez que utiliza la unidad, la radio buscará automáticamente
emisoras DAB/DAB+. La pantalla cambiará a “Scanning… (Buscando…)”. Una
barra de progreso mostrará el progreso de la búsqueda y también el número de
emisoras encontradas.
2. Cuando la búsqueda termine, la radio seleccionará la primera emisora disponible
y comenzará con la retransmisión. Las emisoras se listarán por orden numérico
y después por orden alfabético por defecto.
Nota: La lista de emisoras de radio DAB/DAB+ será almacenada en la memoria,
de esta manera la próxima vez que encienda la radio, la búsqueda de emisoras
no se realizará. Puede buscar emisoras manualmente pulsando y soltando el
botón .SELECT/SCAN
3. Pulse o para seleccionar emisoras de la lista.
4. Cuando la emisora deseada se muestre en pantalla, pulse el botón SELECT/
SCAN para conrmar. Habrá una breve espera mientras su radio sintoniza la
emisora seleccionada.
Notas:
- Si no se hubiera ninguna retransmisión con la búsqueda DAB/DAB+, “No DAB
station” aparecerá en el display.
- Para una mejor recepción, extienda la antena telescópica o realice de nuevo una
búsqueda completa desde otra posición.
- Durante la operación de búsqueda, el nivel de sonido quedará interrumpido
automáticamente.
1. Premete più volte il tasto
/ SOURCE per selezionare la modalità DAB. Al primo
utilizzo, l’apparecchio avvia in automatico la ricerca delle stazioni DAB/DAB+.
Sul display viene visualizzata la dicitura “Scanning (Ricerca in corso)…”. Una
barra di stato indica l’avanzamento della ricerca insieme al numero di stazioni
trovate.
2. Al termine della ricerca, l’apparecchio seleziona la prima stazione disponibile
e ne avvia la riproduzione. Per impostazione predenita, le stazioni vengono
elencate in ordine numerico e successivamente alfabetico.
Nota: l’apparecchio memorizza le stazioni radio DAB/DAB+ trovate, pertanto
alla successiva accensione l’apparecchio non eettua alcuna ricerca. Per
cercare altre stazioni manualmente dovrete premere e rilasciare più volte il tasto
SELECT/SCAN.
3. Premere il tasto o per selezionare una stazione dall'elenco.
4. Quando sul display viene visualizzata la stazione che desiderate ascoltare,
premete il tasto SELECT/SCAN per confermare la selezione. L’apparecchio
impiegherà qualche secondo per sintonizzarsi sulla stazione selezionata.
Notas:
- Se durante la ricerca non viene trovata nessuna stazione, sul display compare la
dicitura “No DAB Station (Ness. staz. DAB)”.
- Per una migliore ricezione, estendete l’antenna telescopica o eseguite di nuovo la
ricerca da una dierente posizione.
- Durante la ricerca l’audio viene disattivato.
1. Druk herhaaldelijk op / SOURCE om de DAB-modus te selecteren. Als de
radio voor het eerst wordt gebruikt, zal er een automatisch scan naar DAB-
zenders worden gestart. Het display toont de melding “Scannen…” en er wordt
een voortgangsbalk getoond die de voortgang van de scan weergeeft. Daarnaast
wordt het aantal zenders dat is gevonden tijdens de scan getoond.
2. Als de scan is voltooid, zal de radio de eerst beschikbare zender selecteren
en het afspelen starten. Zenders worden standaard eerst gerangschikt op
numerieke volgorde en daarna op alfabetische volgorde.
Opmerking: De DAB-zenderlijst wordt opgeslagen in het geheugen. Als u de
radio wordt uitgeschakeld en daarna weer wordt ingeschakeld, zal er dus niet
opnieuw een zenderscan worden uitgevoerd. Het is mogelijk om handmatig naar
zenders te scannen door op SELECT/SCAN te drukken.
3. Druk op of om een zender uit de lijst te selecteren.
4. Als de gewenste zender wordt weergegeven, druk dan ter bevestiging
op SELECT/SCAN. Er zal een korte vertraging zijn terwijl uw radio op de
geselecteerde zender afstemt.
Opmerkingen:
- Als er geen uitzendingen worden gevonden met de DAB/DAB+ scan, dan zal de
melding “Geen DAB-station“ op het display verschijnen.
- Voor betere ontvangst wordt aanbevolen de telescopische antenne volledig uit
te strekken of de volledige scan nogmaals uit te voeren op een andere plaats.
- Het geluid wordt tijdens het scannen naar zenders automatisch uitgeschakeld.
4. Wählen Sie mit der Taste
oder einen gespeicherten Sender aus.
Hinweis: Wenn Sie einen Sender, der nicht zugewiesen worden ist, wählen,
wird “Leer” angezeigt. Wenn der Sender zuvor zugeordnet wurde, wird die FM-
Frequenz oder der DAB-Radioname angezeigt.
5. Betätigen Sie den Knopf, um den ausgewählten Sender zu SELECT/SCAN
speichern. “Speicher X gespeichert” wird angezeigt (x steht für voreingestellte
Nummer).
6. Wiederholen Sie die Schritte 2 bis 5, um weitere Sender zu speichern.
Automatisch speichern
Halten Sie die SELECT/SCAN-Taste im FM-Modus. Das Gerät sucht und speichert
automatisch Radiosender mit starkem Signal. Falls auf einem Speicherplatz bereits
ein Sender gespeichert ist, wird der vorhandene Sender gelöscht und automatisch
durch den neuen ersetzt.
AUFRUFEN DER GESPEICHERTER SENDER
Benutzen Sie die Tasten zur Auswahl des gewünschten Senders. PROG.
4. Use el botón para seleccionar una emisora presintonizada. o
Nota: Si elige una emisora que no p2-ha sido asignada, “Empty” se mostrará
en el display. Si la emisora hubiera sido asignada anteriormente, se mostrará
frecuencia FM o el nombre de la radio DAB.
5. Pulse el botón SELECT/SCAN para guardarlo. “Preset X stored” se mostrará en
el display. (la X signica el número de la memoria).
6. Repite los pasos 2-5 para memorizar otras emisoras.
Almacenamiento automático
Mantenga pulsado en modo FM, la unidad encontrará y guardará SELECT/SCAN
automáticamente las emisoras con señal fuerte. Cuando guarde en un canal que
ya ha sido presintonizado, la emisora anterior se eliminará automáticamente y será
sustituida por la nueva emisora.
PARA ESCUCHAR LAS RADIOS PRESINTONIZADAS
Pulse el botón PROG. para seleccionar una estación presintonizada.
4. Usa i tasti per sintonizzarti su un canale dalla preselezione. o
Nota: Se si seleziona una stazione non memorizzata, sul display viene visualizzata
la dicitura “Empty (Vuoto)”. Se la stazione è stata memorizzata in precedenza, sul
display viene visualizzata la frequenza FM o il nome della radio DAB.
5. Premere il tasto SELECT/SCAN per confermare l’impostazione. Sul quadrante
si leggerà “Preset x Stored” (Preselezione Salvata). (x sta per il numero della
preselezione).
6. Per memorizzare altre stazioni ripetere i passaggi 2-5.
Memorizzazione automatica
Tenete premuto il tasto SELECT/SCAN in modalità FM. L’apparecchio rileverà e
salverà automaticamente le stazioni forti. Salvando una stazione in un programma
della preselezione già occupato, la stazione precedentemente salvata verrà
automaticamente eliminata e sostituita dalla nuova stazione.
ASCOLTO DELLA RADIO PREIMPOSTATE
Premere il tasto PROG. per selezionare una delle stazioni dalla preselezione.
4. Gebruik de knop of om een voorkeurzender te selecteren.
Opmerking: Als u een voorkeurszender selecteert die nog niet is geprogrammeerd,
dan zal de tekst “Leeg” op het display worden getoond. Als u wel een zender heeft
opgeslagen onder het gekozen nummer, dan zal de FM-frequentie of DAB-radio
worden getoond.
5. Druk op SELECT/SCAN om de zender op te slaan. “Zender X Opgeslagen” wordt
weergegeven op het display (X is het voorkeurszendernummer).
6. Herhaal stap 2-5 om andere zenders op te slaan.
Automatisch opslaan
Houd SELECT/SCAN ingedrukt in FM-modus ingedrukt, het apparaat zoekt
automatisch naar sterke zenders en slaat deze op. Als u een zender opslaat op een
kanaalnummer dat al in gebruik is, dan zal de eerder opgeslagen zender automatisch
worden gewist en vervangen door de nieuwe zender.
LUISTEREN NAAR VOORKEURSZENDERS
Druk op de knop PROG. om een voorkeurszender te selecteren.
En el modo de radio FM, pulse el botón
o para sintonización manual.
mantenga pulsado o para búsqueda automática.
Nota: Para una mejor recepción, extienda la antena telescópica.
ESTACIONES PRESINTONÍAS
Esta unidad podrá memorizar hasta 10 emisoras FM y 10 DAB/DAB+
Almacenamiento manual
1. Pulse repetidamente el botón / SOURCE para seleccionar la banda FM o
DAB.
2. Seleccione la búsqueda automática o manual de una emisora de radio.
3. Mantenga pulsado el botón para entrar en el modo de PROG.
memorización de emisoras.
In modalità radio FM, premere il tasto
o per eettuare la sintonizzazione
manuale delle stazioni. Tenere premuti i tasti o per avviare la ricerca
automatica delle stazioni.
Nota: Per una migliore ricezione, estendete l’antenna telescopica.
STAZIONI PREIMPOSTATE
Questo apparecchio consente di memorizzare no a 10 stazioni FM e 10 stazioni
DAB/DAB+.
Memorizzazione manuale
1. Premete più volte il tasto
/ SOURCE per selezionare la banda FM o la banda
DAB.
2. Selezionate una stazione radio manualmente o mediante la ricerca automatica.
3. Tenete premuto il tasto per accedere alla modalità di PROG.
memorizzazione delle preselezioni.
Druk in de FM-radiomodus op of of om handmatig af te stemmen. Houd
ingedrukt om automatisch te scannen.
Opmerking: Voor betere ontvangst wordt aanbevolen de telescopische antenne
volledig uit te strekken.
VOORKEURSZENDERS
Deze radio kan 10 FM- en 10 DAB/DAB+ zenders opslaan als voorkeurszenders.
Handmatig opslaan
1. Druk herhaaldelijk op / SOURCE om de FM- of DAB band te selecteren.
2. Stem met behulp van handmatig of automatisch afstemmen af op een radiozender.
3. Houd PROG. ingedrukt om de opslagmodus voor voorkeurszenders te
openen.
1. Drücken Sie die Taste / SOURCE , um das Gerät einzuschalten.
2. Um das CD-Fach zu önen.
3. Legen Sie eine CD mit der bedruckten Seite nach oben ein und schließen Sie
das CD-Fach wieder.
4. Betätigen Sie die , um zum CD-Betrieb zu wechseln. / SOURCE
5. Nach einigen Sekunden, wiedergabe beginnt automatisch.
Zum:
- Vorübergehenden Unterbrechen der: Drücken Sie einmal auf die Taste / PAIR
- Wiedergabe Wiederaufnehmen der Wiedergabe: Drücken Sie ein zweites Mal auf
die Taste / PAIR
- Stoppen der Wiedergabe:
- Suche rückwärts oder vorwärts: Halten Sie die Taste oder
- Zum vorherigen oder nächsten Titel springen: Drücken Sie auf die Taste oder
DISC-FEHLER
Hinweis:Wenn die Disc verschmutzt, beschädigt oder nicht mehr lesbar ist oder
wenn die Disc falsch herum eingelegt wird, erscheint “NO DISC“ in der Anzeige.
Wenn dies geschieht, reinigen Sie die Disc, legen Sie die Disc richtig herum ein
oder versuchen Sie es mit einer anderen Disc.
Falls CD-Wiedergabeprobleme auftreten, versuchen Sie sie auf eine der
folgenden Weisen zu beheben:
1. Schalten Sie das Gerät aus, trennen Sie das AC-Netzteil und schließen Sie es
dann erneut an die Steckdose an.
2. Reinigen Sie Ihre Compact-Disc.
1. Pulse el botón para encender el aparato./ SOURCE
2. Abra el compartimento del disco.
3. Introduzca el disco en el compartimento, con la cara impresa orientada hacia
arriba y, a continuación, cierre el compartimento.
4. Pulse el botón para seleccionar la función CD./ SOURCE
5. Pasados unos segundos, reproducción comenzará automáticamente.
PARA:
Interrumpir momentáneamente la reproducción: Pulse una vez el botó / PAIR
Retomar la reproducción: Pulse de nuevo el botón / PAIR
Detener la reproducción: Pulse el botón
Buscar hacia atrás o adelante: Mantenga pulsado el botón /
Para saltar a la pista anterior o siguiente: Pulse el botón /
ERROR DE DISCO
Nota: Si el disco está sucio, dañado o es ilegible, o si el disco se puso al revés,
“NO DISC” se verán en la pantalla. Si esto ocurre, limpie el disco, insértelo
correctamente o intente con otro disco.
Si tuviera problemas con la reproducción del CD, cualquiera de los siguientes
procedimientos podría ayudarle:
1. Apague la unidad. Desconecte el adaptador de CA de la toma de corriente de
CA y vuelva a conectarlo.
2. Limpie el CD.
1. Premere il tasto (FONTE) per attivare l’apparecchio./ SOURCE
2. Aprire il vano CD.
3. Inserire un CD con l’etichetta verso l’alto e richiudere lo sportello.
4. Premere il tasto (FONTE) per selezionare la funzione CD. / SOURCE
5. Dopo alcuni secondi, riproduzione si avvia automaticamente.
PER:
Mettere la riproduzione in pausa: Premete una volta il tasto / PAIR
Riprendere la riproduzione: Premete una seconda volta il tasto / PAIR
Interrompere la riproduzione: Premete il tasto
Ricerca in avanti o all’indietro: Premete i tasti /
Passa al brano precedente o successivo: Tenete premuti i tasti /
ERRORE NEL DISC
Nota: Se il disco è sporco, danneggiato o illeggibile, o se è stato inserito capovolto,
sul quadrante apparirà la scritta “NO DISC”. In questo caso, pulire il disco,
riposizionarlo o sostituirlo con un altro.
In caso di problemi con la riproduzione di CD audio cercare di risolvere il
problema come suggerito di seguito:
1. Spegnere l'unità. Scollega l’adattatore CA dalla presa CA e ricollegalo.
2. Pulire il CD.
1. Druk op de toets om het toestel in werking te zetten. / SOURCE
2. Open de CD deur.
3. Breng de disk in het diskcompartiment met de bedrukte zijde langs boven, om
vervolgens het diskcompartiment te sluiten.
4. Druk op de knop om de CD-functie te selecteren./ SOURCE
5. Na een paar seconden, afspelen begint automatisch.
OM:
De weergave te pauzeren: Druk één keer op de toets / PAIR
De weergave te hervatten: Druk een tweede keer op de toets / PAIR
De weergave te stoppen: Druk op de toets
Vooruit of achteruit zoeken: Houd de toets of ingedrukt
Om naar de vorige of volgende track te gaan: Druk op de toets /
FOUTMELDING DISK
Opmerking: als de disc vuil, beschadigd of onleesbaar is of als de disc verkeerd
om wordt geplaatst, dan zal er “ NO DISC” op het display verschijnen. Als dit zich
voordoet, maak de disc schoon, plaats de disc juist of probeer een andere disc.
Als u problemen tegenkomt bij het afspelen van CD's, kunt u dit op de
volgende manieren verhelpen:
1. Schakel het apparaat uit. Koppel de netadapter los van het stopcontact en sluit
de adapter daarna opnieuw aan.
2. Maak de CD schoon.
Der Bluetooth
®
-Markenname und damit verbundene Logos sind Eigentum der
Firma Bluetooth SIG, Inc. Jegliche Benutzung dieser Marken durch die Firma New
One S.A.S stehen unter Lizenz. Alle anderen Produkt- und Markennamen sind
Eigentum_der jeweiligen Besitzer.
Verbindungsaufbau mit einem Bluetooth-Gerät
1. Betätigen Sie die / SOURCE -Taste, um den Bluetooth-Modus zu aktivieren.
Im Display erscheint einige Sekunden lang die Anzeige „Bluetooth“ Die Bluetooth-
Anzeige beginnt blinken.
2. Aktivieren Sie die Bluetooth-Funktion auf Ihrem Bluetooth-Gerät, und wählen Sie
"MUSE M-32DB" in der Geräteliste. (Lesen Sie bitte die Bedienungsanleitung des
jeweiligen Geräts für detaillierte Bedienungsschritte zum Verbindungsaufbau.)
Wenn das Bluetooth-Gerät Sie zur Eingabe eines Schlüssels auordert,
geben Sie bitte "0000" ein. Manche Bluetooth-Geräte erfordern es zudem,
dass die Verbindung bestätigt wird. Sie hören einen Signalton, wenn der
Verbindungsaufbau erfolgreich ist.
Tipp: Wenn Sie Ihren Bluetooth-Lautsprecher mit einem anderen Bluetooth-
AudioGerät verbinden möchten, Halten Sie die / PAIR -Taste gedrückt, das Gerät
zu trennen und die oben beschriebenen Schritte erneut ausführen, um eine neue
Verbindung herzustellen.
• Auf einigen Geräten wie z. B. Computern müssen Sie bei bestehender Verbindung
das Gerät aus dem Bluetooth-Menü wählen und als Audiogerät aktivieren.
• Die Verbindung bleibt bestehen, wenn das Bluetooth-Gerät außer Reichweite bzw.
ausgeschaltet ist. Eine aktive Verbindung wird dann wieder hergestellt, wenn das
Bluetooth-Gerät sich wieder in Reichweite bendet.
• Wird das Gerät erneut eingeschaltet, versucht es automatisch, sich mit dem zuletzt
gekoppelten Bluetooth-Gerät zu verbinden.
Verwenden eines Bluetooth-Geräts
1. Bei bestehender Verbindung (siehe voriger Abschnitt), können Sie das
BluetoothGerät bedienen und den Ton über das M-32 DB wiedergeben.
2. Betätigen Sie die Taste / PAIR , um die Wiedergabe vorübergehend anzuhalten.
Betätigen Sie die Taste ein weiteres Mal, um mit der Wiedergabe fortzufahren.
3. Wählen Sie mit den Tasten /einen Titel aus.
4. Stellen Sie die Lautstärke mithilfe der Lautstärketasten /ein. Sie können
die Lautstärke auch direkt auf dem Gerät, mit dem die Verbindung hergestellt
wurde, einstellen.
NEW ONE S.A.S erklärt hiermit, dass dieser „MUSE M-32 DB/ M-32 DBW“
den wesentlichen Anforderungen und anderen geltenden Vorgaben der
Richtlinie 2014/53/EU entspricht. Die Konformitätserklärung lässt sich unter
www.muse-europe.com herunterladen.
Los logos y nombres Bluetooth
®
son marcas registradas que pertenecen a
Bluetooth SIG, Inc. y cualquier uso de dichas marcas por parte de New One
S.A.S tiene sus respectivas licencias. Otras marcas comerciales y registradas son
propiedad de sus respectivos propietarios.
Emparejar un dispositivo Bluetooth
1. Pulse el botón / SOURCE para seleccionar el modo Bluetooth. La pantalla
mostrará "Bluetooth" y el indicador de Bluetooth comenzará a parpadear.
2. En el dispositivo Bluetooth, habilite Bluetooth y seleccione “MUSE M-32DB” de
la lista de dispositivos. (Para obtener el detalle de operaciones para conectarse,
consulte el manual de usuario del dispositivo). Si el dispositivo Bluetoothle
solicita una contraseña de acceso, utilice “0000”. Algunos dispositivos Bluetooth
le indicarán que acepte la conexión. Podrá oír un aviso acústico cuando se haya
logrado el emparejamiento.
Sugerencia: Si desea conectar su altavoz Bluetooth a otro dispositivo de audio
Bluetooth, Mantenga pulsado el botón / PAIR para desconectar el dispositivo
actual primero y seguir los pasos descritos anteriormente para hacer una conexión
nueva.
• En algunos dispositivos como computadoras, una vez realizado el emparejamiento,
debe seleccionar la unidad del menú Bluetooth y elegir "Use as Audio Device
(stereo) or similar" (utilizar como dispositivo de audio (estéreo) osimilar).
• El emparejamiento permanece intacto cuando launidad y/o su dispositivo
Bluetooth sale del rango de comunicación. Se restablecerá una conexiónactiva
cuando su dispositivo Bluetooth vuelva dentro del rango.
• Cuando vuelva a encender la unidad, se intentará la reconexión automática con el
dispositivo Bluetooth al que se haya emparejado más recientemente.
Utilizar un dispositivo Bluetooth
1. Con alguna unidad emparejada (ver la sección anterior), haga funcionar su
dispositivo Bluetooth. El sonido se escuchará a través de los altavoces M-32 DB.
2. Oprima el botón / PAIR para pausar la reproducción. Presione nuevamente
para retomar la reproducción.
3. Seleccione la pista que desee con . /
4. Ajuste el volumen con los botones de Volumen / . También puede
ajustar el volumen en el dispositivo con el cual está emparejado.
Por la presente, NEW ONE S.A.S declara que el «MUSE M-32 DB/ M-32 DBW»
cumple con los requerimientos esenciales y otras provisiones aplicables de la
Directiva 2014/53/EU. La declaración de conformidad podrá consultarse en
www.muse-europe.com
Il marchio denominativo Bluetooth
®
e i relativi loghi sono marchi registrati di
Bluetooth SIG, Inc., utilizzati da New One S.A.S su licenza. Altri marchi e nomi
commerciali sono di proprietà dei rispettivi titolari.
Associazione di un dispositivo Bluetooth
1. Premete il tasto / SOURCE per selezionare la modalità Bluetooth. Il display
mostrerà "Bluetooth" e l'indicatore Bluetooth inizierà a lampeggiare
2. Attivare la funzione Bluetooth sul proprio dispositivo Bluetooth e selezionare
“MUSE M-32DB” dall’elenco dei dispositivi rilevati (consultare il manuale di
istruzioni del dispositivo per informazioni dettagliate su come connettere il
dispositivo). Se il dispositivo Bluetooth richiede la digitazione di una password,
inserire “0000”. Alcuni dispositivi Bluetooth richiedono di accettare la connessione.
L'unità emette un segnale acustico una volta completata l'associazione.
Consigli: Se si desidera connettere l’altoparlante Bluetooth a un altro dispositivo
Bluetooth, tenere premuto il tasto
/ PAIR per disconnettere il dispositivo corrente,
quindi seguire i passaggi sopra indicati per stabilire una nuova connessione.
• Su alcuni dispositivi, come ad esempio computer, una volta associato il dispositivo
è necessario selezionare l’unità dal menu Bluetooth, quindi selezionare l’opzione
“Utilizza come dispositivo audio (stereo)” o similare.
• L’associazione rimane attiva quando l’unità e/o il dispositivo Bluetooth escono dal
raggio d’azione del Bluetooth. Una connessione attiva viene ristabilita quando il
dispositivo rientra nel raggio d’azione del Bluetooth.
• Una volta riaccesa, l’unità tenta in automatico di riconnettersi all’ultimo dispositivo
Bluetooth associato.
Utilizzo di un dispositivo Bluetooth
1. Una volta associata l’unità a un dispositivo (vedi sezione precedente) l’audio del
dispositivo Bluetooth viene riprodotto mediante l’altoparlante.
2. Premere il tasto
/ PAIR er sospendere la riproduzione. Premerlo di nuovo per
riprendere la riproduzione.
3. Utilizzare i tasti
/ per selezionare la traccia desiderata.
4. Regolare il volume utilizzando i tasti volume / . È possibile regolare il
volume anche dal dispositivo a cui l’unità è associata.
Con la presente, NEW ONE S.A.S dichiara che «MUSE M-32 DB/ M-32 DBW»
è conforme ai requisiti essenziali e alle altre disposizioni fondamentali della
direttiva 2014/53/EU. La dichiarazione di conformità è consultabile alla pagina
www.muse-europe.com
De Bluetooth
®
markering en de logo’s zijn geregistreerde handelsmerken die
eigendom zijn van Bluetooth SIG, Inc. en het gebruik van deze markeringen door
New One S.A.S is onder licentie. Andere handelsmerken en handelsnemen zijn van
hun respectieve eigenaars.
Een Bluetooth-apparaat koppelen
1. Druk op
/ SOURCE om de Bluetooth-modus te selecteren. Op het display
verschijnt "Bluetooth" en de Bluetooth-indicator begint te knipperen.
2. Schakel Bluetooth in op het Bluetooth-apparaat en selecteer “MUSE M-32DB”
uit de lijst met apparaten. (Kijk in de handleiding van het apparaat waarmee u
verbinding wilt maken voor gedetailleerde instructies.) Als het Bluetooth-apparaat
vraagt om een wachtwoord, voer dan “0000” in. Sommige Bluetooth-apparaten
zullen u vragen de verbinding te accepteren. U hoort een spraakmelding als het
koppelen is gelukt.
Tip: Als u uw Bluetooth-luidspreker wilt verbinden met een andere Bluetooth
audioapparaat, Houd
/ PAIR ingedrukt om dan moet u de verbinding met het
huidige apparaat verbreken en de bovenstaande stappen volgen om een nieuwe
verbinding op te zetten.
• Op bepaalde apparaten, zoals computers, moet u, zodra er is gekoppeld, het
apparaat selecteren in het Bluetooth-menu en de optie “Gebruik als audioapparaat
(stereo)” (of een soortgelijke optie) gebruiken.
• De verbinding blijft intact wanneer de luidspreker en/of uw Bluetooth-apparaat
buiten het communicatiebereik wordt verplaatst. Er wordt opnieuw een actieve
verbinding gemaakt wanneer uw Bluetooth-apparaat terugkeert binnen het bereik.
• Als het apparaat weer wordt ingeschakeld, dan zal het automatisch proberen
opnieuw verbinding te maken met het Bluetooth-apparaat waarmee het laatst
werd gekoppeld.
Een Bluetooth-apparaat gebruiken
1. Als u verbinding heeft gemaakt met een apparaat (zie voorgaande paragraaf),
gebruik dan de bediening op uw Bluetooth-apparaat en wanneer het afspelen
wordt gestart, dan zal het geluid uit de luidsprekers van de M-32 DB klinken.
2. Druk op
/ PAIR om het afspelen te pauzeren. Druk nogmaals om het afspelen
te hervatten.
3. Selecteer de gewenste track met . /
4. Stel het volume in met behulp van / . U kunt het volume ook instellen op
het apparaat dat is verbonden met de luidspreker.
Hierbij verklaart NEW ONE S.A.S dat deze “MUSE M-32 DB/ M-32 DBW” voldoet
aan de essentiële eisen en andere relevante bepalingen uit richtlijn 2014/53/EU. De
verklaring van conformiteit kan worden geraadpleegd op www.muse-europe.com
NEW ONE S.A.S
10, Rue de la Mission, 25480 Ecole Valentin, France
NEW ONE S.A.S
10, Rue de la Mission, 25480 Ecole Valentin, France
NEW ONE S.A.S
10, Rue de la Mission, 25480 Ecole Valentin, France
NEW ONE S.A.S
10, Rue de la Mission, 25480 Ecole Valentin, France
M-32DB/IB/V0(DTA)
Antes de tirar las pilas, consulte a su proveedor: puede entregárselas
para reciclarlas.
Prima di gettare le batterie, rivolgetevi al rivenditore di ducia qualora
metta a disposizione un servizio di raccolta e riciclaggio delle batterie.
Raadpleeg uw dealer alvorens de batterijen weg te werpen omdat hij ze
zou kunnen terugnemen om te recycleren.
Notas:
- Nunca cargue pilas que no son recargables. No caliente las pilas ni las desmonte.
- Si no va a utilizar el aparato durante un largo periodo de tiempo, retire las pilas
para evitar una pérdida de líquido de las mismas.
- Para un máximo rendimiento, se recomienda el uso de pilas alcalinas. Estas pilas
deberán ser sustituidas cada 6 meses.
- Las baterías se tienen que sustituir cuando: el volumen disminuye, o el sonido
está distorsionado durante el funcionamiento.
ATENCIÓN: Riesgo de explosión si las pilas no se introducen correctamente.
Cambie las pilas únicamente por otras del mismo tipo o uno equivalente.
Notas:
- Non caricate mai batterie non ricaricabili. Non scaldate le batterie e non apritele.
- Per evitare ogni fuoriuscita di liquido pericoloso, estraete le batterie in caso di un
lungo periodo di non utilizzo.
- Si raccomanda l’uso di batterie alcaline. Per ottenere un funzionamento ottimale,
si raccomanda di sostituire le batterie ogni 6 mesi.
- Le batterie devono essere sostituite quando: il volume diminuisce, o il suono
risulta distorto durante l’uso.
ATTENZIONE: Se le batterie non sono correttamente inserite c’è il rischio di
esplosione. Sostituitele unicamente con batterie identiche o di tipo equivalente.
Opmerkingen:
- Zorg ervoor dat u nooit niet-oplaadbare batterijen oplaadt. Verwarm de batterijen
nooit en probeer ze nooit te openen.
- Om lekkage te voorkomen, verwijder de batterijen altijd als het apparaat voor een
lange periode niet wordt gebruikt.
- Het gebruik van alkalinebatterijen is aan te raden. Om een optimale werking te
verzekeren, is het aan te raden om de batterijen elke 6 maanden te vervangen.
- Vervang de batterijen wanneer het volume vermindert of het geluid vervormt
tijdens het gebruik.
OPGEPAST: Ontplongsgevaar als de batterij niet juist ingevoegd wordt. Vervang
de batterij enkel door een identieke batterij of door een batterij van hetzelfde type.
Produktspecifikationer
Varumärke: | Muse |
Kategori: | CD-spelare/brännare |
Modell: | M-32 DB |
Vikt: | 1400 g |
Bredd: | 260 mm |
Djup: | 190 mm |
Höjd: | 130 mm |
Förpackningens bredd: | 305 mm |
Frekvensband: | DAB, DAB+, FM, PLL |
Bakgrundsbelyst skärm: | Ja |
Antal batterier: | 6 |
Produktens färg: | Svart |
Skärmtyp: | LCD |
MP3-uppspelning: | Ja |
Låddjup: | 220 mm |
Enhetstyp: | Bärbar CD-spelare |
Strömkälla av typen: | AC, Battery |
AC-adapter inkluderad: | Ja |
Batterier medföljer: | Nej |
Antal USB 2.0 anslutningar: | 1 |
Antenner mängd: | 1 |
Antenntyp: | Extern |
Aux-In: | Ja |
Antalet förinställda stationer: | 20 |
AC-adapter, inspänning: | 100 - 240 V |
Uppspelning av CD-R: | Ja |
Uppspelning av CD-RW: | Ja |
Uppspelningsskivtyper: | CD, CD-R, CD-RW |
Behöver du hjälp?
Om du behöver hjälp med Muse M-32 DB ställ en fråga nedan och andra användare kommer att svara dig
CD-spelare/brännare Muse Manualer
16 Oktober 2024
5 September 2024
3 September 2024
24 Augusti 2024
23 Augusti 2024
22 Augusti 2024
22 Augusti 2024
21 Augusti 2024
20 Augusti 2024
17 Augusti 2024
CD-spelare/brännare Manualer
- Roland
- Proline
- Sunstech
- Champion
- GPO
- Technics
- Tascam
- Lenoxx
- Pro-Ject
- Lyngdorf
- Gold Note
- Logik
- Daewoo
- Numark
- Marquant
Nyaste CD-spelare/brännare Manualer
5 April 2025
10 Mars 2025
5 Mars 2025
20 Februari 2025
20 Februari 2025
20 Februari 2025
20 Februari 2025
20 Februari 2025
20 Februari 2025
20 Februari 2025