Optex WXI-AM Bruksanvisning
Optex Larmsystem WXI-AM
Läs gratis den bruksanvisning för Optex WXI-AM (8 sidor) i kategorin Larmsystem. Guiden har ansetts hjälpsam av 25 personer och har ett genomsnittsbetyg på 4.5 stjärnor baserat på 7 recensioner. Har du en fråga om Optex WXI-AM eller vill du ställa frågor till andra användare av produkten? Ställ en fråga
Sida 1/8
Caution
Warning
EN
Manufacturer’s statement
2
INSTALLATION INSTRUCTIONS
No.59-2686-0 1802-16
Quick Reference
Introduction
1
FR
Introduction
DE
Einleitung
IT
Introduzione
ES
Introducción
PT
Introdução
NL
Inleiding
FR
Déclaration du fabricant
DE
Herstellererklärung
IT
Dichiarazione del costruttore
ES
Declaración del fabricante
PT
Declaração do fabricante
NL
Mededeling van de fabrikant
Full information, with multilanguage, available in ;
http://navi.optex.net/manual/50196
• This “Quick Reference” is the part of the entire installation
instructions that guides the installation procedures for installers.
Get the full information with multi-language of the installation
instructions in the web site.
If you need a guide to the operation of the whole system,
please consult your installer of the entire system.
•
•
• Cette “Quick Reference” est la partie des instructions
d’installation entières qui guide les procédures d’installati
on pour
les installateurs.
• Obtenez les informations complètes avec multi-langue des
instructions d’installation dans le site Web.
• Si vous avez besoin d’un guide pour le fonctionnement du
système dans son ensemble, s’il vous plaît consulter votre
installateur de l’ensemble du système.
• Dieses “Quick Reference” ist der Teil der gesamten
Installationsanweisungen, die die Installationsverfahren für
Installateure führt.
• Holen Sie sich die vollständige Information mit mehrsprachiger
der I
nstallationshinweise in der Website.
• Wenn Sie einen Leitfaden für den Betrieb des Systems als
Ganzes benötigen, wenden Sie sich bitte an Ihren Installateur
des gesamten Systems.
• Questa “Guida rapida” è la parte di tutto il istruzioni di
installazione che guida le procedure di installazione per gli
installatori.
• Ottenere le informazioni complete con il multi-linguaggio delle
istruzioni di installazione nel sito web.
• Se occorre una guida per il funzionamento del sistema nel suo
complesso, cons
ultare l’installatore dell’intero sistema.
• Este “Referencia rápida” es la parte de la totalidad de las
instrucciones de instalación que guía los procedimientos de
instalación para los instaladores.
• Obtener la información completa con multi-idioma de las
instrucciones de instalación en el sitio web.
• Si necesita una guía para el funcionamiento del sistema en su
conjunto, por favor consulte a su instalador de todo el sistema.
• Este “Referência Rápida” é parte de toda as instruções de
instala
ção que orienta os procedimentos de instalação para os
instaladores.
• Obter as informações completas com multi-idioma das
instruções de instalação no web site.
• Se você precisa de um guia para a operação do sistema como
um todo, por favor consulte o seu instalador de todo o sistema.
• Deze “Snelle referentie” maakt deel uit van de totale
installatieaanwijzingen die de installateur door de
installatieprocedures leiden.
• Krijg de volledige meertalige informatie van de
installatieaanwijzingen van de websi
te.
• Als u richtlijnen nodig hebt over de werking van het gehele
systeem, raadpleeg dan de installateur van het gehele systeem.
EN
IT
ES
PT
NL
FR
DE
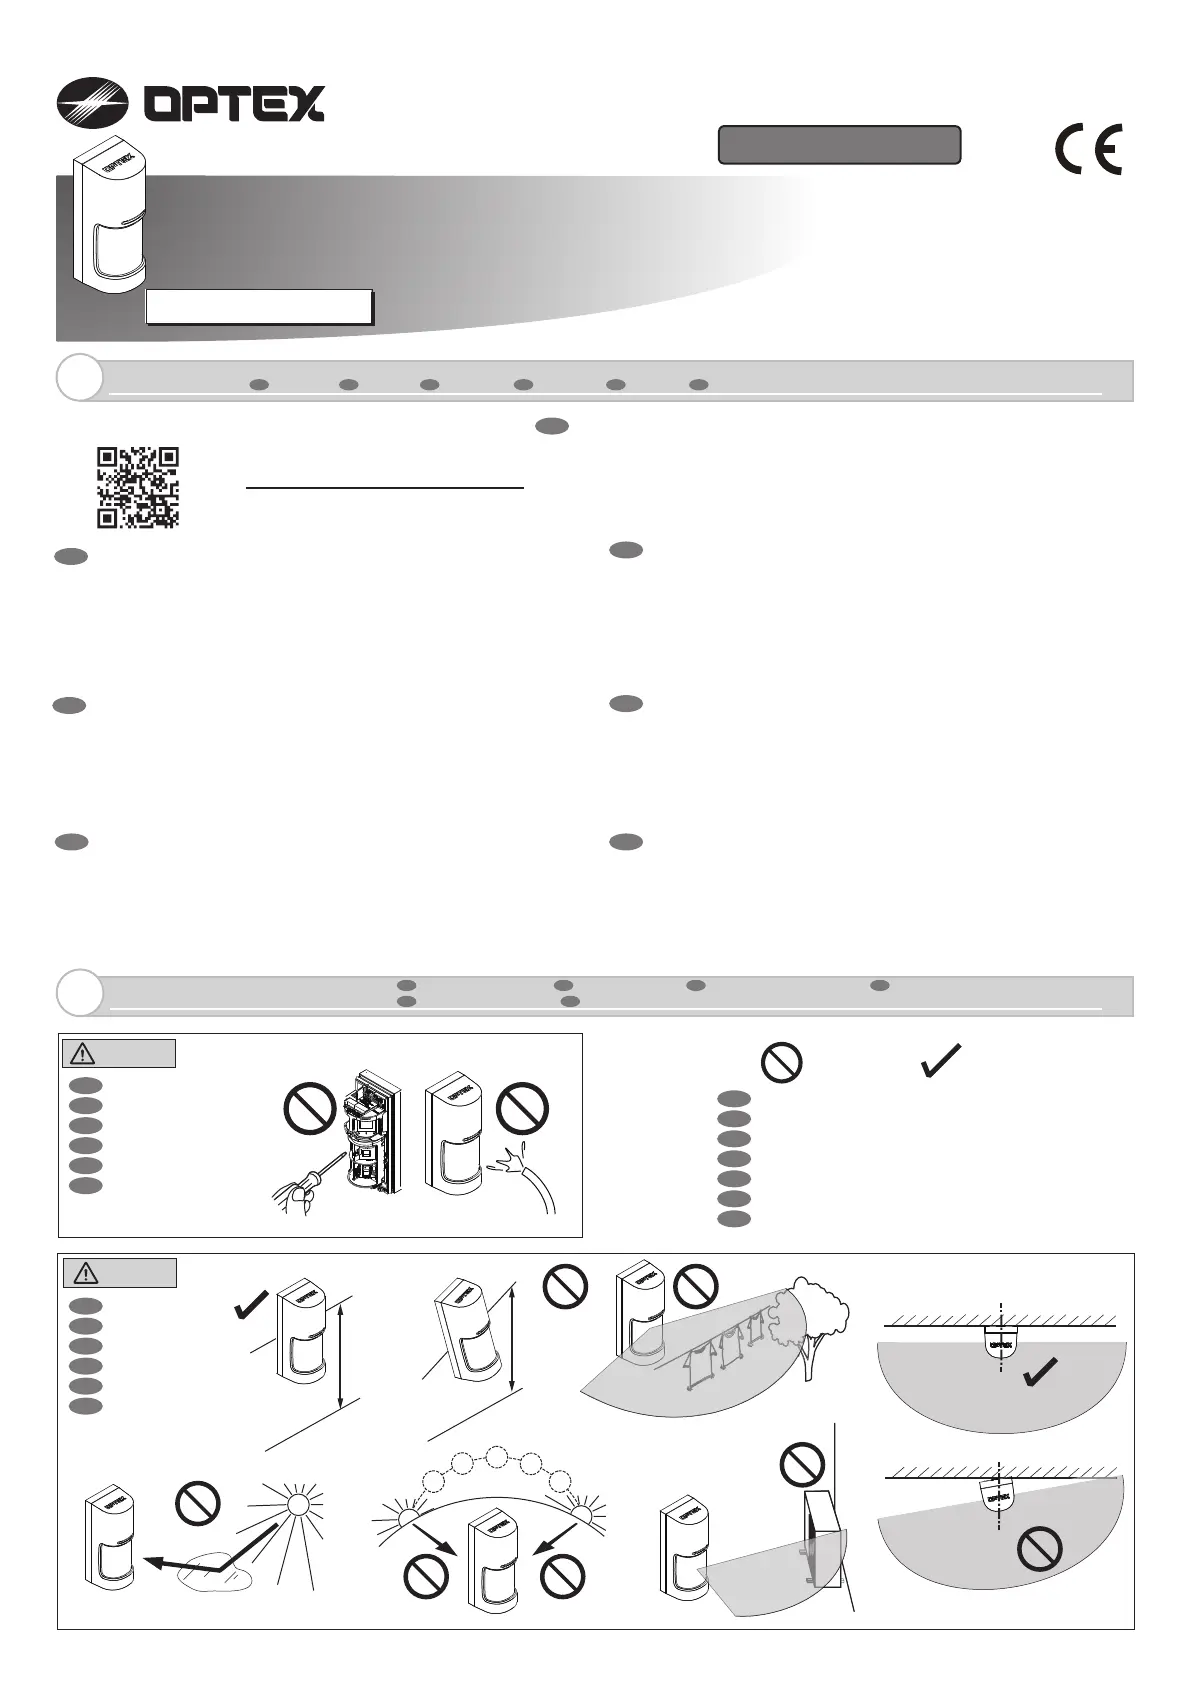
0.8 - 1.2 m
(2′7″-4′)
Parallel
Tilt
FR
Avertissement
DE
Warnung
IT
Avvertenza
ES
Aviso
PT
Aviso
NL
Waarschuwing
EN
Prohibition
FR
Interdiction
DE
Verbot
IT
Divieto
ES
Prohibición
PT
Proibição
NL
Verbod
Recommendation
Recommandation
Empfehlung
Raccomandazione
Recomendación
Recomendação
Aanbeveling
FR
Attention
DE
Vorsicht
IT
Attenzione
ES
Precaución
PT
Cuidado
NL
Voorzichtig
WXI-ST: Standard model
WXI-AM: +Anti-masking
180°WIDE ANGLE OUTDOOR DETECTOR
180°WIDE ANGLE OUTDOOR DETECTOR
WIRED MODEL
WX Infinity seriesWX Infinity series
Produktspecifikationer
| Varumärke: | Optex |
| Kategori: | Larmsystem |
| Modell: | WXI-AM |
Behöver du hjälp?
Om du behöver hjälp med Optex WXI-AM ställ en fråga nedan och andra användare kommer att svara dig
Larmsystem Optex Manualer

3 September 2025
3 September 2025
3 September 2025
6 December 2024
Larmsystem Manualer
Nyaste Larmsystem Manualer
2 April 2026
28 Mars 2026
27 Mars 2026
24 Mars 2026
16 Mars 2026
14 Mars 2026
10 Mars 2026
3 Mars 2026
2 Mars 2026
13 Februari 2026