Pearl Sports P-932 Bruksanvisning
Pearl Sports
trumset
P-932
Läs gratis den bruksanvisning för Pearl Sports P-932 (5 sidor) i kategorin trumset. Guiden har ansetts hjälpsam av 3 personer och har ett genomsnittsbetyg på 4.5 stjärnor baserat på 2 recensioner. Har du en fråga om Pearl Sports P-932 eller vill du ställa frågor till andra användare av produkten? Ställ en fråga
Sida 1/5

Congratulations on your purchase!
To get optimum performance from your P-932 / P-932L / P-931 Drum Pedal,
please read this Instruction Manual before playing.
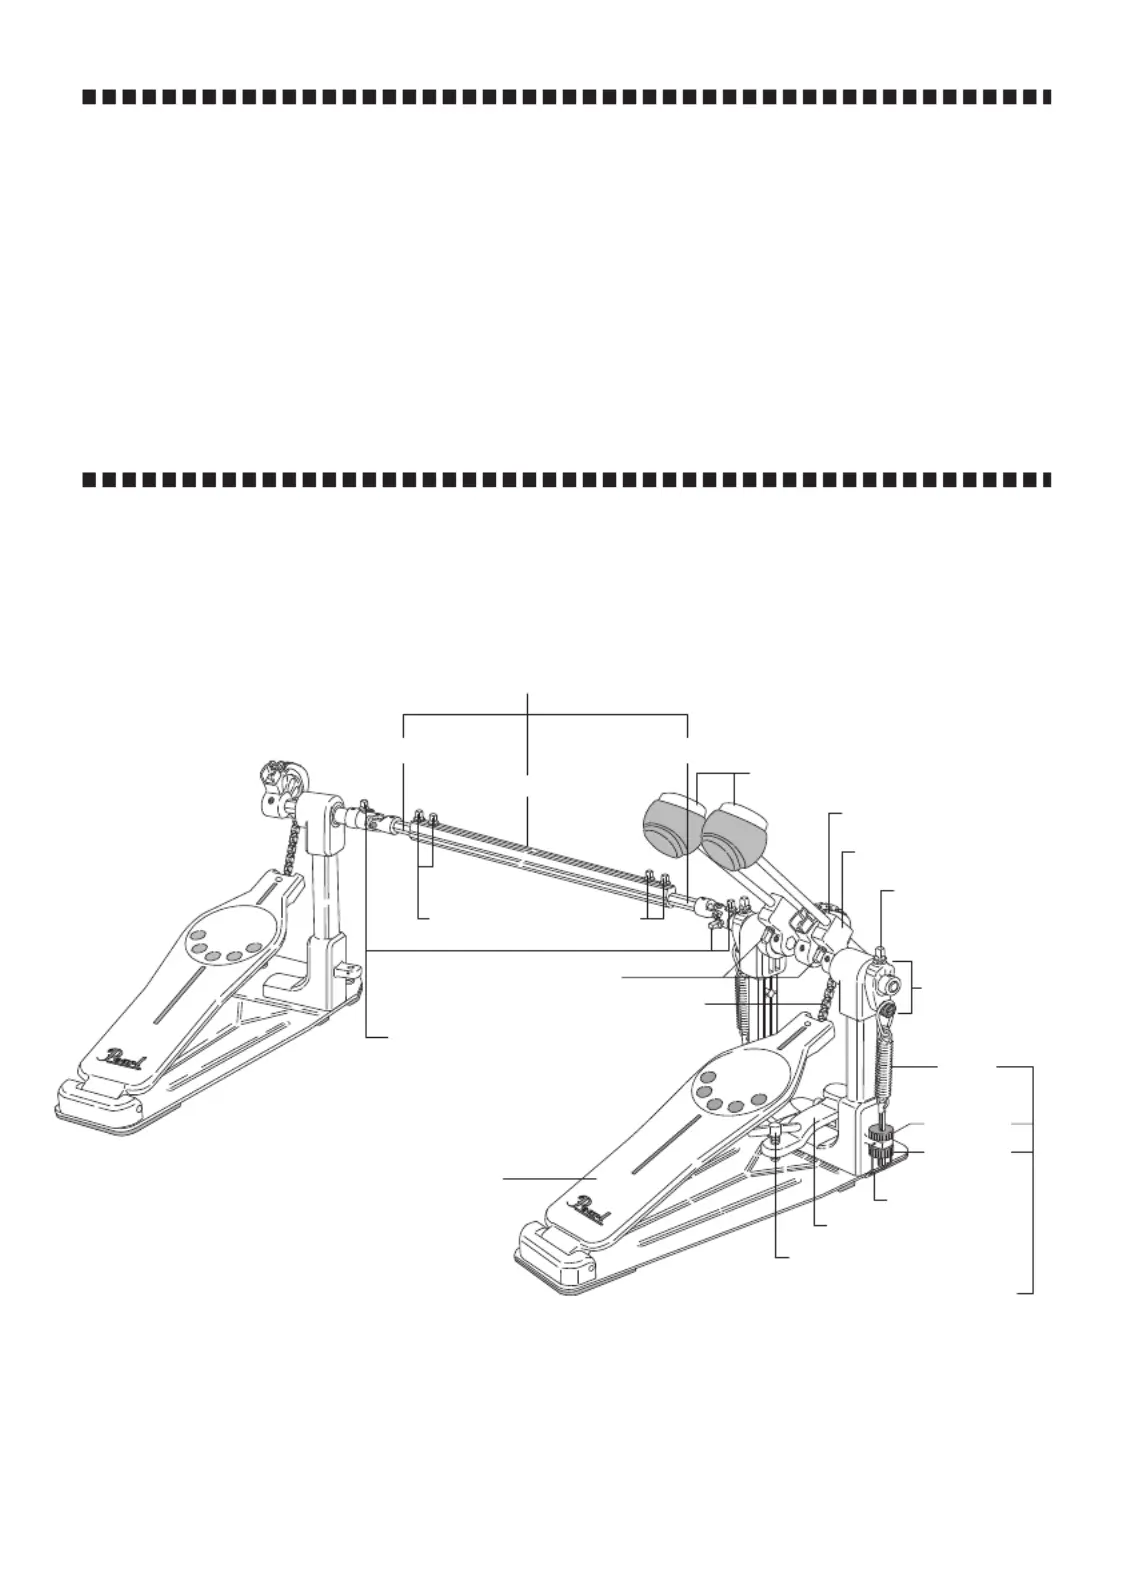
P-932/P-932L/931
PEARL DRUM PEDAL
Instruction Manual
Spring Assembly
Key Bolt
(for Beater Setting)
Hoop Clamp
Wing Bolt
Footboard
DuoBeat Beater (2-Surface Beater)
Drive Shaft Assembly
Drive Shaft Drive Shaft
Key Bolts
(for Drive Shaft Attachment)
Chain
Beater Holder Link
Key Bolt
(for Beater Angle
Adjustment)
Interchangeable Cam
Beater Angle Cam
Spring
Upper Nut
Lower Nut
Click Lock
Key Bolts
(for Adjusting Pedal Spacing)
Center Connecting Tube

AB
Beater Holder Link
DuoBeat Beater
Key Bolt
Fig. 2
Fig. 3
Key Bolt
DuoBeat Beater
Beater Angle Cam
Beater Angle Adjustment
Depending on your preference, the Beater can be
positioned closer or farther away from the Bass Drum Head.
This is accomplished by loosening the Key Bolt on the
Beater Angle Cam and swinging the Beater to the desired
angle. Re-tighten the Key Bolt to secure the angle (Fig.3).
Fig. 1
Surface Material
Felt Surface
Sound
Full,
Warm Sound
Surface Material
Plastic Surface
Sound
Sharper,
Punchier Sound
DuoBeat Beater (2-Surface Beater)
The DuoBeat Beater features a Felt Surface for a full, (A)
warm sound and a Plastic Surface for a sharper, (B)
punchier sound. Use the side that best suits your playing
style (Fig.1).
Beater Setting
Insert the shaft of the DuoBeat Beater into the Beater
Holder Link and tighten the Key Bolt with the provided
Drum Key to secure the Beater at the desired height.
Experiment with different Beater heights to find the best
combination of power and speed (Fig.2).
NOTE
If the Drive Shafts are extended too far, they will separate
from the Center Connecting Tube. Reassemble them with the
dots aligned as shown in Fig.6-B.
Connecting the Drive Shaft Assembly
Connect the ends of the Drive Shaft (A) to the short
extensions (B) on the Main and Slave Side Pedals. You may
need to rotate the Cam on the Slave Side Pedal to bring the
footboard of the Slave Side (left) Pedal to the proper playing
height (angle) before attaching the Drive Shaft Joints (A) to
both pedals. Tighten Key Bolt ① with the provided Drum
Key and then Key Bolt (Figs.4, 5).②
To adjust the length of the Drive Shaft, loosen the Key
Bolts on the Center Connecting Tube of the Drive Shaft
Assembly with the provided Drum Key and adjust the
distance between the Main Pedal and the Slave Side
Pedal to your liking. Make sure to re-tighten the Key Bolts
after making the adjustment (Fig.6-A).
Fig. 4
Fig. 5
Drive Shaft
Fig. 6-B
Fig. 6-A
B
A
Drive Shaft
Key Bolt
Key Bolt
Main Pedal
Slave Side Pedal
Drive Shaft
Center Connecting Tube
Key Bolt

Anchor Bolt
The Slave Side Pedal is
equipped with Anchor
Bolts with spikes for slip
resitance. Turn the
Bolts clockwise to
expose the spikes
(Fig.10).
Fig. 8
Hoop Clamp
Wing Bolt
Fig. 7-A
Fig. 7
Upper Nut
Spring
Lower Nut
Click Lock
Hoop Clamp Wing Bolt
Place the Pedal on the Bass Drum Hoop and square the
Pedal to the floor. Tighten the Wing Bolt to clamp the
Pedal firmly in place (Fig.8).
NOTE
Make sure to remove the Pedal when moving the Bass Drum
to prevent damage to the Bass Drum and the Pedal.
Spring Tension Adjustment
The P-932 Drum Pedal features Pearl’s patented Click
Lock spring tension retention system. To increase the
spring tension, disable the Click Lock by lifting the lever
upward, loosen the Upper Nut and press downwards.
Keep the position of the Upper Nut and tighten the Lower
Nut until the desired tension is achieved (Fig.7). To
decrease spring tension, disable the Click Lock by lifting
the lever upward, loosen the Upper Nut and loosen the
Lower Nut until the desired tension is achieved. When the
desired spring tension is achieved, tighten the Upper Nut
to keep the spring tension from loosening then press the
Click Lock lever down to engage the grooves around the
Lower Nut until you feel the lever "Click" (Fig.7-A). Before
playing, make sure that both Upper and Lower Nuts are
tight and the Click Lock lever is in a vertical position with
both sides of the lever engaged in the grooves around the
Lower Nut.
Anchor Bolt
The Spikes on the Anchror Bolts are sharp. Be careful not to
hurt yourself or others when using them. Use them only on
thick carpeted surface to prevent damage to the flooring
underneath.
CAUTION
Fig. 9-A Fig. 9-B
Fig. 10
Footboard
Footboard
Base Plate
Flat Head
Screw
Base Plate
Flat Head
Screw
PowerShifter
The P-932 Drum Pedal is equipped with Pearl's patented
PowerShifter Function that changes the leverage of the
Footboard and thus the feel of your pedal. By default, it's
set to the position (Fig.9-A). To change to the (A) (B)
position, remove the two Flat Head Screws under the
Base Plate using the provided Hex Wrench (3mm). Move
the Footboard toward the front of the pedal and insert the
guides under the Heel into the appropriate holes in the
Base Plate. Make sure the Heel is flush with the Base
Plate and reattach the Flat Head Screws (Fig.9-B). Tighten
the Screws securely with the provided Hex Wrench.
A
Light Feel
B
Heavy Feel
Produktspecifikationer
Varumärke: | Pearl Sports |
Kategori: | trumset |
Modell: | P-932 |
Behöver du hjälp?
Om du behöver hjälp med Pearl Sports P-932 ställ en fråga nedan och andra användare kommer att svara dig
trumset Pearl Sports Manualer
3 Augusti 2025
2 Augusti 2025
2 Augusti 2025
31 Juli 2025
31 Juli 2025
trumset Manualer
Nyaste trumset Manualer
1 Augusti 2025
31 Juli 2025
29 Juli 2025
28 Juli 2025