Proaim P-18 Bruksanvisning
Proaim
ej kategoriserat
P-18
Läs gratis den bruksanvisning för Proaim P-18 (4 sidor) i kategorin ej kategoriserat. Guiden har ansetts hjälpsam av 21 personer och har ett genomsnittsbetyg på 4.3 stjärnor baserat på 11 recensioner. Har du en fråga om Proaim P-18 eller vill du ställa frågor till andra användare av produkten? Ställ en fråga
Sida 1/4

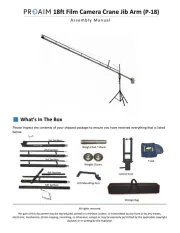
What s In The Box’
Please inspect the contents of your shipped package to ensure you have received everything that is listed
below.
All rights reserved.
No part of this document may be reproduced, stored in a retrieval system, or transmied by any form or by any means,
electronic, mechanical, photo copying, recording, or otherwise, except as may be expressly permied by the applicable copyright -
statutes or in wring by the Publisher.
Central Post
Weight Rod / Shank
Weight Closers
LCD Mounng Arm
Tools
1st Secon
2nd Secon
3rd Secon
4th Secon
5th Secon
18 t Film Crane Jib f Camera Arm (P-18)
A s s e m b l y M a n u a l
Storage Bag
Produktspecifikationer
| Varumärke: | Proaim |
| Kategori: | ej kategoriserat |
| Modell: | P-18 |
Behöver du hjälp?
Om du behöver hjälp med Proaim P-18 ställ en fråga nedan och andra användare kommer att svara dig
ej kategoriserat Proaim Manualer
30 September 2025
4 Juli 2025
ej kategoriserat Manualer
- Lovense
- LUXBIRD
- Zoll
- Elation
- Asko
- ARRI
- Insignia
- Nevadent
- Braun
- Warm Audio
- Siemens
- AS - Schwabe
- PCE Instruments
- Doyon
- EK Water Blocks
Nyaste ej kategoriserat Manualer

23 Oktober 2025
23 Oktober 2025
23 Oktober 2025
23 Oktober 2025
23 Oktober 2025
23 Oktober 2025
23 Oktober 2025
23 Oktober 2025
23 Oktober 2025
23 Oktober 2025