Protector C11-L Bruksanvisning
Protector Gasdetektor C11-L
Läs gratis den bruksanvisning för Protector C11-L (4 sidor) i kategorin Gasdetektor. Guiden har ansetts hjälpsam av 39 personer och har ett genomsnittsbetyg på 4.0 stjärnor baserat på 9 recensioner. Har du en fråga om Protector C11-L eller vill du ställa frågor till andra användare av produkten? Ställ en fråga
Sida 1/4
BATTERYPOWEREDCARBONMONOXIDE
ALARMC11-L
1MAINFEATURES:
1.Highaccuracyandsensitivity
2.Goodanti-jammingcapability
3.Reliablestabilityandreproducibility
4.LEDdisplayCOconcentration(3digitals)
5.Lowquiescentcurrent(≤20uA),energy-saving,longstandbytime
6.ThreeLEDstoindicatedierentstatus:power(green),alarm(red),
fault(yellow)
7.Easyinstallation,portable,idealforhomeandtravel
8.Test/Mutefunction/ManualReset
9.MemoryFunction
10.Lowbatterywarning
11.Sensorfaultsignalwarning
12.Batteryremovalwarning
13.Endofalarmlifewarning
Thisinstructionleaetcontainsimportantinformationonthe
correctinstallationandoperationofyourcarbonmonoxidealarm.
Readthisleaetfullybeforeattemptinginstallationandretainfor
futurereference.
2.SPECIFICATION
PowerSource:2pcsLR03sizeAAA1.5VPAIRDEERbattery
SensorType:Electrochemical
TypeofGassensed:CarbonMonoxide
Alarmactivation:30to49ppm(aer120minutes)
50ppmto99ppm(60to90minutes)
100ppmto299ppm(10to40minutes)
Above300ppm(0to180seconds)
OperationTemperature:-10to40℃℃
AmbientHumidity:15%to90%
HornLevel:85dBat1m(3.3feet)
ProductWeight:99gapprox
ProductSize:98mmx60mmx29mm
ProductLife:10years
3.WHATISCARBONMONOXIDE
CarbonMonoxide(CO)isaninsidiouspoisonthatisreleasedwhenfuels
areburnt.Itisacolourless,odourless,tastelessgasandthereforevery
diculttodetectwiththehumansenses.COkillshundredsofpeople
eachyearandinjuresmanymore.Itbindstothehemoglobininthe
bloodandreducestheamountofoxygenbeingcirculatedinthebody.In
highconcentrations,COcankillinminutes.COisproducedbythe
incompletecombustionoffuelssuchaswood,charcoal,coal,heatingoil,
paran,petrol,naturalgas,propane,butaneetc.
ExamplesofCOsources:
Runningengineingarage-Gasappliances
OilandGasfurnaces-Portablegenerators
Woodstoves-Gasorkeroseneheaters
BarbecuesCloggedchimneys
WoodandgasreplacesHeatingboiler
4.SYMPTOMSOFCOPOISONING
ThefollowingsymptomsmayberelatedtoCOpoisoning:
35ppmThemaximumallowableconcentrationforcontinuous
exposureforhealthyadultsinany8hourperiod.
200ppmSlightheadaches,fatigue,dizziness,nauseaaer2-3hours
400ppmFrontalheadacheswithin1-2hours,lifethreateningaer3
hours
800ppmDizziness,nauseaandconvulsionswithin45minutes.
Unconsciousnesswithin2hours,Deathwithin3hours.
1600ppmHeadache,dizzinessandnauseawithin20minutes.Death
within1hour
6400ppmHeadache,dizzinessandnauseawithin1-2minutes.
WARNING:Theapparatusmaynotpreventthechroniceectsof
carbonmonoxideexposure,andthattheapparatuswillnotfully
safeguardindividualsatspecialrisk.Itmaynotfullysafeguard
individualswithspecicmedicalconditions.Ifindoubt,consultamedical
practitioner.
5.LOCATINGTHECOALARM
C11-LCarbonMonoxidealarmisdesignedtodetectthetoxicCOfumes
thatresultfromincompletecombustion,suchasthoseemittedfrom
appliances,furnaces,replaceandautoexhaust.
NOTE:Formaximumprotectionanalarmshouldbettedinornear
everyroomthatcontainsafuel-burningappliancesuchasanygasres,
centralheatingboilers,room
heaters,waterheaters,cookers,grills,etc.
WARNING:Thisalarmwillonlyindicatethepresenceofcarbon
monoxidegasatthesensor.Carbonmonoxidegasmaybepresentin
otherareas.
ACARBONMONOXIDEALARMDOESNOTFUNCTIONASA
REPLACEMENTFORASMOKEORGASDETECTOR.
6.Locationofthecarbonmonoxidedetector
6.1General
Thedesignandlayoutofdomesticpremisesandthenumber,typeand
positionofcarbonmonoxidesourcesvarywidely.However,general
guidanceisgivenonwhereandwherenottolocatetheapparatusin
ordertominimisetheriskofmisleadingindications.
6.2Whichroom?
Ideally,anapparatusshouldbeinstalledineveryroomcontainingafuel-
burningappliance.Additionalapparatusmaybeinstalledtoensurethat
adequatewarningisgivenforoccupantsinotherrooms,bylocating
apparatusin:
•remoteroomsinwhichtheoccupant(s)spendconsiderabletimewhilst
awakeandfromwhichtheymaynotbeablehearanalarmfrom
apparatusinanotherpartofthepremisesand
•everysleepingroom
•However,ifthereisafuelburningapplianceinmorethanonerooman
thenumberofapparatusislimited,thefollowingpointsshouldbe
consideredwhendecidingwherebesttoputtheapparatus:
•locatetheapparatusinaroomcontainingauelessoropen-ued
appliance,and
•locateapparatusinaroomwheretheoccupant(s)spendmosttime.
Ifthedomesticpremisesisabedsit(asingleroomservingasbothsitting
andbedroom)thentheapparatusshouldbeputasfarfromthecooking
appliancesaspossiblebueneartowherethepersonsleeps.
Iftheapplianceisinaroomnotnormallyused(forexampleaboiler
room),theapparatusshouldbeputjustoutsidetheroomsothatthe
alarmmaybeheardmoreeasily.Alternatively,aremotealarmsirenmay
beconnectedtoatypeAapparatuslocatedinaroom(s)containinga
fuel-burningappliance.
6.3Whereintheroom?
Itshouldbepossibletoviewallthelightindicatorswheninthevicinity
ofthechosenlocationfortheapparatus.
Itisnotpossibletogivespecicguidanceontheexactlocationofa
detectorwhichsuitsalltypesofroomandtheirusage.Thefollowing
pointsshouldbetakenintoconsiderationwhendeterminingan
optimumlocationforanyappropriatesituation.
6.3.1Wherenottoinstalltheapparatus
Theapparatusshouldnotbeinstalled:
•inanenclosedspace(forexampleinacupboardorbehindacurtain)
•whereitcanbeobstructed(forexamplebyfurniture)
•directlyaboveasink
•nexttoadoororwindow
•nexttoanextractorfan
•nexttoanairventorothersimilarventilationopenings
•inanareawherethetemperaturemaydropbelow-10°Corexceed
40°C,unlessitisdesignedtodoso
•wheredirtandustmayblockthesensor
•inadamporhumidlocation
•intheimmediatevicinityofthecookingappliance
6.3.2Apparatuslocatedinthesameroomasafuel-burning
appliance
Iftheapparatusislocatedonawall:
a)itshouldbelocatedclosetotheceiling;
b)itshouldbelocatedataheightgreaterthantheheightofanydooror
window.
Aceilingmountedapparatusshouldbeatleast300mmfromanywall,
andforawallmountedapparatusitshouldbeatleast150mmfromthe
ceiling.Theapparatusshouldbeatahorizontaldistanceofbetween1m
and3mfromthepotentialsource.
Ifthereisapartitioninaroom,theapparatusshouldbelocatedonthe
samesideofthepartitionasthepotentialsource.
CarbonMonoxidealarmsinroomswithslopedceilingsshouldbe
locatedatthehighsideoftheroom.
WARNING:Thiscarbonmonoxidealarmisdesignedforindooruseonly.
Donotexposetorainormoisture.Itwillnotprotectagainsttheriskof
carbonmonoxidepoisoningwhenthebatteryhasdrained.Donotopen
ortamperwiththealarmasthiscouldcausemalfunction.
7.INSTALLINGTHECOALARM
WARNING:Theapparatusshouldbeinstalledbyacompetentperson.
ThisCOalarmispoweredbybatteryandrequiresnoadditionalwiring.It
caneitherbeinstalledonthewallusingthexingsprovidedorona
tabletop.
7.1WallMountInstallation:
Havingestablishedthemountinglocationensurethatthereisno
electricalwiringorpipeworkintheareaadjacenttothemounting
surface(g1).
Markthetwomountingholelocations.
Drillholesinthepositionsmarked.
Screwtightthescrewsintothedrilledholes,andkeepthesteelscrews
outfor4mm.
Insert2pcsLR03sizeAAA1.5Vbatteriesrmlyintobatterycompartment
ontherearofthedetector.
7.2TabletopInstallation:
JustplacetheCOalarmonthetable,sothattheuserscanseeLEDS
clearly.
WARNING:Installationoftheapparatusshouldnotbeusedasa
substituteforproperinstallation,useandmaintenanceoffuelburning
appliancesincludingappropriateventilationandexhaustsystems.
8.OPERATINGYOURCOALARM
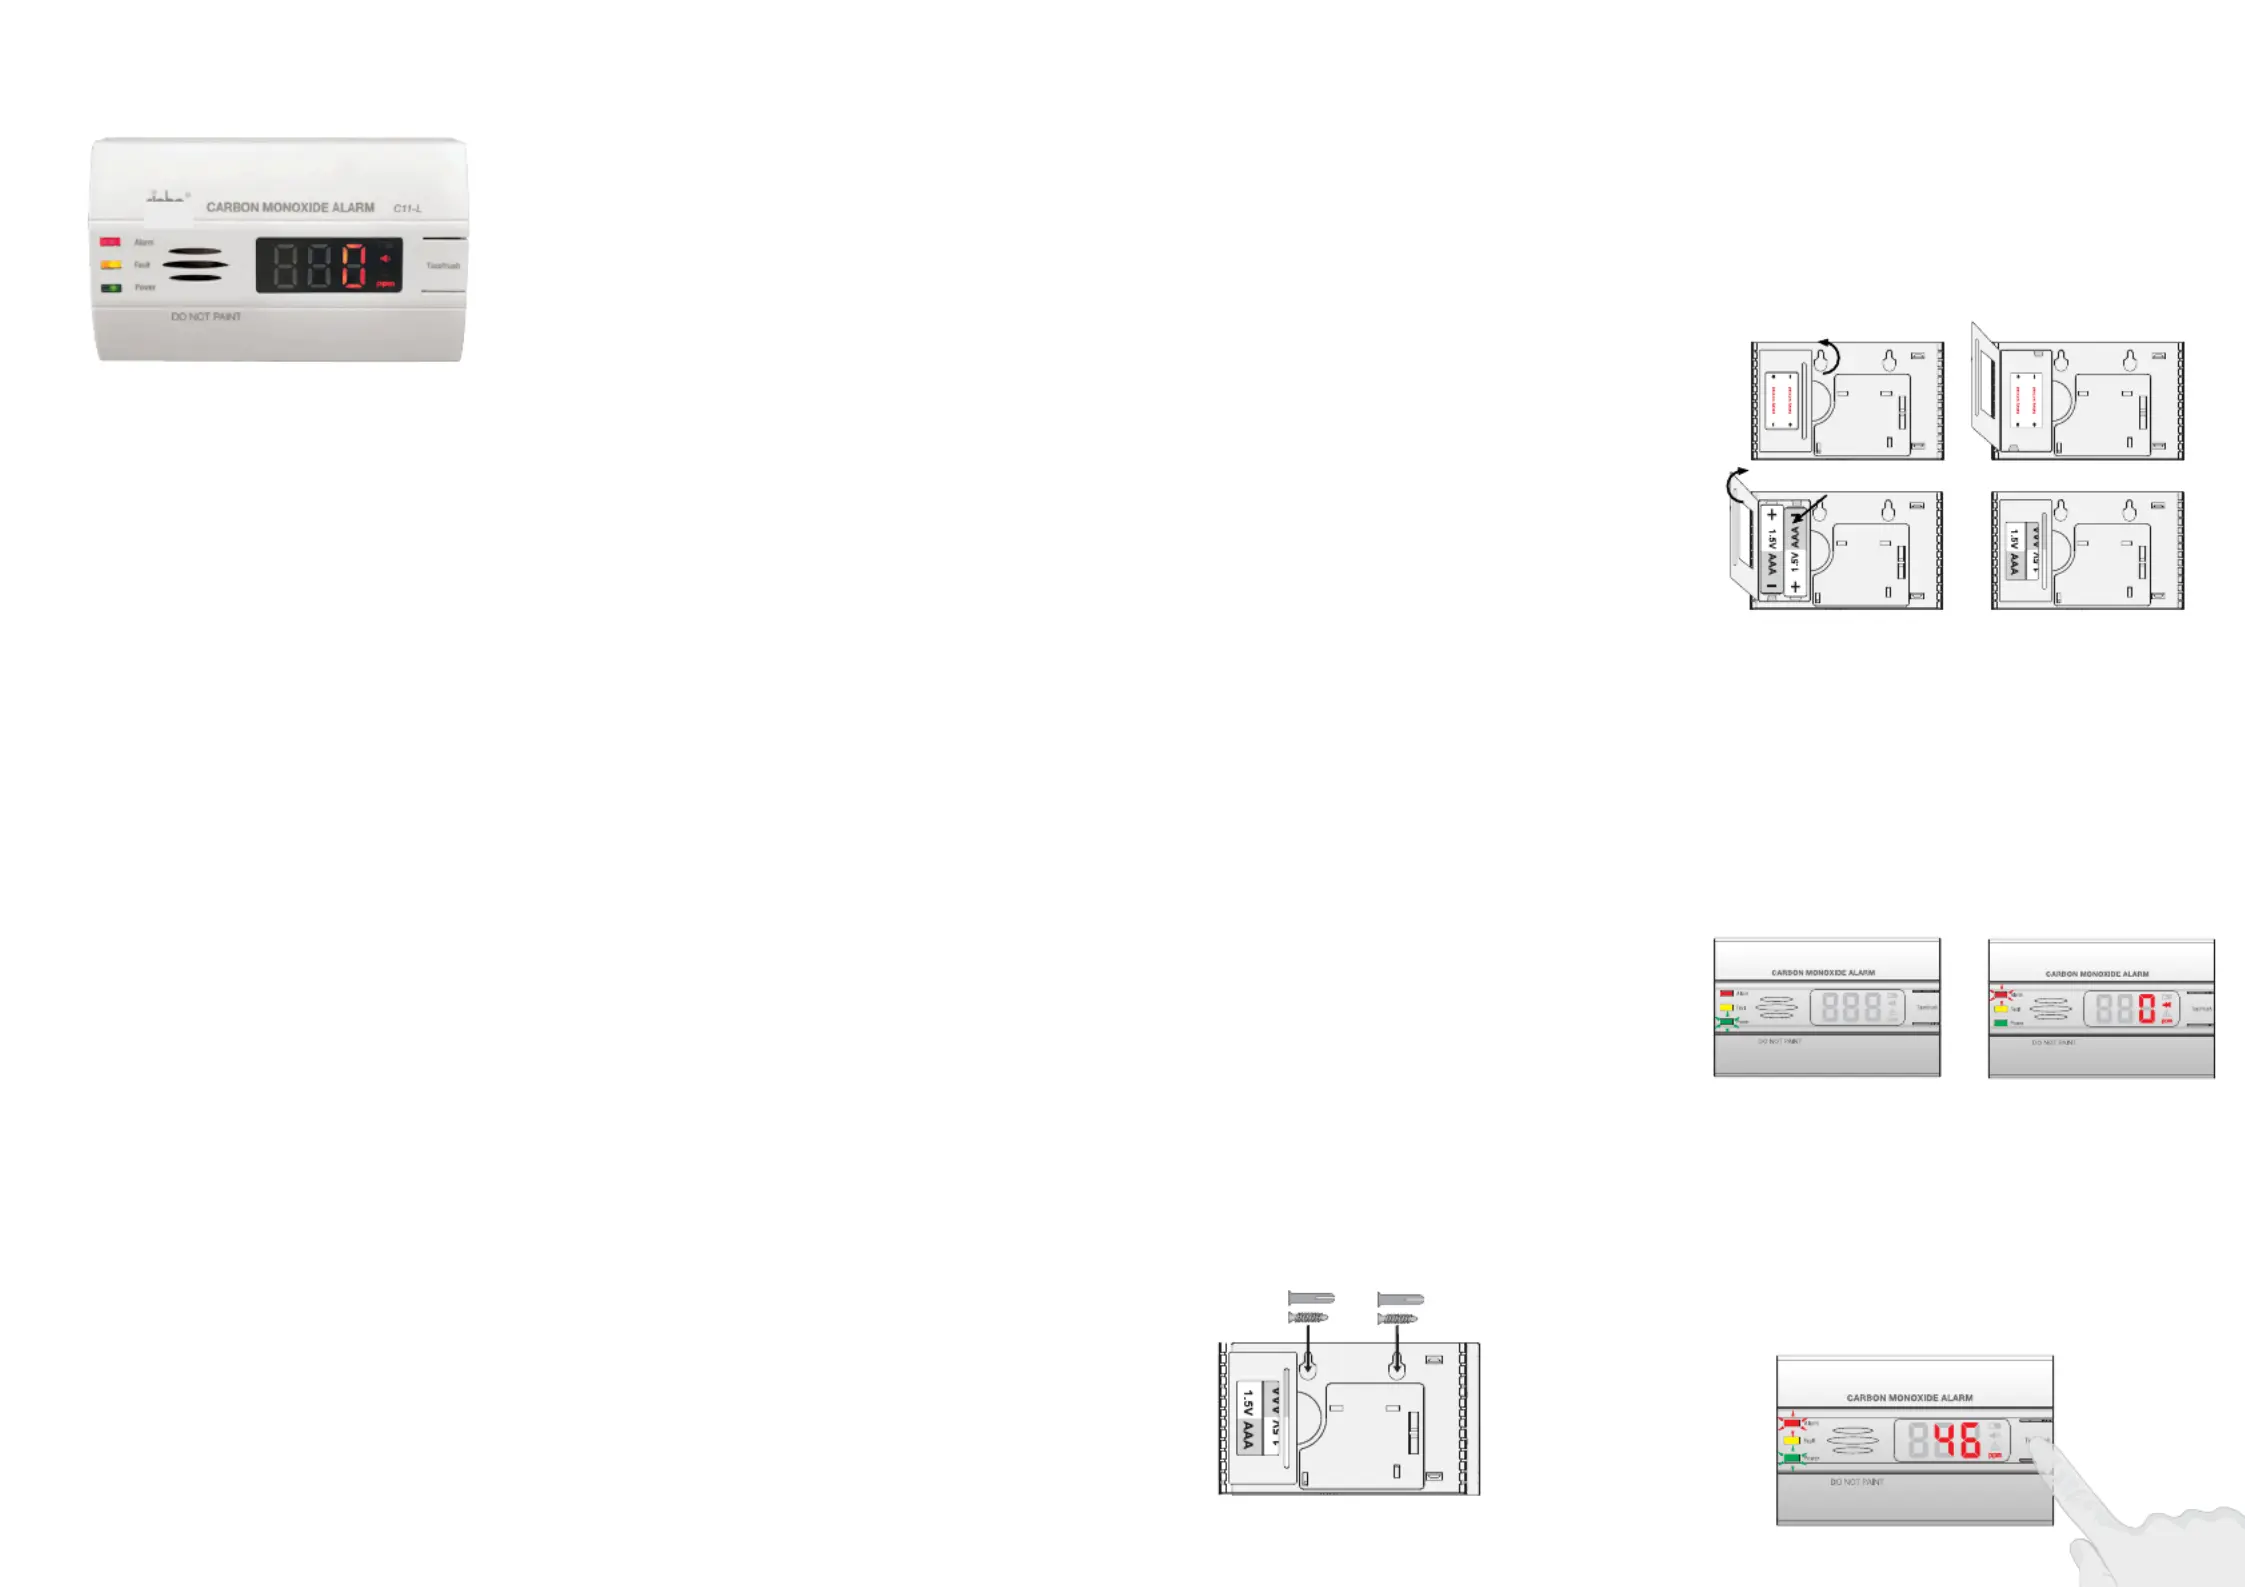
8.1Installbatteries
Thisalarmispoweredby2pcsLR6sizAAA1.5Vbattery,openthebattery
compartmentontherearofthedetectorandinstallthebatteries(seeg
2-5).PAYATTENTIONTOTHEPOLARITYCONNECTIONANDCLOSETHE
BATTERYCOMPARTMENT.
8.2Warmup
Aerthebatteriesareinstalled,thegreen,yellowandredlightsofthe
productareilluminatedinturn,andthenenterthepreheating
countdown,andthewarm-uptimeis120s.
8.3Standbymode
Whennocarbonmonoxideispresent,thegreenLEDashesonceabout
EVERY59SECONDS(seeg6).
8.4TestyourCOalarm
PresstheTESTbuttontoenterthetestmode.Atthistime,thegreen
andyellowlightsarealwayson,theredlightisashing,andtheproduct
simulatesanalarm(seeg7).
NOTE:Thoughthisalarmcanself-diagnosetheamplifyingcircuitand
sensor,itisrecommendedthatyoutestyourCOalarmonceamonthto
ensurethealarmisworkingcorrectly.
8.5Mutefunction
8.5.1EntryCondition
a)Inthealarmstate,iftheconcentrationislowerthan50PPM,pressthe
testbutton(seeFigure8),itwillenterthealarmmutemode,thered
LEDandthegreenLEDwillashonceevery10seconds.
Fig.1
C11-L
Fig.2
Fig.3
Fig.4
Fig.5
Fig.6
Fig.7
Flashesevery59Seconds
C11-L
C11-L
Produktspecifikationer
| Varumärke: | Protector |
| Kategori: | Gasdetektor |
| Modell: | C11-L |
Behöver du hjälp?
Om du behöver hjälp med Protector C11-L ställ en fråga nedan och andra användare kommer att svara dig
Gasdetektor Protector Manualer

12 December 2024
Gasdetektor Manualer
Nyaste Gasdetektor Manualer
1 April 2025
27 Mars 2025
29 December 2024
28 December 2024
22 December 2024
16 December 2024
25 Oktober 2024
22 Oktober 2024
26 September 2024
26 September 2024