RTS KP-5032PB Bruksanvisning
RTS ej kategoriserat KP-5032PB
Läs gratis den bruksanvisning för RTS KP-5032PB (2 sidor) i kategorin ej kategoriserat. Guiden har ansetts hjälpsam av 13 personer och har ett genomsnittsbetyg på 4.6 stjärnor baserat på 2 recensioner. Har du en fråga om RTS KP-5032PB eller vill du ställa frågor till andra användare av produkten? Ställ en fråga
Sida 1/2
Quick Start Guide
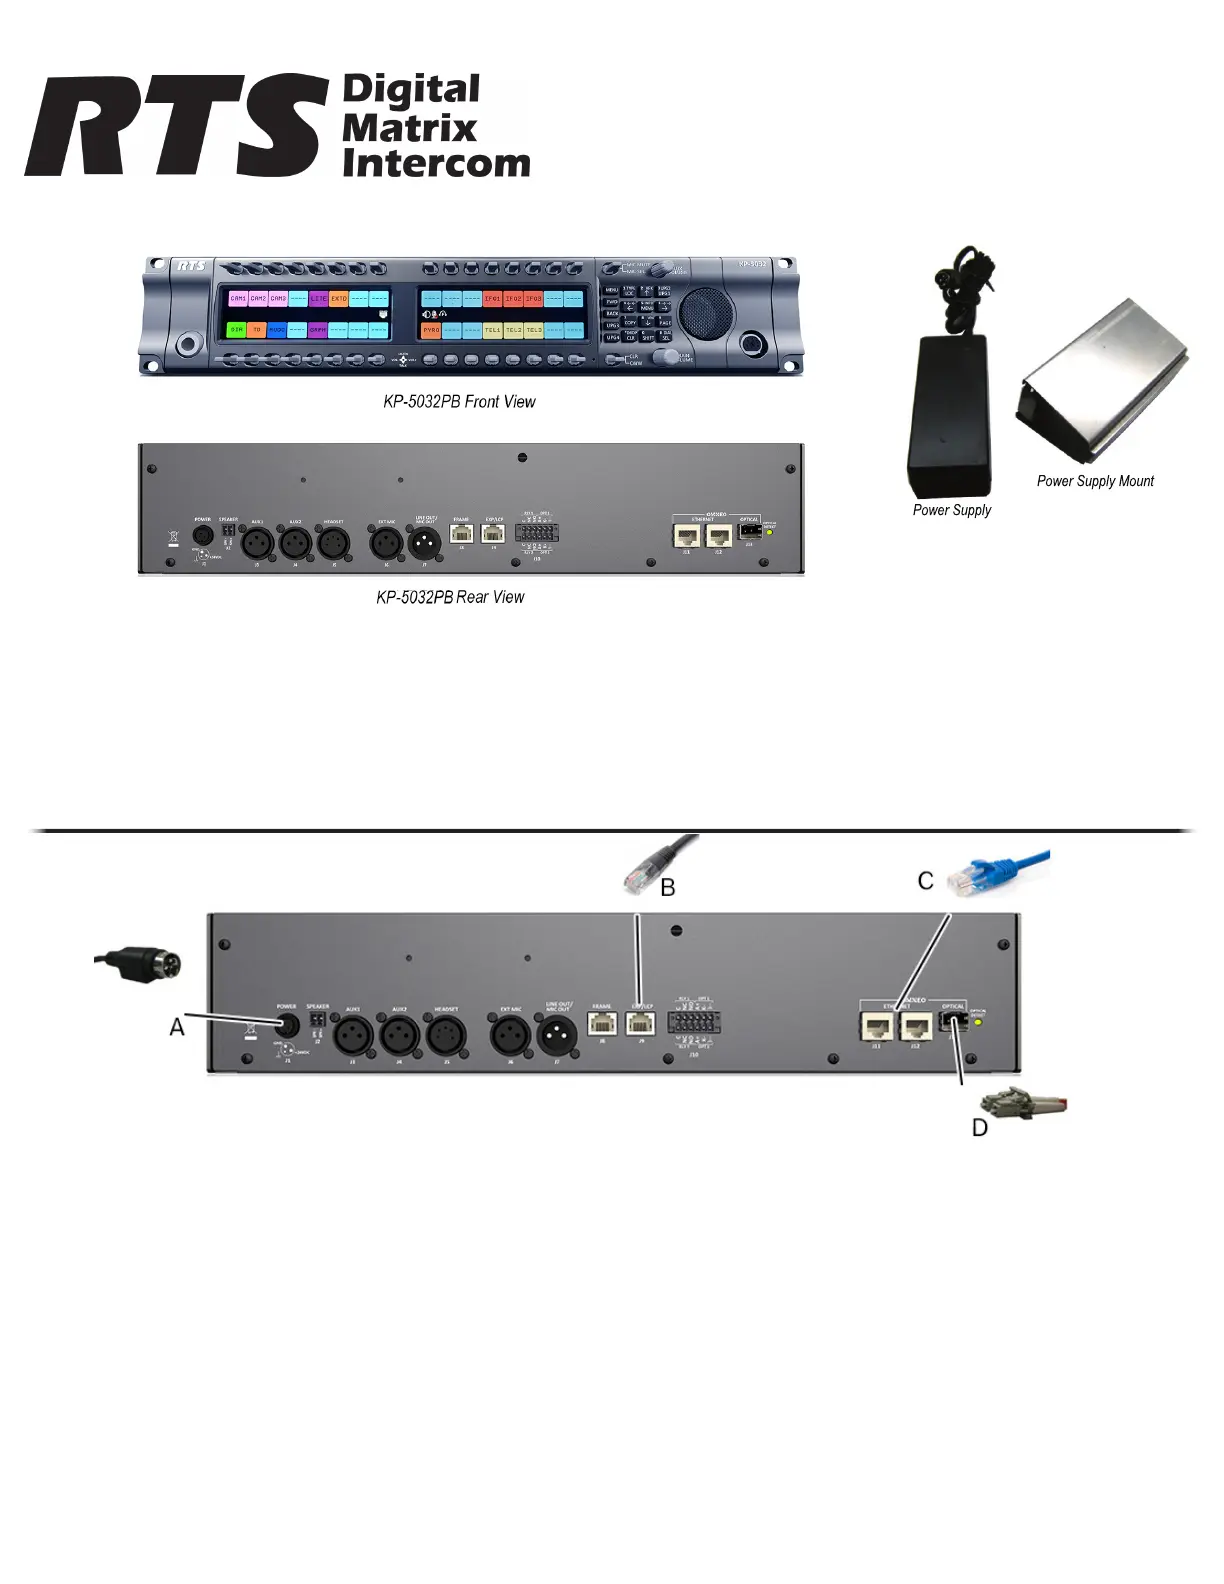
KP-5032 Push Button
Keypanel
Included:
• ASSY KP-5032PB KEYPANEL
• POWER SUPPLY 60W 24V @0~2.5A
• KP-OEI2 POWER SUPPLY MOUNTING BRACKET
• Safety Instructions
• LIT Quick Start Guide F / RP5032
• RTS ADDITIONAL WEBSITE INFORMATION
• 2–POSITION, 2–CONTACT TERMINAL PLUG
• 6–POSITION, 12–CONTACT TERMINAL PLUG
Requirements:
• AZedit V 5.0.0 or later
• IPedit V 3.2.0 or later
• MCII-e V 3.2.0 or later
• AIO-16 V 1.6.0 or later
• FWUT V 3.0.3 or later
• DNS-SD V 3.0.3 or later
• OMI V 5.1.5 or later
Installation
IMPORTANT: If you plan to use the Power Supply Mounting Bracket, we recommend you install the mounting bracket before
cabling the keypanel. For detailed information, refer to the KP-Series Technical Manual.
To install the KP-5032PB, do the following:
1. On the rear panel of the KP-5032PB, plug the 24 Vdc power connector (A) of the power supply into the power connector on the
back panel of the unit.
2. Connect an RJ-12 or RJ-45 (568B or USOC) cable (B) with RTS cabling to the J8 FRAME connector on the rear panel. (analog)
OR
Connect an CAT-5e cable (C) to either J11 or J12 ETHERNET connector on the rear panel. (OMNEO CAT-5e)
IMPORTANT:IfyouhavetheoptionalJ13berconnectorinstalled,connectaberconnector(D)totheOPTICALber
connector on the rear panel. (OMNEO Fiber)
3. Once the unit is cabled, plug the other end of AC power supply cord into the wall outlet or power strip.
Produktspecifikationer
| Varumärke: | RTS |
| Kategori: | ej kategoriserat |
| Modell: | KP-5032PB |
Behöver du hjälp?
Om du behöver hjälp med RTS KP-5032PB ställ en fråga nedan och andra användare kommer att svara dig
ej kategoriserat RTS Manualer

27 September 2025
27 September 2025
27 September 2025
26 September 2025
21 September 2025
20 September 2025
20 September 2025
19 September 2025
19 September 2025
18 September 2025
ej kategoriserat Manualer
Nyaste ej kategoriserat Manualer
3 April 2026
3 April 2026
3 April 2026
3 April 2026
3 April 2026
3 April 2026
3 April 2026
3 April 2026
3 April 2026