Savio AE-03 Bruksanvisning
Savio Kontroller AE-03
Läs gratis den bruksanvisning för Savio AE-03 (2 sidor) i kategorin Kontroller. Guiden har ansetts hjälpsam av 41 personer och har ett genomsnittsbetyg på 4.2 stjärnor baserat på 9 recensioner. Har du en fråga om Savio AE-03 eller vill du ställa frågor till andra användare av produkten? Ställ en fråga
Sida 1/2
1. Package contents:
• SAVIO AE-03 Timer with LCD screen
• User manual
2. Technical specification:
• Rated voltage: 230 V~, 50 Hz
• Max load: 3680 W
• Max current: 16 A
• ON / OFF programs: 10
• Operating temperatures: -10°C — +40°C
• Battery: Ni-MH 1.2V > 100 days reserve time
• Accuracy: +/- 1 minute per month
• Socket standard: CEE 7/5 (E)
• Plug standard: CEE 7/7 (E/F)
• Size: 61 × 76 × 135 mm
• Weight: 165 g
3. Installation of the device:
3.1 The device is equipped with batteries so that it can be programmed
without being plugged in.*
3.2 Set up the device for your needs by referring to the following steps of the
user manual.
3.3Connect the SAVIO AE-03 timer to the 230 V socket and then connect the
device which work you want to measure.
* If the battery is discharged, connect the AE-03 to the power supply to re-
charge it.
4. Initial configuration:
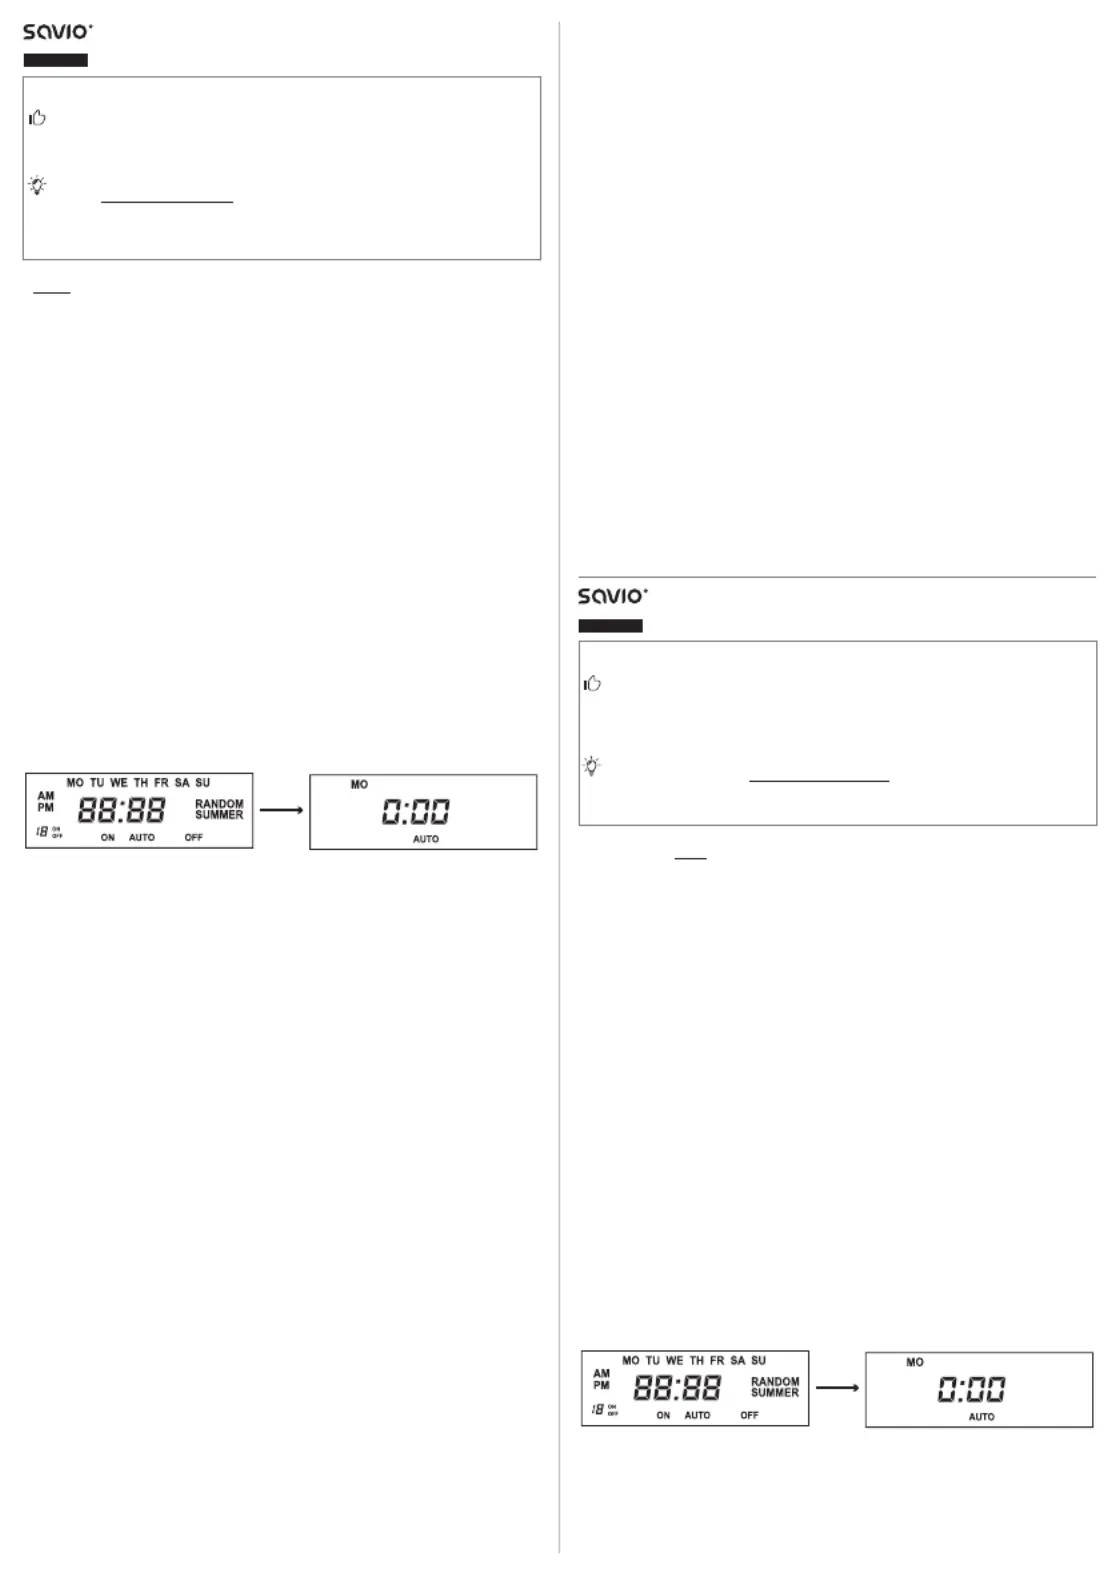
4.1 To clear all settings, use the object that fits in the RESET slot and press the
button. The LCD display will show information, as shown in Fig.1 and the
unit will automatically enter clock mode, as shown in Fig.2.
Fig.1 Fig.2
4.2Changing the time (winter / summer time):
To switch between winter time and summer time, press and hold the
CLOCK button and then press the ON / AUTO / OFF button. If summer
time is selected, the display will show “SUMMER” “, while if winter time is
selected, “SUMMER” will disappear.
4.3 Selecting 12 / 24-hour mode:
To switch between 12 and 24-hour mode, press and hold the CLOCK and TIMER
button simultaneously. For 12-hour mode, the display will show the following
symbols depending on the time of day: AM - before noon and PM - after
noon, and the displayed time will be operated in the range: 12:00 to 11:59 p.m.
In 24-hour mode, the time displayed will be in the range: 0:00 - 23.59.
5. Setting the digital clock:
The LCD display shows the day, hour and minutes.
5.1To set the day, press the CLOCK and WEEK buttons simultaneously (chang-
ing the day to the next day is possible by: pressing the CLOCK and WEEK
buttons again / holding down the CLOCK button and pressing the WEEK
button / pressing and holding down the CLOCK and WEEK buttons).
5.2To set the time, press the CLOCK and HOUR buttons simultaneously
(changing the time is possible by: pressing the CLOCK and HOUR buttons
again / holding down the CLOCK button and pressing the HOUR button /
pressing and holding down the CLOCK and HOUR buttons).
5.3To set the minutes, press the CLOCK and MINUTE buttons simultaneously
(changing the minutes is possible by: pressing the CLOCK and MINUTE
buttons again / holding the CLOCK button and pressing the MINUTE button
/ pressing and holding the CLOCK and MINUTE buttons).
6. Setting the timer:
6.1Press the TIMER button to enter the setting mode of programmes num-
bered 1 to 10. The ON sign next to the number of the certain programme
indicates the start time of the device. The OFF sign next to the program
number informs about the end of the device’s operation.
6.2
Press the WEEK button to select the group of days for which you wish to
program the unit. The days are marked in English, starting with Monday (MO).
6.3Press the HOUR button to set the time.
6.4Press the MINUTE button to set the minutes.
6.5Press the TIMER button to proceed to the setting of the next programme.
6.6When the programme setting stage is complete, press the CLOCK button
or wait 30 seconds to return to the main screen.
Additional notes:
• To delete / return to the last settings press the RES / RCL button.
• Holding down the buttons: HOUR, MINUTE or TIMER for more than 3 seconds
will accelerate the setting of the individual values.
7. Operating modes:
To set the individual operating mode press the button: ON / AUTO / OFF. The
selected operating mode symbols will appear on the LCD display:
1. Zawartość zestawu:
• SAVIO AE-03 Timer with LCD screen
• User manual
2. Specyfikacja techniczna:
• Napięcie nominalne: 230 V~, 50 Hz
• Maksymalne obciążenie: 3680 W
• Maksymalny prąd: 16 A
• Temperatura pracy: -10°C — +40°C
• Ilość programów włączania / wyłączania: 10
• Bateria: Ni-MH 1.2V > 100 dni rezerwy
• Dokładność: +/- 1 minuta na miesiąc
• Standard gniazda: CEE 7/5 (E)
• Standard wtyczki: CEE 7/7 (E/F)
• Wymiary: 61 × 76 × 135 mm
• Waga: 165 g
3. Instalacja urządzenia:
3.1 Urządzenie wyposażone jest w baterie, dzięki czemu możemy je zapro-
gramować bez konieczności podłączania go do prądu.*
3.2 Skonfiguruj urządzenie dla swoich potrzeb zapoznając się z poniższymi
punktami instrukcji obsługi.
3.3Podłącz programator czasowy SAVIO AE-03 do gniazdka 230 V, a następ-
nie podepnij urządzenie, którego pracę chcesz kontrolować.
* W przypadku rozładowania się baterii podłącz urządzenie AE-03 do prądu
w celu jej naładowania.
4. Wstępna konfiguracja:
4.1 W celu usunięcia wszystkich ustawień, użyj przedmiotu mieszczącego się
w polu RESET i wciśnij przycisk. Na wyświetlaczu LCD pokażą się informacje,
jak pokazano na Rys.1, a urządzenie automatycznie przejdzie do trybu
zegara, jak pokazano na Rys.2.
Rys.1 Rys.2
4.2Zmiana czasu (zimowy / letni):
Aby przełączyć pomiędzy czasem zimowym a czasem letnim, naciśnij
i przytrzymaj przycisk CLOCK, a następnie naciśnij przycisk ON / AUTO
/ OFF. W przypadku wyboru czasu letniego na wyświetlaczu pojawi się
napis „SUMMER” ”, natomiast w przypadku wyboru czasu zimowego napis
„SUMMER” zniknie.
4.3 Wybór trybu 12 / 24 –godzinnego:
Aby przełączyć między trybem 12 a 24 - godzinnym, naciśnij i przytrzymaj
7.1AUTO: the unit will operate according to the set programmes.
7.2ON: the appliance will always be switched on.
7.3OFF: the device will always be switched off.
8. The Random ON / OFF function (anti-tampering function):
This function only works with programs set between 6:31 pm and 5:30 am the
next day. In this mode, the timer will randomly turn on and off up to half an hour
earlier / later than the assigned ON / OFF setting.
8.1Set the program and make sure it is within the range of 6:31 pm to 5:30 am
of the next day and then use the RANDOM button to enable the random
ON / OFF functions. The LCD display will show RANDOM, indicating that the
function is active.
8.2If you want to set several programs to operate in random mode, make
sure that the turn-off time of the first program is at least 31 minutes
different from the turn-on time of the next program.
8.3To cancel the random ON / OFF function, simply press the RANDOM button
again and the icon will disappear from the display.
9. Additional notes:
The timer will automatically reset in the following situations:
• Unstable current or voltage.
• Poor connection between the timer and the device.
• Bad condition of the connected device.
• Lightning strike.
• If the timer resets automatically, follow the user manual to reprogram it.
10. Safety conditions:
•
Use the product for its intended purpose, as improper use may damage
the product.
• Do not expose the device to moisture, heat, sunlight or use the product in
a dusty environment.
• Clean the device only with a dry cloth.
• Making repairs or modifications to the device yourself will void the warranty
and may damage the product.
• Hitting or dropping the product may damage it.
•
Ensure that the appliance connected to the timer does not create a load
greater than 3680 watts.
ENGLISH
Timer with LCD screen
model: AE-03
User manual
Thank you for choosing Savio product!
If our product meets your expectations, share your opinion with other
people on the portal ceneo.pl, social media or on the website of the
store where you made the purchase. If you want to show our device on
SAVIO Facebook Page, we will be very pleased.
If there is something that we could improve on our products, please write
to us at support@savio.net.pl
Thanks to your feedback, we will be able to better adapt the product to your
expectations.
Before starting the use of purchased device it is recommended to read the
whole manual.
1
Programator czasowy z wyświetlaczem LCD
model: AE-03
POLSKI
Instrukcja obsługi
Przed przystąpieniem do korzystania z zakupionego urządzenia zaleca się
przeczytanie całej instrukcji obsługi.
Dziękujemy za zakup produktu marki Savio!
Jeśli nasz produkt spełnił Twoje oczekiwania, podziel się swoją opinią z in-
nymi osobami na portalu ceneo.pl, w mediach społecznościowych lub
na stronie sklepu, w którym dokonałeś zakupu. Będzie nam niezmiernie
miło, jeśli zechcesz również pochwalić się naszym urządzeniem na profilu
SAVIO na Facebooku.
Jeśli jest coś, co moglibyśmy poprawić w naszych produktach, napisz
nam o tym na adres: [email protected]
Dzięki Twojej opinii będziemy mogli jeszcze lepiej dopasować produkt
do Twoich oczekiwań.
Produktspecifikationer
| Varumärke: | Savio |
| Kategori: | Kontroller |
| Modell: | AE-03 |
Behöver du hjälp?
Om du behöver hjälp med Savio AE-03 ställ en fråga nedan och andra användare kommer att svara dig
Kontroller Savio Manualer

23 September 2024
Kontroller Manualer
Nyaste Kontroller Manualer
2 April 2026
1 April 2026
28 Mars 2026
15 Mars 2026
14 Mars 2026
1 Mars 2026
19 Februari 2026
6 Februari 2026