Star Micronics mC-Print2 Bruksanvisning
Star Micronics Skrivare mC-Print2
Läs gratis den bruksanvisning för Star Micronics mC-Print2 (3 sidor) i kategorin Skrivare. Guiden har ansetts hjälpsam av 40 personer och har ett genomsnittsbetyg på 4.6 stjärnor baserat på 8 recensioner. Har du en fråga om Star Micronics mC-Print2 eller vill du ställa frågor till andra användare av produkten? Ställ en fråga
Sida 1/3
Connecting a Tablet or PC to the Printer
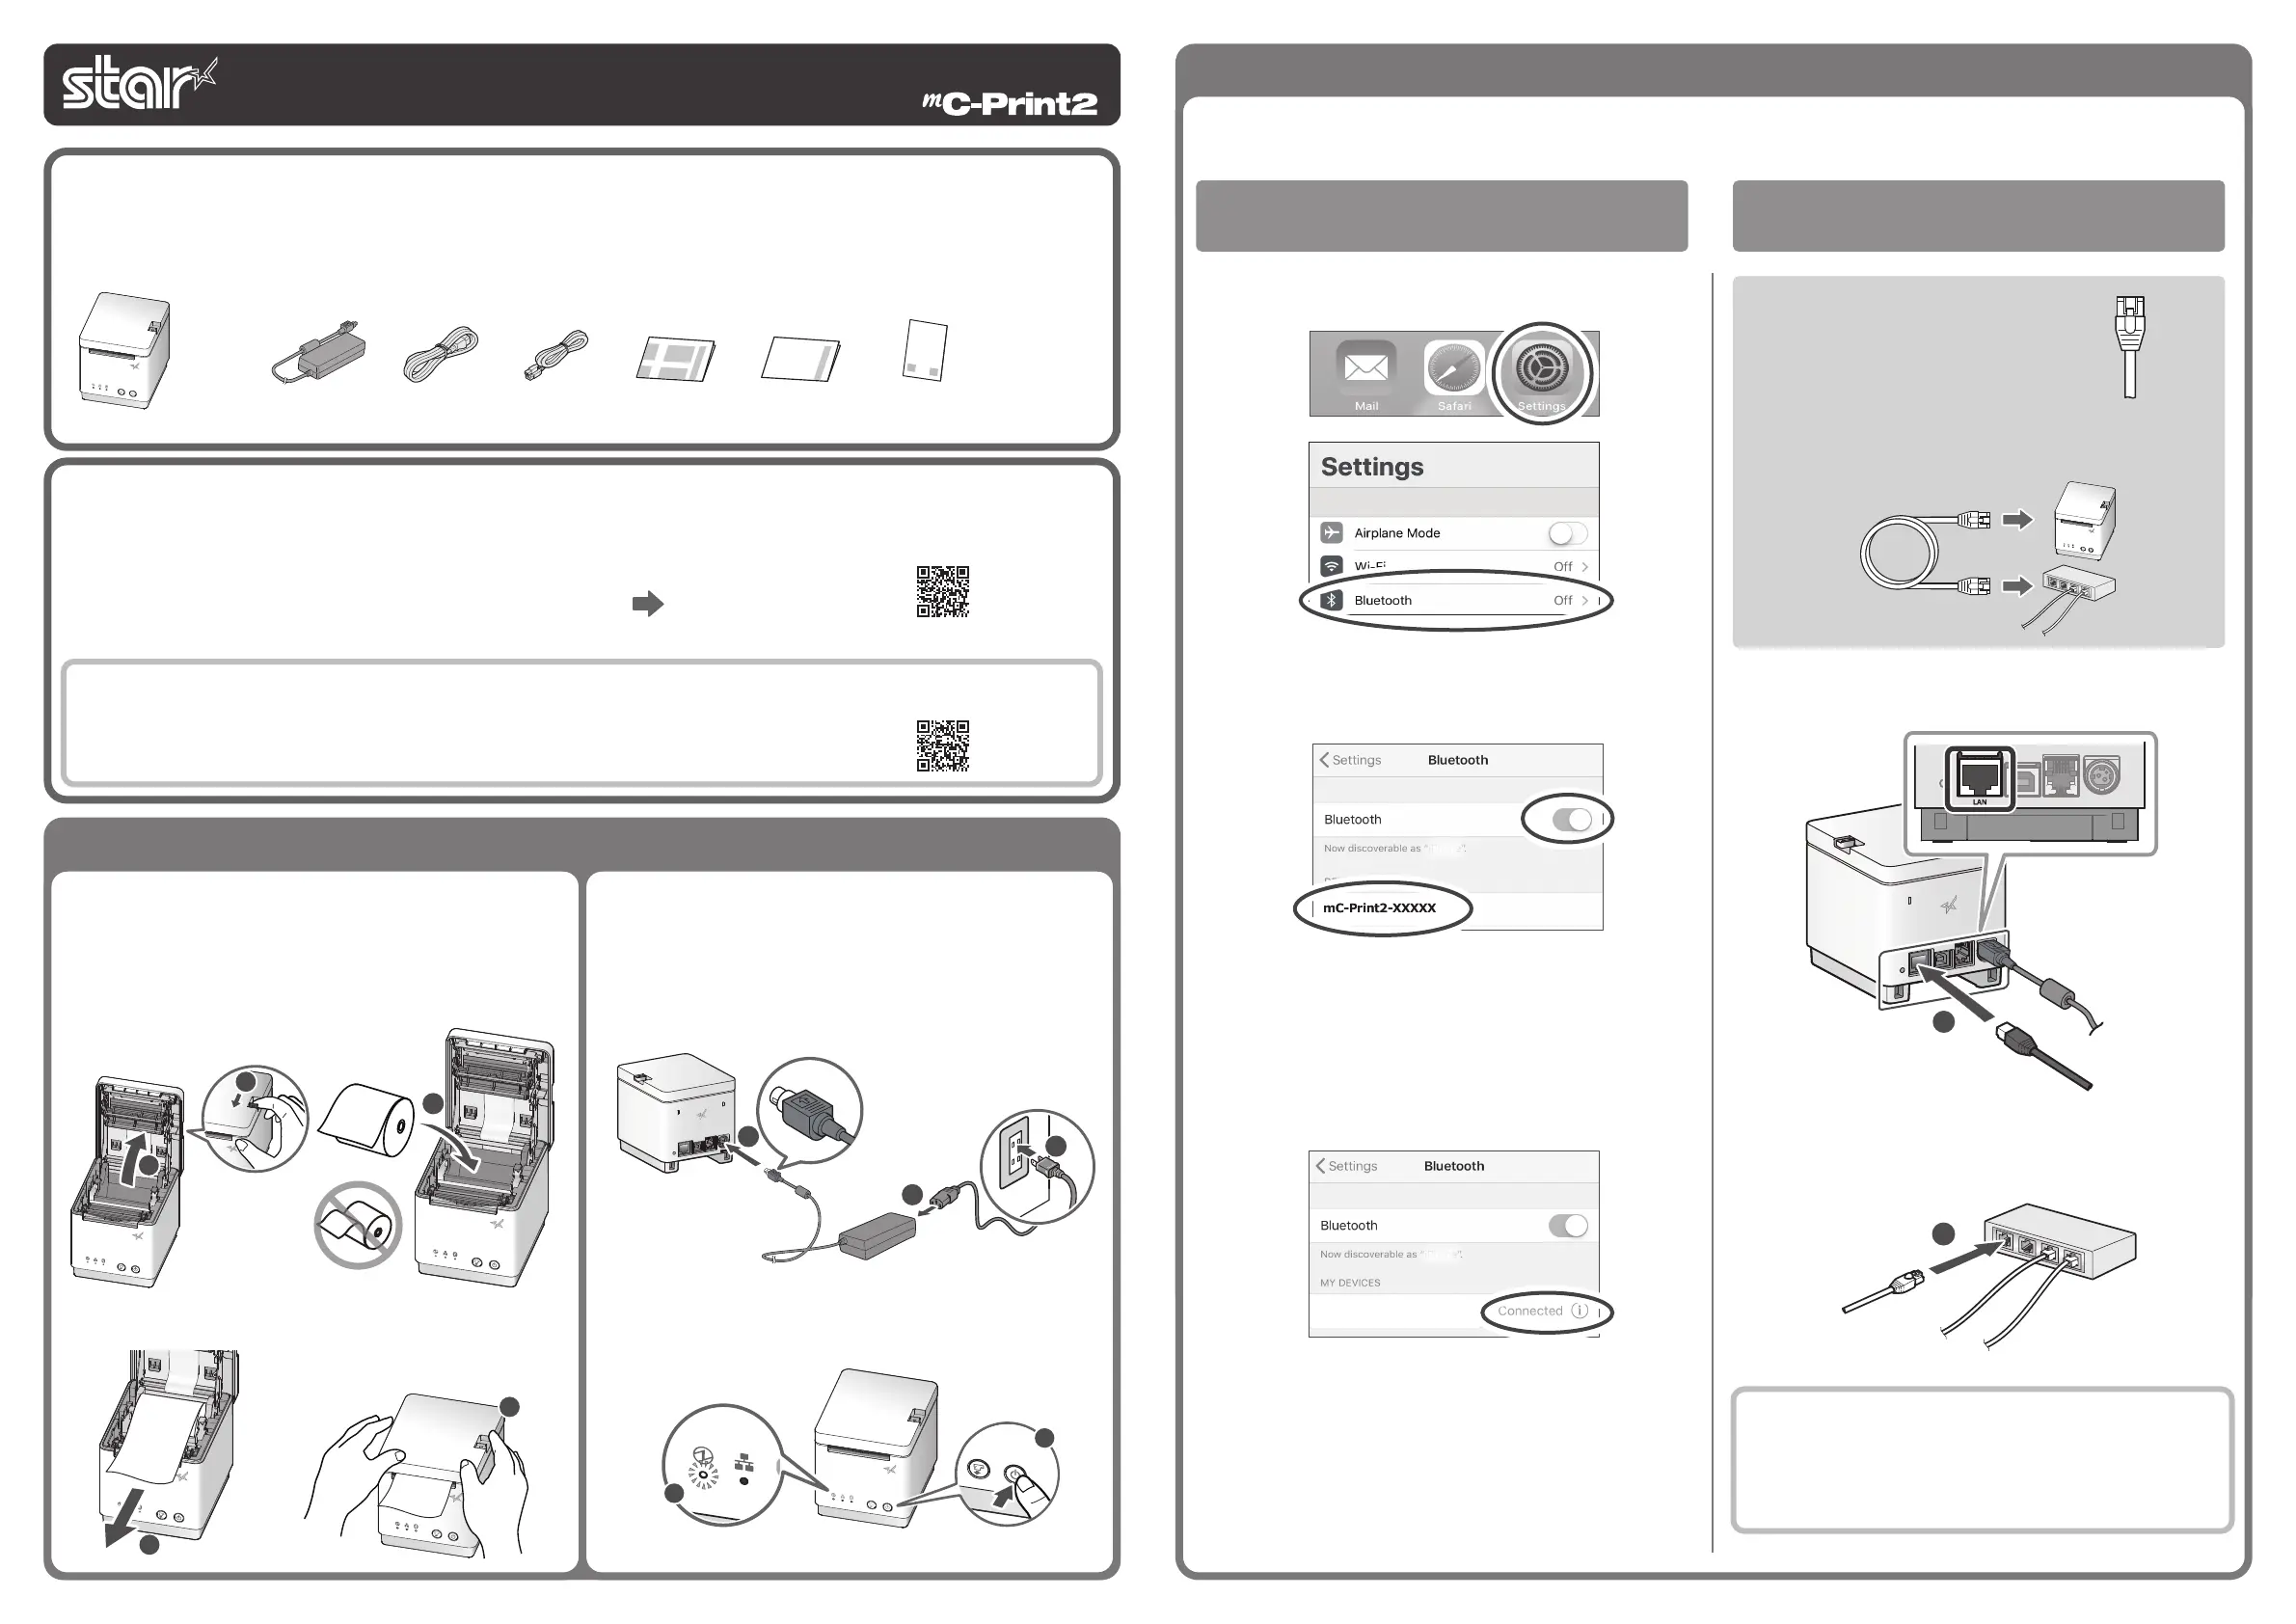
Open the smartphone/tablet settings screen and select Bluetooth.
Bluetooth
interface
Turn on Bluetooth.
Select the displayed device name (mC-Print2-XXXXX).
When “Connected” is displayed, pairing is completed.
mC-Print2-XXXXXmC-Print2-XXXXX
mC-Print2-XXXXXmC-Print2-XXXXX
The device name that is displayed during pairing varies depending
on the product. It can be checked from ***Bluetooth Information***
[Dev Name] in the list that is printed at printer test printing. (For test
printing, turn power ON while holding down the FEED button.)
You will need:
• Commercially-available
LAN cable
Printer-side plug
Connect the LAN cable to the printer LAN connector
.
2
Connect the other plug to the connector of the router, hub, or other
LAN device
.
Wired LAN
interface
Image of connection
<MCP20B only>
DHCP is enabled by default for the wired LAN settings. To con-
tinually use the same IP address, set a static IP address before
use.
For the static IP address setting procedure, refer to the Online
Manual.
1
Easy Setup Guide
3
-A
Connecting an iOS terminal to the printer
Installing the Printer
This document explains the procedures for use of mC-Print2. Please store it carefully after reading it.
1
Installing the paper roll
4
5
3
2
1
2
Turning ON the main unit power
1
2
3
3
5
4
• MCP20
• MCP20B
www.star-m.jp/mcprint-app.html
Star Quick Setup Utility
Download
www.star-m.jp/mcprint2-oml.html
mC-Print2
Online Manual
What the utility can do
The utility can be used to change the settings of the printer and peripheral devices.
Examples) • Bluetooth pairing • memory switch changes, logo registration
• Bluetooth settings, LAN settings • Sample printing etc.
• Firmware update/diagnosis
● To use the utility, download it from the site at right.
● To perform setup using this manual, proceed to Step
1
.
Introduction
Check the Supplied Accessories
If any of the package contents are missing or damaged, contact the dealer where the
product was purchased.
*
Accessories vary depending on the region where the printer was purchased.
Printer
In Case of Trouble
If you experience trouble with the setup procedure, refer to the Online Manual.
Place the enclosed yer close to the printer and use it when necessary.
Pull the open lever
and open the printer cover
.
Take the slack of the paper roll before paper setting, insert the paper roll
as shown in the illustration
.
Pull the end of the paper roll out straight
and use both hands to
close the printer cover
.
Press the power button
and conrm that the LED (blue) illuminates
.
Connect the the power cable to the AC adapter
, and connect the
cable connector to the printer as shown in the illustration
. Insert the
plug into the outlet
.
Easy
Setup Guide
Safety
Instructions
This Manual
Power Cable*AC Adapter
Flyer
(Q&A reference)
USB Cable*
80877992
Produktspecifikationer
| Varumärke: | Star Micronics |
| Kategori: | Skrivare |
| Modell: | mC-Print2 |
| Inbyggd display: | Nej |
| Vikt: | 800 g |
| Bredd: | 96 mm |
| Djup: | 113 mm |
| Höjd: | 100 mm |
| Mobila operativsystem som stöds: | Android, Windows CE, iOS |
| Maximal upplösning: | 203 x 203 DPI |
| Snabbstartsguide: | Ja |
| Modell: | POS-skrivare |
| Kompatibla operativsystem: | Android, iOS, Windows and Linux |
| Maximal rulldiameter: | 50 mm |
| USB-kontakt: | USB Typ B |
| Standardgränssnitt: | Ethernet, USB 2.0 |
| Skrivhastighet: | 100 mm/sek |
| Seriellt gränssnitt: | Ja |
| Produktens färg: | Vit |
| Antal LAN (RJ-45) anslutningar: | 1 |
| Hållbarhetscertifiering: | ENERGY STAR |
| Anslutningsteknologi: | Kabel |
| Nätverksansluten (Ethernet): | Ja |
| Strömkälla av typen: | AC |
| AC-adapter inkluderad: | Ja |
| Antal USB 2.0 anslutningar: | 1 |
| USB-port: | Ja |
| Bluetooth: | Nej |
| Harmonized System (HS)-kod: | 84433210 |
| Mac-kompatibel: | Ja |
| Utskriftsteknologi: | Termal |
| Medelströmförbrukning vid utskrift: | 19.2 W |
| Skärare: | Ja |
| Max utskriftsupplösning, bredd: | 50.8 mm |
| Stöds pappersbredd: | 58 mm |
| Automatisk sax hållbarhet: | 2 miljoner skär |
| Mediats tjocklek: | 0.053 - 0.075 um |
Behöver du hjälp?
Om du behöver hjälp med Star Micronics mC-Print2 ställ en fråga nedan och andra användare kommer att svara dig
Skrivare Star Micronics Manualer

9 September 2025
4 September 2025
3 September 2025
3 September 2025
11 Augusti 2025
25 September 2024
25 September 2024
9 September 2024
4 September 2024
3 September 2024
Skrivare Manualer
Nyaste Skrivare Manualer
2 April 2026
22 Mars 2026
17 Mars 2026
17 Mars 2026
17 Mars 2026
17 Mars 2026
15 Mars 2026
14 Mars 2026
14 Mars 2026
14 Mars 2026