StarTech.com SV431DL2DU3A Bruksanvisning
StarTech.com Växla SV431DL2DU3A
Läs gratis den bruksanvisning för StarTech.com SV431DL2DU3A (2 sidor) i kategorin Växla. Guiden har ansetts hjälpsam av 29 personer och har ett genomsnittsbetyg på 4.9 stjärnor baserat på 7 recensioner. Har du en fråga om StarTech.com SV431DL2DU3A eller vill du ställa frågor till andra användare av produkten? Ställ en fråga
Sida 1/2
Quick-Start Guide
FR: Guide de l’utilisateur - fr.startech.com
DE: Bedienungsanleitung - de.startech.com
ES: Guía del usuario - es.startech.com
NL: Gebruiksaanwijzing - nl.startech.com
PT: Guia do usuário - pt.startech.com
IT: Guida per l’uso - it.startech.com
JP: - jp.startech.com取扱説明書
Manual Revision: 06/28/2018
For the latest information, technical specications, and support for
this product, please visit www.startech.com/SV431DL2DU3A.
Package Contents
• 1 x KVM Switch
• 4 x Rubber Feet
• 1 x Universal Power Adapter (NA/JP, EU, UK, ANZ)
• 1 x Quick-Start Guide
Requirements
Console
• 2 x DVI Enabled Display Device
• 2 x DVI Cable (Male to Male)
• 1 x USB Keyboard
• 1 x USB Mouse
• (Optional) 1-2 x USB 3.0 Peripheral
• (Optional) 1-2 x USB 3.0 Cable (Type-A Male to Type-B Male)
• (Optional) 1 x Microphone-Enabled Audio Device
• (Optional) 1 x Speaker-Enabled Audio Device (or Headset/
Headphones)
• (Optional) 1-2 x 3.5 mm Audio Cable (Male to Male)
Source Computers
• 4 x Computer (with dual-head DVI capability)
• 8 x DVI Cable (Male to Male)
• 4 x USB 3.0 Cable (Type-A Male to Type-B Male)
• 4 x 2-in-1 Audio Cable (with Stereo Audio & Microphone Audio)
Note:This KVM Switch supports DVI-I. If you are using an analog
display or computer (DVI-A, VGA) ensure all of your PC connections
are also analog.
SV431DL2DU3A
4-Port Dual Monitor Dual-Link DVI KVM Switch with Audio & USB 3.0 Hub
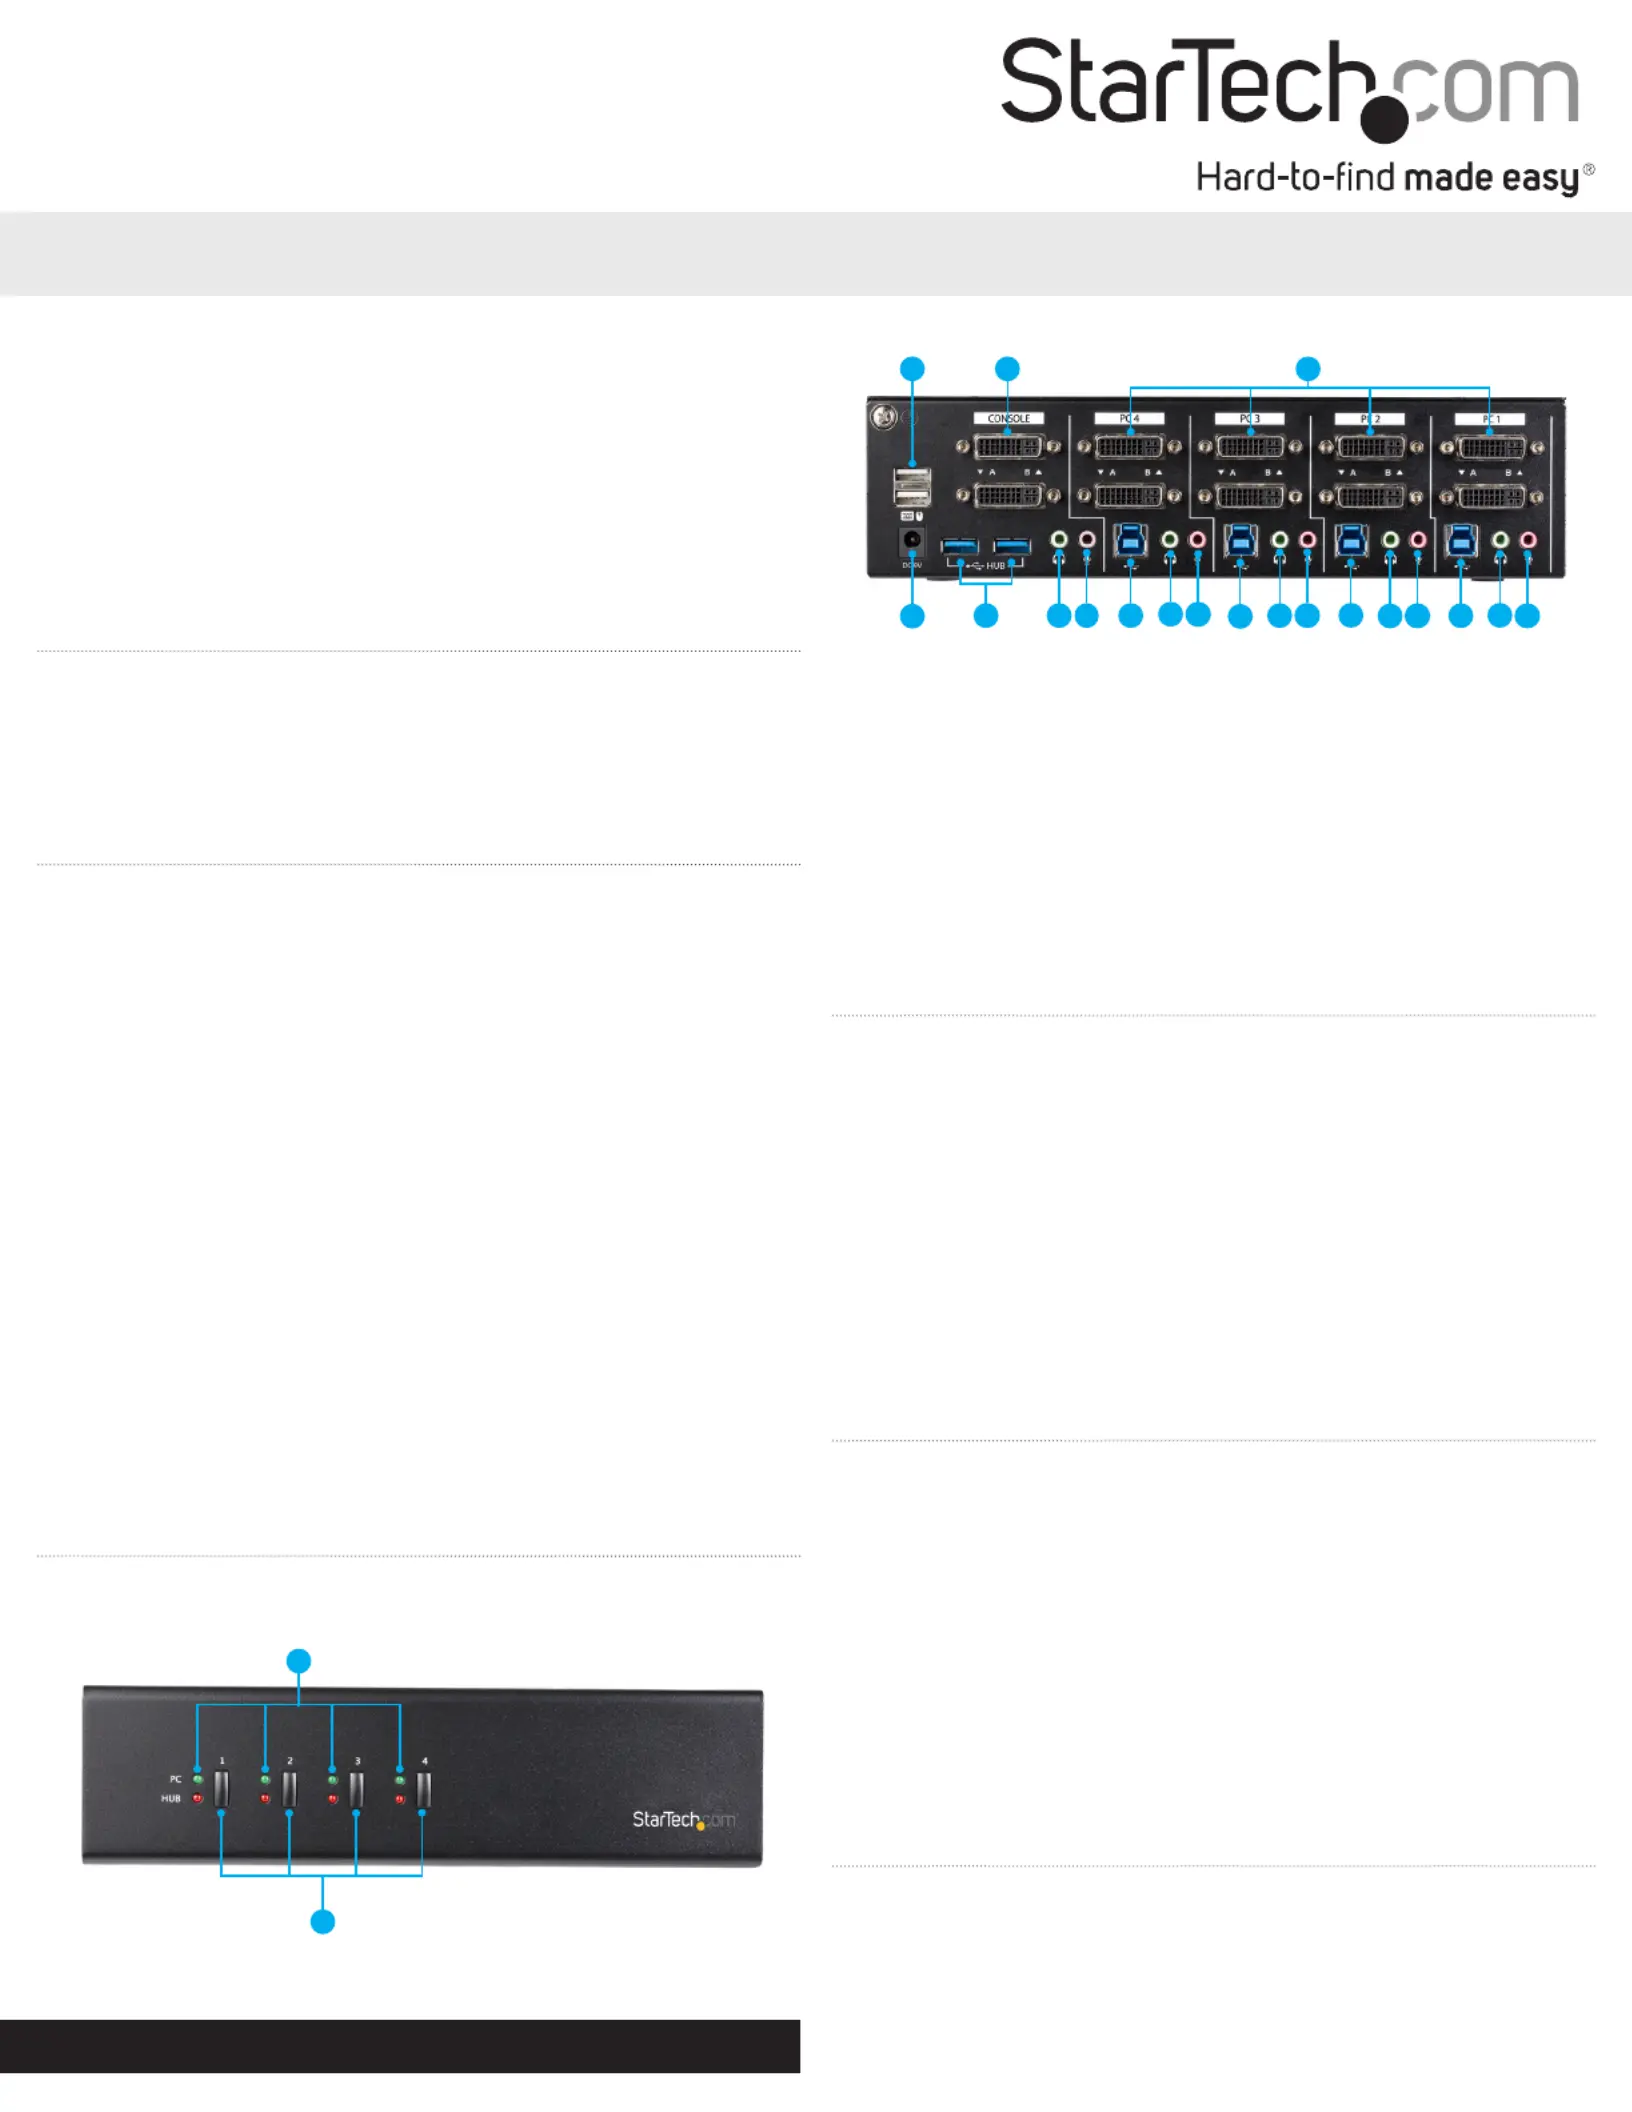
Product Diagram
Front View
Rear View
Connect the Console
1. Turn o your Source Displays and any devices that you intend to
connect (e.g. printers, external hard drives, etc.).
2. (Optional) Connect 1-2 x USB 3.0 Peripheral(s) to the Console Hub
Portson the KVM Switch.
3. Connect a Display to each of the Console DVI Ports on the KVM
Switch.
4. Connect a USB Keyboard and a USB Mouse to the Console USB 2.0
HID Ports on the KVM Switch.
5. (Optional) Connect a Speaker and Microphone, or a Headset-
Enabled Audio Device to the Console Speaker and Microphone
Portson the KVM Switch.
Connect the PCs
1. Connect a DVI Cable from each of the DVI Ports on the Computer
to the PC DVI Ports under on the KVM Switch.PC 1
2. Connect a USB A to B Cable (Type-A Male to Type-B Male) from
the USB A Port on the Computer to the PC USB Port (USB 3.0
Type-B) under on the KVM Switch.PC 1
3. (Optional) If you’re using Audio Devices, connect a set of 3.5
mm Audio Cables from the speaker / microphone port on your
computer to the corresponding PC Speaker Input Port / PC
Microphone Input Port under on the KVM Switch.PC 1
4. Repeat steps 1 to 3 for any additional computers under , PC 2PC
3PC 4 , and/or on the KVM Switch.
*actual product may vary from photos
2
3
4
5
67
8
8
8
8
9
9
9
9
10
10
1010
1. Console USB 2.0 HID Ports (Keyboard and Mouse)
2. Console DVI Ports
3. PC DVI Ports
4. Power Input Port
5. Console Hub Ports (USB 3.0 Type-A)
6. Console Speaker Output Port
7. Console Microphone Input Port
8. PC USB Port (USB 3.0 Type-B)
9. PC Speaker Input Port
10. PC Microphone Input Port
1
1
2
1. LED Indicators
2. Port Selection Buttons
Power-On Sequence
1. Connect the Universal Power Adapter from a wall outlet to the
Power Input Port on the KVM Switch.
2. Power on all USB 3.0 Peripherals.
3. Select PC 1 and power on the corresponding Computer.
*actual product may vary from photos
Produktspecifikationer
| Varumärke: | StarTech.com |
| Kategori: | Växla |
| Modell: | SV431DL2DU3A |
Behöver du hjälp?
Om du behöver hjälp med StarTech.com SV431DL2DU3A ställ en fråga nedan och andra användare kommer att svara dig
Växla StarTech.com Manualer

30 December 2025
30 December 2025
30 December 2025
17 December 2024
17 December 2024
17 December 2024
17 December 2024
17 December 2024
16 December 2024
16 December 2024
Växla Manualer
Nyaste Växla Manualer
9 April 2025
9 April 2025
7 April 2025
5 April 2025
5 April 2025
5 April 2025
5 April 2025
3 April 2025
3 April 2025
2 April 2025