Sunding SD-573C Bruksanvisning
Sunding Cykeldatorer SD-573C
Läs gratis den bruksanvisning för Sunding SD-573C (1 sidor) i kategorin Cykeldatorer. Guiden har ansetts hjälpsam av 43 personer och har ett genomsnittsbetyg på 4.7 stjärnor baserat på 7 recensioner. Har du en fråga om Sunding SD-573C eller vill du ställa frågor till andra användare av produkten? Ställ en fråga
Sida 1/1
Computer\ Sensor Installation
Chest Belt
Functions
Battery Installation
Battery Installation
Battery Installation
Battery InstallationBattery Installation
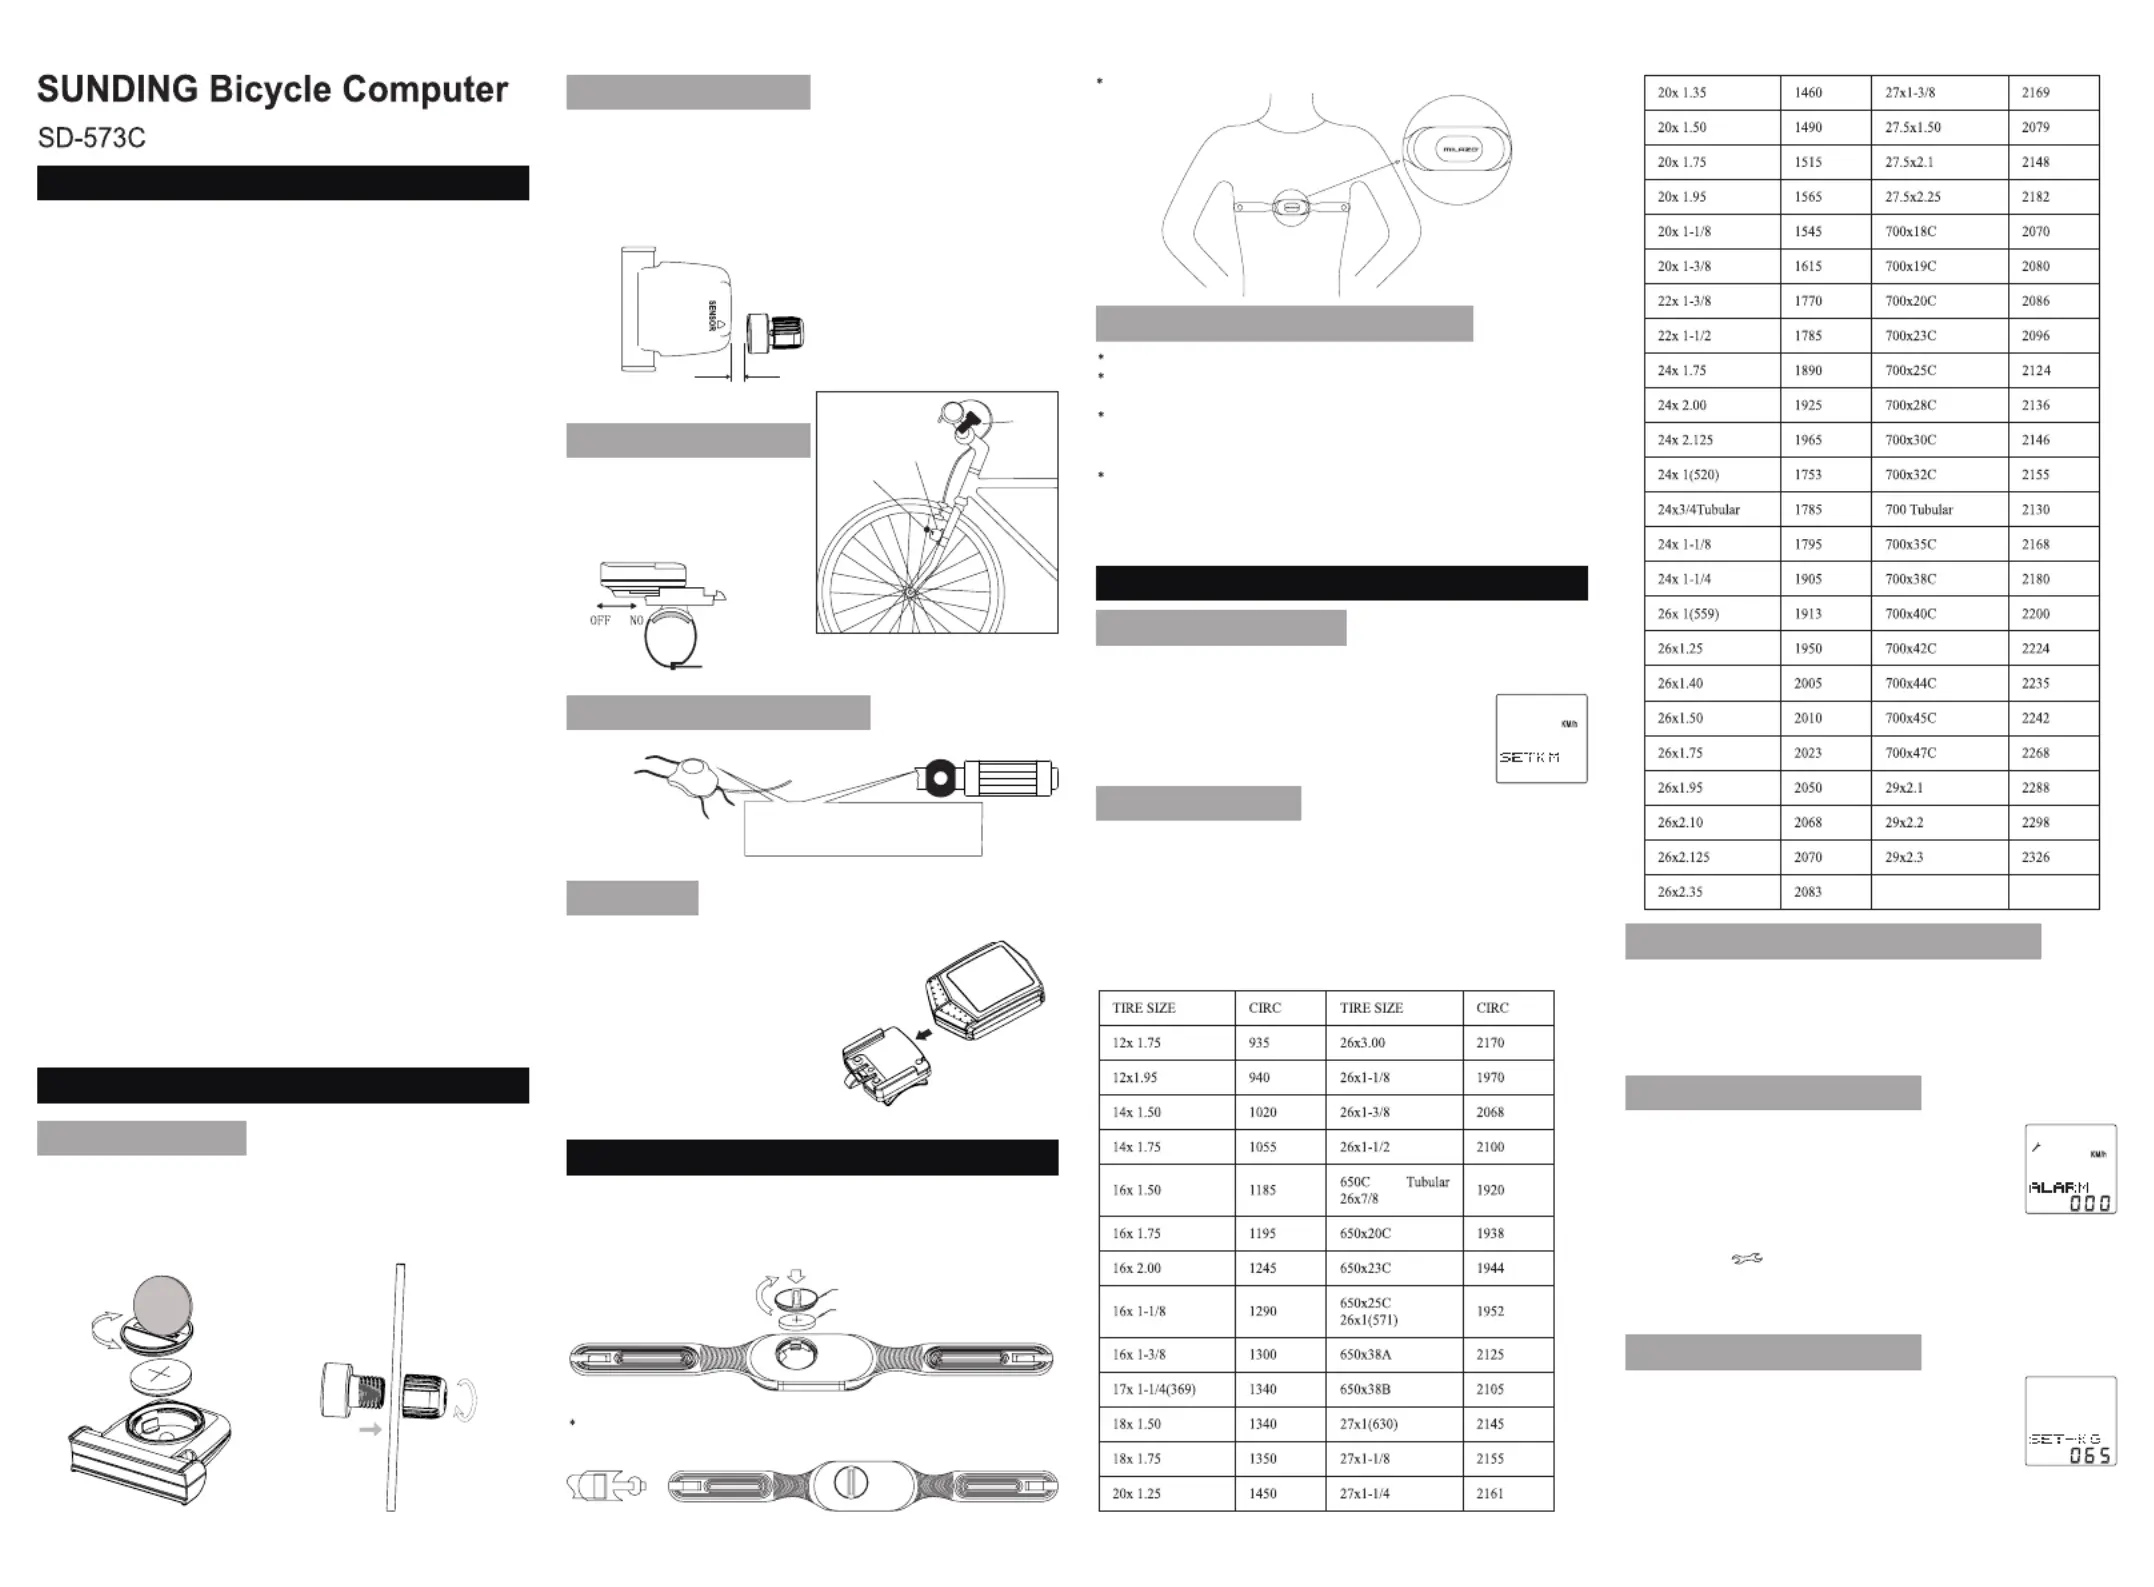
Use a coin to rotate open the battery door, put a CR2032 battery into the
baery compartment, note: the posive pole (+) of the baery is upward, tttitt
aer the baery is loaded, cover the baery door and ghten it. If LCD ftttttti
show irregular figures, take out the baery and re-install it.tt
Speedometer Sensor
Speedometer Sensor
Speedometer Sensor
Speedometer SensorSpeedometer Sensor
Mount the speedometer sensor (Transmitter) on the fork of the bike, on
the same side as the magnet and fix it on the fork with the attached zip
ties. Adjust the relative posion of the magnet and the transmier so that titt
the distance between them is 2mm. The transmier works the best when tt
it is at the shortest distance from the handlebar,
Mounting Bracket
Mounting Bracket
Mounting Bracket
Mounting BracketMounting Bracket
Aach the mouning shoe to thettt
handlebars using the included cable
ties.
Computer
Computer
Computer
ComputerComputer
Attach the computer to the mounting shoe by
sliding the unit until it snaps firmly into its postion.
To remove it, press the button on it and push from
the opposite direction.
To check for proper speed function and
sensor alignment, spin the front wheel
with computer in speed mode. Adjust
the position of sensor and magnet when
there is on weak reaction.
Remove the battery cover from the chest belt, install an CR2032 battery
with the positive (+) pole facing the battery cover and replace the cover.
Move to the left to unlock the cover and right to tight it.
Attaching the chest belt
Attach the belt with the battery cover facing the body.
Functional Description
Functional Description
Functional Description
Functional Description Functional Description And Notes
And Notes
And Notes
And NotesAnd Notes
Wireless transmission heartbeat frequency is 120KHz.
Attach the belt with the logo on the belt can be seen outside and placed
up right. If the logo looks upside down, it is mounted incorrectly.
The belt must be placed near the heart, close to the body. Any cloth or
other materials which will isolate conduction of body and belt are not
allowed.
In dry and cold environment, bad contraction may exist for the first few
minutes when putting on the belt, in this case please just wait for a few
minutes; users can also put a few drops of clean water or conductive gel
to wet the inside of the conductive material, which can help to realize
better and faster heartbeat transmission.
Parameter Settings
Setting (km/h) / (m/h)
Setting (km/h) / (m/h)
Setting (km/h) / (m/h)
Setting (km/h) / (m/h)Setting (km/h) / (m/h)
Reinstall the battttery or press and hold the Right buon +
Le buon for 3 seconds in any mode to enter the fttt
parameter seng. The screen displays the Kilometer (KM) tti
seng, press the Right buon to select Metric (KM) or ttitt
Imperial (MILE). Press the le buon to confirm and enter fttt
the wheel circumference seing.tt
Wheel Size Input
Wheel Size Input
Wheel Size Input
Wheel Size InputWheel Size Input
In the wheel circumference setting mode, the default value is 2155
millimeters. To adjust the value, press the right button. To enter the next
parameter setting directly, press the left button. Select the required
circumference based on the tire model of the bike, as indicated in the table
below. Press the right button to adjust the current digit. Press the left
button to confirm and enter the next digit selection. The input range of
wheel circumference is 0 to 9999mm. After setting, press the left button to
confirm and enter the initial total mileage setting.
Setting The Initial V
Setting The Initial V
Setting The Initial V
Setting The Initial VSetting The Initial Value Of Odometer
alue Of Odometer
alue Of Odometer
alue Of Odometeralue Of Odometer
In ODO mode, Press the LEFT button for 2 seconds to set the ODO value,
its default value is 0000.0. when one figure is flashing, press the RIGHT
button to adjust it and the LEFT button to confirm it, and start to set the
next figure. Press the LEFT button to enter into MAINTENANCE ALERT
SETTING MODE.
Setting Maintenance
Setting Maintenance
Setting Maintenance
Setting Maintenance Setting Maintenance Alert
Alert
Alert
AlertAlert
Setting Rider
Setting Rider
Setting Rider
Setting RiderSetting Rider’
’
’
’’s Weight
s Weight
s Weight
s Weights Weight
In the Rider’s Weight Setting mode, press the RIGHT
button to reset measuring unit, and press the LEFT button
to enter into the next mode. The default weight is
65kg(143lb), press the RIGHT button to adjust the flashing
weight number according to rider’s weight, press the LEFT
button to confirm and advance. Weight ranges: 0299kg/0699lb. Press ~~
the LEFT button to enter into HEART RATE THRESHOLD SETTING MODE.
- SPD CURRENT SPEED
- TOT-ODO TOTAL ODOMETER
- TRPDIST TRIP DISTANCE
- MAXSPD MAXIMUM SPEED
- AVGSPD AVERAGE SPEED
- TRP TIME TRIP TIME
- CLOCK(12H/24H)
- STPWTCH STOPWATCH
- TMP TEMPERATURE
- MIN TMP
- MAX TMP
- SCAN
- COMPARATOR
- CALORIE
- FATBURN
- EXPERTFade menu)(
- SETTING SPEED SCALE (KM/MILE)
- SETTING TIRE CIRCUMFERENCE
- SETTING THE INITAL VALUE OF ODOMETER/ODO
- MAINTENANCE ALERT
- REMOTE CONTROL
- AUTO BACKLIGHT
- CONSTANT ONBACKLIGHT
- AUTO ON/OFF
- DEEP SLEEP MODE
- P(CURRENT HEART RATE)
- AVE(AVERAGE HEART RATE)
- MAX(MAX HEART RATE)
Sensor
Magnet
Computer
Push the zipe through the boom titt
slot on the remote controller
and fix it on the handle
Cable Tie
In Maintenance Alert mode, the default Maintenance Alert
value is 200(KM/M), Press the RIGHT button, the first digit
will flash. Re-press the RIGHT Button to change the value,
and the LEFT button to advance to the next digit the value
ranges 000800(KM/M).~
Functions specifications when the ODO reaches the setted Maintenance
Alert value, the will appear on the screen to alert the rider, Press the
LEFT button for 5 seconds, it will disappear, and the value for Trip Distance\
Maxmum Speed\ Average Speed and Riding Time will be cleared. Press the
LEFT button to entre into the RIDER’S WEIGHT SETTING MODE.
Remote Control Installation
Remote Control Installation
Remote Control Installation
Remote Control InstallationRemote Control Installation
Push Into
CR2032Battery
Battery Cover
2mm
Close
Open
Produktspecifikationer
| Varumärke: | Sunding |
| Kategori: | Cykeldatorer |
| Modell: | SD-573C |
Behöver du hjälp?
Om du behöver hjälp med Sunding SD-573C ställ en fråga nedan och andra användare kommer att svara dig
Cykeldatorer Sunding Manualer

18 Oktober 2024
10 Oktober 2024
30 Juli 2024
28 Juli 2024
27 Juli 2024
24 Juli 2024
Cykeldatorer Manualer
Nyaste Cykeldatorer Manualer
27 Januari 2025
18 Oktober 2024
18 Oktober 2024
18 Oktober 2024
17 Oktober 2024
17 Oktober 2024
14 Oktober 2024
14 Oktober 2024
14 Oktober 2024
13 Oktober 2024