Synco G2 Max Bruksanvisning
Läs gratis den bruksanvisning för Synco G2 Max (2 sidor) i kategorin mikrofon. Guiden har ansetts hjälpsam av 46 personer och har ett genomsnittsbetyg på 4.8 stjärnor baserat på 9 recensioner. Har du en fråga om Synco G2 Max eller vill du ställa frågor till andra användare av produkten? Ställ en fråga
Sida 1/2
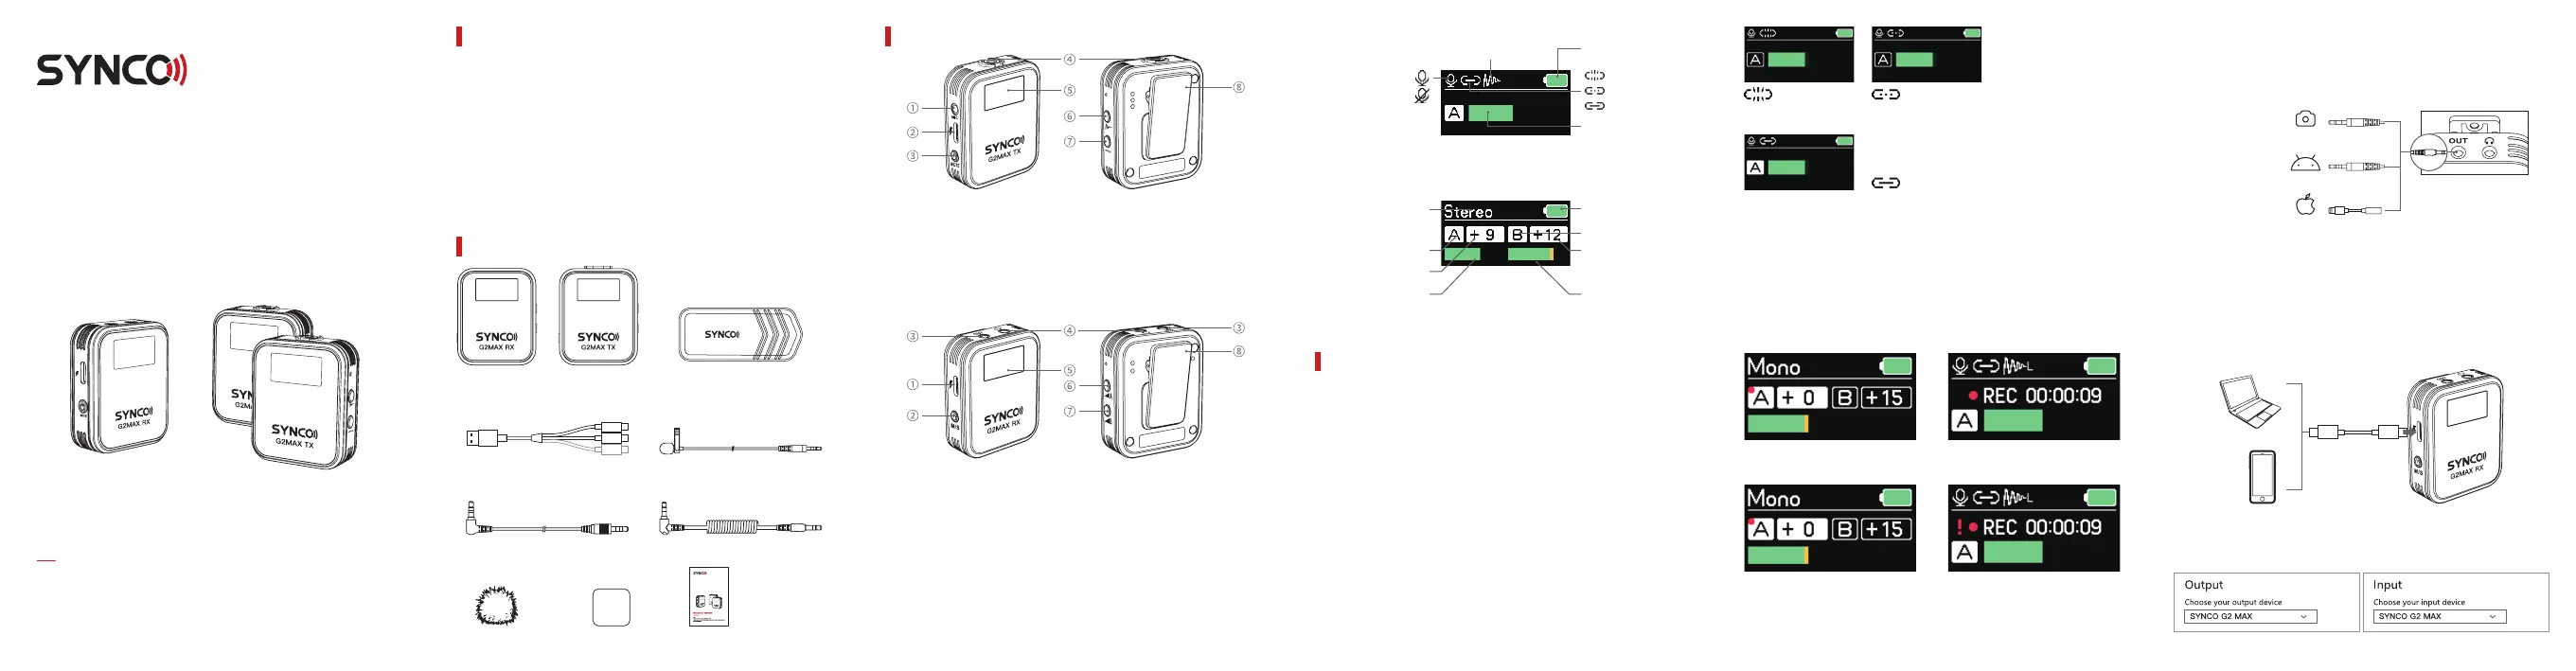
1. TX Transmitter
2. RX Receiver
① External Mic Input
② Type-C Charging Port
③ On/ O Button
④ Built-in Mic
⑤ Display Screen
① Type-C Charging Port / Digital Output
② On/ O Button (Mono / Stereo / Safety Channel)
③ 3.5mm TRS Output
④ 3.5mm Monitoring Port
⑤ Display Screen
⑥ Gain Adjustment of TX A
⑦ Gain Adjustment of TX B
⑧ Magnet Pocket Clip
Caring For Your SYNCO ProductProduct Instruction
Packing List
·Please keep the product in a dry, clean, dust-free environment.
·Keep corrosive chemicals, liquids and heat source away from the
product to prevent mechanics damage.
·Use only a soft and dry cloth for cleaning the product.
·Malfunction may be caused by dropping, impact of external force.
·Do not attempt to disassemble the product. Doing so voids warranty.
·Please have the product checked or repaired by authorized technicians
if any malfunctions happened.
·Failure to follow all the instructions may result in mechanics damage.
·Warranty does not apply to human errors.
Microphone G2A2 MAX
User Manual
Thank you for choosing SYNCO product.
Please read this manual carefully before use and follow all instructions
mentioned herein.
⑥ Noise Reduction Button
⑦ Gain Adjustment of TX/ Internal Storage
Recording Button
⑧ Magnet Pocket Clip
3. Display Screen
Recording
TX A
Gain of TX A
Audio Dynamic
Display of TX A
Noise Reduction on
TX Transmitter
RX Receiver
Muting
Recording Mode:
Mono/ Stereo/ Safety
Disconnected
Connecting
Connected
Audio Dynamic
Display
Power Indicator
TX B
Gain of TX B
Audio Dynamic
Display of TX B
Power Indicator
Operations
RX Receiver x1TX Transmitter
x2
3-in-1 Charging Cable x1External Lav Mic (With Wind Mu) x2
3.5mm TRRS Phone Cable x13.5mm TRS Camera Cable x1
2. Pairing
Automatic Pairing
Automatically pairing after the TX/RX turns on.
Manual Pairing
① Long press the transmitter and receiver at the same time for 3 seconds
to power o .
② After shutdown, long press the power button of the transmitter and
receiver for 8 seconds at the same time to enter the [connecting ] state.
DisconnectedConnecting
Connected
③ Successfully Connected show as the picture
*Note: Before the successful connection, the transmitter channel displays
A by default. The rst transmitter connected to the receiver is transmitter A,
and the second one is transmitter B.
1. Power On/ O
Power On
Long press the power button for 3 seconds to turn on, and the display
screen will light up.
Power O
Long press the power button for 3 seconds to turn it o, and the display
screen will light o.
Mic Windshield x2Magnet x2User Manual X1
Carrying Bag x1
3. Internal Storage Recording Function
On/O:
Long press the internal storage recording button on TX for 3 seconds to
turn on or o the internal storage recording function. Once the function
is on, a red point will be displayed on the screen and will disappear once
the function is o.
Red point on the RX's screen:
Internal storage recording on
Red point on RX is ashing:
Storage is full
"!" on TX: Storage is full
Red point on the TX's screen:
Internal storage recording on
*Note: When using an external microphone, please insert it correctly
into the microphone input jack. Only TRS interface microphones are
supported.
4. Channel output connection
①3.5mm OUT output
The receiver outputs the audio signal to the recording device via either a
3.5mm TRRS phone cable or a 3.5mm TRS camera cable. Please use the
appropriate cable according to your device.
Apple Adapter (With MFI Certication)
3.5mm TRRS Phone Cable
3.5mm TRS Camera Cable
②Type-C port digital output
The receiver Type-C port has a digital output function, which can directly
use the Type-C to Type-C cable to output mobile phones or computers
and other devices.
*Note: When connecting the computer, enter the sound Settings and set
the input microphone to SYNCO G2 MAX to use G2 MAX recording; Set
the output speaker to SYNCO G2 MAX to use real-time ear return in the
receiver listening interface.
Produktspecifikationer
| Varumärke: | Synco |
| Kategori: | mikrofon |
| Modell: | G2 Max |
Behöver du hjälp?
Om du behöver hjälp med Synco G2 Max ställ en fråga nedan och andra användare kommer att svara dig
mikrofon Synco Manualer

6 Oktober 2025
6 Oktober 2025
6 Oktober 2025
6 Oktober 2025
5 Oktober 2025
5 Oktober 2025
5 Oktober 2025
2 Oktober 2025
2 Oktober 2025
2 Oktober 2025
mikrofon Manualer
Nyaste mikrofon Manualer
10 Mars 2026
4 Mars 2026
4 Mars 2026
4 Mars 2026
3 Mars 2026
24 Februari 2026
23 Februari 2026
17 Februari 2026
14 Februari 2026