Vantec NexStar NST-D208C3-BK Bruksanvisning
Vantec Vagga/dockningsstation NexStar NST-D208C3-BK
Läs gratis den bruksanvisning för Vantec NexStar NST-D208C3-BK (2 sidor) i kategorin Vagga/dockningsstation. Guiden har ansetts hjälpsam av 36 personer och har ett genomsnittsbetyg på 4.2 stjärnor baserat på 2 recensioner. Har du en fråga om Vantec NexStar NST-D208C3-BK eller vill du ställa frågor till andra användare av produkten? Ställ en fråga
Sida 1/2
NST-D208C3-BK
Thank You
For Choosing VantecUSA Product.
We are committed to providing you with the
best service and support. If you have a
problem with installing, getting the product
to function or other product related
question, please feel free to write to us.
We will help you answer your question.
You can write to us at :
For the latest Drivers, Manual and
Frequently Asked Questions (FAQ), they are
available at our website at vantecusa.com
or write to us.
Thank you,
VantecUSA Support Team.
Copyright © 2020 Vantec Thermal Technologies. All Rights Reserved.
All Registered Trademarks Belong to Their Respective Compaines.
Pd orinten
Rd Pr.ecleycape
Infoon e e tchan hout e.rmatiinthis documntissubjcto gewitnotic
Rontimanr atwht eproducti of hese maters ialn y annewhsoever itou
wttiiictlyrbi.rien permssn ios str fodden
v1.01
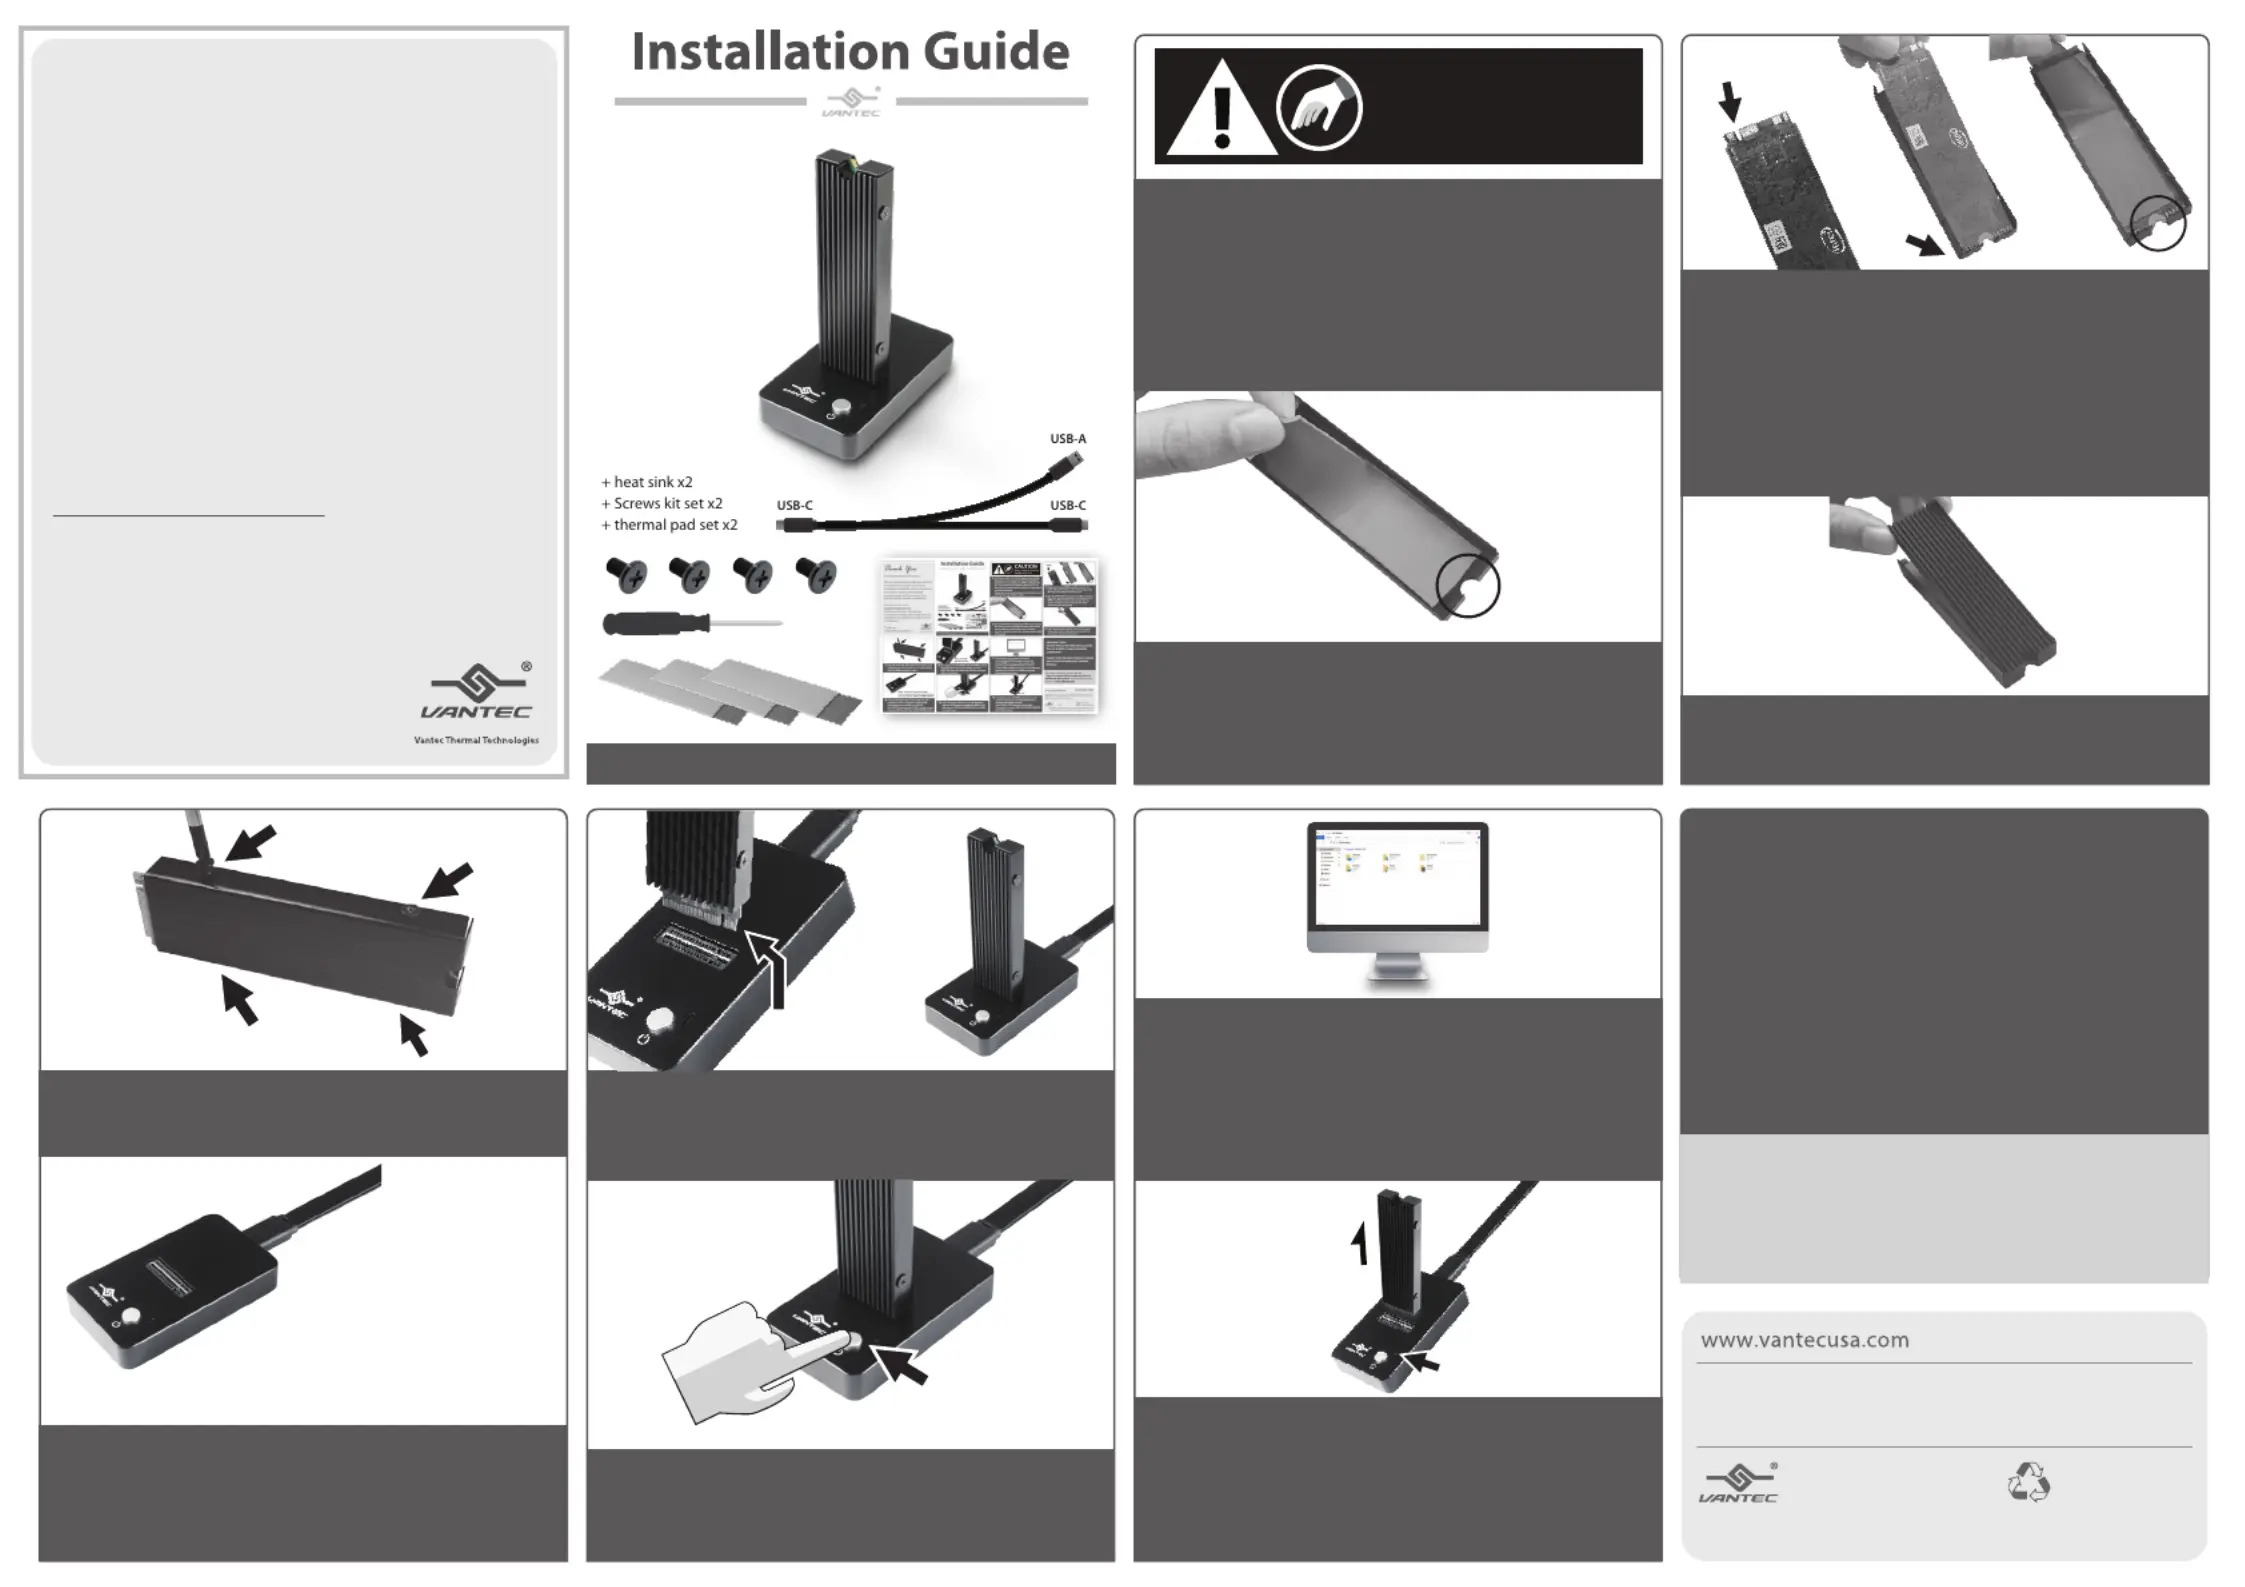
4. Align and set your NVMe module notch to the
same side as the notch on the metal casing with
the chip side facing the Thermal pad.
6. Place the heatsink with the notch on the same
side as the metal casing, press the heatsink to
ensure it is attached and secure.
8. Connect the USB cable to the DOCK and your
computer. If your computer is powered ON,
you should see a red LED on the DOCK
(the RED LED indicates the DOCK is getting power
from the USB Bus, BUT the DOCK POWER is OFF).
5. Use the THIN Thermal pad, peel o the protective
lm from one side and place it on the back of the
NVMe module without covering the notch as
shown. Once it is in place remove the other
protective lm o the pad.
7. Align the heatsink side hole to the metal casing
and fasten the four screws (two on each side) to
hold the NVMe module in place.
10. Press the power button to turn ON the DOCK
and the LED should turn white (the WHITE LED
indicates the DOCK is POWERED ON) the NVMe
is ready for use.
11. At this point, your system OS should
acknowledge a USB storage is connected.
If your NVMe is not new and contains data,
you can use the OS File Explorer to check.
If your NVMe is NEW, you need to prep (initialize,
partition and format) the NVMe using your
Operating System tools.
9. Insert your mounted NVMe into the NVMe slot on
the DOCK and make sure it is fully inserted.
NOTE the M key and align the interface correctly
before inserting it.
3. Use the THICK Thermal pad, peel o the protective
lm from one side and place it on the base metal
casing without covering the notch as shown.
Once it is in place remove the other protective lm
o the pad.
For detail, instruction refers to the FAQ
"How to preparing a New storage, Hard Drive, or
SSD for use with a system"on our website support
section at www.vantecusa.com
IMPORTANT NOTE:
DO NOT UNPLUG THE NVMe MODULE WHEN
THE LED IS WHITE, IT MAY CAUSE DATA
CORRUPTION.
ALWAYS TURN THE DOCK POWER OFF (SHOW
RED LED) BEFORE REMOVING THE NVMe
MODULE.
1. Verify the package contents.
2. STOP and CHECK This DOCK Supports M.2 NVMe
Module, it will not supports M.2 SSD (with M+B
Key) Before you unpack your NVMe module from
the manufacturer's packaging, please be aware
that this is a sensitive device and can be damaged
by Static Electricity.
Please ground yourself before handling them and
hold by the edge of the module.
Static Sensitive Devices
Handle with Care
CAUTION
12. To safely remove the NVMe, please press the
power button to turn OFF the DOCK before
removing the NVMe module.
The DOCK is OFF if you see the RED LED.
If you did not see the RED LED, DO NOT REMOVE
the NVMe module.
NOTE: On the provided Cable, ONLY
Connect either the USB Type C OR USB Type
A to your System. DO NOT CONNECT BOTH.
M-Key cut align
with Dock M-Key
M-Key
LED
Produktspecifikationer
| Varumärke: | Vantec |
| Kategori: | Vagga/dockningsstation |
| Modell: | NexStar NST-D208C3-BK |
| Vikt: | 45 g |
| Bredd: | 40 mm |
| Djup: | 68 mm |
| Höjd: | 12 mm |
| LED-indikatorer: | Ja |
| Ursprungsland: | Taiwan |
| Material: | ABS, Aluminium |
| Typ av lagringsmedia: | SSD |
| Snabbinstallationsguide: | Ja |
| Värdgränssnitt: | USB 3.2 Gen 1 (3.1 Gen 1) Type-C |
| Produktens färg: | Svart |
| Förpackningstyp: | Låda |
| Windows-operativsystem som stöds: | Windows 10, Windows 7, Windows 8 |
| Temperatur vid drift: | 0 - 45 ° C |
| Temperaturintervall (förvaring): | -10 - 70 ° C |
| Intervall för relativ operativ luftfuktighet: | 10 - 85 % |
| Fuktighet (förvaring): | 5 - 90 % |
| Kabel inkluderad: | USB |
| På / av-knapp: | Ja |
| Linux operativsystem som stöds: | Ja |
| Mac-kompatibel: | Ja |
| Lagringsenhetens gränssnitt: | M.2 |
| Storlekar som stöds på lagringsenhet: | M.2 " |
| Maximal överföringshastighet: | 10 Gbit/s |
Behöver du hjälp?
Om du behöver hjälp med Vantec NexStar NST-D208C3-BK ställ en fråga nedan och andra användare kommer att svara dig
Vagga/dockningsstation Vantec Manualer

25 September 2024
25 September 2024
25 September 2024
25 September 2024
25 September 2024
25 September 2024
6 September 2024
Vagga/dockningsstation Manualer
Nyaste Vagga/dockningsstation Manualer
5 April 2025
31 Mars 2025
26 Mars 2025
12 Mars 2025
12 Mars 2025
10 Mars 2025
27 Februari 2025
27 Februari 2025
16 Februari 2025
11 Februari 2025