Vemer Vepal Bruksanvisning
Läs gratis den bruksanvisning för Vemer Vepal (2 sidor) i kategorin brytare. Guiden har ansetts hjälpsam av 44 personer och har ett genomsnittsbetyg på 4.4 stjärnor baserat på 8 recensioner. Har du en fråga om Vemer Vepal eller vill du ställa frågor till andra användare av produkten? Ställ en fråga
Sida 1/2
Manuale d’Uso
INTERRUTTORE CREPUSCOLARE
Leggere attentamente tutte le istruzioni
User Manual
CREPUSCULAR SWITCHES
Read all the instructions carefully
L’interruttore crepuscolare VEPAL è un dispositivo di comando elettronico che esegue azioni
di tipo ed è destinato ad operare in ambienti domestici e similari con grado 1B (EN 60730-1)
di inquinamento normale (EN 60730-1).
AVVERTENZE DI SICUREZZA
Durante l’installazione ed il funzionamento dello strumento è necessario attenersi
alle seguenti prescrizioni:
1) Il prodotto deve essere installato da personale qualificato
2) Leggere attentamente le istruzioni riportate in questo manuale
3) Seguire scrupolosamente gli schemi di collegamento per installare l’apparecchio
4) Prima di accedere ai morsetti di collegamento accertarsi che i conduttori da
collegare o già collegati allo strumento non siano in tensione
5) Non alimentare l’apparecchio se qualche parte di esso risulta danneggiata
6) Lo strumento deve essere installato e messo in funzione in conformità con la
normativa vigente in materia di impianti elettrici.
CARATTERISTICHE TECNICHE
• Alimentazione: 230 V ~ (+10%/-20%) 50/60 Hz
• Assorbimento: 8 VA (1W)
• Portata dei contatti: 10 A/230 V ~ su carico resistivo
• Tipo di carico:
– Lampade fluorescenti: max 360 W/230 V ~ (cos
≥ 0,8)
– Lampade a incandescenza: max 800 W/230 V ~
• Fissaggio da palo
• Sensibilità: 3÷70 lux regolabili
• Fattore di isteresi: 1÷10 lux regolabili
• Tempo d’intervento: circa 10 sec fisso
• Contenitore: resina di policarbonato antichock
• Temperatura di funzionamento: 0 °C ÷ +50 °C
• Temperatura di immagazzinamento: -10 °C ÷ +60 °C
• Umidità relativa 20%÷90% non condensante
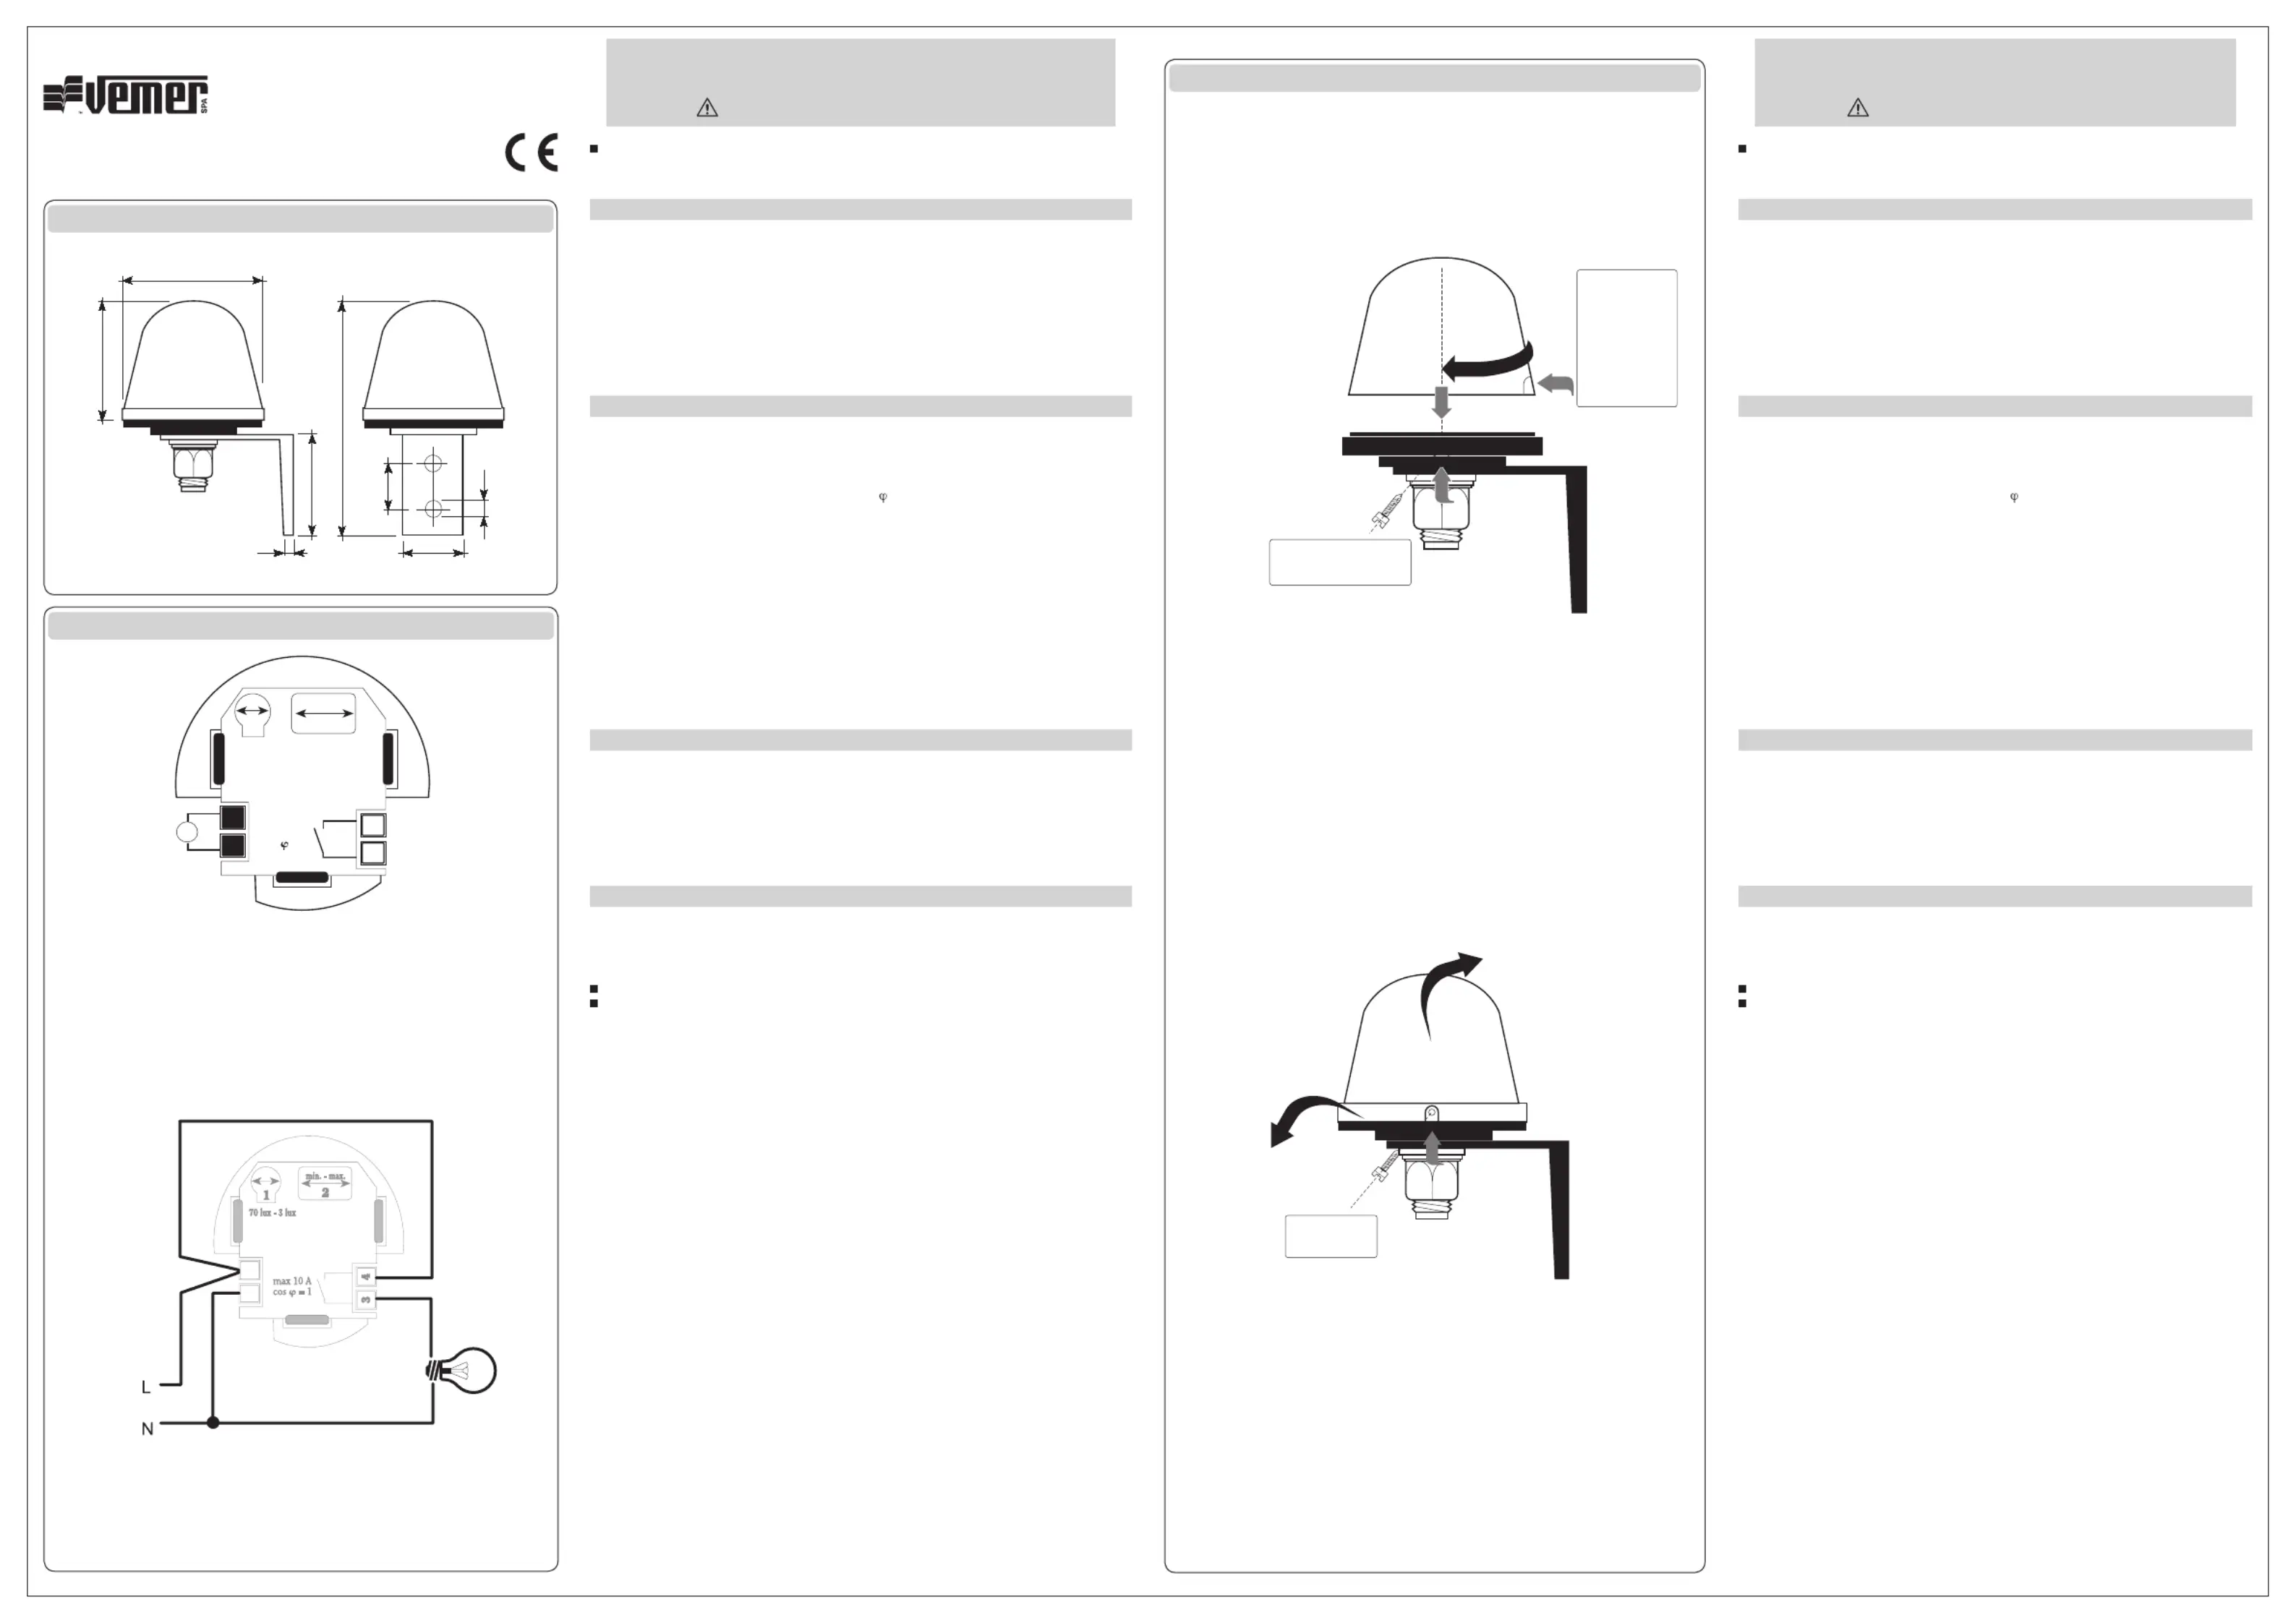
Legenda:
A) Dimensioni
B) Schemi di collegamento
ISTRUZIONI PER L’INSTALLAZIONE
• Fissare l’apparecchio alla parete o al palo tramite gli appositi fori.
• Evitare l’installazione in luoghi dove possono verificarsi abbagli o riflessi.
• Togliere la cupola (vedi esempio) e collegare 2 cavi facendoli passare all’interno della vite di
fissaggio.
• Nel collegamento rispettare lo schema riportato sul foglio d’istruzione.
• Le regolazioni sono già tarate per le condizioni più comuni di intervento.
• Se necessario si possono modificare come desiderato agendo sui corrispondenti trimmer.
NORME DI RIFERIMENTO
• La conformità alle Direttive Comunitarie:
2006/95/CE (Bassa Tensione)
2004/108/CE (E.M.C.)
è dichiarata in riferimento alle Norme seguenti:
CEI EN 60730-1
CEI EN 55014-1 e CEI EN 55014-2
The VEPAL1B twilight time switches is an electronic command device that perform type
(EN 60730-1) actions, and is designed to operate in household and similar settings with
normal pollution levels (EN 60730-1).
SAFETY WARNINGS
During the installation and operation of the instrument, the following safety
instructions should be followed::
1) The instrument should be installed by qualified personnel
2) Read the instructions in this manual carefully
3) Carefully follow the instruction diagrams to install the device
4) Before gaining access to the connector terminals, make sure the conductors to
be connected to the instrument or already connected are not powered
5) Do not supply power to the device if any part of it is damaged
6) The instrument must be installed and activated in compliance with current
electric systems standards.
TECHNICAL SPECIFICATIONS
• Power supply: 230 V~ (+10%/-20%) 50/60 Hz
• Power absorption: 8 VA (1W)
• Contact capacity: 10 A/230 V ~ on resistant load
• Type of load:
– Fluorescent lamps: max 360 W/230 V ~ (cos
≥ 0,8)
– Incandescent lamps: max 800 W/230 V ~
• Pole mounting
• Sensitivity: 3÷70 lux, adjustable
• Hysteresis factor: 1÷10 lux, fixed
• Intervention time: 10 sec approx, fixed
• Container: shockproof polycarbonate resin
• Operating temperature: 0 °C ÷ +50 °C
• Storage temperature: -10 °C ÷ +60 °C
• Relative humidity: 20%÷90% non-condensing
Legend:
A) Dimensions
B) Connection diagrams
INSTALLATION INSTRUCTIONS
• Fix the unit to the wall or pole using the screws provided.
• Do not install in areas where flashes or reflections may occur.
• Remove the dome (see example) and connect 2 cables, passing them inside the fixing
screw.
• When connecting, adhere to the diagram shown on the instruction leaflet.
• The settings are already calibrated for the most normal operating conditions.
• If necessary, these can be adjusted as required, using the appropriate trimmers.
REFERENCE STANDARDS
• Conformity with EU directives:
2006/95/EC (low voltage)
2004/108/EC (E.M.C.)
is declared with reference to the following standards:
EN 60730-1
EN 55014-1 e EN 55014-2
(A)
Montaggio / Assembly
(B)
1) Regolazione della sensibilità
2) Regolazione della isteresi
1) Adjustment of sensitivity
2) Adjustment of hysteresis
1) Einstellung der Empndlichkeit
2) Einstellung der Hysterese
1) Réglage de la sensibilité
2) Réglage de l’hystérésis
1) Ajuste de la sensibilidad
2) Ajuste de la histéresis
Vemer S.p.A.
I - 32032 Feltre (BL) • Via Camp Lonc, 16
Tel +39 0439 80638 • Fax +39 0439 80619
e-mail: info@vemer.it - web site: www.vemer.it
V3IS00065-121
Mod. VEPAL
Ø 75
134
64
ø 5
30
60
35
3
min. -ax. m
2
70 ux3 l - lux
1
43
max 10 A
cos
= 1
3
0
V
~
5
-
6
0
H
z
~
2
0
1
2
Posizi l fo sullbeonedeora as
Positionf ho on b olease
Piziondl'o ose elasla
sullula prima a cpo
dell'ncioagga
(r 90cicaa
rist al foro)peto
Pition of the os
holon e e th
do fore mebe
fixi, 90ng
from thbe holee as
°
°
3
Vitdi fiaioe ssgg
Fixing sewcr
1
Per fissare la cupola: posizionare la cupola come indicato (1)e ruotarla in senso orario (2)
fino a far sovrapporre l’asola al foro; quindi fissare la vite.
To fix the dome in place:Position the dome as shown (1) and rotate in a clockwise direction
(2) until the holes on the dome and base correspond.
At this point, the screw should be fixed in place.
Per togliere la cupola: Togliere la vite e applicare un movimento contemporaneamente sulla
cupola (1) e sulla base (3)tirandole nel verso della freccia.
To remove the dome:Remove the screw and move the dome (1)and base (3) at the same
time, in the direction of the arrows.
Esempio di collegamento con lampade da 230V
Example of connection with 230V lamps
Exemple de raccordement avec des lampes 230V
Beispiel ir die Verbindung mit Lampen 230V
Ejemplo de conexi6n con làmparas de 230V
Produktspecifikationer
| Varumärke: | Vemer |
| Kategori: | brytare |
| Modell: | Vepal |
Behöver du hjälp?
Om du behöver hjälp med Vemer Vepal ställ en fråga nedan och andra användare kommer att svara dig
brytare Vemer Manualer

28 Augusti 2025
27 Augusti 2025
27 Augusti 2025
27 Augusti 2025
27 Augusti 2025
27 Augusti 2025
27 Augusti 2025
27 Augusti 2025
27 Augusti 2025
brytare Manualer
Nyaste brytare Manualer
27 Mars 2026
26 Mars 2026
26 Mars 2026
24 Mars 2026
24 Mars 2026
23 Mars 2026
22 Mars 2026
22 Mars 2026
22 Mars 2026
21 Mars 2026