Veritas Power Stitch JEANS Bruksanvisning
Läs gratis den bruksanvisning för Veritas Power Stitch JEANS (2 sidor) i kategorin Symaskin. Guiden har ansetts hjälpsam av 52 personer och har ett genomsnittsbetyg på 4.6 stjärnor baserat på 2 recensioner. Har du en fråga om Veritas Power Stitch JEANS eller vill du ställa frågor till andra användare av produkten? Ställ en fråga
Sida 1/2
6
1
3
7
4
8
9
5
2
ON
OFF
11
1
2
3
4
8
2
5
6
7
2
3-43-5
3-45-6
3-45-7
3-45-7
2
7
1
1
2
3
3
6
4
5
3-44-5
S1
S1
3
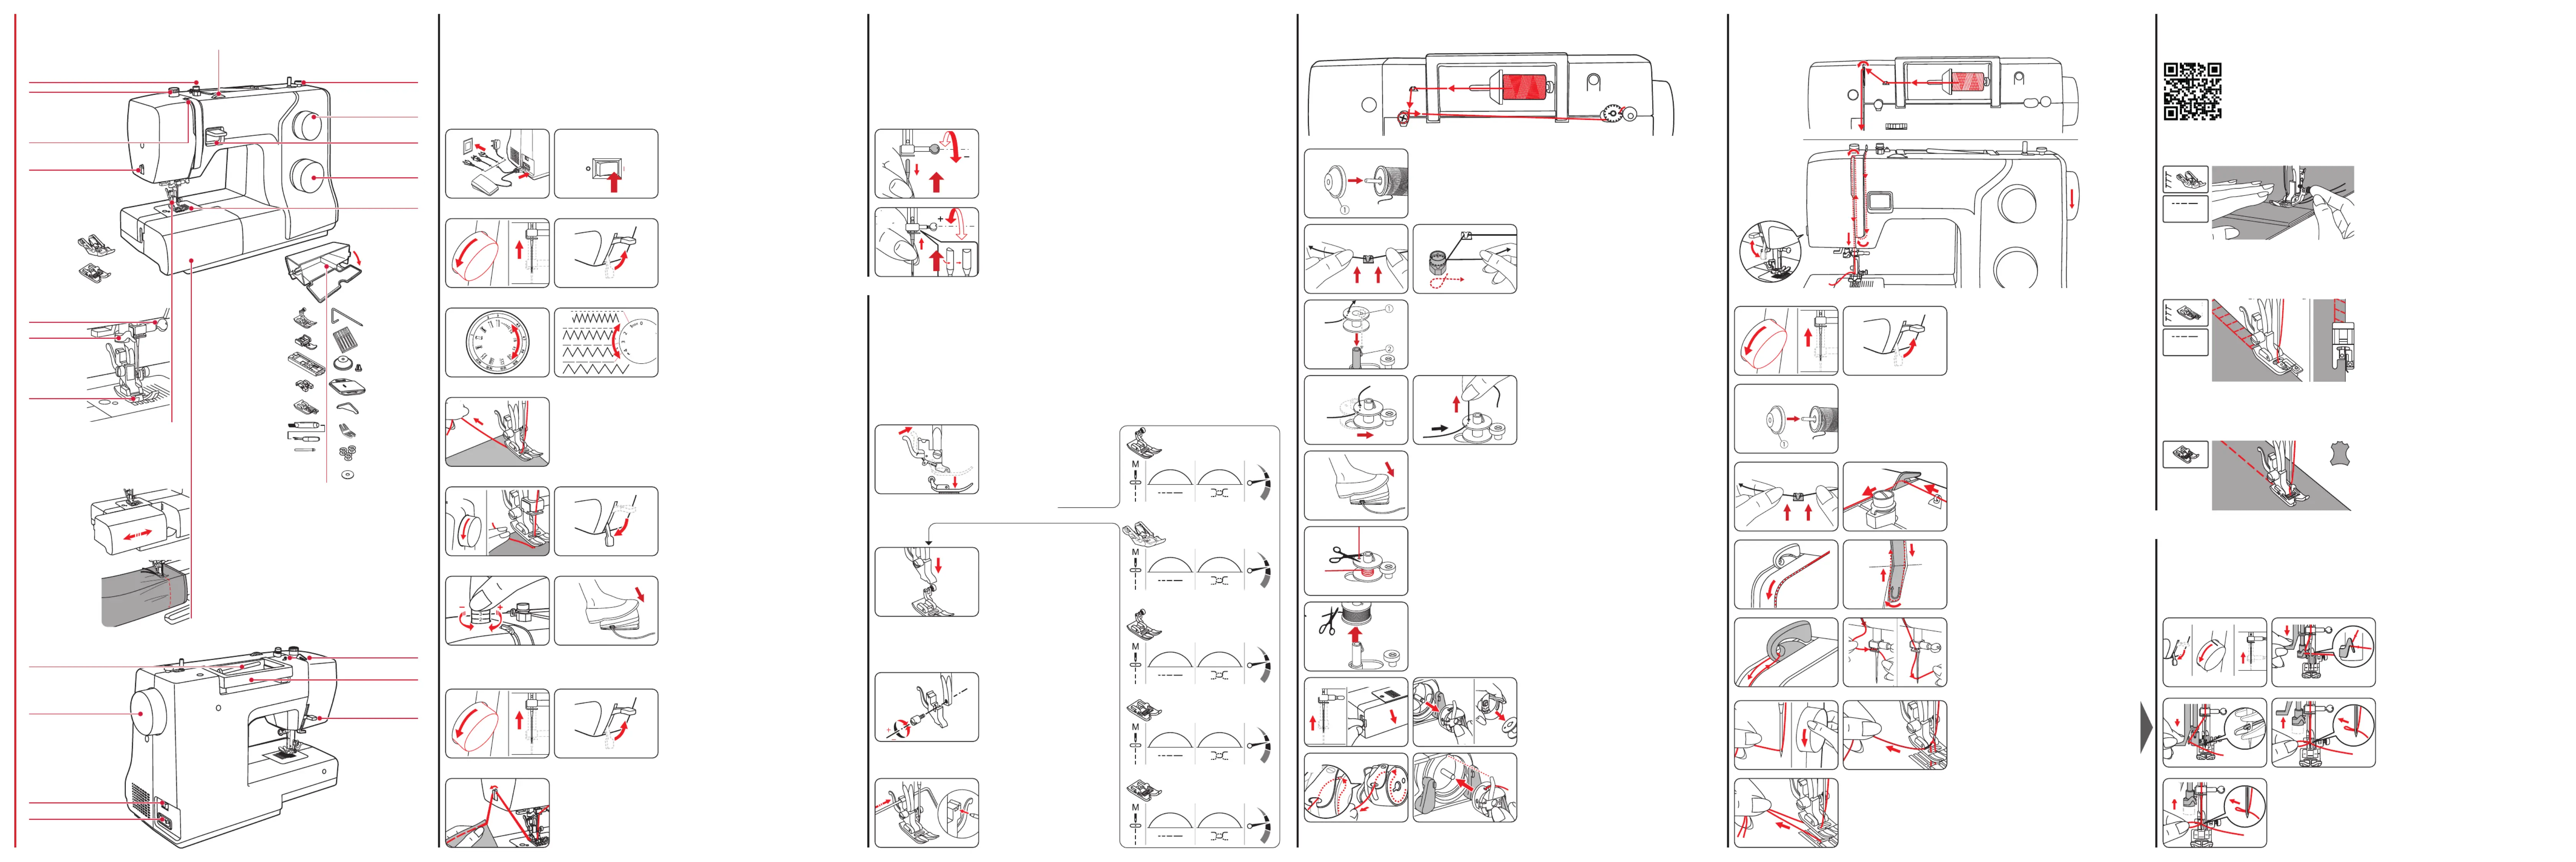
OverviewSewingThreading the upper thread
Starting to sew
Winding and inserting the bobbinInserting the needle
Needle threader
Turn the power switch to o!
Make sure you follow the needle/fabric/thread combinations and use the
suggested presser foot before sewing.
Change the needle regularly, especially when it shows signs of wear or if it causes
problems. Turn the power switch to o ("O") when carrying out below operations!
Attaching and removing the presser foot
Turn the power switch to o when carrying out any of the operations below! Always use
the proper foot for the selected pattern. The wrong foot can cause the needle to break.
Make sure you follow the needle/fabric/thread combinations and use the suggested
presser foot before sewing.
Place the thread and spool holder (1) onto the spool pin. For better sewing quality, choose a proper size of the
spool holder for the thread and attach it next to the spool.
Pull both threads to the back under the presser foot.
Turn the handwheel towards you (counterclockwise) to bring the
needle to highest position. Raise the presser foot lifter.
Draw the thread from the spool and place the thread in between the
thread guide. Guide the thread ahead and pull the thread through the
pre-tension spring as illustrated.
Hold the upper thread with your left hand. Turn the handwheel
counter-clockwise to lower the needle down below the needle plate
then raise it to bring the bobbin thread up.
Continue to guide the thread into the silver discs to keep the thread in
proper tension. Pass the thread under the take-up spring then pull it
upwards as arrow marks illustrated.
Pull the thread to the top then pass the thread through the slotted eye of
the take-up lever. Guide it down afterwards. Pass the thread behind the
flat, horizontal thread guide. Pull the end of it through the needle from front
to rear and pull out about 10 cm of thread.
Due to the special coating on the bottom of this foot, it‘s perfect for sewing
hard-to-feed fabrics, like leather, foam, plastic, imitation leathers and
plastic-coated fabrics, such as vinyl.
Use the extra Power Stitch foot included for heavy fabrics. It ensures that
sewing heavy fabrics or multiple layers of fabric is easy and smooth.
Sewing the overcasting along the edge of the fabric so that the needle
drops (1) over the edge of the fabric on the right side.
Lower the presser foot lifter. Raise the needle to its hightest position by
turning the handwheel toward you until the mark matched
with the line on the machine. Press down the needle threader for a
certain distance and cross the thread over the thread guide.
Press down the needle threader as far as it goes. The needle threader
turns automatically to the threading position and the hook pin passes
through the needle eye. Take the thread in front of the needle and
make sure it is under the hook pin.
Hold the thread loosely and release the lever slowly. The hook turns and passes the thread through the needle
eye forming a loop. Pull the thread through the needle eye.
Turn the handwheel toward you to raise the needle then loosen the needle clamp screw to remove the needle.
When inserting a new needle, keep the flat side of the shaft to the back. Push the needle into the clamp until it
touches the pin and stops. Then secure it by tightening the needle clamp screw.
Lift the sewing foot lifter. Press the rear lever
to release the sewing foot.
Lower the presser foot lifter until the recess
meets the pin. The sewing foot is automati-
cally attached to the presser foot holder.
Lift the presser foot lifter. Align it with the lower
left side of the sewing foot bar. Hold the presser
foot holder and tighten the screw.
Insert the edge and quilting guide into the
slot as shown. Set the width according to your
sewing applications.
Put the machine on a stable table. Connect the machine to a power source
as illustrated. Turn the power switch to on.
Place the fabric under the presser foot, pass the thread under the presser foot, and then pull out about
10cm of thread toward the rear of the machine.
Turn the handwheel towards you (counterclockwise) to bring the
needle to highest position. Raise the presser foot lifter.
Turn the pattern selection dial to select a stitch, then adjust the stitch
length. Generally speaking, the thicker the fabric, thread and needle,
the longer the stitch should be.
Guide both threads to the side of the face plate and into the thread cutter. Pull the threads down to cut them.
Turn the handwheel toward you (counterclockwise) to lower the
needle into the fabric at the beginning of the stitching. Lower the
presser foot lifter.
Adjust presser foot pressure. For very thin fabric, reduce the pressure.
For heavy fabric, increase the pressure. Slowly press down the foot
control to start sewing. Release the foot control to stop the machine.
You can use reverse sewing fby pressing the reverse sewing lever.
Turn the handwheel toward you (counterclockwise) to raise the
needle. Raise the presser foot lifter and remove the fabric.
The needle must be fully raised. Remove the sewing table, then open
the hinged cover. Pull the bobbin case by the hinged latch. Remove the
bobbin of the bobbin case.
Insert the bobbin so that the thread runs in a clockwise direction. Pull the
thread from the slot under the tension spring and through the opening.
Leave a 15 cm tail of thread. Hold the bobbin case by the hinged latch.
Make sure the bobbin case finger fits into the notch at the top of the race
as shown in. Close the hinged cover.
After the bobbin has wound a few rounds, stop the machine and cut the thread near the hole of the bobbin. Conti-
nue filling the bobbin until it is full. Stop the machine, then push the bobbin winder spindle to the left.
Place the thread end through one of the inner holes and place the empty bobbin on the bobbin winder spindle.
Then align the notch with bobbin winder spindle spring.
Cut the thread and then remove the bobbin. When the bobbin winder spindle is pushed to the right position, the
machine is not allowed to sew and the handwheel will be locked.
Push the bobbin to the right. Hold the thread tail securely in one hand.
Step on the foot control to start winding the bobbin.
Draw the thread from the spool and place the thread in between the
thread guide. Wind the thread clockwise around the tension discs.
Place the thread and spool holder (1) onto the spool pin. For better sewing quality, choose a proper size of the
spool holder for the thread and attach it next to the spool.
Non-stick foot
Sewing heavy fabric
Overcasting
Select the best tting foot…
Remove and insert the presser foot holder
Insert the edge/quilting guide
Cotton
Power Stitch foot
Canvas
Synthetic PU
Leather
Hold the sewing table horizontally, then pull toward the left to remove it from
the machine. Attach the sewing table, and then push it to the right.
Free-arm sewing is convenient for sewing tubular areas such as pant hems and
cuffs.
Sewing table and accessory boxPresser foot
Stitch length dial
Reverse sewing button
Needle plate
Bobbin winder stopper
Pattern selector dial
Thread tension dial
Edge/quilt guide
Needles
Spool pin cap
Darning plate
L-screwdriver
Jeans-Support
Bobbin (3x)
Felt cushion
All-purpose presser foot
Zipper foot
Button sewing foot
Overcasting foot
Buttonhole foot
Seam ripper/brush
Second spool pin
Bobbin thread guide
Thread cutter
Thread take-up lever
Presser foot pressure
Power stitch foot
Non-stick foot
Needle clamp screw
All-purpose presser foot
Needle threader
Upper thread guide
Handle
Two-step presser foot lever
Horizontal spool pin
Handwheel
Main power switch
Power cord socket
ÜbersichtNähenUnterfaden aufspulen und einsetzenNadel einsetzenOberfaden einfädelnMit dem Nähen beginnen
Nadeleinfädler
Schalten Sie den Hauptschalter auf die Position «Aus»!
Vergewissern Sie sich vor dem Nähen, dass Sie die Nadel-/Stoff-/
Fadenkombinationen beachten und den empfohlenen Nähfuß
verwenden.
Wechseln Sie die Nadel regelmäßig, insbesondere wenn sie Anzeichen von Verschleiß
aufweist oder Probleme verursacht.
Nähfuß befestigen und abnehmen
Schalten Sie den Netzschalter aus, wenn Sie einen der unten aufgeführten Vorgänge
durchführen! Verwenden Sie immer den richtigen Fuß für das gewählte Muster. Ein
falscher Fuß kann zum Bruch der Nadel führen.
Vergewissern Sie sich vor dem Nähen, dass Sie die Nadel-/Sto-/Fadenkombinationen
beachten und den empfohlenen Nähfuß verwenden.
Setzen Sie den Faden- und Spulenhalter auf den Garnrollenstift. Wählen Sie für bessere Nähqualität einen
Spulenhalter von für das Garn geeigneter Größe und bringen Sie ihn neben der Spule an.
Ziehen Sie beide Fäden nach hinten unter den Nähfuss.
Heben Sie die Nadel auf ihre höchste Position an, indem Sie das
Handrad zu sich drehen, bis der Markierungspunkt mit der Linie auf
der Maschine übereinstimmt. Heben Sie den Nähfußheber an.
Ziehen Sie den Faden von der Spule ab und legen Sie ihn zwischen
die Fadenführung. Führen Sie den Faden vor und ziehen Sie ihn wie
abgebildet durch die Vorspannungsfeder.
Halten Sie den Oberfaden mit Ihrer linken Hand fest. Drehen Sie
das Handrad gegen den Uhrzeigersinn, um die Nadel unter die
Stichplatte abzusenken, um den Unterfaden nach oben zu bringen.
Führen Sie den Faden weiterhin in die silbernen Scheiben, damit
er in der richtigen Spannung bleibt. Führen Sie ihn unter der
Fadenanzugsfeder hindurch und dann nach oben, wie in der
Pfeilmarkierung dargestellt.
Führen Sie den Faden nach oben und durch die geschlitzte Öse des
Aufwickelhebels, anschließend nach unten, danach hinter die flache,
horizontale Fadenführung. Ziehen Sie das Fadenende von vorne nach
hinten durch die Nadel und etwa 10 cm heraus.
Dank der speziellen Beschichtung auf der Unterseite dieses Fußes eignet er
sich perfekt zum Nähen von schwer zu transportierenden Stoffen wie Leder,
Schaumstoff, Kunststoff, Kunstleder und kunststoffbeschichteten Stoffen
wie Vinyl.
Verwenden Sie den extra für schwere Stoffe mitgelieferten Power Stitch
Fuß. Er stellt sicher, dass das Nähen von schweren Stoffen oder mehreren
Lagen Stoff einfach und problemlos funktioniert.
Versäubern Sie den Stoff, indem Sie entlang der Stoffkante nähen. Die
Nadel soll dabei knapp neben der Stoffkante einstechen.
Senken Sie den Nähfußheber ab. Heben Sie die Nadel auf ihre
höchste Position an, indem Sie das Handrad zu sich drehen, bis der
Markierungspunkt mit der Linie auf der Maschine übereinstimmt.
Wickeln Sie den Faden um die Fadenführung am Nadeleinfädler.
Drücken Sie den Hebel so weit wie möglich nach unten. Der Nadelein-
fädler dreht sich automatisch in die Einfädelposition und der Greiferstift
geht durch das Nadelöhr. Bringen Sie den Faden vor die Nadel und
stellen Sie sicher, dass er sich unter dem Greiferstift befindet.
Halten Sie den Faden locker, lassen Sie dann langsam den Hebel los. Der Greifer dreht sich, schiebt den
Faden durch das Nadelöhr, wodurch sich eine Schlaufe bildet. Ziehen Sie den Faden durch das Nadelöhr.
Drehen Sie das Handrad zum Anheben der Nadel nach vorne zu sich, lösen Sie dann die Nadelklemmschraube
zum Entfernen der Nadel.
Setzen Sie die neue Nadel so ein, dass die flache Seite des Nadelschafts zur Rückseite ausgerichtet ist. Setzen
Sie die Nadel ein und schieben Sie sie bis zum Ende nach oben. Sichern Sie sie dann, indem Sie die
Nadelhalterschraube festziehen.
Heben Sie den Nähfußlifter an. Drücken Sie den
hinteren Hebel, um den Nähfuß zu lösen.
Senken Sie den Nähfußlifter ab, bis
die Aussparung auf den Stift trifft. Der
Nähfuß wird automatisch am Nähfußhalter
befestigt.
Heben Sie den Nähfußlifter an. Richten Sie ihn
an der unteren linken Seite der Nähfußstange
aus. Halten Sie den Nähfußhalter und ziehen
Sie die Schraube fest.
Setzen Sie die Kanten- und Steppführung wie
abgebildet in den Schlitz ein. Stellen Sie die
Breite entsprechend Ihren Nähanwendungen
ein.
Stellen Sie das Gerät auf einen stabilen Tisch. Schließen Sie das Gerät
wie abgebildet an eine Stromquelle an. Bringen Sie den Hauptschal-
ter in die Ein-Position.
Legen Sie den Stoff unter den Nähfuß, führen Sie den Faden unter dem Nähfuß hindurch und ziehen Sie dann
etwa 10 cm Faden zur Rückseite der Maschine heraus.
Heben Sie die Nadel auf ihre höchste Position an, indem Sie das
Handrad zu sich drehen, bis der Markierungspunkt mit der Linie auf
der Maschine übereinstimmt. Heben Sie den Nähfußheber an.
Drehen Sie das Musterwahlrad, um einen Stich auszuwählen, und
stellen Sie dann die Stichlänge ein. Generell gilt: Je dicker der Stoff,
der Faden und die Nadel, desto länger sollte der Stich sein.
Führen Sie beide Fäden zur Seite der Planscheibe und in den Fadenschneider. Ziehen Sie die Fäden nach unten,
um sie zu schneiden.
Drehen Sie das Handrad in Ihre Richtung (gegen den Uhrzeigersinn),
um die Nadel am Anfang des Stichs in den Stoff abzusenken. Senken
Sie den Nähfußlifter ab.
Passen Sie den Nähfußdruck an. Bei sehr dünnem Stoff verringern
Sie den Druck. Bei schwerem Stoff erhöhen Sie den Druck. Drücken
Sie den Fußanlasser langsam herunter, um mit dem Nähen zu
beginnen. Lassen Sie den Fußanlasser los, um die Maschine anzu-
halten. Sie können rückwärts nähen, indem Sie den Rückwärtsnäh-
hebel drücken.
Drehen Sie das Handrad in Ihre Richtung (gegen den Uhrzeigersinn),
um die Nadel anzuheben. Heben Sie den Nähfußlifter an und
entfernen Sie den Stoff.
Beim Einsetzen und Herausnehmen der Spule muss die Nadel in höch-
ster Position sein. Entfernen Sie den Anschiebetisch und öffnen Sie dann
den Klappdeckel. Ziehen Sie die Spulenkapsel an dem Klappverschluss.
Entfernen Sie die Spule aus der Spulenkapsel.
Spule so einlegen, dass der Faden im Uhrzeigersinn aufgespult ist. Zie-
hen Sie den Faden aus dem Führungsschlitz unter der Spannfeder und
durch die Öffnung. Belassen Sie ein 15 cm langes Fadenende. Halten Sie
die Spulenkapsel an der Klappverriegelung fest. Achten Sie darauf, dass
der Spulenkapselfinger wie in der Abbildung gezeigt in die Aussparung
am oberen Ende des Laufs passt. Schließen Sie den Klappdeckel.
Stoppen Sie das Gerät, nachdem die Spule einige Male umwickelt wurde, und schneiden Sie den Faden nahe
dem Spulenloch ab. Fahren Sie mit dem Auffüllen der Spule fort, bis sie voll ist. Wenn die Spule voll ist, dreht
sie sich nur noch langsam. Stoppen Sie das Gerät, indem Sie den Fuß vom Fußpedal nehmen; drücken Sie
dann die Spuleinrichtung nach links.
Stecken Sie das Fadenende wie abgebildet durch eines der Innenlöcher einer leeren Spule und setzen Sie sie
auf die Spuleinrichtung.
Schneiden Sie den Faden ab und nehmen Sie die Spule ab. Wenn der Spulerstift nach rechts gedrückt wird,
befindet sie sich im Spulenaufwickelmodus; die Maschine kann dann nicht nähen und das Handrad lässt sich
nicht drehen.
Drücken Sie die Spule nach rechts. Halten Sie das Fadenende sicher
in einer Hand.
Drücken Sie auf das Fußpedal, um mit dem Aufspulen des Unterfadens zu beginnen.
Ziehen Sie am Fadenende und führen Sie den Faden zwischen die
Oberfadenführung. Wickeln Sie den Faden im Uhrzeigersinn um die
Spannungsscheiben.
Setzen Sie den Faden- und Spulenhalter auf den Garnrollenstift. Wählen Sie für bessere Nähqualität einen
Spulenhalter von für das Garn geeigneter Größe und bringen Sie ihn neben der Spule an.
Antihaftfuß
Schweren Sto nähen
Versäubern
Den am besten passenden Fuß wählen…
Nähfußhalter entfernen und einsetzen
Einsetzen der Kanten-/Steppführung
Baumwolle
Power Stichfuß
Leinen
Kunstleder
Leder
Anschiebetisch horizontal halten und nach links ziehen, um ihn zu entfernen.
Anschiebetisch horizontal halten und nach rechts schieben, um ihn wieder zu
befestigen.
Das Freiarmnähen ist sehr praktisch zum Nähen schlauchförmiger Bereiche, wie
Hosensäume und Ärmelaufschläge.
Anschiebetisch und ZubehörfachNähfuß
Stichlängenrad
Rückwärtsnähtaste
Stichplatte
Begrenzung für Spuleinrichtung
Stichwahlrad
Fadenspannungsregler
Kanten-/Quiltführung
Nadeln
Garnrollenkappe
Stopfplatte
L-Schraubendreher
Kappnahtplatte
Spule (3x)
Filzkissen
Allzweck-Nähfuß
Reißverschlussfuß
Knopfannähfuß
Kantenumnähfuß
Knopflochfuß
Nahttrenner/ Reinigungspinsel
Zweiter Garnrollenstift
Unterfadenspulführung
Fadenabschneider
Fadenhebel
Nähfußdruck
Power Stitch Fuß
Antihaftfuß
Nadelbefestigungsschraube
Allzweck-Nähfuß
Nadeleinfädler
Oberfadenführung
Tragegriff
Zweistufen-Nähfußhebel
Horizontaler Garnrollenstift
Handrad
Hauptschalter
Netzanschlussbuchse
Produktspecifikationer
| Varumärke: | Veritas |
| Kategori: | Symaskin |
| Modell: | Power Stitch JEANS |
Behöver du hjälp?
Om du behöver hjälp med Veritas Power Stitch JEANS ställ en fråga nedan och andra användare kommer att svara dig
Symaskin Veritas Manualer

11 Augusti 2025
10 Augusti 2025
10 Augusti 2025
10 Augusti 2025
10 Augusti 2025
10 Augusti 2025
10 Augusti 2025
10 Juli 2025
4 September 2024
3 September 2024
Symaskin Manualer
Nyaste Symaskin Manualer
10 Mars 2026
8 Mars 2026
8 Mars 2026
7 Mars 2026
7 Mars 2026
7 Mars 2026
7 Mars 2026
6 Mars 2026
6 Mars 2026
6 Mars 2026