Voltcraft AM-72x72 Bruksanvisning
Voltcraft Inte kategoriserad AM-72x72
Läs gratis den bruksanvisning för Voltcraft AM-72x72 (4 sidor) i kategorin Inte kategoriserad. Guiden har ansetts hjälpsam av 25 personer och har ett genomsnittsbetyg på 4.8 stjärnor baserat på 3 recensioner. Har du en fråga om Voltcraft AM-72x72 eller vill du ställa frågor till andra användare av produkten? Ställ en fråga
Sida 1/4
BEDIENUNGSANLEITUNG
VERSION 08/12
AM-72X72 EINBAU-MESSGERÄT
BEST.-NR.: 10 35 16300 V/ACBEST.-NR.: 10 35 2025 V/AC
BEST.-NR.: 10 35 1815 V/ACBEST.-NR.: 10 35 2140 V/AC
BESTIMMUNGSGEMÄSSE VERWENDUNG
Analog-Einbauinstrumente zum Einbau in Schaltschränke oder Anzeigetafel. Der Anschluss erfolgt
direkt ohne externe Bauteile; Die entsprechenden Vorwiderstände/Stromshunt´s sind bereits integriert.
Sie dürfen nur im eingebauten Zustand in Betrieb genommen werden. Die entsprechenden Vorschriften
müssen beachtet werden. Die Einbauinstrumente sind mit verschiedenen Messbereichen und Messwerken
erhältlich. Der Skalenzeiger kann an der frontseitigen Schraube feinjustiert werden. Beachten Sie die
entsprechenden technischen Daten. Eine Verwendung in Feuchträumen oder im Freien ist nicht zulässig.
Das gesamte Produkt darf nicht geändert bzw. umgebaut werden! Der Einbau und die Installation darf nur
durch eine Fachkraft erfolgen, welche mit den erforderlichen Vorschriften und möglichen Gefahren vertraut
ist. Die Sicherheitshinweise sind unbedingt zu beachten!
Aus Sicherheits- und Zulassungsgründen (CE) dürfen Sie das Produkt nicht umbauen und/oder verändern.
Falls Sie das Produkt für andere Zwecke verwenden, als zuvor beschrieben, kann das Produkt beschädigt
werden. Außerdem kann eine unsachgemäße Verwendung Gefahren wie zum Beispiel Kurzschluss, Brand,
Stromschlag, etc. hervorrufen. Lesen Sie sich die Bedienungsanleitung genau durch und bewahren Sie
diese auf. Reichen Sie das Produkt nur zusammen mit der Bedienungsanleitung an dritte Personen weiter.
Das Produkt entspricht den gesetzlichen, nationalen und europäischen Anforderungen. Alle enthaltenen
Firmennamen und Produktbezeichnungen sind Warenzeichen der jeweiligen Inhaber. Alle Rechte
vorbehalten.
LIEFERUMFANG
•Einbau-Messgerät
•Montagematerial
•Bedienungsanleitung
SICHERHEITSHINWEISE
Lesen Sie sich die Bedienungsanleitung aufmerksam durch und beachten Sie insbesondere
die Sicherheitshinweise. Falls Sie die Sicherheitshinweise und die Angaben zur
sachgemäßen Handhabung in dieser Bedienungsanleitung nicht befolgen, übernehmen
wir für dadurch resultierende Personen-/Sachschäden keine Haftung. Außerdem erlischt in
solchen Fällen die Gewährleistung/Garantie.
a) Personen / Produkt
•Das Produkt ist kein Spielzeug. Halten Sie es von Kindern und Haustieren fern.
•Lassen Sie das Verpackungsmaterial nicht achtlos liegen. Dieses könnte für Kinder zu einem
gefährlichen Spielzeug werden.
•Schützen Sie das Produkt vor extremen Temperaturen, direktem Sonnenlicht, starken
Erschütterungen, hoher Feuchtigkeit, Nässe, brennbaren Gasen, Dämpfen und Lösungsmitteln.
•Setzen Sie das Produkt keiner mechanischen Beanspruchung aus.
•Wenn kein sicherer Betrieb mehr möglich ist, nehmen Sie das Produkt außer Betrieb und
schützen Sie es vor unbeabsichtigter Verwendung. Der sichere Betrieb ist nicht mehr
gewährleistet, wenn das Produkt:
-sichtbare Schäden aufweist,
-nicht mehr ordnungsgemäß funktioniert,
-über einen längeren Zeitraum unter ungünstigen Umgebungsbedingungen gelagert wurde
oder
-erheblichen Transportbelastungen ausgesetzt wurde.
•Gehen Sie vorsichtig mit dem Produkt um. Durch Stöße, Schläge oder dem Fall aus bereits
geringer Höhe wird es beschädigt.
•Beachten Sie auch die Sicherheitshinweise und Bedienungsanleitungen der übrigen Geräte,
an die das Produkt angeschlossen wird.
b) Sonstiges
•Wenden Sie sich an eine Fachkraft, wenn Sie Zweifel über die Arbeitsweise, die Sicherheit
oder den Anschluss des Produktes haben.
•Lassen Sie Wartungs-, Anpassungs- und Reparaturarbeiten ausschließlich von einem
Fachmann bzw. einer Fachwerkstatt durchführen.
Sollten Sie sich über den korrekten Anschluss bzw. Betrieb nicht im Klaren sein oder sollten sich Fragen
ergeben, die nicht im Laufe der Bedienungsanleitung abgeklärt werden, so setzen Sie sich bitte mit unserer
technischen Auskunft oder einem anderen Fachmann in Verbindung.
Voltcraft®, Lindenweg 15, D-92242 Hirschau, Tel. 0180/586 582 7.
SYMBOLERKLÄRUNG
Am Skalenblatt sind verschiedene Symbole angebracht, welche folgende Bedeutung haben:
Einbaulage senkrecht
1.5
Genauigkeitsklasse bezogen auf den
Skalenendwert
~
Wechselspannung/-strom (AC)Drehspulmesswerk
Isolationsspannung; Die Zahl im Stern zeigt die
Isolationsspannung x1000V an
Diode
Impressum
Diese Bedienungsanleitung ist eine Publikation von Voltcraft®, Lindenweg 15, D-92242 Hirschau, Tel.-Nr. 0180/586 582 7
(www.voltcraft.de).
AlleRechteeinschließlichÜbersetzungvorbehalten.ReproduktionenjederArt,z.B.Fotokopie,Mikroverlmung,oderdieErfassungin
elektronischen Datenverarbeitungsanlagen, bedürfen der schriftlichen Genehmigung des Herausgebers. Nachdruck, auch auszugsweise,
verboten.
Diese Bedienungsanleitung entspricht dem technischen Stand bei Drucklegung. Änderung in Technik und Ausstattung vorbehalten.
© Copyright 2012 by Voltcraft®V3_0812_02-HL
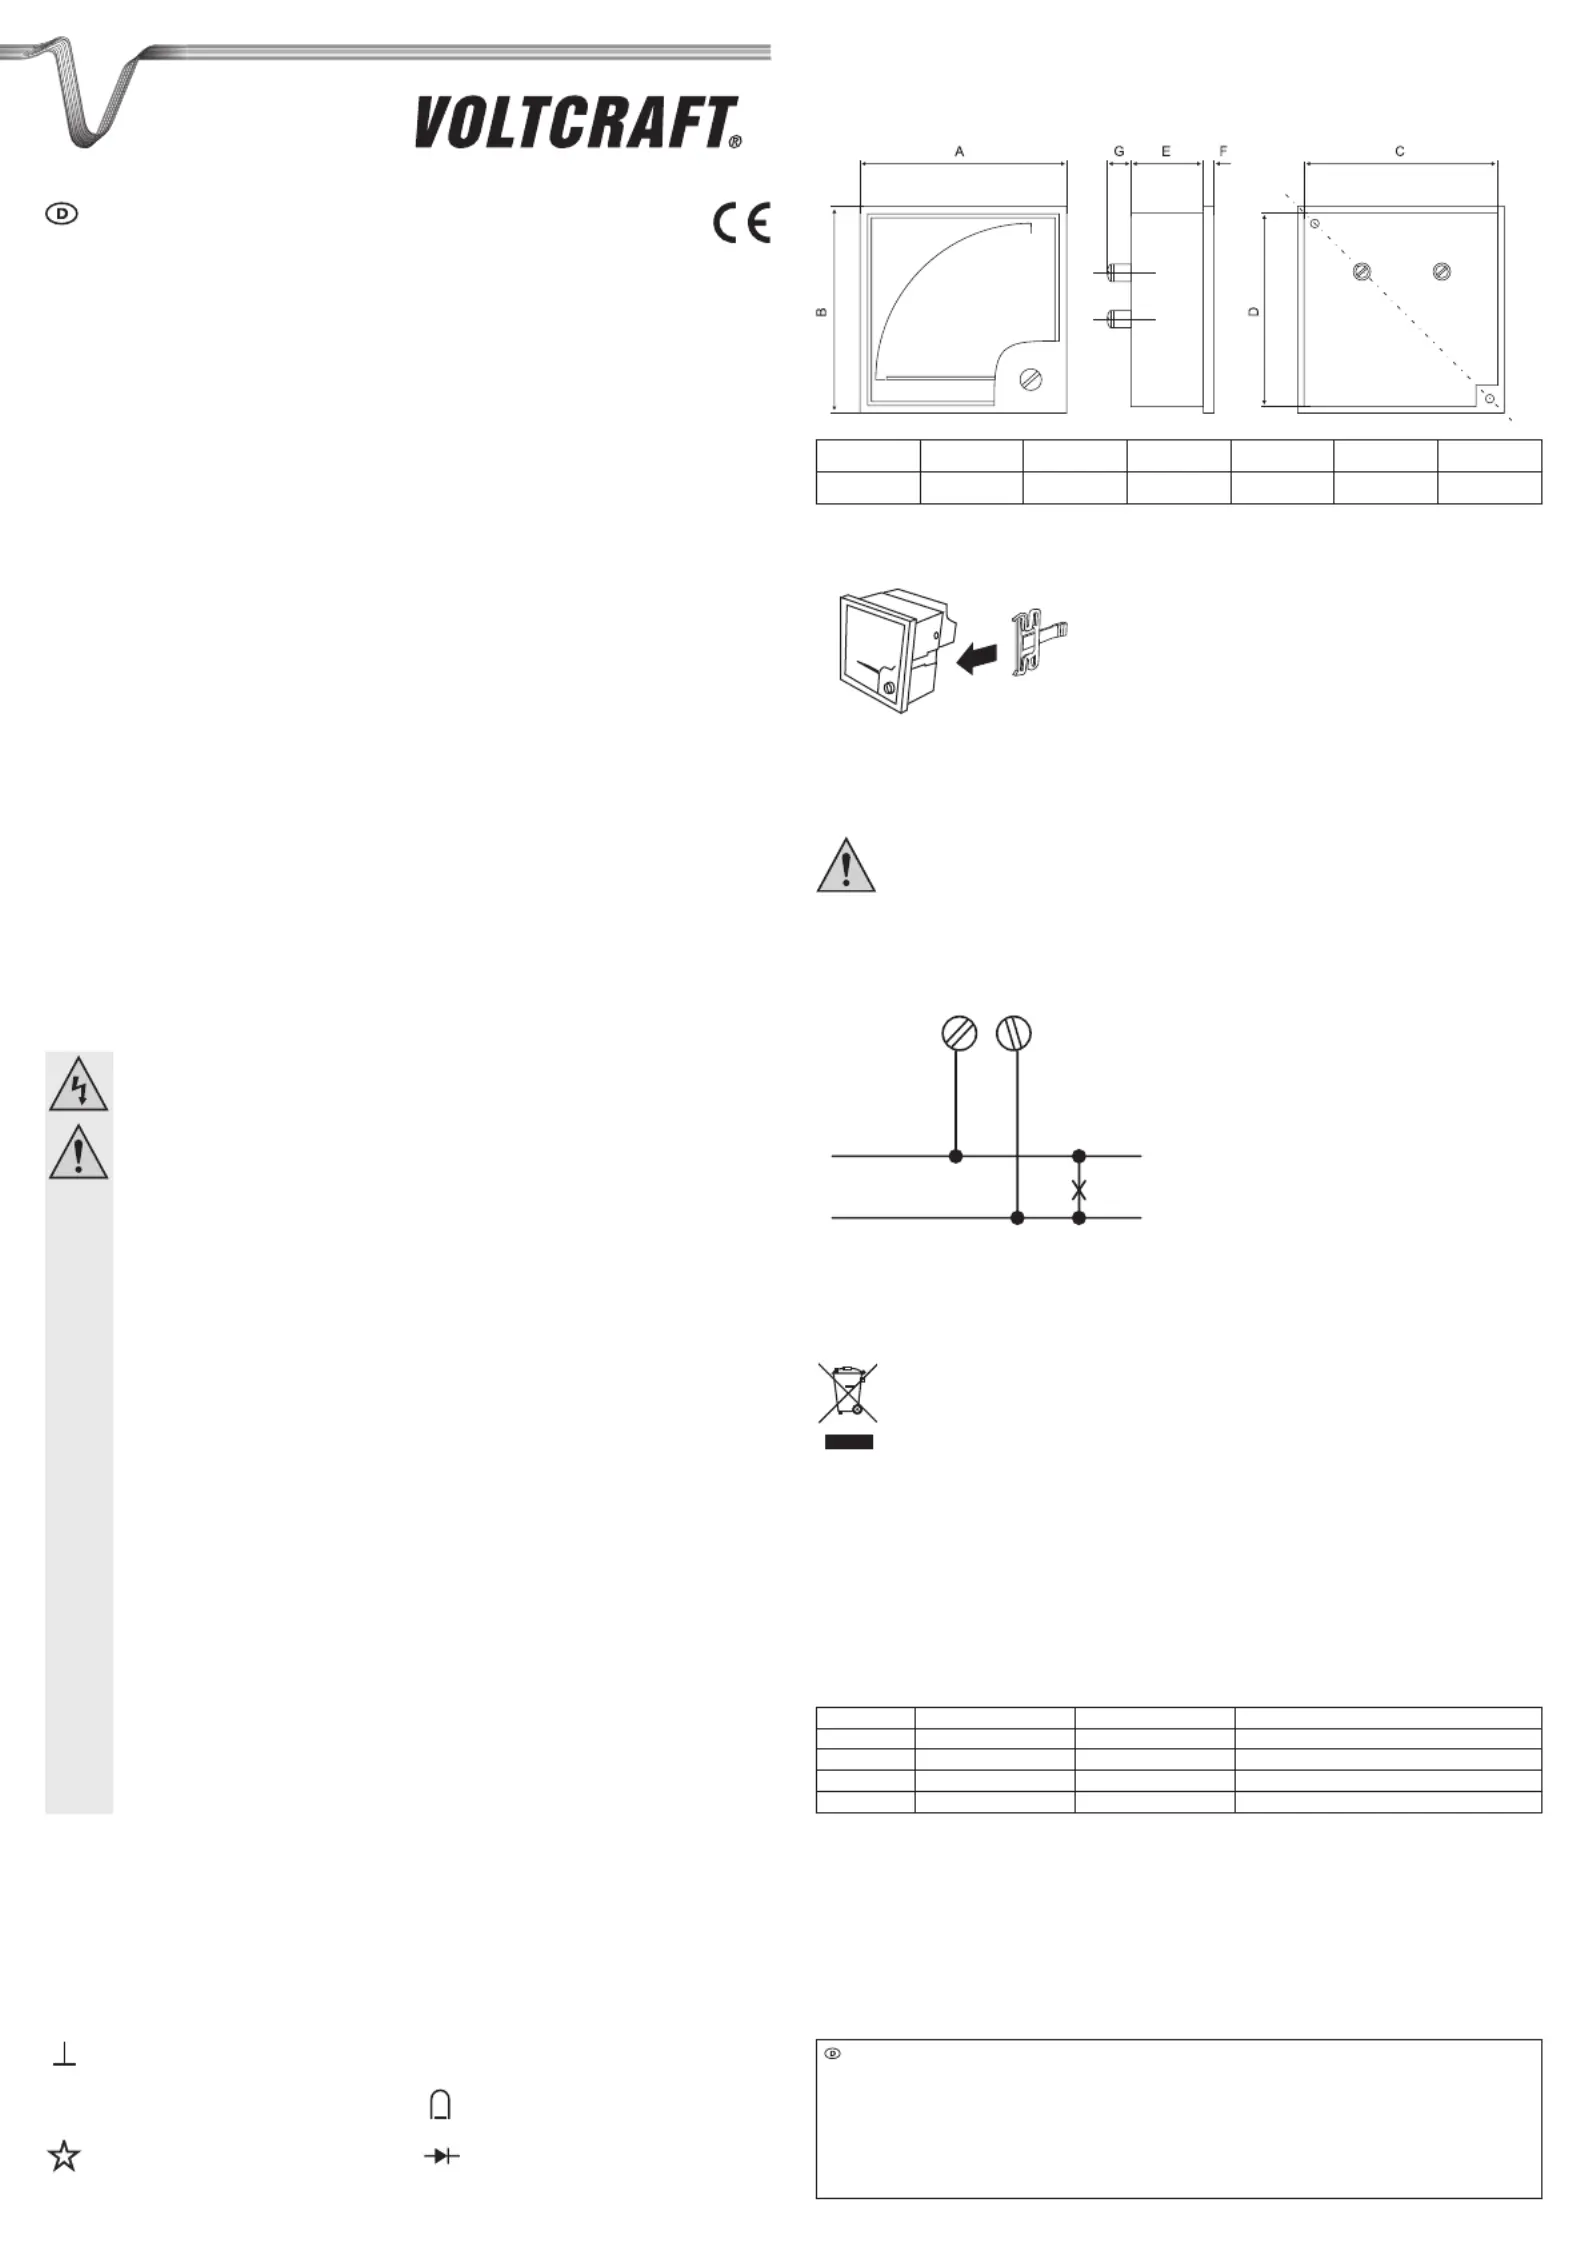
EINBAU
Montieren Sie das Einbauinstrument mit den beiliegenden Montageklammern in eine vorgefertigte,
rechteckige Frontplattenöffnung. Befestigen Sie das Panelmeter sorgfältig. Die entsprechenden
Abmessungen können Sie folgender Skizze entnehmen.
ABCDEFG
72 mm72 mm65 mm65 mm37 mm6,5 mm12,5 mm
1. Befestigen Sie die zwei Befestigungsbügel mit den im Lieferumfang enthaltenen Schrauben,
Distanzscheiben und Schraubenmuttern links und rechts am Rack. Beachten Sie dabei die Ausrichtung
(siehe unten):
2. Befestigen Sie das eingebaute Messinstrument sorgfältig an den Befestigungsbügeln.
ANSCHLUSS
Um eine sachgemäße Inbetriebnahme zu gewährleisten, lesen Sie vor Gebrauch unbedingt
diese Bedienungsanleitung mit den Sicherheitshinweisen vollständig und aufmerksam
durch!
Stellen Sie keinen Anschluss her, wenn die Leitungen unter Spannung stehen.
1. Ziehen Sie den Stecker ab und nehmen Sie die Schutzabdeckung vorsichtig ab.
2. Der Anschluss der Spannungsmessinstrumente erfolgt mittels Parallelschaltung. Schließen Sie das
Instrument an den beiden rückseitigen Schraubklemmen wie abgebildet an.
3. Setzen Sie die Abdeckung wieder auf und befestigen Sie sie nach erfolgtem Anschluss mit den Schrauben.
ENTSORGUNG
Elektronische Geräte sind Wertstoffe und gehören nicht in den Hausmüll.
Entsorgen Sie das Produkt am Ende seiner Lebensdauer gemäß den geltenden gesetzlichen
Bestimmungen.
TECHNISCHE DATEN
Betriebstemperatur -25 bis +55 ºC ...............................
Betriebsluftfeuchtigkeit 20 – 95 % rF .........................
Lagertemperatur -40 bis +70 ºC ...................................
Lagerluftfeuchtigkeit 20 – 95 % rF .............................
Gewicht ca. 103 g .................................................
Best.-Nr.MessbereichMesswerkGenauigkeitsklasse
10 35 160 – 300 V/ACDrehspule1,5
10 35 180 – 15 V/ACDrehspule1,5
10 35 200 – 25 V/ACDrehspule1,5
10 35 210 – 40 V/ACDrehspule1,5
Produktspecifikationer
| Varumärke: | Voltcraft |
| Kategori: | Inte kategoriserad |
| Modell: | AM-72x72 |
| Färg på produkten: | Zwart |
| Vikt: | 388 g |
| Bredd: | 112 mm |
| Djup: | 170 mm |
| Höjd: | 39 mm |
| Instruktioner: | Ja |
| Typ av förpackning: | Doos |
| Processorfrekvens: | - MHz |
| Vormfaktor: | Full-Height/Half-Length (FH/HL) |
| Maximal upplösning: | 7680 x 4320 Pixels |
| Antal HDMI-portar: | 1 |
| HDCP: | Ja |
| HDMI-version: | 2.0b |
| DVI-D-portar: | 1 |
| Integrerad TV-tuner: | Nee |
| Antal DisplayPorts: | 1 |
| NVIDIA G-SYNC: | Ja |
| Antal fans: | 1 ventilator(en) |
| Grafikminne: | 4 GB |
| DisplayPort-version: | 1.4a |
| Typ av anslutning: | PCI Express x16 3.0 |
| Typ av kylning: | Actief |
| Grafikprocessorfamilj: | NVIDIA |
| Grafikprocessor: | GeForce GTX 1630 |
| ANNORLUNDA: | Ja |
| Grafikadapter, minnestyp: | GDDR6 |
| Minnesbuss: | 64 Bit |
| OpenGL version: | 4.6 |
| DirectX version: | 12.0 |
| Minsta systemströmförsörjning: | 300 W |
| Överföringshastighet: | 12 Gbit/s |
| Strömförbrukning (typiskt): | 75 W |
| Stöd för parallell bearbetning: | Niet ondersteund |
| Dual Link DVI: | Ja |
| Maximalt antal visningar per grafikkort: | 3 |
| CUDA-kärnor: | 512 |
| Processorn ökar klockhastigheten: | 1785 MHz |
| NVIDIA Ansel: | Ja |
Behöver du hjälp?
Om du behöver hjälp med Voltcraft AM-72x72 ställ en fråga nedan och andra användare kommer att svara dig
Inte kategoriserad Voltcraft Manualer

1 April 2025
2 Januari 2025
2 Januari 2025
2 Januari 2025
2 Januari 2025
2 Januari 2025
2 Januari 2025
2 Januari 2025
2 Januari 2025
2 Januari 2025
Inte kategoriserad Manualer
Nyaste Inte kategoriserad Manualer
9 April 2025
9 April 2025
9 April 2025
9 April 2025
9 April 2025
9 April 2025
9 April 2025
9 April 2025
9 April 2025
9 April 2025