Voltcraft IR110-6S Bruksanvisning
Voltcraft
Termometer
IR110-6S
Läs gratis den bruksanvisning för Voltcraft IR110-6S (3 sidor) i kategorin Termometer. Guiden har ansetts hjälpsam av 6 personer och har ett genomsnittsbetyg på 4.8 stjärnor baserat på 3.5 recensioner. Har du en fråga om Voltcraft IR110-6S eller vill du ställa frågor till andra användare av produkten? Ställ en fråga
Sida 1/3

Laser radiation can be dangerous, if the laser beam or its reection enters unprotected
eyes. Before using the thermometer, familiarise yourself with the statutory regulations and
instructions for operating such a laser device.
Never look into the laser beam and never point it at people or animals. Laser radiation can
seriously damage your eyes.
If laser radiation enters your eyes, close your eyes immediately and move your head away
from the beam.
If your eyes have been irritated by laser radiation, do not continue to carry out tasks with
safety implications, such as working with machines, working from great heights or close to
high voltage. Do not drive any vehicles until the irritation has completely subsided.
Do not point the laser beam at mirrors or other reective surfaces. The uncontrolled, re-
ected beam may strike people or animals.
Never open the device. Conguration or maintenance tasks must only be completed by a
trained specialist who is familiar with the potential hazards. Improperly executed adjust-
ments might result in dangerous laser radiation.
The product is equipped with a class 2 laser. Laser signs in different languages are in-
cluded in the package. If the sign on the laser is not in your local language, attach the
appropriate sign to the laser.
Caution: Using equipment or procedures other than those described in these instructions
could lead to exposure to dangerous radiation.
6.5 Batteries
Correct polarity must be observed while inserting the batteries.
The batteries should be removed from the device if it is not used for a long period of time to
avoid damage through leaking. Leaking or damaged batteries might cause acid burns when
in contact with skin, therefore use suitable protective gloves to handle corrupted batteries.
Batteries must be kept out of reach of children. Do not leave batteries lying around, as there
is risk, that children or pets swallow them.
All batteries should be replaced at the same time. Mixing old and new batteries in the
device can lead to battery leakage and device damage.
Batteries must not be dismantled, short-circuited or thrown into re. Never recharge nonre-
chargeable batteries. There is a risk of explosion!
6.6 Operation
Consult an expert when in doubt about the operation, safety or connection of the appliance.
If it is no longer possible to operate the product safely, take it out of operation and protect
it from any accidental use. DO NOT attempt to repair the product yourself. Safe operation
can no longer be guaranteed if the product:
–is visibly damaged,
–is no longer working properly,
–has been stored for extended periods in poor ambient conditions or
–has been subjected to any serious transport-related stresses.
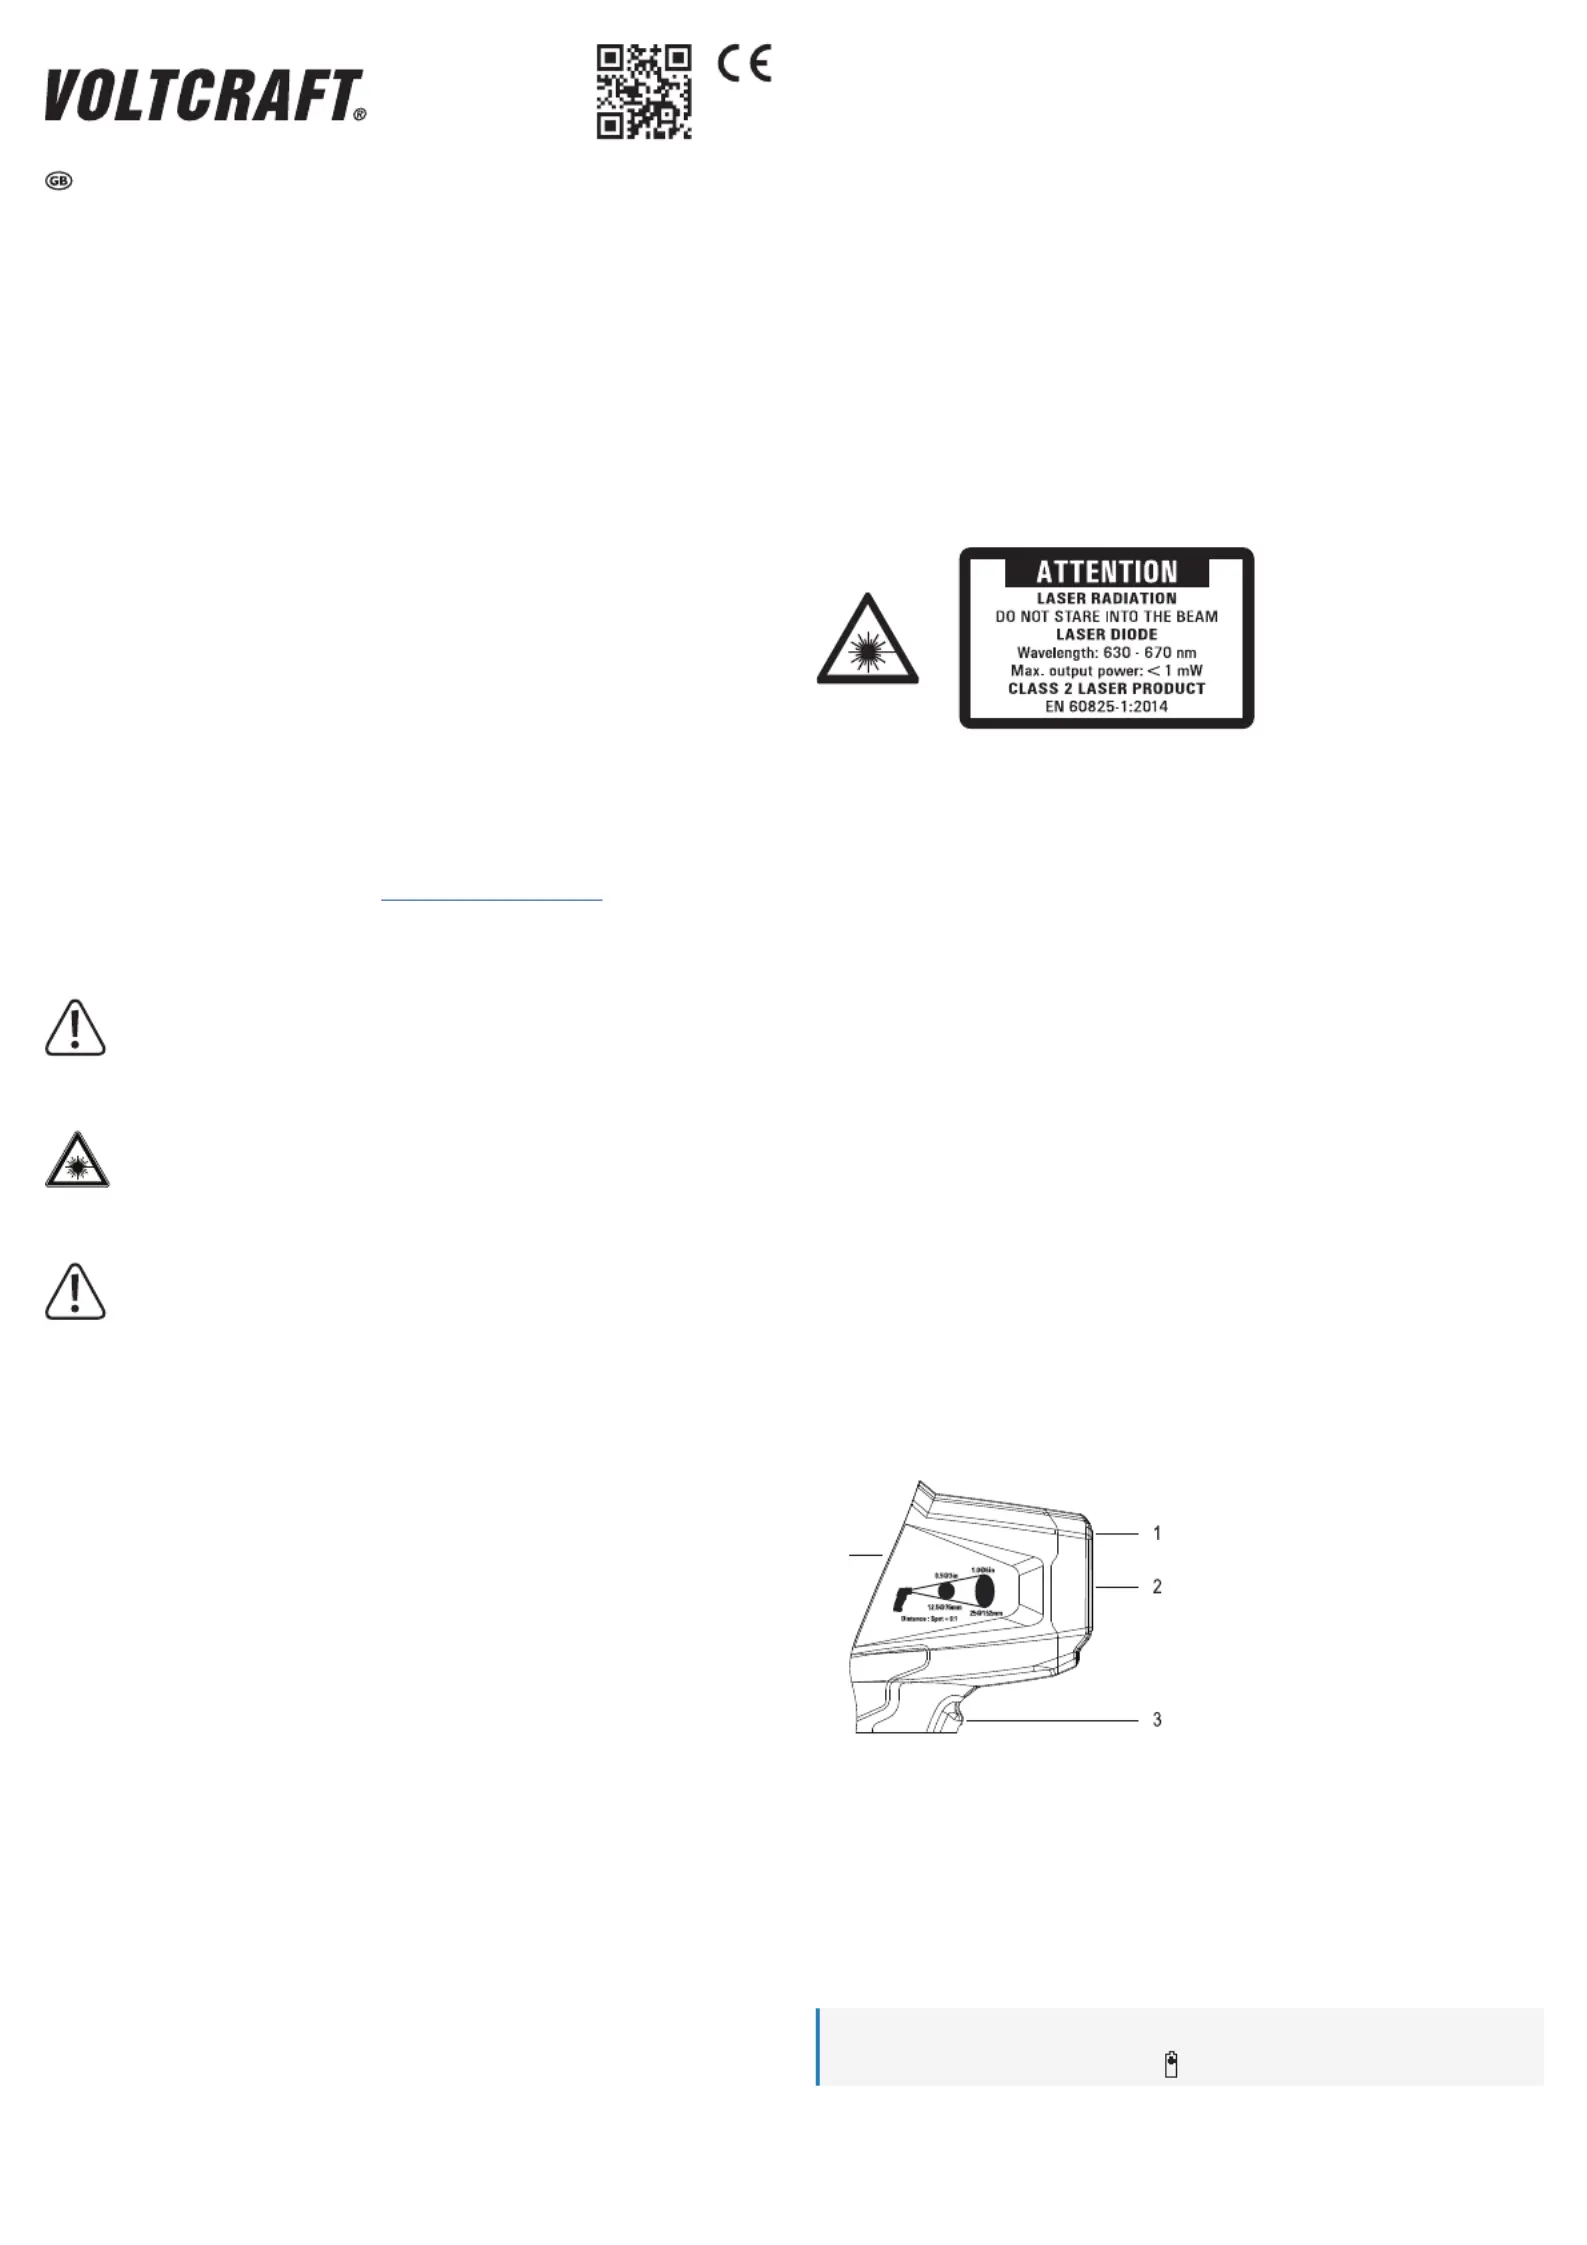
7 Product overview
4
1 Laser outlet
2 Infrared (IR) sensor with lens
3 Measuring button
4 Display
8 Inserting/changing batteries
1. Unlock and then remove the battery compartment cover at the bottom of the handle.
2. Pull out the battery tray.
3. Insert two AAA-sized batteries into the tray. Observe the polarity markings printed on the
tray.
4. Slide the battery tray back in.
5. Reattach the battery compartment cover.
Note:
Replace the batteries if the battery symbol
is shown on the display.
Operating Instructions
IR 110-6S Infrared Thermometer
Item No. 2450948
1 Intended use
The product is used for contact-free measurement of surface temperatures. The infrared sen-
sor detects the emitted heat radiation of an object, and converts this information into a tem-
perature value. The product is not suitable for measuring the body temperature of humans.
The product is suitable only for use in dry environments.
If you use the product for purposes other than those described, the product may be damaged.
Improper use can result in short circuits, res, or other hazards.
The product complies with the statutory national and European requirements. For safety and
approval purposes, you must not rebuild and/or modify the product.
Read the operating instructions carefully and store them in a safe place. Make this product
available to third parties only together with the operating instructions.
All company names and product names are trademarks of their respective owners. All rights
reserved.
2 Delivery content
Product
Laser warning labels
Carrying bag
2x AAA batteries
Operating instructions
3 Latest product information
Download the latest product information at www.conrad.com/downloads or scan the QR code
shown. Follow the instructions on the website.
4 Symbols in this document
The symbol warns of hazards that can lead to personal injury. Read the information
carefully.
5 Symbols on the product
The symbol warns of hazards from exposure to laser beams that can lead to eye
injury.
6 Safety instructions
Read the operating instructions carefully and especially observe the safety
information. If you do not follow the safety instructions and information on
proper handling in this manual, we assume no liability for any resulting per-
sonal injury or damage to property. Such cases will invalidate the warranty/
guarantee.
6.1 General information
The device is not a toy. Keep it out of the reach of children and pets.
Do not leave packaging material lying around carelessly. This may become dangerous
playing material for children.
If you have questions which remain unanswered by these operating instructions, contact
our technical support service or other technical personnel.
Maintenance, modications and repairs must only be completed by a technician or an au-
thorised repair centre.
6.2 Handling
Please handle the product carefully. Jolts, impacts or a fall even from a low height can
damage the product.
6.3 Operating environment
Always comply with the accident prevention regulations for electrical equipment when us-
ing the product in commercial facilities.
Trained personnel must supervise the use of electrical appliances in schools, training facili-
ties and DIY workshops.
Do not place the product under any mechanical stress.
Protect the appliance from extreme temperatures, strong jolts, ammable gases, steam
and solvents.
Protect the product from high humidity and moisture.
Protect the product from direct sunlight.
6.4 Laser
When operating the laser equipment, always make sure that the laser beam is directed
so that no one is in the projection area and that unintentionally reected beams (e.g. from
reective objects) cannot be directed into areas where people are present.

9 Operation
9.1 Distance and precision
Fig. 1
To obtain accurate measurements, consider the following points when measuring:
The measured object must be larger than the IR measuring spot (g. 1).S
The measured object should be at least twice the size of the IR measuring spot (g. 1).S
The smaller the object, the closer it must be to the thermometer.
The D:S ratio is 6:1. At a distance (g. 1) of 6 cm, the size of the IR measuring spot is D
1 cm.
9.2 Surface and environmental constraints
Not all surface materials are suitable for taking measurements. Observe the following con-
straints:
Do not measure surface temperatures of shiny or polished metal surfaces.
Do not measure through transparent surfaces such as glass. It will measure the surface
temperature of the glass instead.
Steam, dust, and smoke can affect the accuracy.
9.3 Switching on/off
1. Press the measuring button to switch the product on.
ÆThe display lights up.
ÆThe product turns off automatically after approx. 15 seconds of inactivity.
9.4 Enabling/disabling the target laser
The target laser helps you direct the infrared sensor at the desired location.
CAUTION
Eye injury from laserlight
Do not point the laser beam at people or animals.
1. Press the measuring button to switch on.
2. Press the button
to enable/disable the target laser.
Æ(If enabled) the symbol
is shown on the display.
Æ(If enabled) the target laser is active while the measuring button is pressed.
9.5 Measuring temperature
Important:
Long measurements of high temperatures at close range cause the product to self-heat.
This results in inaccurate measurements.
The higher the temperature, the greater the measuring distance and the shorter the meas-
uring duration should be.
1
Precondition
DThe product has adjusted to the ambient temperature. This can take up to 30 min.
2
Procedure
1. To measure, press and hold the measuring button and point the infrared sensor at the
object.
ÆThe measured temperature and are shown on the display.SCAN
ÆIf the temperature lies outside the measuring range, the display shows ----.
2. Release the measuring button to freeze the measurement.
ÆThe last measured value and appear on the display.HOLD
9.6 Measuring differential temperature
With the differential temperature function you measure the difference between the highest
and the lowest temperature reading relative to the temperature of a reference object. The rst
measurement serves as the reference temperature.
Temperature
Measuring
location
Reference
temperature
Max
Min
Fig. 2
The graph shows how temperature can vary across measuring locations (or
measuring objects) in relation to the initially set reference temperature.
1. Press the measuring button to switch on.
2. Repeatedly press the button is shown on the display.MODE until DIF
3. Point the infrared sensor at the object.
4. Press and hold the measuring button to start taking measurements.
ÆThe display shows the current temperature and the temperature difference ΔT between
the highest and the lowest temperature reading (g. 2).
9.7 Displaying Maximum/Minimum/Average readings
Besides temperature, the product records and calculates maximum, minimum, and average
temperature. You can set which reading is displayed when taking measurements.
1. Press the measuring button to switch on.
2. Repeatedly press the button MODE to select minimum (MIN), maximum ( ), or average MAX
(AVG) temperature.
9.8 Setting temperature alarms
The temperature alarm function allows you to set a lower and upper temperature threshold.
When measurements fall below the lower or exceed the upper threshold, an alarm sounds.
Thresholds can be enabled independently of each other.
1
Setting thresholds
1. Press and hold the button until MODE ε= ashes on the display.
2. Repeatedly press the button MODE until
(upper threshold) or (lower threshold)
ashes on the display.
3. Press the button ▲to activate the threshold.
ÆThe display switches from (deactivated) to (activated).Off On
4. Press the button MODE to conrm.
ÆThe temperature ashes on the display.
5. Use the buttons ▲ and ▼to set the threshold temperature.
6. Continue pressing the button until no symbols ash on the display.MODE
ÆThe corresponding threshold symbol shows on the display.
ÆYou have set and activated the threshold.
2
Disabling thresholds
Refer to the procedure above for setting thresholds. Instead of activating them, you deactivate
them.
10 Conguration
Use the conguration menu to change and adjust display and measurement settings.
10.1 Available settings
Setting Display indicator Description
Temperature unit
°C/°F
Select between degrees Celsius or degrees
Fahrenheit.
Emissivity
ε=
Set the emissivity level.
Many organic materials have an emissivity of
0.95.
Refer to “Emissivity reference values” for
emissivity levels of different materials.
10.2 Adjusting settings
1. Press and hold the button until MODE ε= ashes on the display.
2. Repeatedly press the button until the display indicator corresponding to the setting MODE
you intend to change ashes on the display.
3. Use the buttons ▲ and ▼to adjust the setting values.
4. Press the button MODE to save the changes.
5. -Exit the menu by pressing the button repeatedly until no symbols ash on the disMODE
play.
ÆYou have changed the setting.

This is a publication by Conrad Electronic SE, Klaus-Conrad-Str. 1, D-92240 Hirschau (www.conrad.com). All rights in-
cluding translation reserved. Reproduction by any method, e.g. photocopy, microlming, or the capture in electronic data
processing systems require the prior written approval by the editor. Reprinting, also in part, is prohibited. This publication
represents the technical status at the time of printing.
Copyright 2021 by Conrad Electronic SE. *2450948_V1_1121_02_mh_jh_en_(2)
11 Care and cleaning
11.1 Housing
Important:
–Do not use aggressive cleaning agents, rubbing alcohol or other chemical solutions.
They damage the housing and can cause the product to malfunction.
–Do not immerse the product in water.
1. Use a dry, lint-free cloth to clean the product.
11.2 Infrared sensor lens
Important:
–Do not use any acidic, alcoholic or other solvents or rough, linty cloth to clean the lens.
–Avoid applying too much pressure when cleaning the lens.
1. Remove loose particles with clean compressed air and wipe off remaining residues with a
ne lens brush.
2. Clean the surface using a lens cloth or a clean, soft, lint-free cloth. The cloth can be mois-
tened with water or a lens cleaning solution to remove ngerprints and other residues.
12 Disposal
12.1 Product
Electronic devices are recyclable waste and must not be disposed of in the house-
hold waste. At the end of its service life, dispose of the product in accordance with
applicable regulatory guidelines.
12.2 (Rechargeable) batteries
Remove any inserted (rechargeable) batteries and dispose of them separately from the prod-
uct. You as the end user are required by law (Battery Ordinance) to return all used (recharge-
able) batteries. Disposing of them in the household waste is prohibited.
Contaminated (rechargeable) batteries are labeled with this symbol to indicate that
disposal in the domestic waste is forbidden. The designations for the heavy metals
involved are: Cd = Cadmium, Hg = Mercury, Pb = Lead (name on (rechargeable)
batteries, e.g. below the trash icon on the left).
Used (rechargeable) batteries can be returned to collection points in your municipality, our
stores or wherever (rechargeable) batteries are sold. You thus fulll your statutory obligations
and contribute to the protection of the environment.
Before disposal, the exposed contacts of batteries must be fully covered with a piece of ad-
hesive tape to prevent short-circuits. Even if batteries are depleted, the remaining energy can
become dangerous in the event of a short-circuit (bursting, severe heating, re, explosion).
13 Emissivity reference values
Note:
The emissivity levels listed in the following table are approximate values. Parameters such
as the shape and characteristics of the material can affect the emissivity of an object.
Surface Emissivity Surface Emissivity
Asphalt 0.90 – 0.98 Varnish (matt) 0.97
Concrete 0.94 Mortar 0.89 – 0.91
Ice 0.96 – 0.98 Paper 0.70 – 0.94
Ferric oxide 0.78 – 0.82 0.85 – 0.95Plastic
Soil/humus 0.92 – 0.96 Sand 0.9
Hard plaster 0.80 – 0.90 Textiles 0.9
Glass, ceramics Water0.90 – 0.95 0.92 – 0.96
Rubber (black) 0.94 Bricks 0.93 – 0.96
Varnish 0.80 – 0.95
14 Technical data
14.1 Power supply
Power supply 3 V, 2 x 1.5 V AAA battery ................................
14.2 Measuring
Measuring range 0 to +110 °C (+32 °F to +230 °F) ...........................
Temperature range Accuracy Resolution
0 to +25 °C ±0.7 °C 0.1 °C (0.1 °F)
>+25 to <+45 °C ±0.3 °C 0.1 °C (0.1 °F)
+45 to +110 °C ±0.7 °C 0.1 °C (0.1 °F)
IR measurement optics 6:1 .................
Emissivity 0.1 – 1.0 ......................................
Response time 300 ms ..............................
14.3 Laser
Laser class ................................... 2
Laser wave length 630 – 670 nm ........................
Laser output <1 mW ..................................
14.4 Other
Operating conditions 0 to +50 °C, 10 – 80 % RH .....................
Storage conditions -10 to +60 °C, <80 % RH ........................
Dimensions (W x H x D) 50 x 172 x 93 mm ...............
Weight .......................................... 236 g
Produktspecifikationer
Varumärke: | Voltcraft |
Kategori: | Termometer |
Modell: | IR110-6S |
Behöver du hjälp?
Om du behöver hjälp med Voltcraft IR110-6S ställ en fråga nedan och andra användare kommer att svara dig
Termometer Voltcraft Manualer
22 Juli 2025
22 Juli 2025
21 Juli 2025
21 Juli 2025
5 Oktober 2024
17 September 2024
17 September 2024
17 September 2024
17 September 2024
16 September 2024
Termometer Manualer
- GlobalTronics
- Kyoritsu
- Westfalia
- ClimeMET
- Pancontrol
- FlinQ
- Duronic
- Mobi
- IFM
- CaterChef
- EMOS
- Joy-it
- Pasha
- Telefunken
- CDN
Nyaste Termometer Manualer
29 Juli 2025
29 Juli 2025
28 Juli 2025
28 Juli 2025
19 Juli 2025
17 Juli 2025
17 Juli 2025
16 Juli 2025
16 Juli 2025
16 Juli 2025