VTech VM305 Bruksanvisning
VTech övervakningskamera VM305
Läs gratis den bruksanvisning för VTech VM305 (3 sidor) i kategorin övervakningskamera. Guiden har ansetts hjälpsam av 32 personer och har ett genomsnittsbetyg på 4.5 stjärnor baserat på 7 recensioner. Har du en fråga om VTech VM305 eller vill du ställa frågor till andra användare av produkten? Ställ en fråga
Sida 1/3
User’s manual
VM305
Accessory baby unit
for use with VTech model
VM343
/
VM343-2
Congratulations
on purchasing your new VTech product.
Before using this product, please read
Important safety instructions.
This manual has instructions on how to set
up and pair your new baby unit. For complete
instructions on using the baby unit, see the
user’s manual that comes with your video and
audio monitor.
For support, shopping, and everything new at
VTech, visit our website at
www.vtechphones.com.
Register online to get an additional
3-month warranty!
Visit www.vtechphones.com.
Registration
Register your product online for
enhanced warranty support.
Product news
Learn about the latest VTech
products.
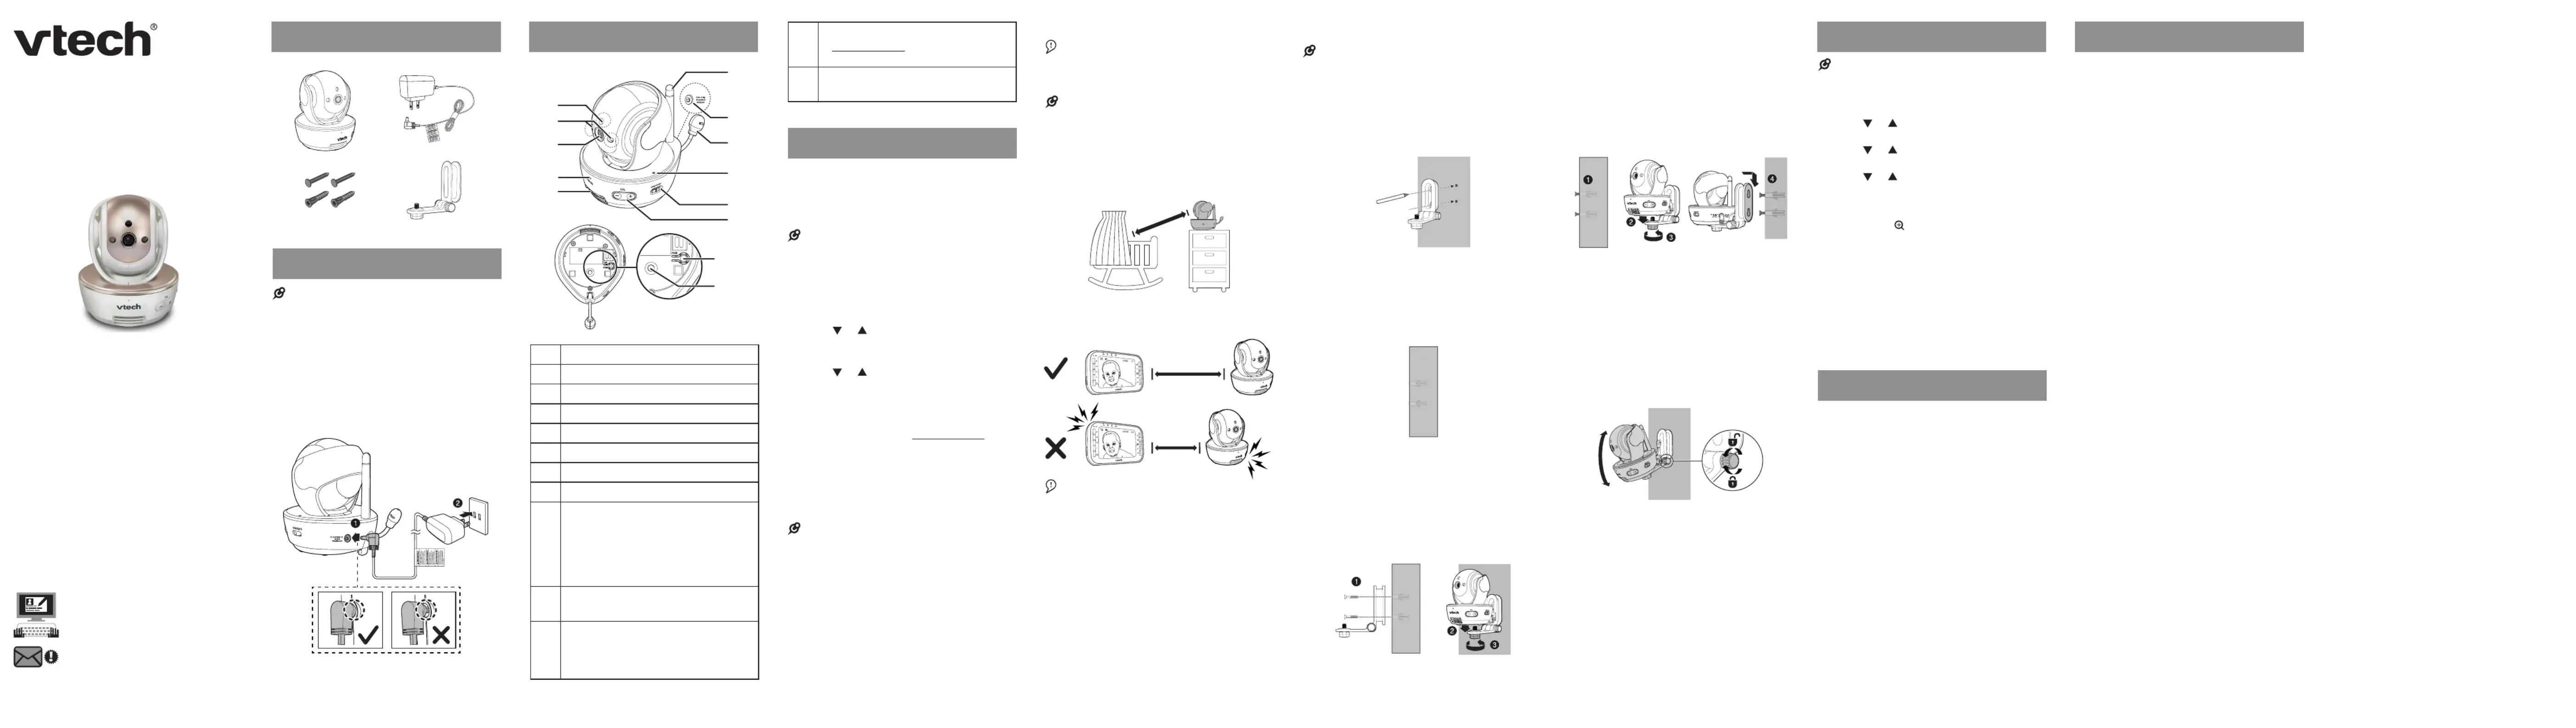
What’s in the box
Connect the baby unit
NOTES
Use only the power adapter supplied with this
product.
Make sure the electrical outlet is not controlled
by a wall switch.
The power adapter is intended to be correctly
oriented in a vertical or floor mount position. The
prongs are not designed to hold the plug in place
if they are plugged into a ceiling, under-the-table
or cabinet outlet.
Make sure the baby unit and the power adapter
cord are out of reach of children.
•
•
•
•
Overview
a
b
d
e
f
g
h
i
j
k
c
l
m
1
Light sensor
2
Infrared LEDs
3
Camera
4
Microphone
5
Speaker
6
Antenna
7
Power jack
8
Temperature sensor
9ON/OFF LED light
On when the baby unit is turned on
and is paired to the parent unit.
Flashes when the baby unit is not
being viewed; or when the link to the
parent unit is lost.
•
•
10
ON/OFF switch
Slide to turn on or off the baby unit.•
11
-/VOL/+
Press to adjust the baby unit speaker
volume. It determines the talkback
volume transmitted from parent unit.
•
12
PAIR
Press and hold to pair to the parent
unit.
•
13Threaded socket
For wall mount installation use.•
Before use
Pair new baby unit
Each newly purchased baby unit () VM305
must be paired to your video and audio
monitor system (/VM343
VM343-2).
NOTES
You can pair a maximum of four baby units to
your parent unit. Each new baby unit must be
paired to the parent unit before use.
Make sure you power on the parent unit before
pairing.
Press when the parent unit is idle.MENU
Press or to choose , Pair/Unpair CAM
then press .SELECT
Press again to choose .SELECTPair CAM
Press or to choose an empty baby unit
slot, then press . SELECT
The parent unit screen displays Press
and hold the pair button at the CAM
for 5 seconds until the power indicator
flashes.PAIR. Immediately press and hold
on the bottom of the baby unit. The LED
light flashes quickly.
When pairing is successful, the screen
displays the view of newly paired baby unit in
SINGLE-CAM mode. The LED light on the
new baby unit remains on.
NOTES
If pairing fails, the screen displays . Pairing failed
Try the pairing process again.
Only one baby unit can be paired at a time.
•
•
1.
2.
3.
4.
5.
•
•
Positioning the baby monitor
CAUTION
Keep the baby units out of the reach of your baby.
Never place or mount the baby units inside the
baby’s crib or playpen.
NOTE
To avoid interference from other electronic
devices, place your baby monitor far away from
devices such as wireless routers, microwaves, cell
phones and computers.
Place the baby units more than 1 meter
(3 feet) away from your baby.
More than 1 meter
(3 feet)
>
1m (3ft)
Place the parent unit more than 1 meter
(3 feet) away from the baby units.
63
ē
63
ē
>
1m (3ft)
<
1m (3ft)
CAUTION
The default volume of your parent unit is level 4.
If you experience high-pitched screeching noise
from your baby monitor while positioning:
Make sure your baby units and parent unit are
more than 1 meter (3 feet) apart, OR
Turn down the volume of your parent unit.
•
•
1.
3.
•
-
-
Mount the baby monitor (optional)
NOTE
Check for reception strength and camera angle
before drilling the holes.
Place the wall mount bracket on a wall and
then use a pencil to mark the top and the
bottom holes as shown. Remove the wall
mount bracket and drill two holes in the wall
(7/32 inch drill bit).
If you drill the holes into a stud, go to step 3.
-OR-
If you drill the holes into an object other than
a stud, insert the wall anchors into the holes.
Tap gently on the ends with a hammer until
the wall anchors are flush with the wall.
Align the wall mount bracket and screws
with the holes in the wall as shown. Tighten
the screw in the middle hole first, so that
the wall mount bracket position is fixed. You
can tighten the other screw in the top hole.
Place the baby unit on the wall mount
bracket. Tighten the screw into the threaded
socket at the bottom to secure the baby unit.
•
1.
2.
3.
-OR-
Insert the screws into the holes and tighten
the screws until only 1/4 inch of the screws
are exposed.
Place the baby unit on the wall mount
bracket. Tighten the screw into the threaded
socket at the bottom to secure the baby unit.
Align the holes on the wall mount bracket
with the screws on the wall, and slide the wall
mount bracket down until it locks into place.
The default angle of the wall mount bracket
is 90 degrees. You can maximize your
baby unit’s viewing angles by tilting the
wall mount bracket.
Hold the baby unit, and then rotate the
knob in anticlockwise direction. This will
loosen the joint of the wall mount bracket.
Tilt your baby unit up or down to adjust to
your preferred angle. Then, rotate the knob
in clockwise direction to tighten the joint
and secure the angle.
Operating range
The operating range of the baby monitor is
up to 300 meters (1,000 feet) outdoors or
50 meters (160 feet) indoors. The actual
operating range may vary depending on
the environmental conditions and other
interferences such as walls, doors and other
obstructions.
4.
Unpair a baby unit
NOTE
Make sure you power on the baby unit and the
parent unit before unpairing the baby unit.
Press when the parent unit is idle.MENU
Press or to choose , Pair/Unpair CAM
then press .SELECT
Press or to choose , then Unpair CAM
press .SELECT
Press or to choose a desired baby
unit, then press .SELECT
The screen displays To unpair CAM X,
press the [ZOOM] key at the Parent
Unit. . Presson the parent unit.
The screen displays Then, press the
[MENU/SELECT] key to confirm.. Press
SELECT to continue.
When unpairing is successful, the screen
displays and returns CAM X is unpaired
to previous menu. If there is no paired
baby unit, the screen displays No CAM is
paired..The LED light on the selected baby
unit flashes slowly.
General product care
To keep this product working well and looking good,
follow these guidelines:
Avoid putting it near heating appliances and
devices that generate electrical noise (for
example, motors or fluorescent lamps).
DO NOT expose it to direct sunlight or moisture.
Avoid dropping the product or treating it roughly.
Clean with a soft cloth.
DO NOT immerse the baby unit in water and do
not clean them under the tap.
DO NOT use cleaning spray or liquid cleaners.
Make sure the baby unit is dry before you connect
them to the mains again.
1.
2.
3.
4.
5.
6.
7.
•
•
•
•
•
•
•
Important safety instructions
When using your equipment, basic safety
precautions should always be followed to reduce the
risk of fire, electric shock and injury, including the
following:
Follow all warnings and instructions marked on
the product.
Adult setup is required.
This product is intended as an aid. It is not
a substitute for responsible and proper adult
supervision and should not be used as such.
This product is not intended for use as a
medical monitor.
Do not use this product near water. For
example, do not use it next to a bath tub, wash
bowl, kitchen sink, laundry tub or swimming
pool, or in a wet basement or shower.
Use only the adapters included with this
product. Incorrect adapter polarity or voltage
can seriously damage the product.
Baby unit power adapter: Output: 5.9 V DC 1A
For pluggable equipment, the socket-outlet
shall be installed near the equipment and shall
be easily accessible.
The power adapters are intended to be correctly
oriented in a vertical or floor mount position.
The prongs are not designed to hold the plug
in place if it is plugged into a ceiling, under-the-
table or cabinet outlet.
Unplug this product from the wall outlet before
cleaning. Do not use liquid or aerosol cleaners.
Use a damp cloth for cleaning.
Do not cut off the power adapters to replace them
with other plugs, as this causes a hazardous
situation.
Do not allow anything to rest on the power
cords. Do not install this product where the
cords may be walked on or crimped.
This product should be operated only from the
type of power source indicated on the marking
label. If you are not sure of the type of power
supply in your home, consult your dealer or local
power company.
Do not overload wall outlets or use an extension
cord.
Do not place this product on an unstable table,
shelf, stand or other unstable surfaces.
This product should not be placed in any area
where proper ventilation is not provided. Slots
and openings in the back or bottom of this
product are provided for ventilation. To protect
them from overheating, these openings must
not be blocked by placing the product on a soft
surface such as a bed, sofa or rug. This product
should never be placed near or over a radiator
or heat register.
Never push objects of any kind into this product
through the slots because they may touch
dangerous voltage points or create a short
circuit. Never spill liquid of any kind on the
product.
1.
2.
3.
4.
5.
6.
7.
8.
9.
10.
11.
12.
13.
14.
15.
To reduce the risk of electric shock, do not
disassemble this product, but take it to an
authorized service facility. Opening or removing
parts of the product other than specified access
doors may expose you to dangerous voltages
or other risks. Incorrect reassembling can cause
electric shock when the product is subsequently
used.
You should test the sound reception every
time you turn on the units or move one of the
components.
Periodically examine all components for
damage.
Be aware of possible loss of privacy while using
public airwaves. Conversations may be picked
up by other nursery monitors, cordless phones,
scanners, etc.
Children should be supervised to ensure that
they do not play with the product.
The product is not intended for use by persons
(including children) with reduced physical,
sensory or mental capabilities, or lack of
experience and knowledge, unless they have
been given supervision or instruction concerning
use of the appliance by a person responsible for
their safety.
SAVE THESE INSTRUCTIONS
Cautions
Use and store the product at a temperature
between 32
o
F and 104
o
F.
Do not expose the product to extreme
cold, heat or direct sunlight. Do not put the
product close to a heating source.
Make sure the baby unit(s) and the adapter
cord(s) are always out of reach of the baby,
at least 3 feet away from the baby or crib, to
avoid a possible strangulation hazard.
Never place the baby unit(s) inside the
baby’s crib or playpen. Never cover the baby
unit(s) with anything such as a towel or a
blanket.
Other electronic products may cause
interference with your baby monitor. Try
installing your baby monitor as far away
from these electronic devices as possible:
wireless routers, radios, cellular telephones,
intercoms, room monitors, televisions,
personal computers, kitchen appliances and
cordless telephones.
16.
17.
18.
19.
20.
21.
1.
2.
3.
4.
5.
Produktspecifikationer
| Varumärke: | VTech |
| Kategori: | övervakningskamera |
| Modell: | VM305 |
Behöver du hjälp?
Om du behöver hjälp med VTech VM305 ställ en fråga nedan och andra användare kommer att svara dig
övervakningskamera VTech Manualer

15 Juni 2025
14 December 2024
14 December 2024
31 Juli 2024
övervakningskamera Manualer
Nyaste övervakningskamera Manualer
2 April 2026
2 April 2026
1 April 2026
1 April 2026
1 April 2026
31 Mars 2026
31 Mars 2026
31 Mars 2026
30 Mars 2026
30 Mars 2026