ArmyTek Barracuda Pro v2 Bruksanvisning
Läs gratis den bruksanvisning för ArmyTek Barracuda Pro v2 (2 sidor) i kategorin Ficklampa. Guiden har ansetts hjälpsam av 36 personer och har ett genomsnittsbetyg på 4.9 stjärnor baserat på 18.5 recensioner. Har du en fråga om ArmyTek Barracuda Pro v2 eller vill du ställa frågor till andra användare av produkten? Ställ en fråga
Sida 1/2
Specifications
Thank you for choosing the products of Armytek Optoelectronics Inc., Canada.
Please read this manual carefully before using the flashlight.
USER MANUAL
THE MOST TECHNICALLY ADVANCED
Warnings
Specifications are subject to change without notice.
Armytek Optoelectronics Inc.
Web: www.armytek.com Email: service@armytek.com
Address: 13-85 West Wilmot St, Richmond Hill, Ontario, L4B 1K7, Canada
* Light output for flashlights with Warm light are about 7% less, beam distances are about 3% less.
** It is allowed to use only protected Li-Ion batteries.
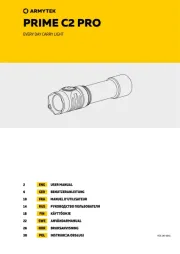
Model
Barracuda Pro XHP35 HI
Barracuda Pro XP-L HI
LED
Cree XHP35 High Intensity
Cree XP-L High Intensity
Optics
Smooth Reflector
Brightness stabilization type
FULL (constant light)
Light output, LED / OTF lumens*
1850 / 1500
13 0 / 11505
Peak beam intensity, candelas
160000
150000
Hotspot / spill
5 ° / 4 0°
Beam distance*
800 meters
775 meters
Modes light output (OTF ,
lumens*) and runtimes
(measured with 2x18650 Li-
Ion 3400mAh until the light
output drops to 10% of the
initial value)
Turbo2
1500 1 lm / h
1150 1.7 lm / h
Turbo1
800 2.8 lm / h
670 3.3 lm / h
Main3
350 8 lm / h
370 6 lm / h
Main2
150 22 lm / h
170 17 lm / h
Main1
30 100 lm / h
28 70 lm / h
Firefly2
1.7 85d lm /
1.7 30d lm /
Firefly1
0.15 500dlm /
0.15 200d lm /
Strobe2
15 1500 2Hz / lm / h
15 1150 3.3Hz / lm / h
Strobe1
15 150 44Hz / lm / h
15 170 34Hz / lm / h
Power source
Body 2x18650
2x18650 Li-Ion**
2 ** 4 18350 ** x18650 Li-Ion / x Li-ion /
4xRCR123 Li-ion** / 4xCR123A
Body 1x18650
1x18650 Li-Ion
1x18650 Li-Ion / 2x Li-ion /18350 **
2xRCR123 Li-ion** / 2xCR123A
Size and weight (without batteries)
Length mm, body diameter 25.4mm, head diameter mm, weight g245 64 259
Armytek Optoelectronics Inc. is a Canadian manufacturer that produces powerful and reliable flashlights designed especially for your
needs. The components made in the USA and Japan. .10 years no-hassle warranty
§Extreme brightness – LED lumens.1 508
§Unprecedented beam distance up to 800 meters for efficient illumination of large areas.
§Ultra-strong materials and robust construction guarantees total protection harsh impacts or vibrations.
§Light-weight flashlight with constant light and fail-proof reliability.
§Simple operation and continuous runtimes – at middle mode.1 hour at maximal mode and almost 22 hours
§Сonstant brightness with almost discharged batteries and at -25 C outside.º
§The highest IP68 dust- and waterproof standard – more than 5 hours at 50 meters depth.
§Guaranteed durability – stands up the recoil of any gun gauge and falling from 30 meters height.
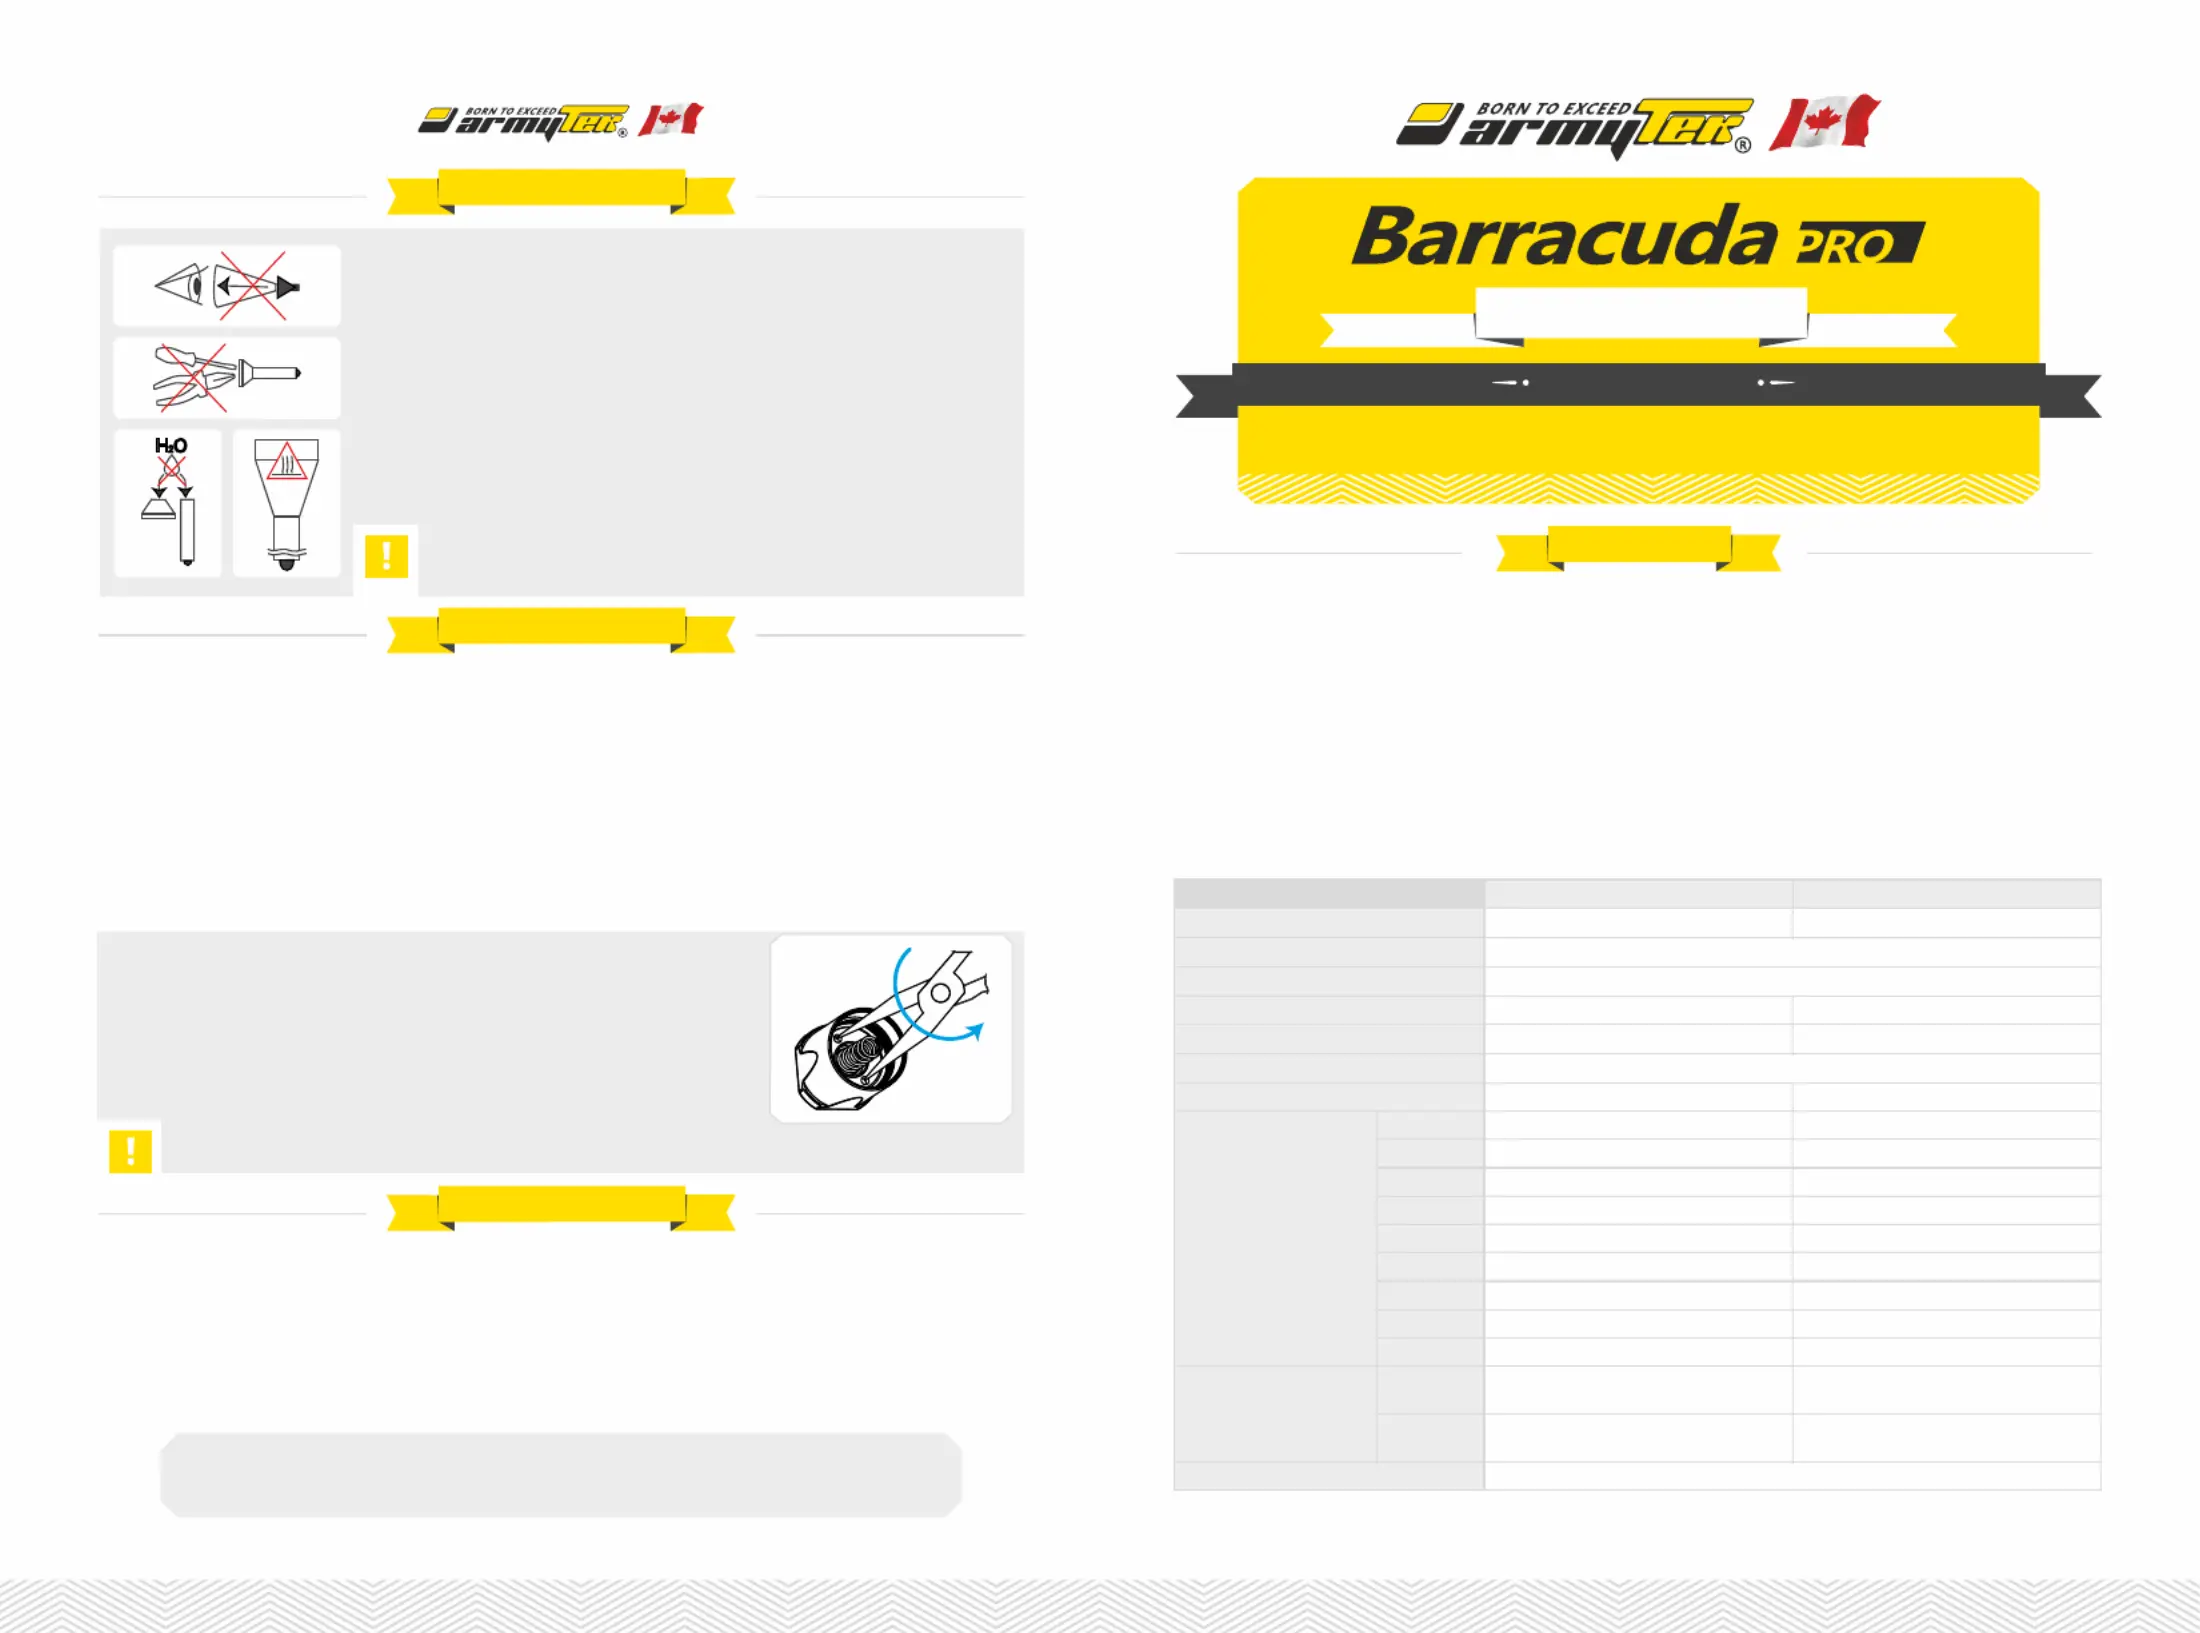
1. Always follow the instructions from this manual and recommendations on battery usage.
2. Apply only the recommended power sources.
3. Do not reverse battery polarity.
4. Do not use different power sources together, i.e. old ones with new ones, charged with
discharged. Do not use different types of batteries combined as the element with less
capacity can be damaged.
5. Do not modify or recast the flashlight and its components as it will deprive you of the
warranty.
6. Do not allow water or any other liquid to leak into the flashlight.
7. Do not aim a switched-on flashlight at people's or animals' eyes – it can cause temporary
blindness.
8. Do not allow children to use the flashlight without your assistance.
The producer will not be liable for any harm done to the user if it was caused by
improper use of the product.
Care and Storage
Service and Warranty
Do not disassemble the flashlight except for unscrewing the thread ring gage and replacing the rubber button. There are no
other parts in the flashlight that can be replaced by the user.
It is recommended to clean the threads and O-ring off dirt and old grease once or twice per year. Remember that protection s reliable
from water and dust cannot be provided by worn out sealing. The fouling as well as lack of lubricant cause fast wear-out of threads and
sealing rings. To clean the threads do the following:
1. Unscrew the tailcap and remove the sealing ring carefully with a toothpick (do not use sharp metal things as they can damage the ring).
2. Wipe the sealing ring thoroughly with a soft cloth (or tissue). Do not use solvents. If the sealing ring is worn out or damaged
replace it by a new one.
3. Clean the metal threads with a brush using ethanol. Be careful not to allow the applied liquid to get inside the flashlight or tailcap as
it can cause fails in functionality of the flashlight.
After cleaning lubricate the thread and the sealing ring with polyalphaolefin-based silica grease, e.g. Nyogel 760G.The application of
automotive and other improper grease can cause swelling and damage of the sealing rings.
In case of active operation and exploitation in dusty environments, it is recommended to perform cleaning and lubricating of the parts
as often as required.
Armytek provides free warranty repair for 10 years (excluding batteries, chargers, switches and connectors which have 2 years
warranty) from the date of buy with the document confirming the purchase.
Guarantee does not extend to damage during:
1. Improper usage.
2. Attempts to modify or repair the flashlight by nonqualified specialists.
3. Longtime application in chlorinated or polluted water, or other liquids (other than water).
4. High temperatures and chemicals' exposure (including the exposure of liquid from defected batteries).
5. Usage of low-quality batteries.
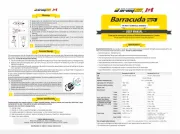
In case the rubber button is damaged, it should be replaced. You can also replace the switch with
the spring in the same way. Replacement order:
1. Unscrew the tailcap.
2. Unscrew the first washer inside it to take out the switch. To do so you should use needle-
nose pliers (round-nose pliers or another tool, the most suitable will be expansion pliers).
Use the tool as it is shown at the picture. To replace the rubber button unscrew the second
washer under the switch.
3. Replace the rubber button and assemble the parts in inverse sequence.
Produktspecifikationer
| Varumärke: | ArmyTek |
| Kategori: | Ficklampa |
| Modell: | Barracuda Pro v2 |
Behöver du hjälp?
Om du behöver hjälp med ArmyTek Barracuda Pro v2 ställ en fråga nedan och andra användare kommer att svara dig
Ficklampa ArmyTek Manualer
19 Augusti 2025
6 Augusti 2025
6 Augusti 2025
5 Augusti 2025
11 Juli 2025

11 Juli 2025

10 September 2024
Ficklampa Manualer
- Coleman
- PCE
- Eisemann
- CEL-TEC
- PowerSmith
- NightStick
- LED Lenser
- Silva Schneider
- Schwaiger
- Casalux
- Black Diamond
- Alpen Optics
- Parat
- Kayoba
- Craftsman
Nyaste Ficklampa Manualer
12 Oktober 2025

12 Oktober 2025
9 Oktober 2025
9 Oktober 2025

9 Oktober 2025
8 Oktober 2025
8 Oktober 2025
8 Oktober 2025
8 Oktober 2025
7 Oktober 2025