Avidsen 103954 Bruksanvisning
Avidsen ej kategoriserat 103954
Läs gratis den bruksanvisning för Avidsen 103954 (8 sidor) i kategorin ej kategoriserat. Guiden har ansetts hjälpsam av 18 personer och har ett genomsnittsbetyg på 4.1 stjärnor baserat på 8 recensioner. Har du en fråga om Avidsen 103954 eller vill du ställa frågor till andra användare av produkten? Ställ en fråga
Sida 1/8
CHRONOTHERMOSTAT DIGITAL
Réf. 103954
FR
V5
www.avidsen.com
11
7
13
9
12
4
14
21
14
3
5
10
6
8
1-2
B
outons d'augmentation/
diminution
3Bouton Reset
4Jour de la semaine
5Heure actuelle
6Période de commutation
7Température sélectionnée
8Température actuelle
9Indicateur de charge des piles
10Écran de verrouillage
11
Symbole du fonctionnement
manuel
12Symbole du mode HOLD
13Symbole du mode Vacances
14Logement batterie
Le chronothermostat digital programmable d’Avidsen est
idéal pour contrôler la température d’une pièce (chambre,
cuisine, etc.) et est très simple d’utilisation. Il permet
d’actionner un appareil de chauffage ou de climatisation
à chaque fois que la température ambiante est inférieure
ou supérieure à une température de référence choisie au
préalable par l’utilisateur. De plus, vous pouvez configurer
un programme de chauffage/climatisation différent au
cours d’une même journée ou pour une semaine entière.
Vous pouvez aussi choisir la fonction de verrouillage pour
éviter une utilisation non autorisée. L’installation est très
simple grâce au montage pas à pas décrit dans le manuel.
La fixation et le branchement peuvent être réalisés aussi
bien par un spécialiste que par un particulier.
IMPORTANT : lire attentivement le mode d’emploi avant
de procéder à l’installation.
PRÉCAUTIONS CONCERNANT L’UTILISATION DES BATTERIES
•
Utiliser exclusivement des batteries dont les dimensions
et le voltage sont conformes aux indications.
• S’assurer d’avoir mis en place les piles en respectant
les polarités indiquées dans le logement des piles.
Des polarités non respectées peuvent endommager
le chronothermostat.
• Ne pas mélanger les types de piles, par exemple une
pile alcaline avec une pile zinc-carbone, ou bien d’an-
ciennes piles avec de nouvelles.
•
Dans le cas où le chonothermostat ne serait pas utilisé
pendant une longue durée, le débrancher des appareils
qui y sont connectés et retirer les piles pour prévenir
les dommages causés par d’éventuels écoulements ou
pertes de liquides des piles.
PRÉCAUTIONS À PRENDRE CONCERNANT L’INSTALLATION ET
L’UTILISATION DU CHRONOTHERMOSTAT
• Le chronothermostat digital d’Avidsen est conçu pour
une utilisation exclusivement en intérieur (locaux
fermés, garages, halls d’entrée, etc.). Ne pas installer
dans un environnement extérieur ou dans un endroit
directement exposé à la pluie.
• Ne pas installer dans des endroits très humides.
•
Le chronothermostat ne peut agir que sur un seul
appareil. Le branchement de plusieurs appareils en
cascade ou en série (un radiateur et un ventilateur,
par exemple) ne permet pas de garantir le bon fon-
ctionnement du dispositif.
•
Couper le courant dans toute la maison avant de bran-
cher un appareil.
•
Faire attention au câblage destiné au branchement
de l’appareil et au réseau d’électricité : une erreur de
connexion ou une protection des câbles électriques
pas assez fiable peut endommager le dispositif et
compromettre la sécurité de l’utilisateur.
N.B : la société Avidsen décline toute responsabilité pour
les dommages éventuels causés par une installation non
conforme ou par une utilisation du dispositif différente de
celle décrite dans le présent manuel.
DESCRIPTION
INSTALLATION
•
Percer des trous dans le mur en veillant à ce qu’ils
correspondent aux trous visibles sur le couvercle du
thermostat.
• Insérer les chevilles (fournies) dans le mur.
• Poser le couvercle sur le mur en alignant les trous.
• Insérer les vis (fournies) dans les trous du couvercle et
les fixer avec un tournevis.
CARACTÉRISTIQUES TECHNIQUES
• Plage de température réglable : 7°C - 35°C
(par pas de 0,5°C)
• Plage de température sur l’écran : 0°C - 35°C
(par pas de 0,1°C)
• Capacité de charge : Max 8 (2) A, 230 V
• Piles : DC 3 V 2 x AA (non fournies)
• Précision : ± 0,5 °C
• Indicateur de piles
• Température de stockage : -10°C à +50°C
• Dimensions : 130 x 80 x 32 mm
PROGRAMMATION ET UTILISATION
1) RÉGLAGE DE LA DATE ET DE L’HEURE
La première chose à faire est d’entrer le jour de la semaine
et l’heure actuelle selon les instructions ci-dessous :
•
appuyer sur le bouton « DAY ». Le numéro du jour
commence à clignoter. Utiliser les boutons - et + pour
modifier le jour
•
en appuyant de nouveau sur le bouton « DAY », l’heure
se met à clignoter. Utiliser les boutons - et + pour régler
l’heure. Faire de même pour régler les minutes. Pour
confirmer, appuyer sur « SET ». Les données correctes
sont ainsi enregistrées et l’appareil affiche de nouve-
au l’écran d’accueil (si aucun bouton n’est actionné
pendant au moins 15 secondes, les paramètres sont
automatiquement confirmés et le dispositif revient à
l’écran d’accueil)
2) PROGRAMMATION
Le dispositif peut être programmé pour une période d’une
semaine. Son fonctionnement est automatique et cycli-
que. Il répètera les programmes qui ont été entrés en six
temps de commutation séparés. Il est possible de choisir,
pour chaque jour de la semaine, une température selon
vos envies. Elle peut être choisie pour chaque temps de
commutation.
La température choisie pour une période déterminée restera
valide jusqu’au prochain changement. Ainsi, le thermostat
maintiendra la température programmée pour le temps
de commutation P1 jusqu’à ce que le temps de commu-
tation P2 soit rajouté. Après le passage au temps P2, la
température sélectionnée pour la période P2 sera valide.
Remarque : Le logiciel du thermostat est habilité à au-
gmenter le niveau des périodes à paramétrer seulement
en fonction des numéros de série (P1, P2, etc.).
Avec les paramètres d’usine, le dispositif effectuera le
changement de périodes suivant pour chaque jour de la
semaine.
Les périodes et les températures peuvent être modifiées :
P1 7:00 20°C
P2 9:00 17°C
P3 12:30 20°C
P4 15:00 19°C
P5 17:30 22°C
P6 23:00 17°C
2.1) Création d’un programme
a) Appuyer sur le bouton « SET » pour accéder à l’écran
d’accueil.
b) Appuyer de nouveau sur le bouton « SET », le main-
tenir enfoncé et appuyer en même temps sur le bouton
« PROG ». Le dispositif est alors en mode programmation
et les numéros qui indiquent les jours de la semaine (1 2
3 4 5 6 7) clignotent sur l’écran.
Sélectionner le jour à programmer ou tous les jours de la
semaine en appuyant plusieurs fois sur les boutons - ou
+ sur le boîtier du dispositif. Si vous souhaitez appliquer
le même programme à tous les jours de la semaine, il
faut choisir simultanément tous les jours de la semaine
(1 2 3 4 5 6 7). De cette façon, il n’est pas nécessaire de
programmer chaque jour séparément. Si vous souhaitez
créer un programme différent pour chaque jour, vous de-
vez programmer chaque jour l’un après l’autre. (Si vous
souhaitez appliquer un même programme à plusieurs
jours, il vous suffit de créer ce programme une seule fois
et de l’appliquer aux autres jours choisis grâce au bouton
« COPY », conformément aux instructions du paragraphe
2.2). Appuyer de nouveau sur le bouton « PROG », puis
régler l’heure de démarrage de la période P1. L’heure
clignote et peut être réglée en utilisant les boutons + et –
sur le côté droit du thermostat. Appuyer de nouveau sur
le bouton « PROG » pour régler la température en utilisant
les boutons + et – pour augmenter ou diminuer la valeur.
Pour paramétrer d’autres périodes (P2, P3, P4, P5, P6),
répéter l’opération.
2.2) Copie d’un programme
Tout d’abord, appuyer sur le bouton « SET » pour accéder
à l’écran d’accueil. Puis appuyer sur le bouton « COPY »
pendant environ 3 secondes pour activer la fonction « CO-
PIE ». Le mot « COPY » (COPIE) apparaît à la place des
indicateurs de temps et le numéro « 1 » qui clignote indique
« lundi ». Toutes les conditions sont réunies pour procéder
à la copie d’un programme.
• Sélectionner le jour pour lequel vous voulez copier le
programme en utilisant les boutons + e - présents sur le
boîtier du dispositif.
• Appuyer sur le bouton « COPY » pour copier le programme
du jour sélectionné. Après cela, le numéro qui indique le
jour et le mot COPY arrêtent de clignoter.
Répéter la même opération pour les autres jours pour
lesquels vous souhaitez que ce programme soit répété.
Enfin, appuyer sur le bouton « SET » pour enregistrer
les modifications (si vous n’appuyez sur aucun bouton
pendant au moins 15 secondes, les modifications sont
automatiquement enregistrées). Le dispositif retourne
ensuite à l’écran d’accueil.
ATTENTION ! La fonction « COPIE » est disponible unique-
ment si les jours de la semaine ont été programmés à part.
2.3) Modification du programme
Le programme paramétré précédemment peut être modifié
à tout moment en répétant les étapes de la programmation.
•
Une période activée précédemment peut être désactivée
en réglant l’heure de démarrage de la période à -: - En
utilisant le bouton « SET » pour accéder à l’écran de
programmation et en appuyant sur les boutons « SET »
et « PROG » pour sélectionner le jour pour lequel vous
souhaitez désactiver la programmation.
• Appuyer de nouveau sur « PROG » pour sélectionner
la période pour laquelle vous souhaitez désactiver la
programmation, puis appuyer sur le bouton « DAY » à la
suite de quoi apparaît le symbole - : - sur la période pour
laquelle vous souhaitez désactiver la programmation.
• Pour la réactiver, il suffit de répéter la même procédure
jusqu’à ce que l’heure et la température n’apparaissent
plus à la place du symbole - : -
•
Une fois les modifications effectuées, appuyer sur
« SET » pour enregistrer. Après environ 1 minute, les
modifications sont automatiquement enregistrées. Le
dispositif retourne ensuite à l’écran d’accueil.
•
Si vous souhaitez avoir un programme totalement
différent, appuyez sur le bouton « RESET » pour réi-
nitialiser le dispositif (cela efface le programme et les
paramètres de base). Pour appuyer sur le bouton, ne
pas utiliser d’objets qui pourraient conduire l’électricité,
comme par exemple une mine de crayon. Ensuite,
entrer de nouveau les paramètres de base du ther-
mostat et créer le nouveau programme en suivant les
instructions de la section 2.
3) MODIFICATION TEMPORAIRE DE LA TEMPÉRA-
TURE CORRESPONDANT AU PROGRAMME
Si vous souhaitez utiliser temporairement le dispositif
d’une façon différente de celle programmée (durant les
jours fériés ou les vacances d’hiver, par exemple), vous
pouvez choisir parmi les options décrites dans les para-
graphes 3.1-3.4
Pour simplifier la modification manuelle de la température,
les températures 18°C et 22°C sont associées respecti-
vement aux boutons - et + selon les paramètres d’usine.
Lorsqu’on modifie la température manuellement, si on ap-
puie une fois sur le bouton – ou + , la température atteint
la valeur associée au bouton. Par exemple, si la période
P3 garantit une température de 19°C, on peut atteindre
une température standard de 22°C si nécessaire en appu-
yant une seule fois sur le bouton. Il n’est pas nécessaire
d’appuyer plusieurs fois pour augmenter la température
par pas de 0,5°C.
On peut, par la suite, utiliser les boutons - et + pour
modifier la température par pas de 0,5°C conformément
aux exigences actuelles. Les valeurs des températures
« économie » ou « confort », associées aux boutons, peu-
vent être modifiées en suivant les instructions ci-dessous :
Pour régler la température « économie », appuyer sur le
bouton « SET » et le maintenir enfoncé tout en appuyant
sur le bouton - . Ensuite, régler la température en utili-
sant les boutons – et + . Une fois la température réglée,
appuyer sur le bouton « SET » pour enregistrer la modifi-
cation (après environ 15 secondes, les modifications sont
automatiquement enregistrées). Le dispositif retourne
ensuite à l’écran d’accueil.
Pour régler la température « confort », appuyer sur le
bouton « SET » et le maintenir enfoncé tout en appuyant
sur le bouton + . Ensuite, régler la température en utili-
sant les boutons – et + . Une fois la température réglée,
appuyer sur le bouton « SET » pour enregistrer la modifi-
cation (après environ 15 secondes, les modifications sont
automatiquement enregistrées). Le dispositif retourne
ensuite à l’écran d’accueil.
3.1) Mode manual (HOLD)
Choisir la température grâce aux boutons - et + sur le
boîtier du dispositif et appuyer sur le bouton « HOLD ». Le
dispositif contrôlera la chaudière en fonction de la valeur
choisie. Pour reprendre une utilisation programmée du
thermostat, appuyer sur « SET ».
3.2) Modification de la température jusqu’au pro-
chain programme paramétré
Régler la température en utilisant les boutons - et + sur
le boîtier du dispositif. Apparaît alors sur l’écran l’icône
qui indique que le thermostat a été actionné avec
une commande manuelle.
Le dispositif va contrôler la chaudière selon la valeur choisie
jusqu’au changement suivant prévu par le programme.
Pendant cette modification temporaire, les segments qui
indiquent le temps sur l’écran montrent, en alternance,
l’heure et le temps qui reste à la commande manuelle (par
exemple : 1 H: 0 2, soit 1 heure et 2 minutes). Une fois
le temps écoulé, l’icône disparaît et le dispositif reprend le
programme qui a été paramétré. Si vous souhaitez repren-
dre le programme paramétré sans attendre le changement
suivant, appuyez sur « SET »
3.3) Modification de la température pendant 1 à
9 heure(s) (programme période courte)
Régler la température en utilisant les boutons - et + sur le
boîtier du dispositif, puis appuyer sur « DAY ».
Apparaît alors sur l’écran l’icône avec le numéro « 1 »
qui remplace le numéro de la période. Ce numéro indique
la durée de la modification en heures. Choisir la durée
souhaitée (entre 1 et 9) en utilisant les gros boutons – et
+ Le programme commencera environ 10 secondes après
le réglage. Le dispositif maintient alors la température pen-
dant une durée déterminée. La température choisie peut
être modifiée librement pendant la durée du programme
sans en sortir. Pendant cette modification temporaire, les
segments qui indiquent le temps sur l’écran montrent, en
alternance, l’heure et le temps qui reste à la commande
manuelle (par exemple : 3 H: 0 2, soit, 3 heures et 2 mi-
nutes). Une fois le temps écoulé, l’icône disparaît et le
dispositif reprend le programme comme il a été paramétré.
Si vous souhaitez revenir au programme paramétré avant
que la durée choisie ne soit arrivée à son terme, appuyez
sur « SET »
3.4) Modification de la température pendant 1 à
99 jours (programme vacances)
Régler la température en utilisant les boutons - et + sur le
boîtier du dispositif, puis appuyer sur le bouton « HOLD »
et le maintenir enfoncé pendant au moins 2 secondes.
Apparaît alors sur l’écran l’icône avec l’inscription
-d:01- qui remplace le temps. Elle indique la durée de la
modification en jours. Choisir la durée souhaitée (entre 1
et 99) en utilisant les boutons - et + (1 jour équivaut à
24 heures). Le programme vacances commence environ
10 secondes après le réglage. Le dispositif maintient alors
la température pendant une durée déterminée. La tempéra-
ture choisie peut être modifiée librement pendant la durée
du programme sans en sortir. Pendant cette modification
temporaire, les segments qui indiquent le temps sur l’écran
montrent, en alternance, l’heure et le temps qui reste à la
commande manuelle (par exemple : d: 03, soit 3 jours).
Une fois le temps écoulé, l’icône disparaît et le dispositif
reprend le programme qui a été paramétré. Si vous souhai-
tez revenir au programme paramétré avant que la durée
choisie ne soit arrivée à son terme, appuyez sur « SET »
3.5) Régler la sensibilité de commutation (précision)
Selon les paramètres par défaut, la sensibilité de commu-
tation est de ± 0,2°C (l’écran indique le réglage avec le
symbole «S: 1») qui peut être changé à + 0/-0,2°C (l’écran
affiche le réglage avec le symbole «S: 2 »). La sensibilité
de commutation souhaité peut être réglé en appuyant sur
le « DAY », « COPY », et les boutons - et +, appuyez sur
le bouton « SET» (après environ 15 secondes, les réglages
sont automatiquement reconnus et l’appareil revient à
l’écran principal). En appuyant sur le bouton « RESET »,
la sensibilité de commutation est remis à la valeur par
défaut « de ± 0,2°C ( « S: 1 »).
La sensibilité de commutation ± 0,2°C assurée par les
paramètres d’usine (l’écran affiche le symbole « S: 1 »
pour ce paramètre) vaut en particulier pour les centrales
thermiques à base de radiateur (plaque radiateurs) à faible
inertie thermique, tandis que la sensibilité de commutation
de C + 0 / -0,2 ° (l’écran affiche le symbole « S: 2» pour
ce paramètre) vaut pour les systèmes de chauffage à forte
inertie thermique (par exemple un chauffage par le sol).
3.6) Activation de la fonction de protection de la pompe:
Pour activer ou le désactiver, appuyez sur le bouton « SET
» pour accéder à l’écran principal. Appuyez ensuite sur le
bouton « DAY » et « PROG » puis utilisez les boutons - et
+ pour activer « HP: ON » ou pour désactiver « HP: OF »
4) REMPLACEMENT DES PILES
La durée moyenne des piles est de 1 an. Si l’icône
indiquant un niveau d’énergie faible apparaît sur l’écran,
alors les piles doivent être remplacées. Le dispositif devra
être remis à l’heure et à la date du jour. Mais il gardera en
mémoire le programme paramétré, même sans piles. Vous
ne serez donc pas obligés de reprogrammer le dispositif.
5) RÉINITIALISATION DU THERMOSTAT AVEC LES
PARAMÈTRES D’USINE
En appuyant sur « RESET », le thermostat peut revenir
aux paramètres d’usine. Cela se traduit par l’effacement
du jour, de l’heure exacte, des paramètres de base et
du programme paramétré. Pour appuyer sur le bouton
« RESET », ne pas utiliser d’objets qui pourraient condu-
ire l’électricité, comme par exemple une mine de crayon.
Après la réinitialisation du dispositif, entrer de nouveau
les paramètres de base du thermostat et créer le nouveau
programme en suivant les instructions des sections 2 et 3.
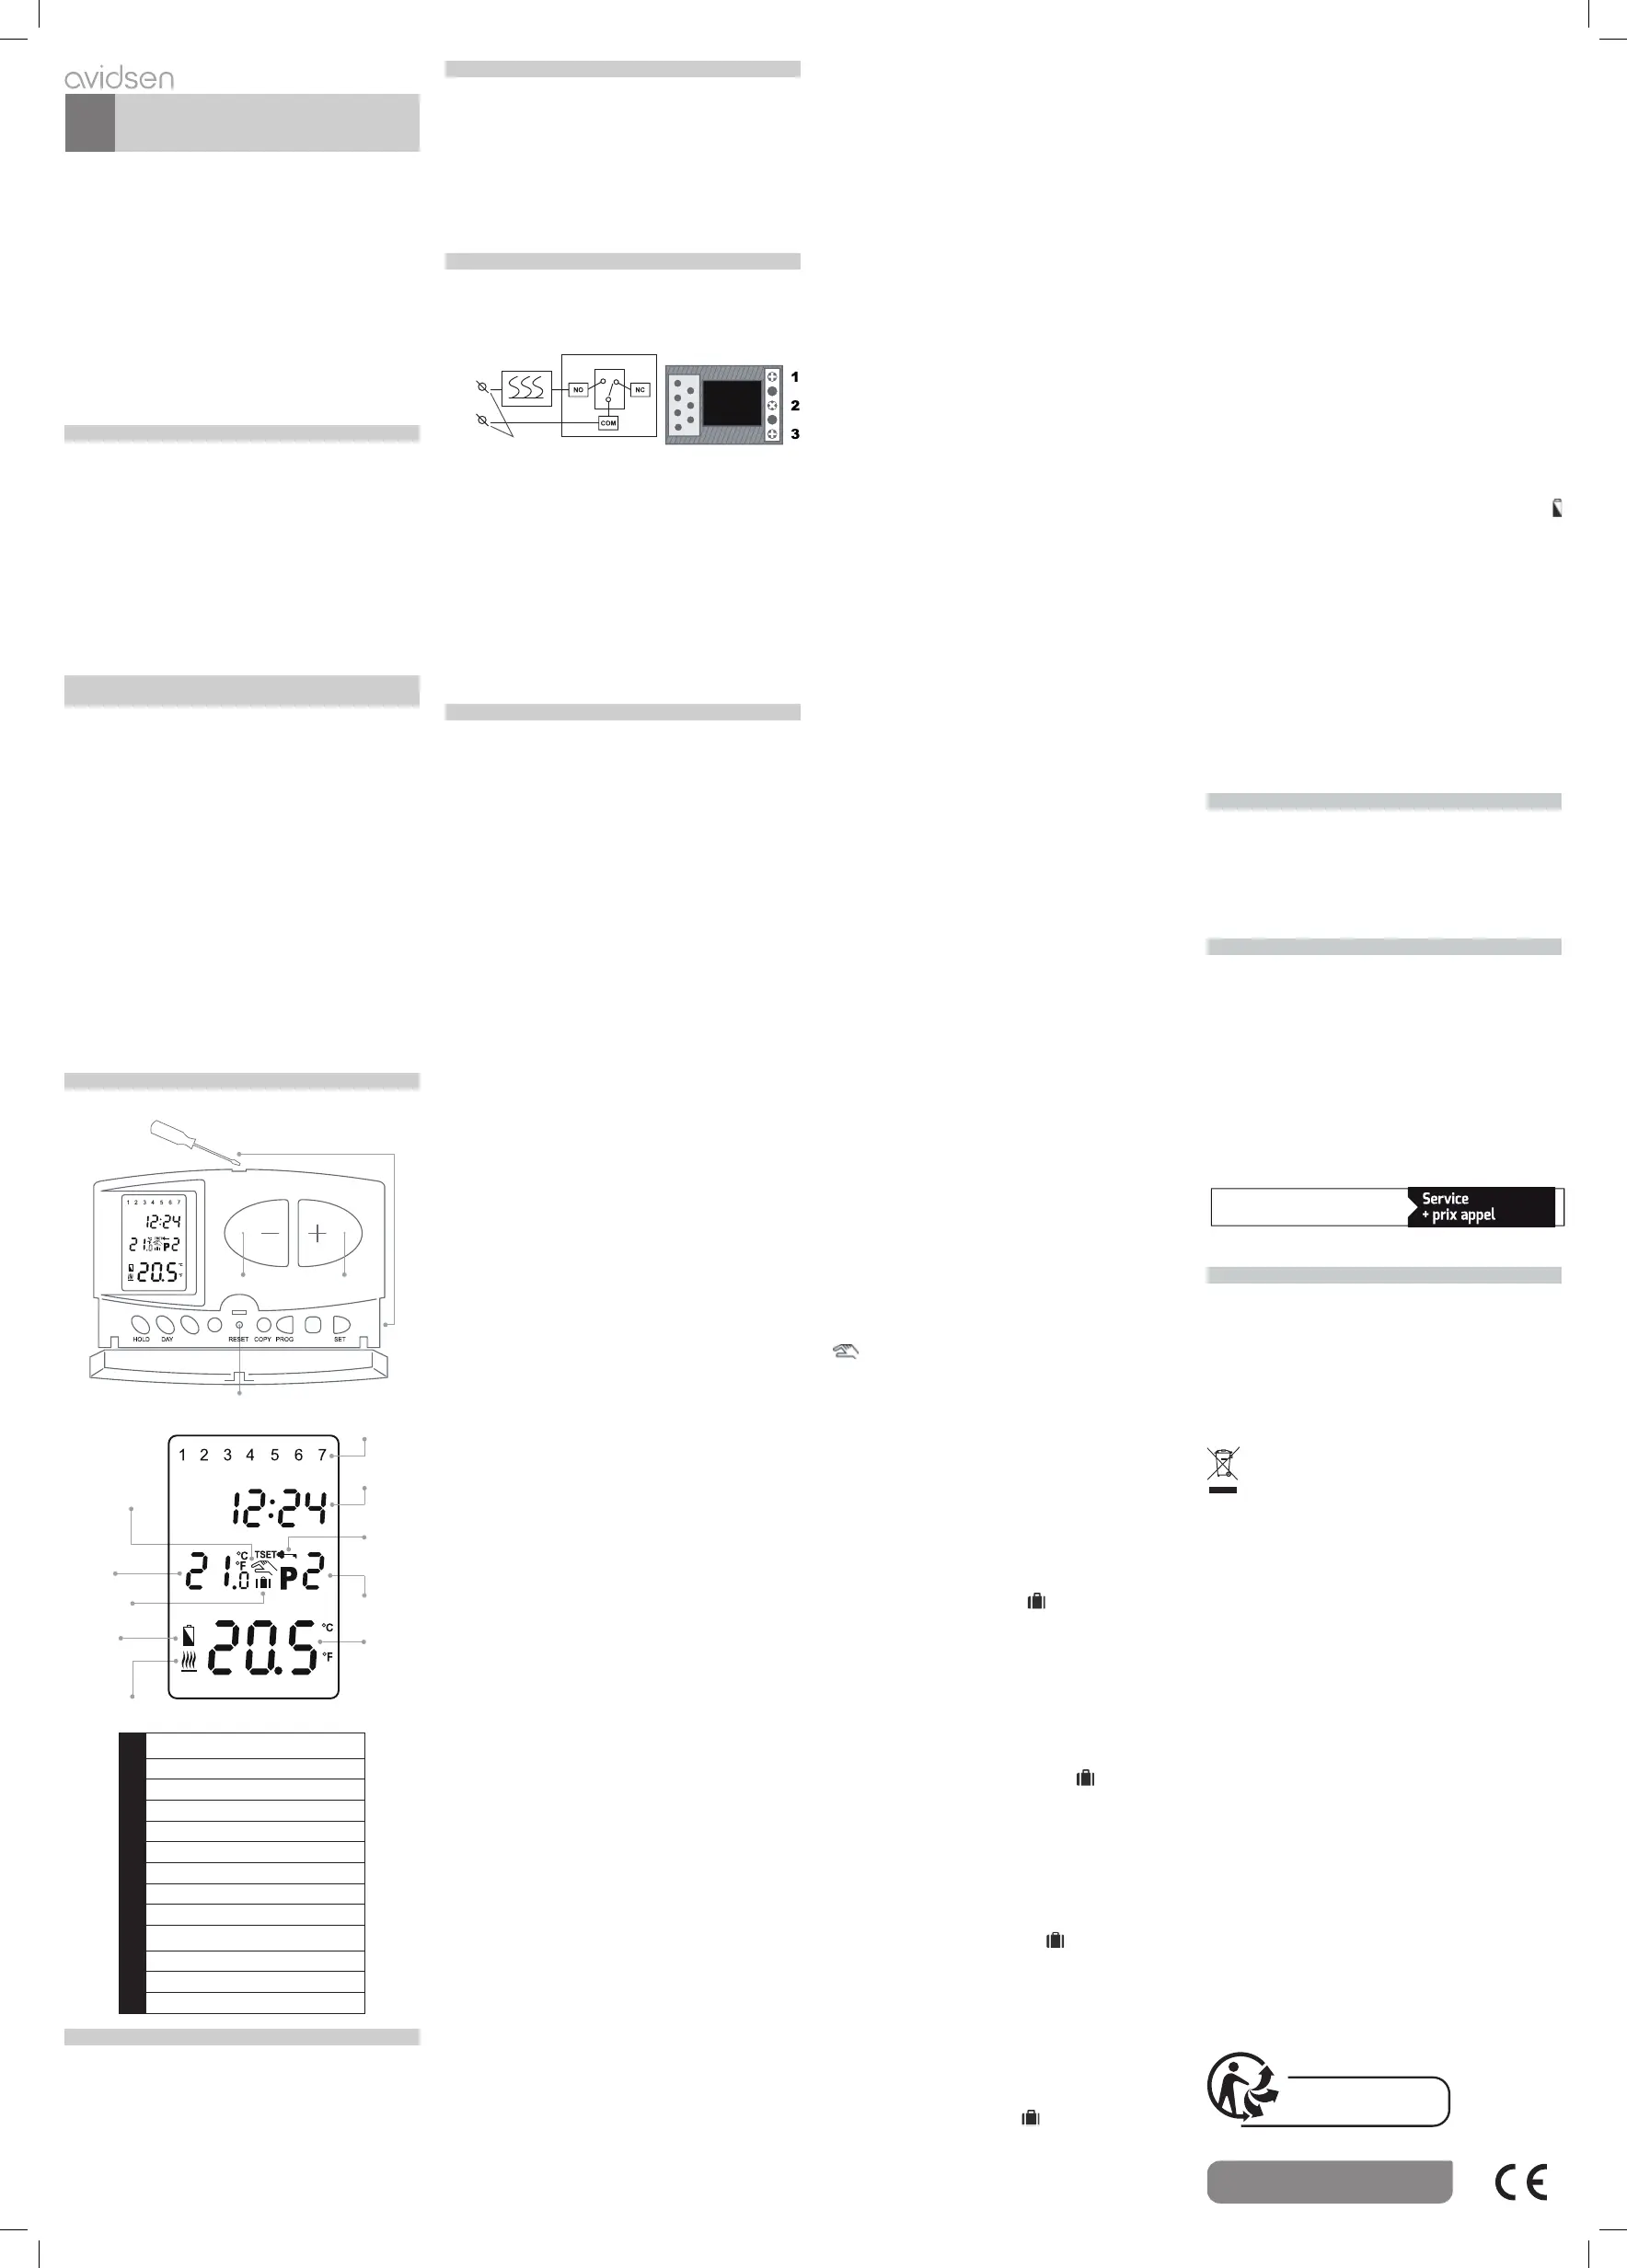
INSTALLATION
Branchements électriques :
Au dos du couvercle du thermostat, se trouve une plaque
à bornes pour le branchement électrique.
1 (NO) 2 (COM) 3 (NC)
Le relais de sortie du thermostat a trois points de connexion
sans potentiels, à savoir n. 1 (NO); No. 2 (COM) et n. 3
(NC), qui sont situées sous un couvercle intérieur côté
intérieur du panneau arrière. Pour commander le chauffage,
relier les deux conducteurs de connexion du dispositif à
contrôler aux bornes n. 1 (NO) et n. 2 (COM), soit aux
bornes normalement ouverts du relais, tandis que les deux
conducteurs de connexion du dispositif de refroidissement
doivent être connectés aux bornes n. 2 (COM) et n. 3 (NC),
ou aux bornes normalement fermés du relais.
IMPORTANT : on ne peut brancher qu’un seul appareil
(radiateur, ventilateur, chaudière). Le branchement de
plusieurs appareils en cascade ou en série (un radiateur
et un ventilateur, par exemple) ne permet pas de garantir
le bon fonctionnement du dispositif.
INFORMATIONS COMPLÉMENTAIRES
•
Avant toute opération de nettoyage, débranchez le
dispositif d’alimentation.
•
Ne pas nettoyer avec des produits abrasifs ou corrosifs.
• Utilisez l’appareil toujours dans un endroit sec.
• Ne pas ouvrir le boîtier afi n d’éviter des risques de
choc électrique.
GARANTIE ET SERVICES
Le produit est couvert par la garantie légale de 2 ans
du vendeur sur les défauts de conformité prévue par les
articles 128 et suivants du décret législatif n. 206/2005
(Code de la consommation italien).
ATTENTION : La garantie n’est valide qu’avec le ticket
de caisse ou la facture d’achat. La garantie ne couvre
pas les dommages causés par la négligence, les chocs
ou autres incidents divers. Aucun des composants de ce
produit ne doit être ouvert ou réparé, à l’exception de
l’insertion des piles ou de leur remplacement, par des
personnes étrangères à la société Avidsen.
Toute intervention sur l’appareil annulera la garantie.
Assistance technique :
Tel :
0,35 €
/ min
0 892 701 369
Du lundi au vendredi de 9H à 12H et de 14H à 18H.
INFORMATIONS AUX USAGERS
Conformément à l’article 13 du décret législatif du 25 juil-
let 2005, n° 151 « Application des directives 2002/95/CE
et 2003/108/CE, relatives à la réduction de l’utilisation
de substances dangereuses dans les appareils électri-
ques et électroniques, et au recyclage des déchets ». Le
pictogramme de la poubelle barrée placé sur l’appareil
indique que le produit en fi n de vie doit être séparé des
autres déchets.
Ce logo signifi e qu’il ne faut pas jeter les appareils
hors d’usage avec les ordures ménagères, les
substances dangereuses qu’ils sont susceptibles
de contenir peuvent nuire à la santé et à l’environ-
nement. Faites reprendre ces appareil par votre
distributeur ou utilisez les moyens de collecte sélective
mis à disposition par votre commune
boîtier du dispositif, puis appuyer sur « DAY ».
Apparaît alors sur l’écran l’icône avec le numéro « 1 »
manuelle (par exemple : 3 H: 0 2, soit, 3 heures et 2 mi-
nutes). Une fois le temps écoulé, l’icône disparaît et le
Apparaît alors sur l’écran l’icôneavec l’inscription
Une fois le temps écoulé, l’icône disparaît et le dispositif
reprend le programme qui a été paramétré. Si vous souhai-
qui indique que le thermostat a été actionné avec
Pour en savoir plus :
www.quefairedemesdechets.fr
8A 250VAC
Coil 3VDC
Neutral N
Phase L
To be connected to 230V - Supported Load 230V AC 8A Max
Thermostat
Controlled
equipment
1 (NO) 2 (COM) 3 (NC)
Produktspecifikationer
| Varumärke: | Avidsen |
| Kategori: | ej kategoriserat |
| Modell: | 103954 |
Behöver du hjälp?
Om du behöver hjälp med Avidsen 103954 ställ en fråga nedan och andra användare kommer att svara dig
ej kategoriserat Avidsen Manualer

21 September 2025
ej kategoriserat Manualer
Nyaste ej kategoriserat Manualer
3 April 2026
3 April 2026
3 April 2026
3 April 2026
3 April 2026
3 April 2026
3 April 2026
3 April 2026
3 April 2026