Avtec SSA-PIZZA Bruksanvisning
Avtec
ej kategoriserat
SSA-PIZZA
Läs gratis den bruksanvisning för Avtec SSA-PIZZA (4 sidor) i kategorin ej kategoriserat. Guiden har ansetts hjälpsam av 18 personer och har ett genomsnittsbetyg på 4.8 stjärnor baserat på 9.5 recensioner. Har du en fråga om Avtec SSA-PIZZA eller vill du ställa frågor till andra användare av produkten? Ställ en fråga
Sida 1/4
OPERATOR MANUAL
IMPORTANT INFORMATION, KEEP FOR OPERATOR
888-994-7636, fax 888-864-7636
uniedbrands.net
PART NUMBER PP MNL2201, REV. B (08/23)
This manual provides information for:
SIMPLESPEC
VENTILATION SYSTEMS
THIS MANUAL MUST BE RETAINED FOR FUTURE REFERENCE. READ,
UNDERSTAND AND FOLLOW THE INSTRUCTIONS AND WARNINGS CONTAINED
IN THIS MANUAL.
FOR YOUR SAFETY Do not store or use gasoline or other ammable vapors
and liquids in the vicinity of this or any other appliance.
NOTIFY CARRIER OF DAMAGE AT ONCE It is the responsibility of the
consignee to inspect the container upon receipt of same and to determine
the possibility of any damage, including concealed damage. Avtec suggests
that if you are suspicious of damage to make a notation on the delivery
receipt. It will be the responsibility of the consignee to le a claim with the
carrier. We recommend that you do so at once.
Manufacture Service/Questions 888-994-7636.
RETAIN THIS MANUAL FOR FUTURE REFERENCE
NOTICE: Due to a continuous program of product improvement, Avtec reserves the
right to make changes in design and specications without prior notice.
NOTICE: Please read the entire manual carefully before installation. If certain
recommended procedures are not followed, warranty claims will be denied.
MODEL NUMBER _________________________
SERIAL NUMBER _________________________
INSTALLATION DATE ______________________
INSTALLATION INSTRUCTIONS
Avtec value ventilation hoods are provided with punched hanging brackets
designed to receive 1/2” threaded rod with a 1/2” nut and washer. Supporting
rods must be connected to all factory installed brackets. Recommended hanging
height is 6’-6” above nished oor for canopies. Low side wall ventilators should
be installed directly upon a Avtec base or on a re rated wall. If wall mounted, the
bottom of the vent side panel should be 3’ above nished oor.
ALL AVTEC VENTILATION SYSTEMS MUST BE INSTALLED IN ACCORDANCE
WITH NFPA-96, REMOVAL OF SMOKE AND GREASE LADEN VAPORS FROM
COMMERCIAL COOKING EQUIPMENT.
DISHWASHER/DISPLAY/BOX HOOD (SSA-DISH, SSA-ISLE, & SSA-BOX)
1. Check all local codes prior to installation. Special requirements may be
necessary depending upon building material construction.
2. Move crated hood to location of installation and very carefully uncrate hood.
3. Raise hood to proper hanging height.
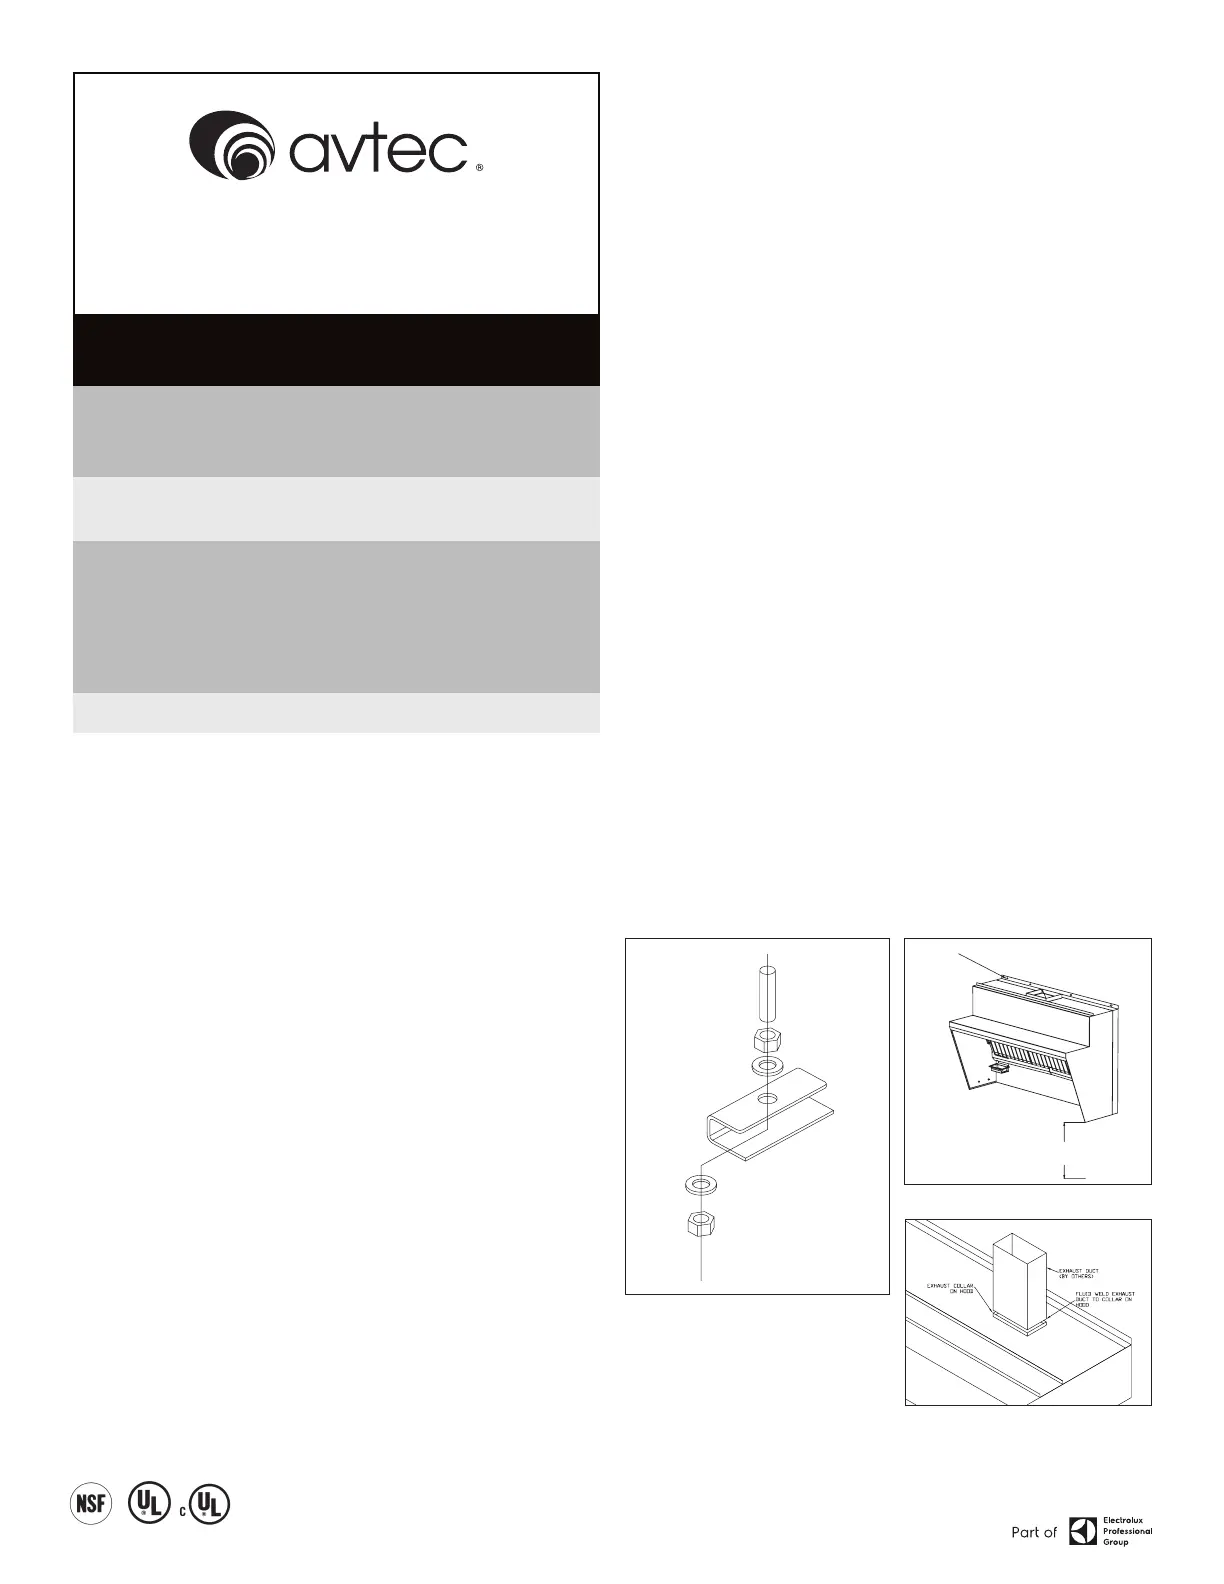
4. Suspend hood from adequate roof supports using 1/2” threaded rods with
nuts and washers (See Fig. 1).
5. Level hood left to right and front to back.
6. Display hoods only: Slide chrome sleeve over all thread rod before securing
to hood/structure.
FRYER HOOD (SSA-FRYER)
1. Check all local codes prior to installation. Special requirements may be
necessary depending upon building material construction.
2. Move crated hood to location of installation and very carefully uncrate vent.
3. If vent is base mounted, base must be installed and leveled front to back and
left to right.
FIGURE 1
FIGURE 2
FIGURE 3
4. Place vent on wall, level front to back and left to right, then bolt metal
hanging bracket located on top of hood to wall (See Fig. 3).
5. Bottom of ventilator should be 32-34” above nished oor (See Fig. 2).
6. Fluid weld exhaust duct to hood exhaust duct collar (See Fig. 3).
32"-34" ABOVE
FINISHED FLOOR
SCREW
FOR
WALL
MOUNT
Information contained in this document is known to be current and accurate at the time of printing/creation. Reference our product line website for the most updated
product information and specications. © 2023 Electrolux Professional, Inc. All Rights Reserved.
Produktspecifikationer
| Varumärke: | Avtec |
| Kategori: | ej kategoriserat |
| Modell: | SSA-PIZZA |
Behöver du hjälp?
Om du behöver hjälp med Avtec SSA-PIZZA ställ en fråga nedan och andra användare kommer att svara dig
ej kategoriserat Avtec Manualer

21 September 2025
5 September 2025
4 September 2025
ej kategoriserat Manualer
- Graco
- Hortus
- Chauvet
- Standard Horizon
- Krom
- Power Dynamics
- Portkeys
- Gentrax
- Martin Audio
- Marshall
- ZKTeco
- LAFE
- Overmax
- Altrad
- HK Audio
Nyaste ej kategoriserat Manualer
23 Oktober 2025
23 Oktober 2025
23 Oktober 2025
23 Oktober 2025
23 Oktober 2025
23 Oktober 2025
23 Oktober 2025
23 Oktober 2025
23 Oktober 2025
23 Oktober 2025